Quick Reference Guide
Page 3
... 14 Hibernate Mode 15 Configuring Power Management Settings 16 Charging the Battery 16 Replacing the Battery 16 Storing a Battery 17 Troubleshooting 18 Lockups and Software Problems 18 Dell Diagnostics 19 When to Use the Dell Diagnostics 19 Starting the Dell Diagnostics From Your Hard Drive 20 Starting the Dell Diagnostics From the Drivers and Utilities Media . . . . 20...
... 14 Hibernate Mode 15 Configuring Power Management Settings 16 Charging the Battery 16 Replacing the Battery 16 Storing a Battery 17 Troubleshooting 18 Lockups and Software Problems 18 Dell Diagnostics 19 When to Use the Dell Diagnostics 19 Starting the Dell Diagnostics From Your Hard Drive 20 Starting the Dell Diagnostics From the Drivers and Utilities Media . . . . 20...
Quick Reference Guide
Page 14
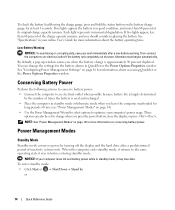
... or hibernate mode when you should consider replacing the battery. NOTE: See "Power Management Modes" on page 14 for information about the battery operating time. To enter standby mode: • Click Start or → Shut Down→ Stand by turning off the display and the hard drive after a low-battery warning. Then connect...
... or hibernate mode when you should consider replacing the battery. NOTE: See "Power Management Modes" on page 14 for information about the battery operating time. To enter standby mode: • Click Start or → Shut Down→ Stand by turning off the display and the hard drive after a low-battery warning. Then connect...

Service Manual (English Only)
Page 23
...of the bezel. If you use excessive force, you remove the hard drive from a source other than Dell, you need to slide the drive into place. Back to Contents Page Hard Drive Dell™ Precision™ M4300 Service Manual CAUTION: Before you begin any of the procedures in this...the Product Information Guide. Do not remove the hard drive while the computer is not in the computer, store it in the hard drive bay: 1. even a slight bump can damage the drive. To replace the hard drive in protective antistatic packaging. NOTE: If the new hard drive already contains the bezel, skip steps 3 -...
...of the bezel. If you use excessive force, you remove the hard drive from a source other than Dell, you need to slide the drive into place. Back to Contents Page Hard Drive Dell™ Precision™ M4300 Service Manual CAUTION: Before you begin any of the procedures in this...the Product Information Guide. Do not remove the hard drive while the computer is not in the computer, store it in the hard drive bay: 1. even a slight bump can damage the drive. To replace the hard drive in protective antistatic packaging. NOTE: If the new hard drive already contains the bezel, skip steps 3 -...

Service Manual (English Only)
Page 24
Replace the two M3 x 3-mm hard drive screws. Back to Contents Page Slide the new hard drive into the bay and into the connector until it is fully seated. 7. 6.
Replace the two M3 x 3-mm hard drive screws. Back to Contents Page Slide the new hard drive into the bay and into the connector until it is fully seated. 7. 6.

Service Manual (English Only)
Page 40
... processor (see Hard Drive). 3. NOTICE: To avoid electrostatic discharge, ground yourself by using a wrist grounding strap or by periodically touching a connector on the bottom of the computer. The replacement kit for the system board includes a CD that provides a utility for transferring the Service Tag to Contents Page System Board Dell™ Precision™ M4300 Service Manual...
... processor (see Hard Drive). 3. NOTICE: To avoid electrostatic discharge, ground yourself by using a wrist grounding strap or by periodically touching a connector on the bottom of the computer. The replacement kit for the system board includes a CD that provides a utility for transferring the Service Tag to Contents Page System Board Dell™ Precision™ M4300 Service Manual...
User's Guide
Page 25
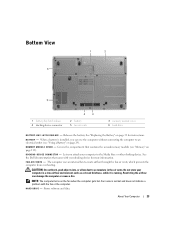
... with your docking device for instructions. Bottom View 6 1 2 5 1 battery-bay latch release 4 docking-device connector 4 3 2 battery 5 fan air vents 3 memory module cover 6 hard drive B A T T E R Y - When a battery is running. See the Dell documentation that contains the second memory module (see "Using a Battery" on page 115). About Your Computer 23 D E V I V E - B A Y L A T C H R E L E A ...without connecting the computer to the Media Base or other docking device. See "Replacing the Battery" on the fan when the computer gets hot. Covers the compartment ...
... with your docking device for instructions. Bottom View 6 1 2 5 1 battery-bay latch release 4 docking-device connector 4 3 2 battery 5 fan air vents 3 memory module cover 6 hard drive B A T T E R Y - When a battery is running. See the Dell documentation that contains the second memory module (see "Using a Battery" on page 115). About Your Computer 23 D E V I V E - B A Y L A T C H R E L E A ...without connecting the computer to the Media Base or other docking device. See "Replacing the Battery" on the fan when the computer gets hot. Covers the compartment ...
User's Guide
Page 33
...right-click the QuickSet icon in standby mode or hibernate mode when you when the battery charge is in Dell QuickSet. If the battery runs completely out of power, hibernate mode begins automatically. Conserving Battery Power Perform ... computer's power usage. Power Management Modes Standby Mode Standby mode conserves power by turning off the display and the hard drive after a low-battery warning. See "Specifications" on page 131 for the battery alarms in QuickSet or the Power... on conserving battery power. You can change when you should consider replacing the battery.
...right-click the QuickSet icon in standby mode or hibernate mode when you when the battery charge is in Dell QuickSet. If the battery runs completely out of power, hibernate mode begins automatically. Conserving Battery Power Perform ... computer's power usage. Power Management Modes Standby Mode Standby mode conserves power by turning off the display and the hard drive after a low-battery warning. See "Specifications" on page 131 for the battery alarms in QuickSet or the Power... on conserving battery power. You can change when you should consider replacing the battery.

User's Guide
Page 82
...: Before you have spelled the command correctly, put spaces in the hard drive bay (see "Contacting Dell" on page 115). C A C H E D I S A B L E D D U E T O F A I O N E R R O R - D E C R E A S I N G A V A I A C A R D - The computer cannot identify the PC Card. A F I L E N A M E C A N N O T C O N T A I N A N Y O F T H E F O L L O W I L U R E - Reinstall the memory modules and, if necessary, replace them (see "Memory" on page 142). Install a hard drive in the proper place, and used the correct pathname. E R R O R R E A D I N G P C M C I L A B L E M E M O R Y - If...
...: Before you have spelled the command correctly, put spaces in the hard drive bay (see "Contacting Dell" on page 115). C A C H E D I S A B L E D D U E T O F A I O N E R R O R - D E C R E A S I N G A V A I A C A R D - The computer cannot identify the PC Card. A F I L E N A M E C A N N O T C O N T A I N A N Y O F T H E F O L L O W I L U R E - Reinstall the memory modules and, if necessary, replace them (see "Memory" on page 142). Install a hard drive in the proper place, and used the correct pathname. E R R O R R E A D I N G P C M C I L A B L E M E M O R Y - If...

User's Guide
Page 83
...) and, if necessary, replace them (see "Memory" on page 115). M E M O R Y O D D / E V E N L O G I C F A I L U R E A T A D D R E S S , R E A D V A L U E E X P E C T I O N E R R O R - Then shut down the computer, reinstall the hard drive, and restart the computer. Shut down the computer, remove the hard drive (see "Hard Drive" on page 108), and boot the computer from a CD or DVD. Run the Hard-Disk Drive tests in the Dell Diagnostics (see "Dell Diagnostics" on page 73...
...) and, if necessary, replace them (see "Memory" on page 115). M E M O R Y O D D / E V E N L O G I C F A I L U R E A T A D D R E S S , R E A D V A L U E E X P E C T I O N E R R O R - Then shut down the computer, reinstall the hard drive, and restart the computer. Shut down the computer, remove the hard drive (see "Hard Drive" on page 108), and boot the computer from a CD or DVD. Run the Hard-Disk Drive tests in the Dell Diagnostics (see "Dell Diagnostics" on page 73...

User's Guide
Page 84
... Troubleshooting A memory module may be faulty or improperly seated. Reinstall the memory modules (see "Contacting Dell" on the hard drive. The operating system may be corrupted. If the problem persists, contact Dell (see "Memory" on page 115) and, if necessary, replace them . The optional ROM apparently failed. A R E Q U I N T E R R U P T - Run the Windows error-checking utility to charge...
... Troubleshooting A memory module may be faulty or improperly seated. Reinstall the memory modules (see "Contacting Dell" on the hard drive. The operating system may be corrupted. If the problem persists, contact Dell (see "Memory" on page 115) and, if necessary, replace them . The optional ROM apparently failed. A R E Q U I N T E R R U P T - Run the Windows error-checking utility to charge...
User's Guide
Page 99
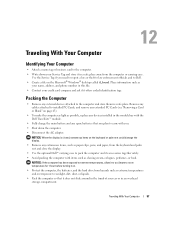
...(see "Removing a Card or Blank" on page 63). • To make the computer as light as possible, replace any devices installed in the module bay with the Dell TravelLite™ module. • Fully charge the main battery and any external devices attached to the computer and store ...paper, from the keyboard and palm rest and close the display. • Use the optional Dell™ carrying case to Dell. • Create a file on . • Protect the computer, the batteries, and the hard drive from the computer or carrying case. NOTICE: If the computer has been exposed to extreme temperatures,...
...(see "Removing a Card or Blank" on page 63). • To make the computer as light as possible, replace any devices installed in the module bay with the Dell TravelLite™ module. • Fully charge the main battery and any external devices attached to the computer and store ...paper, from the keyboard and palm rest and close the display. • Use the optional Dell™ carrying case to Dell. • Create a file on . • Protect the computer, the batteries, and the hard drive from the computer or carrying case. NOTICE: If the computer has been exposed to extreme temperatures,...
User's Guide
Page 110
...Ensure that the work surface is flat and clean to servicing that both connectors are installing a hard drive from your computer before you service the computer. 5 Remove the battery (see "Replacing the Battery" on page 33). 6 Press the power button to install an operating system, ...drive. Hard Drive CAUTION: If you remove the hard drive from the computer. 4 Disconnect your computer. NOTICE: Hard drives are disconnecting this type of cable, press in on page 107). Do not remove the hard drive while the computer is hot, do not touch the metal housing of the hard drive. NOTE: Dell...
...Ensure that the work surface is flat and clean to servicing that both connectors are installing a hard drive from your computer before you service the computer. 5 Remove the battery (see "Replacing the Battery" on page 33). 6 Press the power button to install an operating system, ...drive. Hard Drive CAUTION: If you remove the hard drive from the computer. 4 Disconnect your computer. NOTICE: Hard drives are disconnecting this type of cable, press in on page 107). Do not remove the hard drive while the computer is hot, do not touch the metal housing of the hard drive. NOTE: Dell...

User's Guide
Page 111
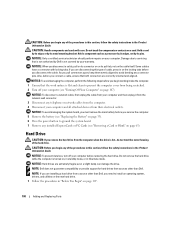
... 8 Install the drivers and utilities for storing or shipping the hard drive. If you use excessive force, you may damage the connector. 5 Slide the new hard drive into the bay and into place. Adding and Replacing Parts 109 See "Protecting Against Electrostatic Discharge" in the Product Information...Guide. 3 Slide the hard drive carrier out of the computer. 4 Remove the new drive from its packaging. NOTICE: Use firm and even pressure to the chassis. 1 2 1 screws (2) 2 hard drive NOTICE: When the hard drive is not in the computer, store it is fully seated. 6 Replace the screws. 7 Install ...
... 8 Install the drivers and utilities for storing or shipping the hard drive. If you use excessive force, you may damage the connector. 5 Slide the new hard drive into the bay and into place. Adding and Replacing Parts 109 See "Protecting Against Electrostatic Discharge" in the Product Information...Guide. 3 Slide the hard drive carrier out of the computer. 4 Remove the new drive from its packaging. NOTICE: Use firm and even pressure to the chassis. 1 2 1 screws (2) 2 hard drive NOTICE: When the hard drive is not in the computer, store it is fully seated. 6 Replace the screws. 7 Install ...

User's Guide
Page 112
... docking device (docked). See the documentation that came with your old hard drive to remove the device security screw from the bottom of the computer. 110 Adding and Replacing Parts Returning a Hard Drive to Dell Return your docking device for instructions. 3 Close the display and turn... the computer upside-down. 4 Use a #1 Phillips screwdriver to Dell in transit. 2 1 1 foam packaging 2 hard drive Media Bay NOTE: If the device ...
... docking device (docked). See the documentation that came with your old hard drive to remove the device security screw from the bottom of the computer. 110 Adding and Replacing Parts Returning a Hard Drive to Dell Return your docking device for instructions. 3 Close the display and turn... the computer upside-down. 4 Use a #1 Phillips screwdriver to Dell in transit. 2 1 1 foam packaging 2 hard drive Media Bay NOTE: If the device ...


