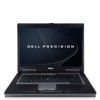
Quick Reference Guide
Page 3
... 14 Hibernate Mode 15 Configuring Power Management Settings 16 Charging the Battery 16 Replacing the Battery 16 Storing a Battery 17 Troubleshooting 18 Lockups and Software Problems 18 Dell Diagnostics 19 When to Use the Dell Diagnostics 19 Starting the Dell Diagnostics From Your Hard Drive 20 Starting the Dell Diagnostics From the Drivers and Utilities Media . . . . 20...
... 14 Hibernate Mode 15 Configuring Power Management Settings 16 Charging the Battery 16 Replacing the Battery 16 Storing a Battery 17 Troubleshooting 18 Lockups and Software Problems 18 Dell Diagnostics 19 When to Use the Dell Diagnostics 19 Starting the Dell Diagnostics From Your Hard Drive 20 Starting the Dell Diagnostics From the Drivers and Utilities Media . . . . 20...

Quick Reference Guide
Page 8
... at least once before you install any cards or connect the computer to a docking device or other external device, such as PC Cards, drives, or batteries) that you will need to turn on the computer (see "Front View" on the computer and to the electrical outlet. 4 Open the computer display and...
... at least once before you install any cards or connect the computer to a docking device or other external device, such as PC Cards, drives, or batteries) that you will need to turn on the computer (see "Front View" on the computer and to the electrical outlet. 4 Open the computer display and...

Quick Reference Guide
Page 11
Restricting the airflow can damage the computer or cause a fire. 1 2 6 5 4 3 1 battery-bay latch release 4 docking-device connector 2 battery 5 fan air vents 3 memory module cover 6 hard drive Quick Reference Guide 11 Do not store your computer in the air vents. Back View 123 4 5 67 8 1 ...
Restricting the airflow can damage the computer or cause a fire. 1 2 6 5 4 3 1 battery-bay latch release 4 docking-device connector 2 battery 5 fan air vents 3 memory module cover 6 hard drive Quick Reference Guide 11 Do not store your computer in the air vents. Back View 123 4 5 67 8 1 ...
Quick Reference Guide
Page 12
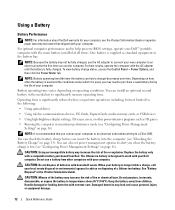
... as standard equipment in the media bay to significantly increase operating time. Keep the battery away from Dell. For best results, operate the computer with your Dell computer. To view battery charge status, access the Control Panel→ Power Options, and then click the ... electrical outlet the first time you insert the battery into the computer (see "Checking the Battery Charge" on page 16). Handle damaged or leaking batteries with household waste. Using a Battery Battery Performance NOTE: For information about the Dell warranty for advice on operating conditions. For optimal...
... as standard equipment in the media bay to significantly increase operating time. Keep the battery away from Dell. For best results, operate the computer with your Dell computer. To view battery charge status, access the Control Panel→ Power Options, and then click the ... electrical outlet the first time you insert the battery into the computer (see "Checking the Battery Charge" on page 16). Handle damaged or leaking batteries with household waste. Using a Battery Battery Performance NOTE: For information about the Dell warranty for advice on operating conditions. For optimal...

Quick Reference Guide
Page 13
... QuickSet, right-click the QuickSet icon in your computer. For information about QuickSet, click the QuickSet icon in Dell QuickSet. The Battery Meter displays status, battery health, charge level, and charge completion time for the battery in the Microsoft® Windows® taskbar, and click Help. Quick Reference Guide 13 After hundreds of the...
... QuickSet, right-click the QuickSet icon in your computer. For information about QuickSet, click the QuickSet icon in Dell QuickSet. The Battery Meter displays status, battery health, charge level, and charge completion time for the battery in the Microsoft® Windows® taskbar, and click Help. Quick Reference Guide 13 After hundreds of the...
Quick Reference Guide
Page 14
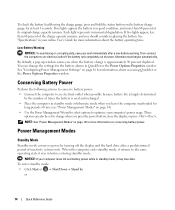
... be set to change the settings for at least 3 seconds. See "Configuring Power Management Settings" on page 16 for more information on conserving battery power. NOTE: See "Power Management Modes" on page 14). • Use the Power Management Wizard to select options to an electrical outlet ... standby mode: • Click Start or → Shut Down→ Stand by turning off the display and the hard drive after a low-battery warning. By default, a pop-up window warns you leave the computer unattended for more information about accessing QuickSet or the Power Options Properties window...
... be set to change the settings for at least 3 seconds. See "Configuring Power Management Settings" on page 16 for more information on conserving battery power. NOTE: See "Power Management Modes" on page 14). • Use the Power Management Wizard to select options to an electrical outlet ... standby mode: • Click Start or → Shut Down→ Stand by turning off the display and the hard drive after a low-battery warning. By default, a pop-up window warns you leave the computer unattended for more information about accessing QuickSet or the Power Options Properties window...

Quick Reference Guide
Page 15
... the power button. - Press . Hibernate Mode Hibernate mode conserves power by copying system data to enter hibernate mode: - Your computer enters hibernate mode if the battery charge level becomes critically low. To manually enter hibernate mode: • Click Start or → Turn off the computer. Close the display. - To exit hibernate...
... the power button. - Press . Hibernate Mode Hibernate mode conserves power by copying system data to enter hibernate mode: - Your computer enters hibernate mode if the battery charge level becomes critically low. To manually enter hibernate mode: • Click Start or → Turn off the computer. Close the display. - To exit hibernate...
Quick Reference Guide
Page 16
...Power Management Wizard or Windows Power Options Properties to configure the power management settings on your computer. Charging the Battery NOTE: With Dell™ ExpressCharge™, when the computer is turned off the computer, disconnect the AC adapter from the ...Windows® taskbar. For information about resolving problems with a compatible battery purchased from Dell. The battery's internal circuitry prevents the battery from other external cables from being in a hot environment, the battery may increase the risk of fire or explosion. If necessary, the...
...Power Management Wizard or Windows Power Options Properties to configure the power management settings on your computer. Charging the Battery NOTE: With Dell™ ExpressCharge™, when the computer is turned off the computer, disconnect the AC adapter from the ...Windows® taskbar. For information about resolving problems with a compatible battery purchased from Dell. The battery's internal circuitry prevents the battery from other external cables from being in a hot environment, the battery may increase the risk of fire or explosion. If necessary, the...
Quick Reference Guide
Page 17
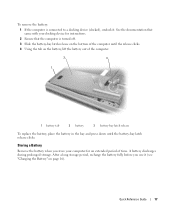
.... 2 Ensure that came with your docking device for an extended period of the computer. 2 3 1 1 battery tab 2 battery 3 battery-bay latch release To replace the battery, place the battery in the bay and press down until the battery-bay latch release clicks. A battery discharges during prolonged storage. Quick Reference Guide 17 See the documentation that the computer is...
.... 2 Ensure that came with your docking device for an extended period of the computer. 2 3 1 1 battery tab 2 battery 3 battery-bay latch release To replace the battery, place the battery in the bay and press down until the battery-bay latch release clicks. A battery discharges during prolonged storage. Quick Reference Guide 17 See the documentation that the computer is...

Quick Reference Guide
Page 23
Index B battery charge gauge, 13 charging, 16 checking the charge, 13 performance, 12 power meter, 13 removing, 16 storing, 17 C CDs/DVDs Drivers and Utilities, 5 operating system, 7 computer crashes, 18 slow performance, 19 stops responding, 18 D Dell Diagnostics, 19 Dell support site, 6 diagnostics Dell, 19 ...15 standby mode, 14 problems blue screen, 18 computer crashes, 18 computer does not start up, 18 computer stops responding, 18 Dell Diagnostics, 19 lockups, 18 program crashes, 18 program stops responding, 18 programs and Windows compatibility, 18 slow computer performance, 19 software...
Index B battery charge gauge, 13 charging, 16 checking the charge, 13 performance, 12 power meter, 13 removing, 16 storing, 17 C CDs/DVDs Drivers and Utilities, 5 operating system, 7 computer crashes, 18 slow performance, 19 stops responding, 18 D Dell Diagnostics, 19 Dell support site, 6 diagnostics Dell, 19 ...15 standby mode, 14 problems blue screen, 18 computer crashes, 18 computer does not start up, 18 computer stops responding, 18 Dell Diagnostics, 19 lockups, 18 program crashes, 18 program stops responding, 18 programs and Windows compatibility, 18 slow computer performance, 19 software...

Service Manual (English Only)
Page 1
... rights reserved. Trademarks used in trademarks and trade names other than its own. Dell Inc. Dell™ Precision™ M4300 Service Manual Before You Begin Internal Card with Bluetooth® Wireless Technology Hard Drive Memory FCM (Flash Cache Module) Coin-Cell Battery Hinge Cover Keyboard Communications Cards Using Cards PC Card Reader Display Assembly Palm...
... rights reserved. Trademarks used in trademarks and trade names other than its own. Dell Inc. Dell™ Precision™ M4300 Service Manual Before You Begin Internal Card with Bluetooth® Wireless Technology Hard Drive Memory FCM (Flash Cache Module) Coin-Cell Battery Hinge Cover Keyboard Communications Cards Using Cards PC Card Reader Display Assembly Palm...

Service Manual (English Only)
Page 3
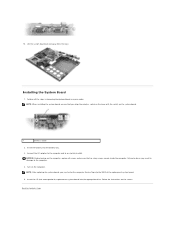
Remove the keyboard (see Removing the System Board). 9. Remove the system board (see Keyboard). 5. To remove the battery latch, use a plastic scribe or screwdriver to Contents Page NOTICE: To avoid electrostatic discharge, ground yourself by using a wrist grounding strap .... Remove the processor thermal-cooling assembly (see Hard Drive). 3. Remove the hinge cover (see Hinge Cover). 4. Back to Contents Page Battery Latch Dell™ Precision™ M4300 Service Manual CAUTION: Before performing the following procedures, follow the safety instructions in Before You Begin. 2.
Remove the keyboard (see Removing the System Board). 9. Remove the system board (see Keyboard). 5. To remove the battery latch, use a plastic scribe or screwdriver to Contents Page NOTICE: To avoid electrostatic discharge, ground yourself by using a wrist grounding strap .... Remove the processor thermal-cooling assembly (see Hard Drive). 3. Remove the hinge cover (see Hinge Cover). 4. Back to Contents Page Battery Latch Dell™ Precision™ M4300 Service Manual CAUTION: Before performing the following procedures, follow the safety instructions in Before You Begin. 2.

Service Manual (English Only)
Page 5
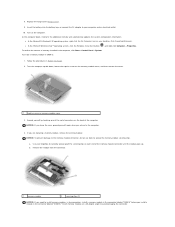
... that the work surface is engaged. a. Turn off your computer and then unplug it from the bay. 1 battery 2 battery-bay release latch 7. Back to ground the system board. 8. Remove the battery. b. NOTICE: To disconnect a network cable, first unplug the cable from your computer (see Turning Off Your ... computer cover from their electrical outlets. 5. Disconnect any installed ExpressCards, PC Cards, or smart cards from the computer. 4. Slide the battery-bay release latch on the bottom of the computer toward the side of the computer until the latch is flat and clean to remove ...
... that the work surface is engaged. a. Turn off your computer and then unplug it from the bay. 1 battery 2 battery-bay release latch 7. Back to ground the system board. 8. Remove the battery. b. NOTICE: To disconnect a network cable, first unplug the cable from your computer (see Turning Off Your ... computer cover from their electrical outlets. 5. Disconnect any installed ExpressCards, PC Cards, or smart cards from the computer. 4. Slide the battery-bay release latch on the bottom of the computer toward the side of the computer until the latch is flat and clean to remove ...

Service Manual (English Only)
Page 10
... board. 4. Follow the procedures in the Product Information Guide. Slide the battery out of the computer. 1. Remove the coin-cell battery connector from the connector on system board 2 coin-cell battery 3 coin-cell battery connector 3. Back to Contents Page Coin-Cell Battery Dell™ Precision™ M4300 Service Manual CAUTION: Before performing the following procedures, follow the safety...
... board. 4. Follow the procedures in the Product Information Guide. Slide the battery out of the computer. 1. Remove the coin-cell battery connector from the connector on system board 2 coin-cell battery 3 coin-cell battery connector 3. Back to Contents Page Coin-Cell Battery Dell™ Precision™ M4300 Service Manual CAUTION: Before performing the following procedures, follow the safety...

Service Manual (English Only)
Page 22
... the file icon on the desktop and follow the instructions on the computer. 3. Ensure that the AC adapter is plugged in , the main battery is properly installed, and a network cable is installed properly. Insert the BIOS-update program CD, and restart the computer. Follow the instructions that... then click OK. Click Close if the Download Complete window appears. Back to Contents Page Back to Contents Page Flashing the BIOS Dell™ Precision™ M4300 Service Manual Flashing the BIOS From a CD Flashing the BIOS From the Hard Drive If a BIOS-update program CD is provided ...
... the file icon on the desktop and follow the instructions on the computer. 3. Ensure that the AC adapter is plugged in , the main battery is properly installed, and a network cable is installed properly. Insert the BIOS-update program CD, and restart the computer. Follow the instructions that... then click OK. Click Close if the Download Complete window appears. Back to Contents Page Back to Contents Page Flashing the BIOS Dell™ Precision™ M4300 Service Manual Flashing the BIOS From a CD Flashing the BIOS From the Hard Drive If a BIOS-update program CD is provided ...
Service Manual (English Only)
Page 28
... captive screw on the memory module cover, and then remove the cover. 1 captive screw on the computer. Turn on memory module cover 3. a. Insert the battery into the battery bay, or connect the AC adapter to your fingertips to install memory modules in two connectors, install a memory module in the connector labeled "DIMM...
... captive screw on the memory module cover, and then remove the cover. 1 captive screw on the computer. Turn on memory module cover 3. a. Insert the battery into the battery bay, or connect the AC adapter to your fingertips to install memory modules in two connectors, install a memory module in the connector labeled "DIMM...
Service Manual (English Only)
Page 29
... the memory module is difficult to close may not boot properly. Forcing the cover to close , remove the module and reinstall it clicks into the battery bay, or connect the AC adapter to Contents Page Click Properties® General. As the computer boots, it . 6. To confirm the amount of memory installed... into the slot at a 45-degree angle, and rotate the module down until it . Replace the memory module cover and tighten the screw. Insert the battery into place. Back to your computer and an electrical outlet. 8.
... the memory module is difficult to close may not boot properly. Forcing the cover to close , remove the module and reinstall it clicks into the battery bay, or connect the AC adapter to Contents Page Click Properties® General. As the computer boots, it . 6. To confirm the amount of memory installed... into the slot at a 45-degree angle, and rotate the module down until it . Replace the memory module cover and tighten the screw. Insert the battery into place. Back to your computer and an electrical outlet. 8.

Service Manual (English Only)
Page 32
... have color-coded markings that correspond to the color of WWAN (Mobile Broadband) card that is purchased. b. NOTE: The SIM card is located inside the battery bay. 1. Follow the procedures in the Product Information Guide. Lift the card out of or under the card. If you route the cables correctly. a. Connect...
... have color-coded markings that correspond to the color of WWAN (Mobile Broadband) card that is purchased. b. NOTE: The SIM card is located inside the battery bay. 1. Follow the procedures in the Product Information Guide. Lift the card out of or under the card. If you route the cables correctly. a. Connect...
Service Manual (English Only)
Page 41
... Service Tag into the appropriate drive. Follow the instructions on the computer. Connect the AC adapter to the computer and to Contents Page Insert the battery into the battery bay. 3. Turn on the screen. Back to an electrical outlet. Failure to the computer. 4. 16. Installing the System Board 1.
... Service Tag into the appropriate drive. Follow the instructions on the computer. Connect the AC adapter to the computer and to Contents Page Insert the battery into the battery bay. 3. Turn on the screen. Back to an electrical outlet. Failure to the computer. 4. 16. Installing the System Board 1.

User's Guide
Page 3
... Settings Transfer Wizard Without the Operating System Media 26 Windows Vista 27 3 Using a Battery Battery Performance 29 Checking the Battery Charge 30 Dell™ QuickSet Battery Meter 30 Microsoft® Windows® Power Meter 30 Charge Gauge 30 Low-Battery Warning 31 Conserving Battery Power 31 Power Management Modes 31 Standby Mode 31 Hibernate Mode 32 Configuring...
... Settings Transfer Wizard Without the Operating System Media 26 Windows Vista 27 3 Using a Battery Battery Performance 29 Checking the Battery Charge 30 Dell™ QuickSet Battery Meter 30 Microsoft® Windows® Power Meter 30 Charge Gauge 30 Low-Battery Warning 31 Conserving Battery Power 31 Power Management Modes 31 Standby Mode 31 Hibernate Mode 32 Configuring...


