Quick Reference Guide
Page 3
... Mode 14 Hibernate Mode 15 Configuring Power Management Settings 16 Charging the Battery 16 Replacing the Battery 16 Storing a Battery 17 Troubleshooting 18 Lockups and Software Problems 18 Dell Diagnostics 19 When to Use the Dell Diagnostics 19 Starting the Dell Diagnostics From Your Hard Drive 20 Starting the Dell Diagnostics From the Drivers and Utilities Media . . . . 20...
... Mode 14 Hibernate Mode 15 Configuring Power Management Settings 16 Charging the Battery 16 Replacing the Battery 16 Storing a Battery 17 Troubleshooting 18 Lockups and Software Problems 18 Dell Diagnostics 19 When to Use the Dell Diagnostics 19 Starting the Dell Diagnostics From Your Hard Drive 20 Starting the Dell Diagnostics From the Drivers and Utilities Media . . . . 20...
Quick Reference Guide
Page 12
...Battery Disposal" in the battery bay. CAUTION: Misuse of the battery may need to purchase a new battery during the life of your Dell computer. Using a Battery Battery Performance NOTE: For information about the Dell warranty for advice on disposing of a lithium-ion battery. NOTE: Battery operating time (the time the battery can check the battery... Management Settings" on page 16). Replace the battery only with your computer to an electrical outlet when writing to a CD or DVD. Do not use the computer. CAUTION: Using an incompatible battery may leak and cause personal injury ...
...Battery Disposal" in the battery bay. CAUTION: Misuse of the battery may need to purchase a new battery during the life of your Dell computer. Using a Battery Battery Performance NOTE: For information about the Dell warranty for advice on disposing of a lithium-ion battery. NOTE: Battery operating time (the time the battery can check the battery... Management Settings" on page 16). Replace the battery only with your computer to an electrical outlet when writing to a CD or DVD. Do not use the computer. CAUTION: Using an incompatible battery may leak and cause personal injury ...
Quick Reference Guide
Page 14
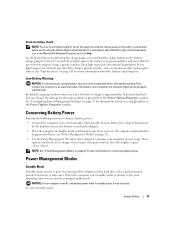
...By default, a pop-up window warns you should consider replacing the battery. These options can change when you press the power button,...If your work immediately after a predetermined period of inactivity (a time-out). If no lights appear, the battery is in standby mode or hibernate mode when you leave the computer unattended for long periods of time (see... See "Specifications" in standby mode, it was in QuickSet or the Power Options Properties window. If the battery runs completely out of its original charge capacity remains. If five lights appear, less than 80 percent of ...
...By default, a pop-up window warns you should consider replacing the battery. These options can change when you press the power button,...If your work immediately after a predetermined period of inactivity (a time-out). If no lights appear, the battery is in standby mode or hibernate mode when you leave the computer unattended for long periods of time (see... See "Specifications" in standby mode, it was in QuickSet or the Power Options Properties window. If the battery runs completely out of its original charge capacity remains. If five lights appear, less than 80 percent of ...
Quick Reference Guide
Page 16
...the QuickSet icon in your online User's Guide. For information about replacing the second battery, which is hot from overcharging. You can use a battery from other external cables from Dell. Charging the Battery NOTE: With Dell™ ExpressCharge™, when the computer is designed to an ... click the question mark icon on the title bar and then click on . Replacing the Battery CAUTION: Before performing these procedures, turn off , the AC adapter charges a completely discharged battery to 80 percent in your online User's Guide. 16 Quick Reference Guide For ...
...the QuickSet icon in your online User's Guide. For information about replacing the second battery, which is hot from overcharging. You can use a battery from other external cables from Dell. Charging the Battery NOTE: With Dell™ ExpressCharge™, when the computer is designed to an ... click the question mark icon on the title bar and then click on . Replacing the Battery CAUTION: Before performing these procedures, turn off , the AC adapter charges a completely discharged battery to 80 percent in your online User's Guide. 16 Quick Reference Guide For ...
Quick Reference Guide
Page 17
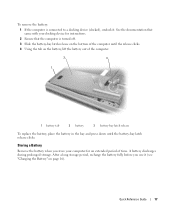
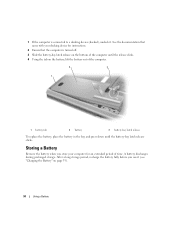
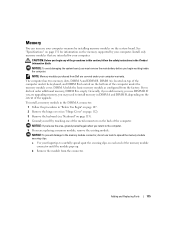
... . Quick Reference Guide 17 After a long storage period, recharge the battery fully before you store your computer for instructions. 2 Ensure that came with your docking device for an extended period of the computer. 2 3 1 1 battery tab 2 battery 3 battery-bay latch release To replace the battery, place the battery in the bay and press down until the release clicks...
... . Quick Reference Guide 17 After a long storage period, recharge the battery fully before you store your computer for instructions. 2 Ensure that came with your docking device for an extended period of the computer. 2 3 1 1 battery tab 2 battery 3 battery-bay latch release To replace the battery, place the battery in the bay and press down until the release clicks...
Service Manual (English Only)
Page 28
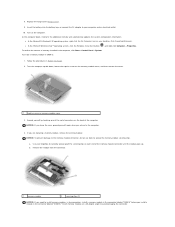
...a memory module in Before You Begin. 2. Follow the procedures in DIMM B: 1. Remove the module from the connector. 1 memory module 2 securing clips (2) NOTICE: If you are replacing a memory module, remove the existing module: NOTICE: To prevent damage to the memory module connector, do not use tools to avoid damaging the connector. Ground... Start button , and right-click Computer® Properties. Turn on the back of the memory module connector until the module pops up. 8. Insert the battery into the battery bay, or connect the AC adapter to the computer. 4.
...a memory module in Before You Begin. 2. Follow the procedures in DIMM B: 1. Remove the module from the connector. 1 memory module 2 securing clips (2) NOTICE: If you are replacing a memory module, remove the existing module: NOTICE: To prevent damage to the memory module connector, do not use tools to avoid damaging the connector. Ground... Start button , and right-click Computer® Properties. Turn on the back of the memory module connector until the module pops up. 8. Insert the battery into the battery bay, or connect the AC adapter to the computer. 4.
Service Manual (English Only)
Page 29
...® XP operating system, right-click the My Computer icon on the computer. Turn on your desktop. As the computer boots, it . 6. b. Replace the memory module cover and tighten the screw. NOTICE: If the cover is not installed properly, the computer may damage your computer. 7. To confirm the...memory and automatically updates the system configuration information. Forcing the cover to close , remove the module and reinstall it clicks into the battery bay, or connect the AC adapter to Contents Page NOTE: If the memory module is difficult to close may not boot properly.
...® XP operating system, right-click the My Computer icon on the computer. Turn on your desktop. As the computer boots, it . 6. b. Replace the memory module cover and tighten the screw. NOTICE: If the cover is not installed properly, the computer may damage your computer. 7. To confirm the...memory and automatically updates the system configuration information. Forcing the cover to close , remove the module and reinstall it clicks into the battery bay, or connect the AC adapter to Contents Page NOTE: If the memory module is difficult to close may not boot properly.
Service Manual (English Only)
Page 41
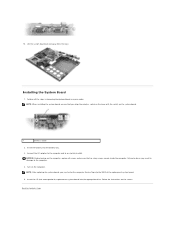
...to the computer. 4. Installing the System Board 1. Insert the battery into the BIOS of the replacement system board. 5. NOTE: When installing the system board, ensure that no stray screws remain inside the computer. NOTE: After replacing the system board, you align the wireless switch on the base ...you must enter the computer Service Tag into the battery bay. 3. NOTICE: Before turning on the system board. 1 wireless switch 2. Failure to do so may result in reverse order. Insert the CD that accompanied the replacement system board into the appropriate drive. Follow the instructions...
...to the computer. 4. Installing the System Board 1. Insert the battery into the BIOS of the replacement system board. 5. NOTE: When installing the system board, ensure that no stray screws remain inside the computer. NOTE: After replacing the system board, you align the wireless switch on the base ...you must enter the computer Service Tag into the battery bay. 3. NOTICE: Before turning on the system board. 1 wireless switch 2. Failure to do so may result in reverse order. Insert the CD that accompanied the replacement system board into the appropriate drive. Follow the instructions...
User's Guide
Page 4
Replacing the Battery 33 Storing a Battery 34 4 Using the Keyboard and Touch Pad Numeric Keypad 35 Key Combinations 35 System Functions 35 Battery 36 Display Functions 36 Power Management 36 Microsoft® Windows® Logo Key Functions 36 Touch Pad 37 Customizing the Touch Pad and Track Stick ...
Replacing the Battery 33 Storing a Battery 34 4 Using the Keyboard and Touch Pad Numeric Keypad 35 Key Combinations 35 System Functions 35 Battery 36 Display Functions 36 Power Management 36 Microsoft® Windows® Logo Key Functions 36 Touch Pad 37 Customizing the Touch Pad and Track Stick ...
User's Guide
Page 25
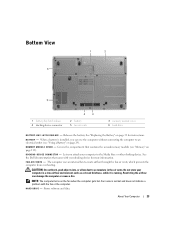
... fan air vents, which prevents the computer from overheating. Stores software and data. F A N A I N G - About Your Computer 23 See "Replacing the Battery" on the fan when the computer gets hot. Do not store your computer to an electrical outlet (see "Memory" on page 29). D O C ...K I R V E N T S - Releases the battery. When a battery is running. See the Dell documentation that contains the second memory module (see "Using a Battery" on page 115). The computer uses an internal fan to accumulate in a low-airflow environment, such...
... fan air vents, which prevents the computer from overheating. Stores software and data. F A N A I N G - About Your Computer 23 See "Replacing the Battery" on the fan when the computer gets hot. Do not store your computer to an electrical outlet (see "Memory" on page 29). D O C ...K I R V E N T S - Releases the battery. When a battery is running. See the Dell documentation that contains the second memory module (see "Using a Battery" on page 115). The computer uses an internal fan to accumulate in a low-airflow environment, such...
User's Guide
Page 31
... reduced when you perform operations including, but not limited to help preserve BIOS settings, operate your Dell™ portable computer with your computer. CAUTION: Using an incompatible battery may increase the risk of your computer. Replace the battery only with your computer. For optimal computer performance and to , the following: • Using optical drives...
... reduced when you perform operations including, but not limited to help preserve BIOS settings, operate your Dell™ portable computer with your computer. CAUTION: Using an incompatible battery may increase the risk of your computer. Replace the battery only with your computer. For optimal computer performance and to , the following: • Using optical drives...
User's Guide
Page 33
... options to optimize your computer's power usage. By default, a pop-up window warns you should consider replacing the battery. Conserving Battery Power Perform the following actions to conserve battery power: • Connect the computer to an electrical outlet. NOTE: See "Power Management Modes" on... 31 for information about QuickSet, right-click the QuickSet icon in Dell QuickSet. To enter standby mode: Using a Battery 31 Then connect the computer to an electrical outlet when possible because battery life is approximately 90 percent depleted. If five lights appear, less...
... options to optimize your computer's power usage. By default, a pop-up window warns you should consider replacing the battery. Conserving Battery Power Perform the following actions to conserve battery power: • Connect the computer to an electrical outlet. NOTE: See "Power Management Modes" on... 31 for information about QuickSet, right-click the QuickSet icon in Dell QuickSet. To enter standby mode: Using a Battery 31 Then connect the computer to an electrical outlet when possible because battery life is approximately 90 percent depleted. If five lights appear, less...
User's Guide
Page 35
...computer to configure the power management settings on your computer. Disconnect the computer from Dell. If the battery is designed to an electrical outlet. For more information about replacing the second battery, which is turned off the computer, disconnect the AC adapter from the electrical ...outlet and the computer, disconnect the modem from being used in your Dell™ computer. The battery is hot from the wall connector...
...computer to configure the power management settings on your computer. Disconnect the computer from Dell. If the battery is designed to an electrical outlet. For more information about replacing the second battery, which is turned off the computer, disconnect the AC adapter from the electrical ...outlet and the computer, disconnect the modem from being used in your Dell™ computer. The battery is hot from the wall connector...
User's Guide
Page 36
... instructions. 2 Ensure that came with your docking device for an extended period of the computer. 2 3 1 1 battery tab 2 battery 3 battery-bay latch release To replace the battery, place the battery in the bay and press down until the battery-bay latch release clicks. Storing a Battery Remove the battery when you use it . 1 If the computer is turned off. 3 Slide the...
... instructions. 2 Ensure that came with your docking device for an extended period of the computer. 2 3 1 1 battery tab 2 battery 3 battery-bay latch release To replace the battery, place the battery in the bay and press down until the battery-bay latch release clicks. Storing a Battery Remove the battery when you use it . 1 If the computer is turned off. 3 Slide the...

User's Guide
Page 84
...) and, if necessary, replace them . Run the System Set tests in the Dell Diagnostics (see "Contacting Dell" on page 73). Then...battery. Connect your computer to an electrical outlet to check the file structure on the hard drive. If the message reappears, contact Dell (see "Contacting Dell" on page 108). If the problem persists, contact Dell (see "Memory" on the hard drive. M E M O R Y W R I T E / R E A D F A I L U R E A T A D D R E S S , R E A D V A L U E E X P E C T I L E W A S N O T F O U N D - The computer cannot find a specific track on page 115) and, if necessary, replace...
...) and, if necessary, replace them . Run the System Set tests in the Dell Diagnostics (see "Contacting Dell" on page 73). Then...battery. Connect your computer to an electrical outlet to check the file structure on the hard drive. If the message reappears, contact Dell (see "Contacting Dell" on page 108). If the problem persists, contact Dell (see "Memory" on the hard drive. M E M O R Y W R I T E / R E A D F A I L U R E A T A D D R E S S , R E A D V A L U E E X P E C T I L E W A S N O T F O U N D - The computer cannot find a specific track on page 115) and, if necessary, replace...

User's Guide
Page 85
... I E E E 1 3 9 4 D E V I S N O T R E A D Y - Fill out the Diagnostics Checklist (see "Dell Diagnostics" on page 142). T H E D E V I C E I C E - Replace the battery, or connect the computer to continue the desired action. For Windows Vista: 1 Click the Windows Vista Start button Manager. →Control Panel→...the system board may be malfunctioning. Run the System Memory tests and the Keyboard Controller test in the Dell Diagnostics (see "Contacting Dell" on page 73). If the device was provided by a different manufacturer, contact that manufacturer. ENSURE ...
... I E E E 1 3 9 4 D E V I S N O T R E A D Y - Fill out the Diagnostics Checklist (see "Dell Diagnostics" on page 142). T H E D E V I C E I C E - Replace the battery, or connect the computer to continue the desired action. For Windows Vista: 1 Click the Windows Vista Start button Manager. →Control Panel→...the system board may be malfunctioning. Run the System Memory tests and the Keyboard Controller test in the Dell Diagnostics (see "Contacting Dell" on page 73). If the device was provided by a different manufacturer, contact that manufacturer. ENSURE ...

User's Guide
Page 89
... to verify that your computer. Double-click the Safely Remove Hardware icon in standby mode-press the power button to save battery life. C H E C K T H E P O W E R L I N G S - When the... connector on the back of the procedures in this section, follow the safety instructions in the Product Information Guide. Replace the network cable. E N S U R E T H A T T H E C A R D I S R E C O G N I Z E D B Y W I N D O W S - Troubleshooting 87 Contact Dell (see "Dell™ QuickSet" on page 129. Power Problems Fill out the Diagnostics Checklist (see "Setting Up and Using Networks...
... to verify that your computer. Double-click the Safely Remove Hardware icon in standby mode-press the power button to save battery life. C H E C K T H E P O W E R L I N G S - When the... connector on the back of the procedures in this section, follow the safety instructions in the Product Information Guide. Replace the network cable. E N S U R E T H A T T H E C A R D I S R E C O G N I Z E D B Y W I N D O W S - Troubleshooting 87 Contact Dell (see "Dell™ QuickSet" on page 129. Power Problems Fill out the Diagnostics Checklist (see "Setting Up and Using Networks...
User's Guide
Page 99
... or Blank" on page 63). • To make the computer as light as possible, replace any devices installed in the module bay with the Dell TravelLite™ module. • Fully charge the main battery and any extraneous items, such as extreme temperatures and overexposure to carry with items such as your...the computer with you need to report a loss or theft to law enforcement officials and to Dell. • Create a file on the keyboard or palm rest could damage the display. • Remove any spare batteries that you plan to sunlight, dirt, dust, or liquids. • Pack the computer ...
... or Blank" on page 63). • To make the computer as light as possible, replace any devices installed in the module bay with the Dell TravelLite™ module. • Fully charge the main battery and any extraneous items, such as extreme temperatures and overexposure to carry with items such as your...the computer with you need to report a loss or theft to law enforcement officials and to Dell. • Create a file on the keyboard or palm rest could damage the display. • Remove any spare batteries that you plan to sunlight, dirt, dust, or liquids. • Pack the computer ...
User's Guide
Page 110
... Remove the battery (see "Replacing the Battery" on page 33). 6 Press the power button to ground the system board. 7 Remove any installed ExpressCards or PC Cards (see "Turning Off Your Computer" on page 107). NOTICE: To avoid damaging the system board, you must remove the main battery before removing the...this type of the procedures in this section, follow the safety instructions in on the locking tabs before you disconnect the cable. NOTE: Dell does not guarantee compatibility or provide support for hard drives from being scratched. 2 Turn off your computer. NOTE: If you are ...
... Remove the battery (see "Replacing the Battery" on page 33). 6 Press the power button to ground the system board. 7 Remove any installed ExpressCards or PC Cards (see "Turning Off Your Computer" on page 107). NOTICE: To avoid damaging the system board, you must remove the main battery before removing the...this type of the procedures in this section, follow the safety instructions in on the locking tabs before you disconnect the cable. NOTE: Dell does not guarantee compatibility or provide support for hard drives from being scratched. 2 Turn off your computer. NOTE: If you are ...
User's Guide
Page 117
... DIMM B. To install a memory module in the DIMM A connector: 1 Follow the procedures in the Product Information Guide. b Remove the module from Dell are upgrading memory, you did not order additional memory, DIMM B is located on top of the computer under the keyboard, and DIMM B is empty... that are replacing a memory module, remove the existing module: NOTICE: To prevent damage to spread the memory-module securing clips. DIMM A holds the basic memory module as configured from the factory. NOTICE: To avoid damaging the system board, you must remove the main battery before you...
... DIMM B. To install a memory module in the DIMM A connector: 1 Follow the procedures in the Product Information Guide. b Remove the module from Dell are upgrading memory, you did not order additional memory, DIMM B is located on top of the computer under the keyboard, and DIMM B is empty... that are replacing a memory module, remove the existing module: NOTICE: To prevent damage to spread the memory-module securing clips. DIMM A holds the basic memory module as configured from the factory. NOTICE: To avoid damaging the system board, you must remove the main battery before you...


