

Dell Owners Manual
Page 3
... the Base Cover...11 Removing the System Badge...11 Installing the System Badge...12 Removing the Battery...13 Installing the Battery...13 Removing the Touchpad...13 Installing the Touchpad...14 Removing the Hard Drive...15 Installing the Hard Drive...16 Removing the Speakers ...16 Installing the Speakers...17 Removing the Wireless Local...
... the Base Cover...11 Removing the System Badge...11 Installing the System Badge...12 Removing the Battery...13 Installing the Battery...13 Removing the Touchpad...13 Installing the Touchpad...14 Removing the Hard Drive...15 Installing the Hard Drive...16 Removing the Speakers ...16 Installing the Speakers...17 Removing the Wireless Local...

Dell Owners Manual
Page 13
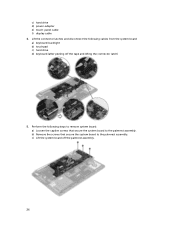
b) Remove the screws that secure the touchpad to the computer. 13 c) Lift the battery off the palmrest assembly. Installing the Battery 1. Remove the: a) base cover b) battery 3. Remove the screws that secure the .... 4. Remove the base cover. 3. Follow the procedures in After Working Inside Your Computer. Connect the battery cable to the palmrest assembly. 2. Removing the Touchpad 1. Disconnect and remove the touchpad cable from the system board. Follow the procedures in Before Working Inside Your Computer. 2. Removing the Battery 1. Tighten the screws that secure the...
b) Remove the screws that secure the touchpad to the computer. 13 c) Lift the battery off the palmrest assembly. Installing the Battery 1. Remove the: a) base cover b) battery 3. Remove the screws that secure the .... 4. Remove the base cover. 3. Follow the procedures in After Working Inside Your Computer. Connect the battery cable to the palmrest assembly. 2. Removing the Touchpad 1. Disconnect and remove the touchpad cable from the system board. Follow the procedures in Before Working Inside Your Computer. 2. Removing the Battery 1. Tighten the screws that secure the...

Dell Owners Manual
Page 14
Slide out the touchpad and lift it away from the computer. Follow the procedures in its position on the computer. 2. 4. Tighten the screws to secure the touchpad to the system board. 4. Align the touchpad in After Working Inside Your Computer. 14 Connect the touchpad cable to the computer. 3. Install the: a) battery b) base cover 5. Installing the Touchpad 1.
Slide out the touchpad and lift it away from the computer. Follow the procedures in its position on the computer. 2. 4. Tighten the screws to secure the touchpad to the system board. 4. Align the touchpad in After Working Inside Your Computer. 14 Connect the touchpad cable to the computer. 3. Install the: a) battery b) base cover 5. Installing the Touchpad 1.
Dell Owners Manual
Page 26
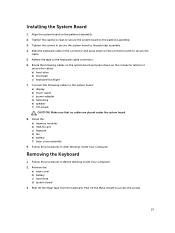
Perform the following cables from the system board: a) keyboard-backlight b) touchpad c) hard drive d) keyboard (after peeling off the palmrest assembly. 26 b) Remove the screws that secure the system board to the palmrest assembly. c) Lift the system board off the tape and lifting the connector latch) 5. c) hard drive d) power-adapter e) touch-panel cable f) display cable 4. Lift the connector latches and disconnect the following steps to remove system board: a) Loosen the captive screws that secure the system board to the palmrest assembly.
Perform the following cables from the system board: a) keyboard-backlight b) touchpad c) hard drive d) keyboard (after peeling off the palmrest assembly. 26 b) Remove the screws that secure the system board to the palmrest assembly. c) Lift the system board off the tape and lifting the connector latch) 5. c) hard drive d) power-adapter e) touch-panel cable f) display cable 4. Lift the connector latches and disconnect the following steps to remove system board: a) Loosen the captive screws that secure the system board to the palmrest assembly.
Dell Owners Manual
Page 27
... under the system board. 8. Connect the following cables on the system board and press down on the connector latches to secure the cables: a) hard-drive b) touchpad c) keyboard-backlight 7. Route the following cables to the palmrest assembly. 4. Follow the procedures in Before Working Inside Your Computer. 2. Removing the Keyboard 1. Installing the System...
... under the system board. 8. Connect the following cables on the system board and press down on the connector latches to secure the cables: a) hard-drive b) touchpad c) keyboard-backlight 7. Route the following cables to the palmrest assembly. 4. Follow the procedures in Before Working Inside Your Computer. 2. Removing the Keyboard 1. Installing the System...
Dell Owners Manual
Page 47
... 80 mm Specification HD Camera / Digital Array Microphone 0.92 megapixels ( Maximum ) 1280 x 720 Pixels @ 30 Frame Per Seconds ( Maximum ) 74 degrees Specification SATA 3 (6 Gb/s) 47 Touchpad Feature Active Area: X-axis Y-axis Table 17. Feature Active area (X/Y) Maximum resolution Maximum Brightness Operating angle Refresh rate Minimum viewing angles: Horizontal Vertical Table 15.
... 80 mm Specification HD Camera / Digital Array Microphone 0.92 megapixels ( Maximum ) 1280 x 720 Pixels @ 30 Frame Per Seconds ( Maximum ) 74 degrees Specification SATA 3 (6 Gb/s) 47 Touchpad Feature Active Area: X-axis Y-axis Table 17. Feature Active area (X/Y) Maximum resolution Maximum Brightness Operating angle Refresh rate Minimum viewing angles: Horizontal Vertical Table 15.


