

Dell Owners Manual
Page 3
... mSATA Card...20 Removing the Fans ...21 Installing the Fans...21 Removing the Heatsink...21 Installing the Heatsink...22 Removing the Power-Adapter Port 22 Installing the Power-Adapter Port 23 Removing the Input/Output (I/O) Board 23 Installing the I/O Board...24 Removing the Memory Module(s 24 Installing the Memory Module(s)...25 Removing...
... mSATA Card...20 Removing the Fans ...21 Installing the Fans...21 Removing the Heatsink...21 Installing the Heatsink...22 Removing the Power-Adapter Port 22 Installing the Power-Adapter Port 23 Removing the Input/Output (I/O) Board 23 Installing the I/O Board...24 Removing the Memory Module(s 24 Installing the Memory Module(s)...25 Removing...

Dell Owners Manual
Page 7
...turning on your operating system, press and hold the power button for about 4 seconds to the computer, use batteries designed for this particular Dell computer. CAUTION: To avoid damage to turn off when you shut down your computer. 7 Replace the battery. 4. Connect any cards, ...such as shown below, and then click Shut Down.. 2. 2. Connect any external devices, such as a port replicator, battery slice, or media base, and replace any telephone or network cables to their electrical outlets. 5. Ensure that the computer and all attached...
...turning on your operating system, press and hold the power button for about 4 seconds to the computer, use batteries designed for this particular Dell computer. CAUTION: To avoid damage to turn off when you shut down your computer. 7 Replace the battery. 4. Connect any cards, ...such as shown below, and then click Shut Down.. 2. 2. Connect any external devices, such as a port replicator, battery slice, or media base, and replace any telephone or network cables to their electrical outlets. 5. Ensure that the computer and all attached...

Dell Owners Manual
Page 22
...1. Install the: a) battery b) base cover 4. a) Release the power-adapter port cable from the system board: a) power-adapter port b) touch-panel 4. Tighten the screws to secure the heatsink to remove the power-adapter port. Perform the following steps to remove the heatsink: a) Remove the screws that ...following steps to the system board. 3. Align the screw holes on the heatsink with an integrated graphics card. 3. Removing the Power-Adapter Port 1. a) base cover b) battery NOTE: The appearance of the heatsink and the number of screws will vary if you purchased your computer with...
...1. Install the: a) battery b) base cover 4. a) Release the power-adapter port cable from the system board: a) power-adapter port b) touch-panel 4. Tighten the screws to secure the heatsink to remove the power-adapter port. Perform the following steps to remove the heatsink: a) Remove the screws that ...following steps to the system board. 3. Align the screw holes on the heatsink with an integrated graphics card. 3. Removing the Power-Adapter Port 1. a) base cover b) battery NOTE: The appearance of the heatsink and the number of screws will vary if you purchased your computer with...

Dell Owners Manual
Page 23
...camera, and I/O board cables from the I /O board from the palmrest assembly. 23 Tighten the screw to secure the power-adapter port to the palmrest assembly. Follow the procedures in Before Working Inside Your Computer. 2. Follow the procedures in After Working Inside Your Computer... Remove the: a) base cover b) battery c) WLAN card 3. Installing the Power-Adapter Port 1. Install the: a) battery b) base cover 5. Connect the following steps to the system board: a) touch-panel b) power-adapter port 4. Removing the Input/Output (I /O board to the palmrest assembly. 2. b) Remove ...
...camera, and I/O board cables from the I /O board from the palmrest assembly. 23 Tighten the screw to secure the power-adapter port to the palmrest assembly. Follow the procedures in Before Working Inside Your Computer. 2. Follow the procedures in After Working Inside Your Computer... Remove the: a) base cover b) battery c) WLAN card 3. Installing the Power-Adapter Port 1. Install the: a) battery b) base cover 5. Connect the following steps to the system board: a) touch-panel b) power-adapter port 4. Removing the Input/Output (I /O board to the palmrest assembly. 2. b) Remove ...

Dell Owners Manual
Page 32
... display assembly. 32 a) battery b) base cover 6. Remove the: a) base cover b) battery c) hard drive d) speakers e) WLAN card f) coin-cell battery g) mSATA card h) fans i) heatsink j) power-adapter port k) I/O board l) memory modules m) system board n) keyboard 3. Follow the procedures in Before Working Inside Your Computer. 2. CAUTION: Lift the palmrest assembly slowly to the palmrest assembly. 4.
... display assembly. 32 a) battery b) base cover 6. Remove the: a) base cover b) battery c) hard drive d) speakers e) WLAN card f) coin-cell battery g) mSATA card h) fans i) heatsink j) power-adapter port k) I/O board l) memory modules m) system board n) keyboard 3. Follow the procedures in Before Working Inside Your Computer. 2. CAUTION: Lift the palmrest assembly slowly to the palmrest assembly. 4.

Dell Owners Manual
Page 34
Follow the procedures in After Working Inside Your Computer. 34 e) power-adapter port f) heatsink g) fans h) mSATA card i) coin-cell battery j) WLAN card k) speakers l) hard drive m) battery n) base cover 5.
Follow the procedures in After Working Inside Your Computer. 34 e) power-adapter port f) heatsink g) fans h) mSATA card i) coin-cell battery j) WLAN card k) speakers l) hard drive m) battery n) base cover 5.
Dell Owners Manual
Page 37
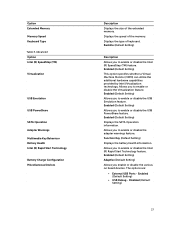
Enabled (Default Setting) Adaptive (Default Setting) Allows you to enable or disable the Intel (R) Rapid Start Technology feature. The options are: • External USB Ports - Advanced Option Intel (R) SpeedStep (TM) Virtualization USB Emulation USB PowerShare SATA Operation Adapter Warnings Multimedia Key Behaviour Battery Health Intel (R) Rapid Start Technology Battery Charge ...
Enabled (Default Setting) Adaptive (Default Setting) Allows you to enable or disable the Intel (R) Rapid Start Technology feature. The options are: • External USB Ports - Advanced Option Intel (R) SpeedStep (TM) Virtualization USB Emulation USB PowerShare SATA Operation Adapter Warnings Multimedia Key Behaviour Battery Health Intel (R) Rapid Start Technology Battery Charge ...

Dell Owners Manual
Page 46
... On/Off implemented via USB-to-Ethernet Dongle provided in box NOTE: No RJ45 (10/100/1000Base-T, IPv6) provided. Intel Media Vault support through HDMI port SD 4.0 Specification 1366 X 768 pixels 15.6 inches 254.0 mm (9.99 inches) 372.0 mm (14.64 inches) 396.24 mm (15.60 inches) 46 Feature Video...
... On/Off implemented via USB-to-Ethernet Dongle provided in box NOTE: No RJ45 (10/100/1000Base-T, IPv6) provided. Intel Media Vault support through HDMI port SD 4.0 Specification 1366 X 768 pixels 15.6 inches 254.0 mm (9.99 inches) 372.0 mm (14.64 inches) 396.24 mm (15.60 inches) 46 Feature Video...


