Users Guide
Page 19
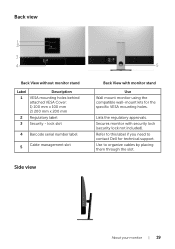
... by placing them through the slot. About your monitor | 19 Secures monitor with monitor stand Use Wall mount monitor using the compatible wall-mount kits for the specific VESA mounting holes. Use to contact Dell for Mexico) , 0.75-0.3ᅝ, 50/60䌿㤆 Consumo de energía: XXX Wh...) CO., LTD TPV Electronics (Fujian) Co., Ltd. 080-200-3800 Q40G043N-700-01A Back View without monitor stand Label Description 1 VESA mounting holes behind attached VESA Cover: 1) 100 mm x 100 mm 2) 200 mm x 200 mm 2 Regulatory label 3 Security - Lists the regulatory approvals.
... by placing them through the slot. About your monitor | 19 Secures monitor with monitor stand Use Wall mount monitor using the compatible wall-mount kits for the specific VESA mounting holes. Use to contact Dell for Mexico) , 0.75-0.3ᅝ, 50/60䌿㤆 Consumo de energía: XXX Wh...) CO., LTD TPV Electronics (Fujian) Co., Ltd. 080-200-3800 Q40G043N-700-01A Back View without monitor stand Label Description 1 VESA mounting holes behind attached VESA Cover: 1) 100 mm x 100 mm 2) 200 mm x 200 mm 2 Regulatory label 3 Security - Lists the regulatory approvals.
Users Guide
Page 27
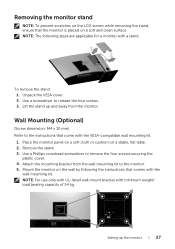
... Electronics (Fujian) Co., Ltd. 080-200-3800 Q40G043N-700-01A Setting up and away from the wall mounting kit to the instructions that comes with the VESA-compatible wall mounting kit. 1. Place the monitor panel on a soft cloth or cushion on a soft and clean surface. Remove...remove the four screws securing the plastic cover. 4. Refer to the monitor. 5. Attach the mounting bracket from the monitor. Use a Phillips crosshead screwdriver to release the four screws. 3. Unpack the VESA cover. 2. Removing the monitor stand NOTE: To prevent scratches on the LCD screen while ...
... Electronics (Fujian) Co., Ltd. 080-200-3800 Q40G043N-700-01A Setting up and away from the wall mounting kit to the instructions that comes with the VESA-compatible wall mounting kit. 1. Place the monitor panel on a soft cloth or cushion on a soft and clean surface. Remove...remove the four screws securing the plastic cover. 4. Refer to the monitor. 5. Attach the mounting bracket from the monitor. Use a Phillips crosshead screwdriver to release the four screws. 3. Unpack the VESA cover. 2. Removing the monitor stand NOTE: To prevent scratches on the LCD screen while ...


