Monitor Users Guide
Page 7
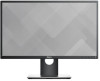
.... • Tilt, swivel, height, and rotate adjustment capabilities. • Removable stand and Video Electronics Standards Association (VESA™) 100 mm mounting holes for flexible mounting solutions. • Digital connectivity with DisplayPort and HDMI. • Equipped with 1 USB upstream port and 4 USB ... Optimize eye comfort with fullscreen support or lower resolutions. • P2317H/P2317HWH: 58.4 cm (23-inch) viewable area (measured diagonally). About Your Monitor | 7 Product Features The Dell P2217H/P2317H/P2317HWH/P2417H/P2717H flat panel display has an active matrix, Thin-...
.... • Tilt, swivel, height, and rotate adjustment capabilities. • Removable stand and Video Electronics Standards Association (VESA™) 100 mm mounting holes for flexible mounting solutions. • Digital connectivity with DisplayPort and HDMI. • Equipped with 1 USB upstream port and 4 USB ... Optimize eye comfort with fullscreen support or lower resolutions. • P2317H/P2317HWH: 58.4 cm (23-inch) viewable area (measured diagonally). About Your Monitor | 7 Product Features The Dell P2217H/P2317H/P2317HWH/P2417H/P2717H flat panel display has an active matrix, Thin-...
Monitor Users Guide
Page 9
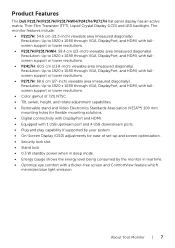
Secures monitor with monitor stand Label Description 1 VESA mounting holes (100 mm x 100 mm behind attached VESA Cover) 2 Regulatory label 3 Stand release button 4 Security lock slot 5 Barcode, serial number, and Service Tag label 6 Dell Soundbar mounting slots 7 Cable-management slot Use Wall mount monitor using VESA-compatible wall mount kit (100 mm x 100 mm). NOTE: Please remove the plastic...
Secures monitor with monitor stand Label Description 1 VESA mounting holes (100 mm x 100 mm behind attached VESA Cover) 2 Regulatory label 3 Stand release button 4 Security lock slot 5 Barcode, serial number, and Service Tag label 6 Dell Soundbar mounting slots 7 Cable-management slot Use Wall mount monitor using VESA-compatible wall mount kit (100 mm x 100 mm). NOTE: Please remove the plastic...
Monitor Users Guide
Page 16
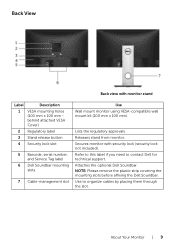
... (6.75 lb) Weight of stand assembly 2.10 kg (4.63 lb) 2.10 kg (4.63 lb) Front frame gloss 2-4 2-4 16 | About Your Monitor Physical Characteristics Model P2217H P2317H/P2317HWH Signal cable type • Analog: D-Sub, 15 pins • Digital: DisplayPort, 20 pins • Digital: HDMI, 19 pins (cable not included) • Universal Serial... (16.18 lb) Weight with stand assembly and cables 5.37 kg (11.81 lb) 5.59 kg (12.32 lb) Weight without stand assembly (For wall mount or VESA mount considerations -
... (6.75 lb) Weight of stand assembly 2.10 kg (4.63 lb) 2.10 kg (4.63 lb) Front frame gloss 2-4 2-4 16 | About Your Monitor Physical Characteristics Model P2217H P2317H/P2317HWH Signal cable type • Analog: D-Sub, 15 pins • Digital: DisplayPort, 20 pins • Digital: HDMI, 19 pins (cable not included) • Universal Serial... (16.18 lb) Weight with stand assembly and cables 5.37 kg (11.81 lb) 5.59 kg (12.32 lb) Weight without stand assembly (For wall mount or VESA mount considerations -
Monitor Users Guide
Page 17
... (21.52 lb) Weight with stand assembly and cables 5.90 kg (12.98 lb) 7.44 kg (16.40 lb) Weight without stand assembly (For wall mount or VESA mount considerations -
... (21.52 lb) Weight with stand assembly and cables 5.90 kg (12.98 lb) 7.44 kg (16.40 lb) Weight without stand assembly (For wall mount or VESA mount considerations -
Monitor Users Guide
Page 32
...) (Screw dimension: M4 x 10 mm). NOTE: For use only with UL-listed wall mount bracket with the wall mounting kit. Refer to the instructions that come with the VESA-compatible wall mounting kit. 1 Place the monitor panel on a soft cloth or cushion on a stable, flat table. 2 Remove the stand. 3... four screws securing the plastic cover. 4 Attach the mounting bracket from the wall mounting kit to the monitor. 5 Mount the monitor on the wall by following the instructions that comes with minimum weight/load bearing capacity of 2.81 kg (P2217H) / 3.06 kg (P2317H/P2317HWH) /3.33 kg (P2417H) / 4.58 kg ...
...) (Screw dimension: M4 x 10 mm). NOTE: For use only with UL-listed wall mount bracket with the wall mounting kit. Refer to the instructions that come with the VESA-compatible wall mounting kit. 1 Place the monitor panel on a soft cloth or cushion on a stable, flat table. 2 Remove the stand. 3... four screws securing the plastic cover. 4 Attach the mounting bracket from the wall mounting kit to the monitor. 5 Mount the monitor on the wall by following the instructions that comes with minimum weight/load bearing capacity of 2.81 kg (P2217H) / 3.06 kg (P2317H/P2317HWH) /3.33 kg (P2417H) / 4.58 kg ...


