
Dell Monitor Outline Drawing
Page 1
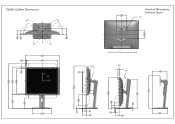
P1914S Outline Dimensions \ Swivel 45° / / Swivel 45° M Cl 00 O N 17.5 (0.69) ti 411.4 (16.20) 376.4 (14.82) Pivot 90* 3.4 (0.1.3) 0, 0 N / 225.0 (8.86) ri 39.1 O (1.54) 51.1. (2.01) 122.0,2X (4.80) Nominal Dimensions Unit:mm (inch) 1,44x10(4x) 0 ri 0 Back view of Monitor without stand Tlit 5* 21° 178.3 (7.02) / N O N 15.4 (0.61) N. i 39.1. (1.54) 180.0 (7.09)
P1914S Outline Dimensions \ Swivel 45° / / Swivel 45° M Cl 00 O N 17.5 (0.69) ti 411.4 (16.20) 376.4 (14.82) Pivot 90* 3.4 (0.1.3) 0, 0 N / 225.0 (8.86) ri 39.1 O (1.54) 51.1. (2.01) 122.0,2X (4.80) Nominal Dimensions Unit:mm (inch) 1,44x10(4x) 0 ri 0 Back view of Monitor without stand Tlit 5* 21° 178.3 (7.02) / N O N 15.4 (0.61) N. i 39.1. (1.54) 180.0 (7.09)
Dell Monitor Statement of Volatility
Page 1
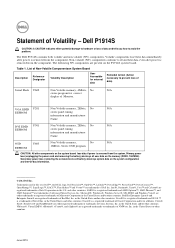
Statement of data and tells you how to avoid the problem. Dell P1914S CAUTION: A CAUTION indicates either potential damage to hardware or loss of Volatility - Volatile components lose their data even after power is a trademark of Citrix .... DVI EDID U301 Non Volatile memory, 2Kbits, No N/A EEPROM stores panel timing information and manufacturer Name. in the United States and/or other countries. The Dell P1914S contains both volatile and non-volatile (NV) components. Table 1. June 2013 OSD U603 Non Volatile memory, No N/A 16Kbits, Stores OSD program. in the United...
Statement of data and tells you how to avoid the problem. Dell P1914S CAUTION: A CAUTION indicates either potential damage to hardware or loss of Volatility - Volatile components lose their data even after power is a trademark of Citrix .... DVI EDID U301 Non Volatile memory, 2Kbits, No N/A EEPROM stores panel timing information and manufacturer Name. in the United States and/or other countries. The Dell P1914S contains both volatile and non-volatile (NV) components. Table 1. June 2013 OSD U603 Non Volatile memory, No N/A 16Kbits, Stores OSD program. in the United...

Dell Users Guide
Page 2
...Corporation in this document is subject to hardware or loss of the U.S. All rights reserved. As an ENERGY STAR partner, Dell Inc. disclaims any manner whatsoever without notice. WARNING: A WARNING indicates a potential for energy efficiency. Trademarks used in trademarks ... A00 Environmental Protection Agency. Reproduction of these materials in this text: Dell and the DELL logo are not followed. Dell Inc. is a registered trademark of data if instructions are trademarks of Dell Inc. NOTE: A NOTE indicates important information that this product meets...
...Corporation in this document is subject to hardware or loss of the U.S. All rights reserved. As an ENERGY STAR partner, Dell Inc. disclaims any manner whatsoever without notice. WARNING: A WARNING indicates a potential for energy efficiency. Trademarks used in trademarks ... A00 Environmental Protection Agency. Reproduction of these materials in this text: Dell and the DELL logo are not followed. Dell Inc. is a registered trademark of data if instructions are trademarks of Dell Inc. NOTE: A NOTE indicates important information that this product meets...
Dell Users Guide
Page 3
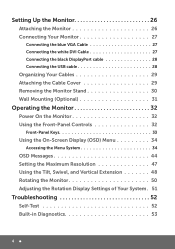
Contents Dell Display Manager User's Guide 6 Overview 6 Using the Quick Settings Dialog 6 Setting Basic Display Functions 7 Assigning Preset Modes to Applications 7 Applying Energy-Conservation Features 9 About Your ...
Contents Dell Display Manager User's Guide 6 Overview 6 Using the Quick Settings Dialog 6 Setting Basic Display Functions 7 Assigning Preset Modes to Applications 7 Applying Energy-Conservation Features 9 About Your ...
Dell Users Guide
Page 4
Setting Up the Monitor 26 Attaching the Monitor 26 Connecting Your Monitor 27 Connecting the blue VGA Cable 27 Connecting the white DVI Cable 27 Connecting the black DisplayPort cable 28 Connecting the USB cable 28 Organizing Your Cables 29 Attaching the Cable Cover 29 Removing the Monitor Stand 30 Wall Mounting (Optional 31 Operating the Monitor 32 Power On the Monitor 32 Using the Front-Panel Controls 32 Front-Panel Keys 33 Using the On-Screen Display (OSD) Menu 34 Accessing the Menu System 34 OSD Messages 44 Setting the Maximum Resolution 47 Using the Tilt, Swivel, and ...
Setting Up the Monitor 26 Attaching the Monitor 26 Connecting Your Monitor 27 Connecting the blue VGA Cable 27 Connecting the white DVI Cable 27 Connecting the black DisplayPort cable 28 Connecting the USB cable 28 Organizing Your Cables 29 Attaching the Cable Cover 29 Removing the Monitor Stand 30 Wall Mounting (Optional 31 Operating the Monitor 32 Power On the Monitor 32 Using the Front-Panel Controls 32 Front-Panel Keys 33 Using the On-Screen Display (OSD) Menu 34 Accessing the Menu System 34 OSD Messages 44 Setting the Maximum Resolution 47 Using the Tilt, Swivel, and ...
Dell Users Guide
Page 5
... Setting Up Your Monitor 59 Setting the display resolution to 1280 x 1024 (Maximum) 59 If you have a Dell desktop or a Dell portable computer with Internet access 60 If you have a non Dell desktop, portable computer, or graphics card 60 Procedures for setting up dual monitors in Windows Vista® , Windows® 7 or Windows...
... Setting Up Your Monitor 59 Setting the display resolution to 1280 x 1024 (Maximum) 59 If you have a Dell desktop or a Dell portable computer with Internet access 60 If you have a non Dell desktop, portable computer, or graphics card 60 Procedures for setting up dual monitors in Windows Vista® , Windows® 7 or Windows...
Dell Users Guide
Page 6
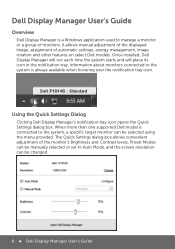
...always available when hovering over the notification tray icon. Using the Quick Settings Dialog Clicking Dell Display Manager's notification tray icon opens the Quick Settings dialog box. Once installed, Dell Display Manager will run each time the system starts and will place its icon in ...allows manual adjustment of the displayed image, assignment of automatic settings, energy management, image rotation and other features on select Dell models. When more than one supported Dell model is connected to the system is a Windows application used to manage a monitor or a group of the monitor's...
...always available when hovering over the notification tray icon. Using the Quick Settings Dialog Clicking Dell Display Manager's notification tray icon opens the Quick Settings dialog box. Once installed, Dell Display Manager will run each time the system starts and will place its icon in ...allows manual adjustment of the displayed image, assignment of automatic settings, energy management, image rotation and other features on select Dell models. When more than one supported Dell model is connected to the system is a Windows application used to manage a monitor or a group of the monitor's...
Dell Users Guide
Page 7
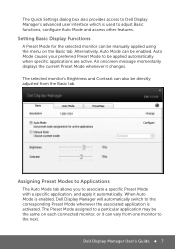
...to the corresponding Preset Mode whenever the associated application is used to adjust Basic functions, configure Auto Mode and access other features. Dell Display Manager User's Guide 7 An onscreen message momentarily displays the current Preset Mode whenever it automatically. The Quick ...Settings dialog box also provides access to Dell Display Manager's advanced user interface which is activated. The Preset Mode assigned to be the same on the Basic tab. Auto ...
...to the corresponding Preset Mode whenever the associated application is used to adjust Basic functions, configure Auto Mode and access other features. Dell Display Manager User's Guide 7 An onscreen message momentarily displays the current Preset Mode whenever it automatically. The Quick ...Settings dialog box also provides access to Dell Display Manager's advanced user interface which is activated. The Preset Mode assigned to be the same on the Basic tab. Auto ...

Dell Users Guide
Page 8
Dell Display Manager is pre-configured for many popular applications. NOTE: Preset Mode assignments targeting batch files, scripts, and loaders, as well as non-executable files such as zip archives or packed files, are not supported and will be ineffective. 8 Dell Display Manager User's Guide To add a new application to the assignment list, simply drag the application from the desktop, Windows Start Menu or elsewhere, and drop it onto the current list.
Dell Display Manager is pre-configured for many popular applications. NOTE: Preset Mode assignments targeting batch files, scripts, and loaders, as well as non-executable files such as zip archives or packed files, are not supported and will be ineffective. 8 Dell Display Manager User's Guide To add a new application to the assignment list, simply drag the application from the desktop, Windows Start Menu or elsewhere, and drop it onto the current list.
Dell Users Guide
Page 9
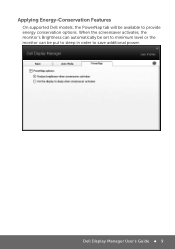
When the screensaver activates, the monitor's Brightness can automatically be set to minimum level or the monitor can be available to save additional power. Applying Energy-Conservation Features On supported Dell models, the PowerNap tab will be put to sleep in order to provide energy conservation options. Dell Display Manager User's Guide 9
When the screensaver activates, the monitor's Brightness can automatically be set to minimum level or the monitor can be available to save additional power. Applying Energy-Conservation Features On supported Dell models, the PowerNap tab will be put to sleep in order to provide energy conservation options. Dell Display Manager User's Guide 9
Dell Users Guide
Page 10
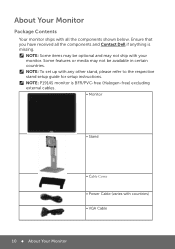
..., please refer to the respective stand setup guide for setup instructions. About Your Monitor Package Contents Your monitor ships with all the components and Contact Dell if anything is BFR/PVC-free (Halogen-free) excluding external cables. • Monitor • Stand • Cable Cover • Power Cable (varies with countries) •...
..., please refer to the respective stand setup guide for setup instructions. About Your Monitor Package Contents Your monitor ships with all the components and Contact Dell if anything is BFR/PVC-free (Halogen-free) excluding external cables. • Monitor • Stand • Cable Cover • Power Cable (varies with countries) •...
Dell Users Guide
Page 11
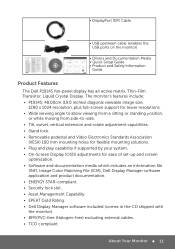
...of set-up and screen optimization. • Software and documentation media which includes an information file (INF), Image Color Matching File (ICM), Dell Display Manager software application and product documentation. • ENERGY STAR-compliant. • Security lock slot. • Asset Management Capability. • EPEAT ...) • Drivers and Documentation Media • Quick Setup Guide • Product and Safety Information Guide Product Features The Dell P1914S flat-panel display has an active matrix, Thin-Film Transistor, Liquid Crystal Display. About Your Monitor 11
...of set-up and screen optimization. • Software and documentation media which includes an information file (INF), Image Color Matching File (ICM), Dell Display Manager software application and product documentation. • ENERGY STAR-compliant. • Security lock slot. • Asset Management Capability. • EPEAT ...) • Drivers and Documentation Media • Quick Setup Guide • Product and Safety Information Guide Product Features The Dell P1914S flat-panel display has an active matrix, Thin-Film Transistor, Liquid Crystal Display. About Your Monitor 11
Dell Users Guide
Page 12
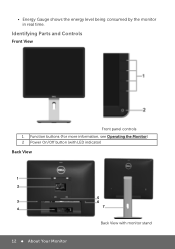
Function buttons (For more information, see Operating the Monitor) 2 Power On/Off button (with LED indicator) Back View 1 2 3 4 12 About Your Monitor 5 6 7 Back View with monitor stand • Energy Gauge shows the energy level being consumed by the monitor in real time. Identifying Parts and Controls Front View Front panel controls 1.
Function buttons (For more information, see Operating the Monitor) 2 Power On/Off button (with LED indicator) Back View 1 2 3 4 12 About Your Monitor 5 6 7 Back View with monitor stand • Energy Gauge shows the energy level being consumed by the monitor in real time. Identifying Parts and Controls Front View Front panel controls 1.
Dell Users Guide
Page 13
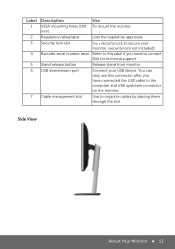
... to the computer and USB upstream connector on the monitor. You can only use this label if you have connected the USB cable to contact Dell for technical support. Label 1 2 3 4 5 6 7 Description VESA mounting holes (100 mm) Regulatory rating label Security lock slot Barcode serial number label Stand release button USB downstream...
... to the computer and USB upstream connector on the monitor. You can only use this label if you have connected the USB cable to contact Dell for technical support. Label 1 2 3 4 5 6 7 Description VESA mounting holes (100 mm) Regulatory rating label Security lock slot Barcode serial number label Stand release button USB downstream...

Dell Users Guide
Page 14
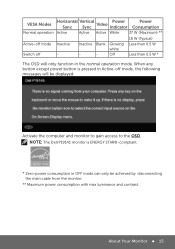
Once this cable is referred to as Power Save Mode. The following sections give you information about the various power management modes and pin assignments for the various connectors of this connector after you have connected the USB cable to the monitor and the computer. Monitor Specifications The following table shows the power consumption and signaling of your monitor. Power Management Modes If you can only use . This is connected, you have VESA's DPM compliance display card or software installed in your PC, the monitor automatically reduces its power consumption when ...
Once this cable is referred to as Power Save Mode. The following sections give you information about the various power management modes and pin assignments for the various connectors of this connector after you have connected the USB cable to the monitor and the computer. Monitor Specifications The following table shows the power consumption and signaling of your monitor. Power Management Modes If you can only use . This is connected, you have VESA's DPM compliance display card or software installed in your PC, the monitor automatically reduces its power consumption when ...
Dell Users Guide
Page 15
...®-compliant. * Zero-power consumption in OFF mode can only be displayed: Activate the computer and monitor to gain access to the OSD. NOTE: The Dell P1914S monitor is pressed in the normal operation mode. Inactive Blank Glowing white - - Horizontal Vertical Power Power VESA Modes Video Sync Sync Indicator Consumption Normal operation...
...®-compliant. * Zero-power consumption in OFF mode can only be displayed: Activate the computer and monitor to gain access to the OSD. NOTE: The Dell P1914S monitor is pressed in the normal operation mode. Inactive Blank Glowing white - - Horizontal Vertical Power Power VESA Modes Video Sync Sync Indicator Consumption Normal operation...
Dell Users Guide
Page 16
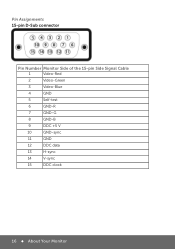
Pin Assignments 15-pin D-Sub connector Pin Number Monitor Side of the 15-pin Side Signal Cable 1 Video-Red 2 Video-Green 3 Video-Blue 4 GND 5 Self-test 6 GND-R 7 GND-G 8 GND-B 9 DDC +5 V 10 GND-sync 11 GND 12 DDC data 13 H-sync 14 V-sync 15 DDC clock 16 About Your Monitor
Pin Assignments 15-pin D-Sub connector Pin Number Monitor Side of the 15-pin Side Signal Cable 1 Video-Red 2 Video-Green 3 Video-Blue 4 GND 5 Self-test 6 GND-R 7 GND-G 8 GND-B 9 DDC +5 V 10 GND-sync 11 GND 12 DDC data 13 H-sync 14 V-sync 15 DDC clock 16 About Your Monitor
Dell Users Guide
Page 17
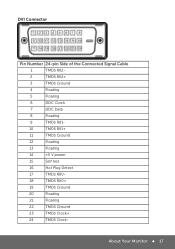
About Your Monitor 17 DVI Connector Pin Number 24-pin Side of the Connected Signal Cable 1 TMDS RX2 2 TMDS RX2+ 3 TMDS Ground 4 Floating 5 Floating 6 DDC Clock 7 DDC Data 8 Floating 9 TMDS RX1 10 TMDS RX1+ 11 TMDS Ground 12 Floating 13 Floating 14 +5 V power 15 Self test 16 Hot Plug Detect 17 TMDS RX0 18 TMDS RX0+ 19 TMDS Ground 20 Floating 21 Floating 22 TMDS Ground 23 TMDS Clock+ 24 TMDS Clock-
About Your Monitor 17 DVI Connector Pin Number 24-pin Side of the Connected Signal Cable 1 TMDS RX2 2 TMDS RX2+ 3 TMDS Ground 4 Floating 5 Floating 6 DDC Clock 7 DDC Data 8 Floating 9 TMDS RX1 10 TMDS RX1+ 11 TMDS Ground 12 Floating 13 Floating 14 +5 V power 15 Self test 16 Hot Plug Detect 17 TMDS RX0 18 TMDS RX0+ 19 TMDS Ground 20 Floating 21 Floating 22 TMDS Ground 23 TMDS Clock+ 24 TMDS Clock-
Dell Users Guide
Page 18
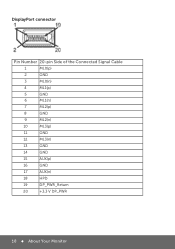
DisplayPort connector Pin Number 20-pin Side of the Connected Signal Cable 1 ML0(p) 2 GND 3 ML0(n) 4 ML1(p) 5 GND 6 ML1(n) 7 ML2(p) 8 GND 9 ML2(n) 10 ML3(p) 11 GND 12 ML3(n) 13 GND 14 GND 15 AUX(p) 16 GND 17 AUX(n) 18 HPD 19 DP_PWR_Return 20 +3.3 V DP_PWR 18 About Your Monitor
DisplayPort connector Pin Number 20-pin Side of the Connected Signal Cable 1 ML0(p) 2 GND 3 ML0(n) 4 ML1(p) 5 GND 6 ML1(n) 7 ML2(p) 8 GND 9 ML2(n) 10 ML3(p) 11 GND 12 ML3(n) 13 GND 14 GND 15 AUX(p) 16 GND 17 AUX(n) 18 HPD 19 DP_PWR_Return 20 +3.3 V DP_PWR 18 About Your Monitor

Dell Users Guide
Page 19
NOTE: This monitor supports High-Speed Certified USB 2.0 interface. Transfer Speed High speed Full speed Low speed 4-pin Side of the Connector 480 Mbps 12 Mbps 1.5 Mbps USB Upstream Connector Pin Number 1 2 3 4 Data Rate DMU VCC DPU GND USB Downstream Connector Pin Number 1 Data Rate VCC About Your Monitor 19 Universal Serial Bus (USB) Interface This section gives you information about the USB ports that are available on the monitor.
NOTE: This monitor supports High-Speed Certified USB 2.0 interface. Transfer Speed High speed Full speed Low speed 4-pin Side of the Connector 480 Mbps 12 Mbps 1.5 Mbps USB Upstream Connector Pin Number 1 2 3 4 Data Rate DMU VCC DPU GND USB Downstream Connector Pin Number 1 Data Rate VCC About Your Monitor 19 Universal Serial Bus (USB) Interface This section gives you information about the USB ports that are available on the monitor.