E-Family Re-Image Guide
Page 23
... XP 32 & 64 Bit only: o Creative Labs Integrated Webcam driver available on Dell's driver & downloads support web site (support.dell.com) under the "Input Device Drivers" section 2.6.22 Webcam - The Dell E-Family Webcam driver enables the built-in system digital camera. Dell recommends performing Microsoft Windows updates to ensure the latest security, reliability, and compatibility...
... XP 32 & 64 Bit only: o Creative Labs Integrated Webcam driver available on Dell's driver & downloads support web site (support.dell.com) under the "Input Device Drivers" section 2.6.22 Webcam - The Dell E-Family Webcam driver enables the built-in system digital camera. Dell recommends performing Microsoft Windows updates to ensure the latest security, reliability, and compatibility...

Setup and Quick Reference Guide
Page 7
Front View 12 3 25 24 23 22 21 20 19 18 1 camera and microphone (optional) 3 display 4 5 6 9 A 7 8 9 12 11 10 1514 13 16 17 2 display latch 4 keyboard status lights About Your Computer 7 About Your Computer NOTE: For more information about the features of your computer, see the Dell™ Technology Guide at support.dell.com.
Front View 12 3 25 24 23 22 21 20 19 18 1 camera and microphone (optional) 3 display 4 5 6 9 A 7 8 9 12 11 10 1514 13 16 17 2 display latch 4 keyboard status lights About Your Computer 7 About Your Computer NOTE: For more information about the features of your computer, see the Dell™ Technology Guide at support.dell.com.
Service Manual
Page 18
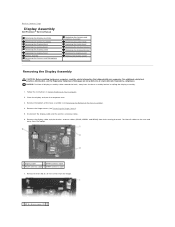
...and away from the base assembly before installing the display assembly. 1. NOTICE: Position all cables to Contents Page Display Assembly Dell Precision™ Service Manual Removing the Display Assembly Replacing the Display Assembly Removing the Display Bezel Replacing the Display Bezel Removing the ...Display Panel Replacing the Display Panel Display Inverter Removing the Camera and Microphone Assembly Replacing the Camera and Microphone Assembly Removing the Latch Hook Replacing the Latch Hook Removing the Display Bracket Replacing the...
...and away from the base assembly before installing the display assembly. 1. NOTICE: Position all cables to Contents Page Display Assembly Dell Precision™ Service Manual Removing the Display Assembly Replacing the Display Assembly Removing the Display Bezel Replacing the Display Bezel Removing the ...Display Panel Replacing the Display Panel Display Inverter Removing the Camera and Microphone Assembly Replacing the Camera and Microphone Assembly Removing the Latch Hook Replacing the Latch Hook Removing the Display Bracket Replacing the...

Service Manual
Page 24
... Display Assembly). For additional safety best practices information, see the Regulatory Compliance Homepage on www.dell.com at an angle and disconnect the camera/microphone cable. 1 display cover 2 camera microphone assembly 3 camera microphone cable 4 M2 x 3-mm screw (1) Replacing the Camera and Microphone Assembly CAUTION: Before working inside your computer, read the safety information that shipped...
... Display Assembly). For additional safety best practices information, see the Regulatory Compliance Homepage on www.dell.com at an angle and disconnect the camera/microphone cable. 1 display cover 2 camera microphone assembly 3 camera microphone cable 4 M2 x 3-mm screw (1) Replacing the Camera and Microphone Assembly CAUTION: Before working inside your computer, read the safety information that shipped...

Service Manual
Page 25
Removing the Latch Hook CAUTION: Before working inside your computer, read the safety information that secures the camera/microphone assembly to the display cover. 5. Remove the display bezel (see Replacing the Display Bezel). 5. Replacing the Display ...the M2 x 3-mm screw that shipped with your computer. For additional safety best practices information, see the Regulatory Compliance Homepage on www.dell.com at : www.dell.com/regulatory_compliance. 1. Replace the M2.5 x 5-mm screw. 4. Replacing the Latch Hook CAUTION: Before working inside your computer, read ...
Removing the Latch Hook CAUTION: Before working inside your computer, read the safety information that secures the camera/microphone assembly to the display cover. 5. Remove the display bezel (see Replacing the Display Bezel). 5. Replacing the Display ...the M2 x 3-mm screw that shipped with your computer. For additional safety best practices information, see the Regulatory Compliance Homepage on www.dell.com at : www.dell.com/regulatory_compliance. 1. Replace the M2.5 x 5-mm screw. 4. Replacing the Latch Hook CAUTION: Before working inside your computer, read ...

Service Manual
Page 26
...working inside your computer, read the safety information that shipped with your computer. Replace the display assembly (see Replacing the Camera and Microphone Assembly). 3. Position the display bracket on Your Computer 2. NOTICE: Position all display assembly cables toward the back... Before Working on the display panel. 2. For additional safety best practices information, see the Regulatory Compliance Homepage on www.dell.com at : www.dell.com/regulatory_compliance. Remove the display bezel (see Removing the Display Panel). 5. Remove the display panel (see Removing the...
...working inside your computer, read the safety information that shipped with your computer. Replace the display assembly (see Replacing the Camera and Microphone Assembly). 3. Position the display bracket on Your Computer 2. NOTICE: Position all display assembly cables toward the back... Before Working on the display panel. 2. For additional safety best practices information, see the Regulatory Compliance Homepage on www.dell.com at : www.dell.com/regulatory_compliance. Remove the display bezel (see Removing the Display Panel). 5. Remove the display panel (see Removing the...


