
Service Manual
Page 3
...Card Cover 34 4.5 MEMORY ...36 4.5.1 Removing a Memory Module ...36 4.6 HARD DRIVE ...37 4.6.1 Removing the Hard Drive ...37 4.7 MINI-CARD ...38 4.7.1 Removing the Mini-Card ...39 4.8 ...XT2 XFR FEATURES ...6 1.1 XT2 XFR USER MODES ...6 1.1.1 Notebook Mode...6 1.1.2 Tablet Mode ...7 1.2 XT2 XFR BUTTONS ...8 1.2.1 Tablet Buttons...8 1.2.2 Scroll Buttons ...8 1.3 XT2 XFR INTERFACE...9 1.3.1 Windows Vista/XP XT2 XFR Interface Comparison 9 1.3.2 Windows Vista...9 1.3.3 Windows XP...12 1.4 XT2 XFR SETTINGS ...13 1.4.1 Installation ...13 1.4.2 Windows™ XP vs. Dell™ Latitude™ XT2 XFR...
...Card Cover 34 4.5 MEMORY ...36 4.5.1 Removing a Memory Module ...36 4.6 HARD DRIVE ...37 4.6.1 Removing the Hard Drive ...37 4.7 MINI-CARD ...38 4.7.1 Removing the Mini-Card ...39 4.8 ...XT2 XFR FEATURES ...6 1.1 XT2 XFR USER MODES ...6 1.1.1 Notebook Mode...6 1.1.2 Tablet Mode ...7 1.2 XT2 XFR BUTTONS ...8 1.2.1 Tablet Buttons...8 1.2.2 Scroll Buttons ...8 1.3 XT2 XFR INTERFACE...9 1.3.1 Windows Vista/XP XT2 XFR Interface Comparison 9 1.3.2 Windows Vista...9 1.3.3 Windows XP...12 1.4 XT2 XFR SETTINGS ...13 1.4.1 Installation ...13 1.4.2 Windows™ XP vs. Dell™ Latitude™ XT2 XFR...

Service Manual
Page 24
...XT2 XFR turns off . Dell™ Latitude™ XT2 XFR Service Manual CAUTION: To guard against electrical shock, always unplug your XT2 XFR from the appropriate slots. 12. While you work, periodically touch an unpainted metal surface to turn them off. 2.4 After Working Inside Your XT2 XFR Page 24 of the XT2 XFR. Shut down your XT2 XFR. 1. Remove the hard drive (see Removing the Hard Drive... • Small plastic scribe • Flash BIOS update program CD 2.3 Turning Off Your XT2 XFR CAUTION: To avoid losing data, save and close all open files and exit all attached devices...
...XT2 XFR turns off . Dell™ Latitude™ XT2 XFR Service Manual CAUTION: To guard against electrical shock, always unplug your XT2 XFR from the appropriate slots. 12. While you work, periodically touch an unpainted metal surface to turn them off. 2.4 After Working Inside Your XT2 XFR Page 24 of the XT2 XFR. Shut down your XT2 XFR. 1. Remove the hard drive (see Removing the Hard Drive... • Small plastic scribe • Flash BIOS update program CD 2.3 Turning Off Your XT2 XFR CAUTION: To avoid losing data, save and close all open files and exit all attached devices...
Service Manual
Page 37
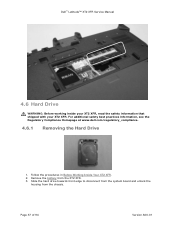
Dell™ Latitude™ XT2 XFR Service Manual 4.6 Hard Drive WARNING: Before working inside your XT2 XFR, read the safety information that shipped with your XT2 XFR. Follow the procedures in Before Working Inside Your XT2 XFR. 2. Remove the battery from the chassis. For additional safety best practices information, see the Regulatory Compliance Homepage at www.dell.com/regulatory_compliance. 4.6.1 Removing the Hard Drive 1. Page 37 of 94 Version A00-01 Slide the hard drive towards front edge to disconnect from the system board and unlock the housing from the XT2 XFR. 3.
Dell™ Latitude™ XT2 XFR Service Manual 4.6 Hard Drive WARNING: Before working inside your XT2 XFR, read the safety information that shipped with your XT2 XFR. Follow the procedures in Before Working Inside Your XT2 XFR. 2. Remove the battery from the chassis. For additional safety best practices information, see the Regulatory Compliance Homepage at www.dell.com/regulatory_compliance. 4.6.1 Removing the Hard Drive 1. Page 37 of 94 Version A00-01 Slide the hard drive towards front edge to disconnect from the system board and unlock the housing from the XT2 XFR. 3.

Service Manual
Page 38
Lift the handle to remove the hard drive from the XT2 XFR. For additional safety best practices information, see the Regulatory Compliance Homepage at www.dell.com/regulatory_compliance. Handle 4.7 Mini-Card WARNING: Before working inside your XT2 XFR, read the safety information that shipped with your XT2 XFR. Dell™ Latitude™ XT2 XFR Service Manual 4. Page 38 of 94 Version A00-01
Lift the handle to remove the hard drive from the XT2 XFR. For additional safety best practices information, see the Regulatory Compliance Homepage at www.dell.com/regulatory_compliance. Handle 4.7 Mini-Card WARNING: Before working inside your XT2 XFR, read the safety information that shipped with your XT2 XFR. Dell™ Latitude™ XT2 XFR Service Manual 4. Page 38 of 94 Version A00-01

Service Manual
Page 43
... Inside Your XT2 XFR. 2. Remove two cable clamp to the front and rear mounting plate screws. For additional safety best practices information, see the Regulatory Compliance Homepage at www.dell.com/regulatory_compliance. 4.9.1 Removing the Palm Rest 1. Remove the hard drive before continuing....the XT2 XFR. 6. Remove the memory and mini-card cover before continuing. 4. Remove the battery before continuing. 3. Dell™ Latitude™ XT2 XFR Service Manual 4.9 Palm Rest WARNING: Before working inside your XT2 XFR, read the safety information that shipped with your XT2 XFR. Disconnect...
... Inside Your XT2 XFR. 2. Remove two cable clamp to the front and rear mounting plate screws. For additional safety best practices information, see the Regulatory Compliance Homepage at www.dell.com/regulatory_compliance. 4.9.1 Removing the Palm Rest 1. Remove the hard drive before continuing....the XT2 XFR. 6. Remove the memory and mini-card cover before continuing. 4. Remove the battery before continuing. 3. Dell™ Latitude™ XT2 XFR Service Manual 4.9 Palm Rest WARNING: Before working inside your XT2 XFR, read the safety information that shipped with your XT2 XFR. Disconnect...

Service Manual
Page 48
... Compliance Homepage at www.dell.com/regulatory_compliance. 4.10.1 Removing the Coin-Cell Battery 1. Install the hard drive. (See hard drive chapter for reference) 4.10 Coin-Cell Battery WARNING: Before working inside your XT2 XFR, read the safety information that shipped with your XT2 XFR. Install the battery. ...for reference) 14. Disconnect the coin-cell battery from the system board and remove from the XT2 XFR Page 48 of 94 Version A00-01 Dell™ Latitude™ XT2 XFR Service Manual 13. Install the mini-card and memory door. (See memory cover chapter for reference...
... Compliance Homepage at www.dell.com/regulatory_compliance. 4.10.1 Removing the Coin-Cell Battery 1. Install the hard drive. (See hard drive chapter for reference) 4.10 Coin-Cell Battery WARNING: Before working inside your XT2 XFR, read the safety information that shipped with your XT2 XFR. Install the battery. ...for reference) 14. Disconnect the coin-cell battery from the system board and remove from the XT2 XFR Page 48 of 94 Version A00-01 Dell™ Latitude™ XT2 XFR Service Manual 13. Install the mini-card and memory door. (See memory cover chapter for reference...
Service Manual
Page 73
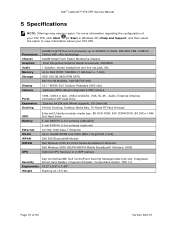
...RW, 2nd Hard Drive 4-cell 28W/Hr Li-Ion primary (standard) 6-cell 42W/Hr Li-Ion primary (optional) 10/100/1000 base-T Ethernet Up to view information about your XT2 XFR. For more information regarding the configuration of your XT2 XFR, click Start...Dell Wireless 5530 HSUPA/HSDPA Mobile Broadband1 Minicard, GOBI Optional GPS Receiver or 2.0MP Camera Security Ergonomics Weight Dell ControlVault®, Dell ControlPoint Security ManagerCable lock slot, Integrated Smart Card Reader, Fingerprint Reader, Computrace Option, TPM 1.2 12.2" x 9.6" x 1.49" Starting at Dell™ Latitude™ XT2 XFR...
...RW, 2nd Hard Drive 4-cell 28W/Hr Li-Ion primary (standard) 6-cell 42W/Hr Li-Ion primary (optional) 10/100/1000 base-T Ethernet Up to view information about your XT2 XFR. For more information regarding the configuration of your XT2 XFR, click Start...Dell Wireless 5530 HSUPA/HSDPA Mobile Broadband1 Minicard, GOBI Optional GPS Receiver or 2.0MP Camera Security Ergonomics Weight Dell ControlVault®, Dell ControlPoint Security ManagerCable lock slot, Integrated Smart Card Reader, Fingerprint Reader, Computrace Option, TPM 1.2 12.2" x 9.6" x 1.49" Starting at Dell™ Latitude™ XT2 XFR...

Service Manual
Page 74
...you can select Diagnostics from the one-time boot menu at support.dell.com. Press any questions that the device you want to a docking device (docked), undock it. Dell™ Latitude™ XT2 XFR Service Manual 6 Dell Diagnostics CAUTION: Before you begin any of the procedures in this ... electrical outlet that came with your computer does not display a screen image, contact Dell Support. 1. Start the Dell Diagnostics from your hard drive or from the diagnostics utility partition on your hard drive. NOTE: The Drivers and Utilities media is connected to test is active. Press and...
...you can select Diagnostics from the one-time boot menu at support.dell.com. Press any questions that the device you want to a docking device (docked), undock it. Dell™ Latitude™ XT2 XFR Service Manual 6 Dell Diagnostics CAUTION: Before you begin any of the procedures in this ... electrical outlet that came with your computer does not display a screen image, contact Dell Support. 1. Start the Dell Diagnostics from your hard drive or from the diagnostics utility partition on your hard drive. NOTE: The Drivers and Utilities media is connected to test is active. Press and...

Service Manual
Page 79
... Continue; otherwise, contact your computer or at support.dell.com. Optical Drive Problems NOTE: High-speed optical drive vibration is normal and may appear. Dell™ Latitude™ XT2 XFR Service Manual TEST THE DRIVE - • Insert another disc to eliminate the ...dell.com. ADJUST THE WINDOWS VOLUME CONTROL - • Click the speaker icon in all programs before you are checked. Click Start and click My Computer. 2. Click Properties→ Tools→ Check Now. 4. See Sound and Speaker Problems. Problems writing to continue the desired action. 4. Hard Drive...
... Continue; otherwise, contact your computer or at support.dell.com. Optical Drive Problems NOTE: High-speed optical drive vibration is normal and may appear. Dell™ Latitude™ XT2 XFR Service Manual TEST THE DRIVE - • Insert another disc to eliminate the ...dell.com. ADJUST THE WINDOWS VOLUME CONTROL - • Click the speaker icon in all programs before you are checked. Click Start and click My Computer. 2. Click Properties→ Tools→ Check Now. 4. See Sound and Speaker Problems. Problems writing to continue the desired action. 4. Hard Drive...

Service Manual
Page 81
...your computer. A Solid Blue Screen Appears TURN THE COMPUTER OFF - BACK UP YOUR FILES IMMEDIATELY USE A VIRUS-SCANNING PROGRAM TO CHECK THE HARD DRIVE, FLOPPY DISKS, CDS, OR DVDS SAVE AND CLOSE ANY OPEN FILES OR PROGRAMS AND SHUT DOWN YOUR COMPUTER THROUGH THE START MENU 6.2.5 Memory... and hold the power button for an Earlier Windows Operating System RUN THE PROGRAM COMPATIBILITY WIZARD - Page 81 of Windows. 2. Dell™ Latitude™ XT2 XFR Service Manual A Program Crashes Repeatedly NOTE: Most software includes installation instructions in this version of 94 Version A00-01
...your computer. A Solid Blue Screen Appears TURN THE COMPUTER OFF - BACK UP YOUR FILES IMMEDIATELY USE A VIRUS-SCANNING PROGRAM TO CHECK THE HARD DRIVE, FLOPPY DISKS, CDS, OR DVDS SAVE AND CLOSE ANY OPEN FILES OR PROGRAMS AND SHUT DOWN YOUR COMPUTER THROUGH THE START MENU 6.2.5 Memory... and hold the power button for an Earlier Windows Operating System RUN THE PROGRAM COMPATIBILITY WIZARD - Page 81 of Windows. 2. Dell™ Latitude™ XT2 XFR Service Manual A Program Crashes Repeatedly NOTE: Most software includes installation instructions in this version of 94 Version A00-01

Service Manual
Page 92
... board. Try the other slot with just the hard drive and just the optical drive. 3. Replace the system board. Reseat the device. 2. Replace the system board. Storage device error 1. Replace the device that is detected but has errors 1. Replace the system board. Dell™ Latitude™ XT2 XFR Service Manual ON-FLASH-ON OFF-FLASH-FLASH FLASH...
... board. Try the other slot with just the hard drive and just the optical drive. 3. Replace the system board. Reseat the device. 2. Replace the system board. Storage device error 1. Replace the device that is detected but has errors 1. Replace the system board. Dell™ Latitude™ XT2 XFR Service Manual ON-FLASH-ON OFF-FLASH-FLASH FLASH...

Service Manual
Page 94
... (start-up) configuration • Basic device configuration settings • System security and hard drive password setting Page 94 of the screen displays help information for your XT2 XFR) appear less bright. System setup key functions are listed at the left. Dell™ Latitude™ XT2 XFR Service Manual Press to view and/or change settings that option. The...
... (start-up) configuration • Basic device configuration settings • System security and hard drive password setting Page 94 of the screen displays help information for your XT2 XFR) appear less bright. System setup key functions are listed at the left. Dell™ Latitude™ XT2 XFR Service Manual Press to view and/or change settings that option. The...

Setup and Features Information
Page 4
... equipment is restricted to a Port Replicator for connectivity to indoor use in Mobile Satellite systems' channels. Dell™ Latitude™ XT2 XFR Setup and Features Information Bottom View 4 1 2 5 3 6 1 Memory access 2 Wireless access 3 Battery & HDD locking latches 4 Docking connector 5 Hard disk drive access 6 Battery access CAUTION: Risk of the 5.25-5.35GHz and 5.65-5.85GHz bands. CAUTION: This...
... equipment is restricted to a Port Replicator for connectivity to indoor use in Mobile Satellite systems' channels. Dell™ Latitude™ XT2 XFR Setup and Features Information Bottom View 4 1 2 5 3 6 1 Memory access 2 Wireless access 3 Battery & HDD locking latches 4 Docking connector 5 Hard disk drive access 6 Battery access CAUTION: Risk of the 5.25-5.35GHz and 5.65-5.85GHz bands. CAUTION: This...

Setup and Features Information
Page 11
Hard Disk Drive (HDD) Remove a HDD 1. Page 11 Turn the computer upside down into their flat positions. Remove the battery as shown below. Ensure that the computer is turned off. 2. Locate the HDD in the battery compartment as discussed in the Battery section above. 4. Push the battery locking latches down , and place on a flat surface. 3. Dell™ Latitude™ XT2 XFR Setup and Features Information 4.
Hard Disk Drive (HDD) Remove a HDD 1. Page 11 Turn the computer upside down into their flat positions. Remove the battery as shown below. Ensure that the computer is turned off. 2. Locate the HDD in the battery compartment as discussed in the Battery section above. 4. Push the battery locking latches down , and place on a flat surface. 3. Dell™ Latitude™ XT2 XFR Setup and Features Information 4.

Setup and Features Information
Page 23
.../DVD, 8X DVD+/-RW, 2nd Hard Drive 4-cell 28W/Hr Li-Ion primary (standard) 6-cell 42W/Hr Li-Ion primary (optional) 9-cell 45W/Hr Li-Ion High Capacity Battery Slice (optional) Ethernet WLAN 10/100/1000 base-T Ethernet Up to view information about your computer. Dell™ Latitude™ XT2 XFR Setup and Features Information Specifications...
.../DVD, 8X DVD+/-RW, 2nd Hard Drive 4-cell 28W/Hr Li-Ion primary (standard) 6-cell 42W/Hr Li-Ion primary (optional) 9-cell 45W/Hr Li-Ion High Capacity Battery Slice (optional) Ethernet WLAN 10/100/1000 base-T Ethernet Up to view information about your computer. Dell™ Latitude™ XT2 XFR Setup and Features Information Specifications...


