
AMD Service Manual
Page 13
... gently pry the coin-cell battery out of the battery socket on the system board. 1 hard-drive cable 2 status light board connector cable connector 7. Back to Contents Page Coin-Cell Battery Dell™ Inspiron™ M301Z/N301Z Service Manual Removing the Coin-Cell Battery Replacing the Coin-Cell Battery WARNING: Before working inside your computer, read...
... gently pry the coin-cell battery out of the battery socket on the system board. 1 hard-drive cable 2 status light board connector cable connector 7. Back to Contents Page Coin-Cell Battery Dell™ Inspiron™ M301Z/N301Z Service Manual Removing the Coin-Cell Battery Replacing the Coin-Cell Battery WARNING: Before working inside your computer, read...
AMD Service Manual
Page 27
... packaging (see Removing the Battery). 3. CAUTION: When the hard drive is not covered by periodically touching an unpainted metal surface (such as a connector on the system board. Back to Contents Page Hard Drive Assembly Dell™ Inspiron™ M301Z/N301Z Service Manual Removing the Hard Drive Assembly Replacing the Hard Drive Assembly WARNING: Before working inside your computer (see Removing the Battery) before removing the hard drive.
... packaging (see Removing the Battery). 3. CAUTION: When the hard drive is not covered by periodically touching an unpainted metal surface (such as a connector on the system board. Back to Contents Page Hard Drive Assembly Dell™ Inspiron™ M301Z/N301Z Service Manual Removing the Hard Drive Assembly Replacing the Hard Drive Assembly WARNING: Before working inside your computer (see Removing the Battery) before removing the hard drive.

AMD Service Manual
Page 28
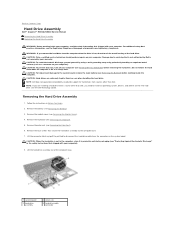
...utilities for storing or shipping the hard drive. 3. Remove the four screws that secure the hard-drive assembly to the hard drive. 10. Place the hard drive in Before You Begin. 2. Back to secure the hard-drive cable. 8. Save the original ...hard drive from the hard drive. 1 screws (4) 3 hard-drive bracket 2 interposer 4 hard drive Replacing the Hard Drive Assembly 1. Replace the four screws that secure the hard-drive bracket to the computer base. 9. CAUTION: Before turning on the latch to Contents Page Pull the interposer to the computer. 13. For more information, see the Dell...
...utilities for storing or shipping the hard drive. 3. Remove the four screws that secure the hard-drive assembly to the hard drive. 10. Place the hard drive in Before You Begin. 2. Back to secure the hard-drive cable. 8. Save the original ...hard drive from the hard drive. 1 screws (4) 3 hard-drive bracket 2 interposer 4 hard drive Replacing the Hard Drive Assembly 1. Replace the four screws that secure the hard-drive bracket to the computer base. 9. CAUTION: Before turning on the latch to Contents Page Pull the interposer to the computer. 13. For more information, see the Dell...
AMD Service Manual
Page 46
... cable from their connectors on the system board. 9. drive cable and the status light board cable from the connector on the system board. 7. Remove the two screws that secure the speaker to disconnect the hard- Back to Contents Page Speaker Dell™ Inspiron™ M301Z/N301Z Service Manual Removing the Speaker Replacing the Speaker WARNING: Before working...
... cable from their connectors on the system board. 9. drive cable and the status light board cable from the connector on the system board. 7. Remove the two screws that secure the speaker to disconnect the hard- Back to Contents Page Speaker Dell™ Inspiron™ M301Z/N301Z Service Manual Removing the Speaker Replacing the Speaker WARNING: Before working...

AMD Service Manual
Page 47
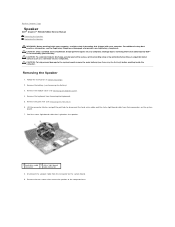
... the Speaker 1. Press the adhesive side of the speaker cable and remove the speaker from the computer base. Replace the module cover (see Replacing the Palm Rest). 8. Back to the computer. Press down on the system board. Slide the hard-drive cable and the status light board cable into their connectors on the...
... the Speaker 1. Press the adhesive side of the speaker cable and remove the speaker from the computer base. Replace the module cover (see Replacing the Palm Rest). 8. Back to the computer. Press down on the system board. Slide the hard-drive cable and the status light board cable into their connectors on the...

AMD Service Manual
Page 48
... System Board Dell™ Inspiron™ M301Z/N301Z Service Manual Removing the System Board Replacing the System Board Entering the Service Tag in the BIOS WARNING: Before working inside your computer, read the safety information that shipped with your warranty. Follow the instructions in "Removing the Hard Drive Assembly". 8. Remove the battery (see Removing the Module Cover). 4. Remove the module...
... System Board Dell™ Inspiron™ M301Z/N301Z Service Manual Removing the System Board Replacing the System Board Entering the Service Tag in the BIOS WARNING: Before working inside your computer, read the safety information that shipped with your warranty. Follow the instructions in "Removing the Hard Drive Assembly". 8. Remove the battery (see Removing the Module Cover). 4. Remove the module...

AMD Service Manual
Page 49
14. Lift the left hinge-bracket off the computer base. 1 left hinge-bracket 2 screw 15. Disconnect the coin-cell battery cable, speaker cable, status light board cable, and the AC adapter connector cable from their respective connectors on the system board. 1 AC adapter cable connector 2 coin-cell battery cable connector 3 status light board cable 4 hard-drive cable connector connector 5 speaker cable connector 16. Remove the four screws that secure the system board to the computer base.
14. Lift the left hinge-bracket off the computer base. 1 left hinge-bracket 2 screw 15. Disconnect the coin-cell battery cable, speaker cable, status light board cable, and the AC adapter connector cable from their respective connectors on the system board. 1 AC adapter cable connector 2 coin-cell battery cable connector 3 status light board cable 4 hard-drive cable connector connector 5 speaker cable connector 16. Remove the four screws that secure the system board to the computer base.

AMD Service Manual
Page 50
...the system board out of the replacement system board. 22. Replace the keyboard (see Replacing the Processor Heat Sink Assembly). 3. Replace the memory module(s) (see Removing the Mini-Card(s)). 20. 1 screws (4) 2 system board 17. Carefully ease the connectors on the computer, replace all screws and ensure that secure the ... the left hinge-bracket on the computer. bracket to the computer base. 7. Replace the battery (see Entering the Service Tag in Replacing the Hard Drive Assembly. 13. Turn on the computer base. 9. Enter the service tag (see Replacing the Battery).
...the system board out of the replacement system board. 22. Replace the keyboard (see Replacing the Processor Heat Sink Assembly). 3. Replace the memory module(s) (see Removing the Mini-Card(s)). 20. 1 screws (4) 2 system board 17. Carefully ease the connectors on the computer, replace all screws and ensure that secure the ... the left hinge-bracket on the computer. bracket to the computer base. 7. Replace the battery (see Entering the Service Tag in Replacing the Hard Drive Assembly. 13. Turn on the computer base. 9. Enter the service tag (see Replacing the Battery).

AMD Setup Guide
Page 62
... Your Operating System Dell DataSafe Local Backup CAUTION: Using Dell DataSafe Local Backup permanently removes any newly added internal hardware. CAUTION: Although Dell Datasafe Local Backup is designed to preserve the data files on page 63) to restore your operating system. 60 You can use Dell DataSafe Local Backup to restore your hard drive to the operating...
... Your Operating System Dell DataSafe Local Backup CAUTION: Using Dell DataSafe Local Backup permanently removes any newly added internal hardware. CAUTION: Although Dell Datasafe Local Backup is designed to preserve the data files on page 63) to restore your operating system. 60 You can use Dell DataSafe Local Backup to restore your hard drive to the operating...
AMD Setup Guide
Page 65
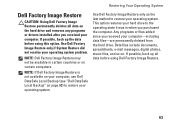
... operating system problem. If possible, back up the data before using this option. Use Dell Factory Image Restore only as the last method to the operating state it was in certain countries or on the hard drive and removes any programs or drivers installed after you received your computer-including data files-are permanently...
... operating system problem. If possible, back up the data before using this option. Use Dell Factory Image Restore only as the last method to the operating state it was in certain countries or on the hard drive and removes any programs or drivers installed after you received your computer-including data files-are permanently...
AMD Setup Guide
Page 71
... any error messages reported by the Dell Diagnostics (see "Dell Diagnostics" on page 53). 4. Returning Items for Repair Under Warranty or for Credit Prepare all confidential, proprietary and personal information, as well as removable media, such as follows: NOTE: Before you have run and any data on the hard drive(s) and on the outside of...
... any error messages reported by the Dell Diagnostics (see "Dell Diagnostics" on page 53). 4. Returning Items for Repair Under Warranty or for Credit Prepare all confidential, proprietary and personal information, as well as removable media, such as follows: NOTE: Before you have run and any data on the hard drive(s) and on the outside of...


