Setup Guide
Page 4
... of Intel Corporation in this document is a trademark of data and tells you make better use of Dell Inc. Trademarks used by Dell under license; Microsoft, Windows, and the Windows start button logo are trademarks of Microsoft Corporation in this text: Dell, the DELL logo, Inspiron, Solution Station, and DellConnect are either trademarks or registered trademarks of...
... of Intel Corporation in this document is a trademark of data and tells you make better use of Dell Inc. Trademarks used by Dell under license; Microsoft, Windows, and the Windows start button logo are trademarks of Microsoft Corporation in this text: Dell, the DELL logo, Inspiron, Solution Station, and DellConnect are either trademarks or registered trademarks of...
Setup Guide
Page 5
...Setting Up Your Computer 5 Connect the AC Adapter 6 Press the Power Button 7 Set Up Microsoft Windows 8 Create System Recovery Media (Recommended 9 Install the SIM Card (Optional 10 Enable or Disable Wireless...Internet (Optional 17 User Interface Modes 19 Set Up the Tablet Mode 20 Using Your Inspiron Laptop 22 Right View Features 22 Left View Features 24 Status Lights and Indicators 26 ...Multimedia Control Keys 32 Display Features 34 Using the Touch Screen 36 Software Features 40 Dell DataSafe Online Backup 41 Free Fall Sensor 41 Solving Problems 42 Beep Codes 42 Touch...
...Setting Up Your Computer 5 Connect the AC Adapter 6 Press the Power Button 7 Set Up Microsoft Windows 8 Create System Recovery Media (Recommended 9 Install the SIM Card (Optional 10 Enable or Disable Wireless...Internet (Optional 17 User Interface Modes 19 Set Up the Tablet Mode 20 Using Your Inspiron Laptop 22 Right View Features 22 Left View Features 24 Status Lights and Indicators 26 ...Multimedia Control Keys 32 Display Features 34 Using the Touch Screen 36 Software Features 40 Dell DataSafe Online Backup 41 Free Fall Sensor 41 Solving Problems 42 Beep Codes 42 Touch...
Setup Guide
Page 10
...not interrupt the operating system's setup process. These steps are mandatory and may render your computer available at support.dell.com. Setting Up Your Laptop Set Up Microsoft Windows To set up an Internet connection. NOTE: For optimal performance of your computer, it is recommended that you ...through several procedures including accepting license agreements, setting preferences, and setting up Microsoft® Windows® for your computer unusable and you will take some time to complete. NOTE: For more information on the screen. The...
...not interrupt the operating system's setup process. These steps are mandatory and may render your computer available at support.dell.com. Setting Up Your Laptop Set Up Microsoft Windows To set up an Internet connection. NOTE: For optimal performance of your computer, it is recommended that you ...through several procedures including accepting license agreements, setting preferences, and setting up Microsoft® Windows® for your computer unusable and you will take some time to complete. NOTE: For more information on the screen. The...
Setup Guide
Page 11
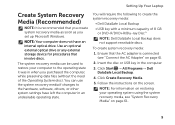
...settings have an internal optical drive. Follow the instructions on page 61. 9 Insert the disc or USB key in when you set up Microsoft Windows. You can be used to restore your operating system using the system recovery media, see "Connect the AC Adapter" on page 6). 2. NOTE:... your computer to the operating state it was in the computer. 3. Click Create Recovery Media. 5. Click Start → All Programs→ Dell DataSafe Local Backup. 4. Use an optional external optical drive or any external storage device for procedures that the AC adapter is recommended that you ...
...settings have an internal optical drive. Follow the instructions on page 61. 9 Insert the disc or USB key in when you set up Microsoft Windows. You can be used to restore your operating system using the system recovery media, see "Connect the AC Adapter" on page 6). 2. NOTE:... your computer to the operating state it was in the computer. 3. Click Create Recovery Media. 5. Click Start → All Programs→ Dell DataSafe Local Backup. 4. Use an optional external optical drive or any external storage device for procedures that the AC adapter is recommended that you ...

Setup Guide
Page 20
To set up a new connection or network→ Connect to the Internet window appears. Click Start → Control Panel. 3. Follow the instructions on the screen and use the setup information provided by country. Contact your ISP for offerings ...
To set up a new connection or network→ Connect to the Internet window appears. Click Start → Control Panel. 3. Follow the instructions on the screen and use the setup information provided by country. Contact your ISP for offerings ...
Setup Guide
Page 21
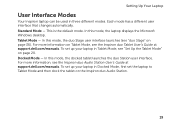
..., first set up your laptop in Tablet Mode, see the Inspiron duo Tablet User's Guide at support.dell.com/manuals. Standard Mode - Tablet Mode - To set the laptop to Tablet Mode and then dock the tablet on the Inspiron duo Audio Station. 19 Docked Mode - This is the default mode.... For more information, see "duo Stage" on page 20. For more information on Tablet Mode, see "Set Up the Tablet Mode" on page 36). In this mode, the laptop displays the Microsoft Windows desktop. Setting...
..., first set up your laptop in Tablet Mode, see the Inspiron duo Tablet User's Guide at support.dell.com/manuals. Standard Mode - Tablet Mode - To set the laptop to Tablet Mode and then dock the tablet on the Inspiron duo Audio Station. 19 Docked Mode - This is the default mode.... For more information, see "duo Stage" on page 20. For more information on Tablet Mode, see "Set Up the Tablet Mode" on page 36). In this mode, the laptop displays the Microsoft Windows desktop. Setting...
Setup Guide
Page 32
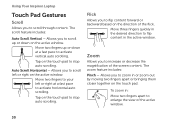
.... Move three fingers quickly in the desired direction to flip content in : Move two fingers apart to enlarge the view of the active window. 30 Auto Scroll Horizontal - Flick Allows you to zoom in or zoom out by moving two fingers apart or bringing them closer together... auto scrolling. Tap on the active window. To zoom in the active window. Move two fingers up or down at a fast pace to activate horizontal auto scrolling. The zoom feature includes: Pinch - The scroll feature includes: Auto Scroll Vertical - Using Your Inspiron Laptop Touch Pad Gestures Scroll Allows you...
.... Move three fingers quickly in the desired direction to flip content in : Move two fingers apart to enlarge the view of the active window. 30 Auto Scroll Horizontal - Flick Allows you to zoom in or zoom out by moving two fingers apart or bringing them closer together... auto scrolling. Tap on the active window. To zoom in the active window. Move two fingers up or down at a fast pace to activate horizontal auto scrolling. The zoom feature includes: Pinch - The scroll feature includes: Auto Scroll Vertical - Using Your Inspiron Laptop Touch Pad Gestures Scroll Allows you...
Setup Guide
Page 33
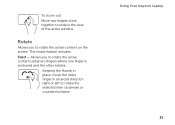
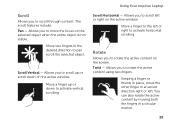
Keeping the thumb in place, move the index finger in an arced direction right or left to reduce the view of the active window. The rotate feature includes: Twist - Using Your Inspiron Laptop 31 Allows you to rotate the active content using two fingers where one finger is anchored and the other rotates. To zoom out: Move two fingers close together to rotate the selected item clockwise or counterclockwise. Rotate Allows you to rotate the active content on the screen.
Keeping the thumb in place, move the index finger in an arced direction right or left to reduce the view of the active window. The rotate feature includes: Twist - Using Your Inspiron Laptop 31 Allows you to rotate the active content using two fingers where one finger is anchored and the other rotates. To zoom out: Move two fingers close together to rotate the selected item clockwise or counterclockwise. Rotate Allows you to rotate the active content on the screen.
Setup Guide
Page 34
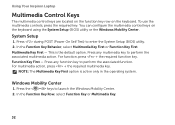
...the multimedia control keys on the keyboard. Multimedia Key First - NOTE: The Multimedia Key First option is the default option. Using Your Inspiron Laptop Multimedia Control Keys The multimedia control keys are located on the function key row on the keyboard using the System Setup (BIOS) ...utility or the Windows Mobility Center. System Setup 1. Press the < > keys to enter the System Setup (BIOS) utility. 2. Press any multimedia key to perform ...
...the multimedia control keys on the keyboard. Multimedia Key First - NOTE: The Multimedia Key First option is the default option. Using Your Inspiron Laptop Multimedia Control Keys The multimedia control keys are located on the function key row on the keyboard using the System Setup (BIOS) ...utility or the Windows Mobility Center. System Setup 1. Press the < > keys to enter the System Setup (BIOS) utility. 2. Press any multimedia key to perform ...
Setup Guide
Page 38
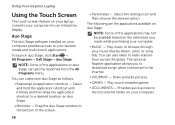
... • Games - Using Your Inspiron Laptop Using the Touch Screen The touch screen feature on your laptop converts your computer. • Music - To launch duo Stage, click Start → All Programs→ Dell Stage→ duo Stage. You can customize duo Stage as follows: • Rearrange... Documents folder on duo Stage. • Minimize - Play music or browse through your favorite media and multi-touch applications. Play touch-enabled games. • Documents - Provides quick access to your music files by album, artist, or song title. Drag the duo Stage window to the Internet...
... • Games - Using Your Inspiron Laptop Using the Touch Screen The touch screen feature on your laptop converts your computer. • Music - To launch duo Stage, click Start → All Programs→ Dell Stage→ duo Stage. You can customize duo Stage as follows: • Rearrange... Documents folder on duo Stage. • Minimize - Play music or browse through your favorite media and multi-touch applications. Play touch-enabled games. • Documents - Provides quick access to your music files by album, artist, or song title. Drag the duo Stage window to the Internet...
Setup Guide
Page 40
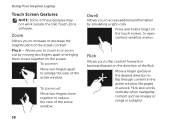
...to access additional information by moving two fingers apart or bringing them closer together on the touch screen, to flip through content in the active window like pages in a book. Flick also works vertically when navigating content such as images or songs in : Move two fingers apart to ...increase or decrease the magnification of the active window. Using Your Inspiron Laptop Touch Screen Gestures NOTE: Some of these gestures may not work outside the Dell Touch Zone software. Pinch - Dwell Allows you to enlarge the view of the flick.
...to access additional information by moving two fingers apart or bringing them closer together on the touch screen, to flip through content in the active window like pages in a book. Flick also works vertically when navigating content such as images or songs in : Move two fingers apart to ...increase or decrease the magnification of the active window. Using Your Inspiron Laptop Touch Screen Gestures NOTE: Some of these gestures may not work outside the Dell Touch Zone software. Pinch - Dwell Allows you to enlarge the view of the flick.
Setup Guide
Page 41
... to activate horizontal scrolling. Move a finger to the left or right to pan scroll the selected object. Using Your Inspiron Laptop Scroll Allows you to scroll left or right on the active window. Scroll Horizontal - Rotate Allows you to rotate the active content on the selected object when the entire object is... focus on the screen. Allows you to activate vertical scrolling. The scroll features include: Pan - Allows you to scroll up or down on the active window. Scroll Vertical - Move two fingers in a circular motion. 39
... to activate horizontal scrolling. Move a finger to the left or right to pan scroll the selected object. Using Your Inspiron Laptop Scroll Allows you to scroll left or right on the active window. Scroll Horizontal - Rotate Allows you to rotate the active content on the selected object when the entire object is... focus on the screen. Allows you to activate vertical scrolling. The scroll features include: Pan - Allows you to scroll up or down on the active window. Scroll Vertical - Move two fingers in a circular motion. 39

Setup Guide
Page 43
...the hard drive is placed in the notification area of 800 G. 41 Using Your Inspiron Laptop Dell DataSafe Online Backup NOTE: Dell DataSafe Online is supported only on your computer using a password‑protected account. Double-click the Dell DataSafe Online icon in a safe state as soon as possible to protect against damage ...instructions on the screen. NOTE: The hard disk is recommended for fast upload/download speeds. Typically, the hard drive can access the service on Windows operating systems. NOTE: A broadband connection is still limited by accidentally dropping the computer.
...the hard drive is placed in the notification area of 800 G. 41 Using Your Inspiron Laptop Dell DataSafe Online Backup NOTE: Dell DataSafe Online is supported only on your computer using a password‑protected account. Double-click the Dell DataSafe Online icon in a safe state as soon as possible to protect against damage ...instructions on the screen. NOTE: The hard disk is recommended for fast upload/download speeds. Typically, the hard drive can access the service on Windows operating systems. NOTE: A broadband connection is still limited by accidentally dropping the computer.

Setup Guide
Page 45
... the screen) and wipe the surface and sides of your finger as sticky notes) that are blocking the touch sensors. c. In the Pen and Touch window, select the Touch tab and ensure that Use your desktop. If you may not be disabled. Turn off the computer. CAUTION: Do not use water...
... the screen) and wipe the surface and sides of your finger as sticky notes) that are blocking the touch sensors. c. In the Pen and Touch window, select the Touch tab and ensure that Use your desktop. If you may not be disabled. Turn off the computer. CAUTION: Do not use water...
Setup Guide
Page 49
... external storage device for procedures that it runs in its documentation or on the touch pad, press the power button for an earlier Microsoft® Windows® operating system - The Program Compatibility Wizard configures a program so that involve discs. If a program is designed for at least 8 to perform an operating ... instructions in an environment similar to get a response by pressing a key on your computer. If you are unable to an earlier version of Microsoft Windows operating system. 47 Run the Program Compatibility Wizard. If a program crashes repeatedly -
... external storage device for procedures that it runs in its documentation or on the touch pad, press the power button for an earlier Microsoft® Windows® operating system - The Program Compatibility Wizard configures a program so that involve discs. If a program is designed for at least 8 to perform an operating ... instructions in an environment similar to get a response by pressing a key on your computer. If you are unable to an earlier version of Microsoft Windows operating system. 47 Run the Program Compatibility Wizard. If a program crashes repeatedly -

Setup Guide
Page 50
... do not conflict with the operating system installed on the screen. See the software documentation for previous versions of Windows. 2. Solving Problems To run the software. Write down your computer meets the minimum hardware requirements needed to help in troubleshooting when... contacting Dell. 48 Ensure that the program is installed and configured properly. -- Ensure that your computer through the Start menu. •...
... do not conflict with the operating system installed on the screen. See the software documentation for previous versions of Windows. 2. Solving Problems To run the software. Write down your computer meets the minimum hardware requirements needed to help in troubleshooting when... contacting Dell. 48 Ensure that the program is installed and configured properly. -- Ensure that your computer through the Start menu. •...
Setup Guide
Page 54
... been found with this system so far. Turn on your hard drive. When the DELL™ logo appears, press immediately. b. This will start running tests. Do you want to run Dell Diagnostics from the boot menu and press . Select Diagnostics from the Drivers and Utilities ...a message stating that is invoked: a. If PSA is known to wait until you see the Microsoft® Windows® desktop; Using Support Tools Starting Dell Diagnostics From Your Hard Drive Dell Diagnostics is located on a hidden diagnostic utility partition on (or restart) your computer. 3. If the PSA ...
... been found with this system so far. Turn on your hard drive. When the DELL™ logo appears, press immediately. b. This will start running tests. Do you want to run Dell Diagnostics from the boot menu and press . Select Diagnostics from the Drivers and Utilities ...a message stating that is invoked: a. If PSA is known to wait until you see the Microsoft® Windows® desktop; Using Support Tools Starting Dell Diagnostics From Your Hard Drive Dell Diagnostics is located on a hidden diagnostic utility partition on (or restart) your computer. 3. If the PSA ...
Setup Guide
Page 55
...screen to return to the Choose An Option window. 4. Select the test you contact Dell. 6. Write down the error code and problem description and contact Dell (see "Contacting Dell" on your computer when you want to continue." To exit Dell Diagnostics and restart the computer, click Exit.... 53 If you are experiencing memory issues, press , otherwise press . The following message appears: "Booting Dell Diagnostic Utility Partition. Press any key to go to the Choose An Option window. 7. NOTE: The ...
...screen to return to the Choose An Option window. 4. Select the test you contact Dell. 6. Write down the error code and problem description and contact Dell (see "Contacting Dell" on your computer when you want to continue." To exit Dell Diagnostics and restart the computer, click Exit.... 53 If you are experiencing memory issues, press , otherwise press . The following message appears: "Booting Dell Diagnostic Utility Partition. Press any key to go to the Choose An Option window. 7. NOTE: The ...
Setup Guide
Page 56
... CD menu and press to the devices specified in the system setup program. 3. Select the test you see the Microsoft Windows desktop; Using Support Tools Starting Dell Diagnostics From the Drivers and Utilities Disc NOTE: The Drivers and Utilities disc may not ship with your computer and try ...and the operating system logo appears, continue to wait until you want to run. 54 Shut down your computer. Select Run the 32 Bit Dell Diagnostics from the menu that involve discs. 1. Use an optional external optical drive or any external storage device for procedures that appears and press...
... CD menu and press to the devices specified in the system setup program. 3. Select the test you see the Microsoft Windows desktop; Using Support Tools Starting Dell Diagnostics From the Drivers and Utilities Disc NOTE: The Drivers and Utilities disc may not ship with your computer and try ...and the operating system logo appears, continue to wait until you want to run. 54 Shut down your computer. Select Run the 32 Bit Dell Diagnostics from the menu that involve discs. 1. Use an optional external optical drive or any external storage device for procedures that appears and press...
Setup Guide
Page 57
... the error code and problem description and contact Dell (see "Contacting Dell" on your computer when you identify your screen. The Service Tag helps you contact Dell. 9. When the tests complete, close the test screen to return to the Choose An Option window. 10.To exit Dell Diagnostics and restart the computer, click Exit. 11...
... the error code and problem description and contact Dell (see "Contacting Dell" on your computer when you identify your screen. The Service Tag helps you contact Dell. 9. When the tests complete, close the test screen to return to the Choose An Option window. 10.To exit Dell Diagnostics and restart the computer, click Exit. 11...


