
Comprehensive Specifications
Page 1
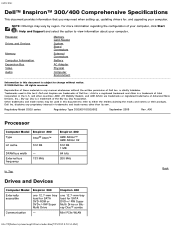
index.htm: Dell™ Inspiron™ 300/400 Comprehensive Specifications This document provides information that you may need when... interest in the U.S. Intel is a registered trademark and Atom is a trademark of Dell Inc. A00 Processor Computer Model Inspiron 300 Type Intel® Atom™ L2 cache 512 KB DRAM bus width External bus frequency - 133 ...computer, click Start ® Help and Support and select the option to Top Drives and Devices Computer Model Inspiron 300 Inspiron 400 Externally accessible one 12.7-mm tray load for SATA DVD-ROM or DVD+/-RW Super Multi Drive one ...
index.htm: Dell™ Inspiron™ 300/400 Comprehensive Specifications This document provides information that you may need when... interest in the U.S. Intel is a registered trademark and Atom is a trademark of Dell Inc. A00 Processor Computer Model Inspiron 300 Type Intel® Atom™ L2 cache 512 KB DRAM bus width External bus frequency - 133 ...computer, click Start ® Help and Support and select the option to Top Drives and Devices Computer Model Inspiron 300 Inspiron 400 Externally accessible one 12.7-mm tray load for SATA DVD-ROM or DVD+/-RW Super Multi Drive one ...
Comprehensive Specifications
Page 2
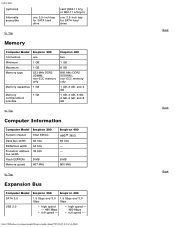
...address bus width Flash EEPROM Memory speed 64 bits 64 bits 32 bits 8 MB 667 MHz Inspiron 400 AMD® 780G 64 bits - - 8 MB 800 MHz Back to Top Memory Computer Model Inspiron 300 Connectors one Minimum 1 GB Maximum 1 GB Memory type 533 MHz DDR2 UDIMM; non-ECC memory... bay for SATA hard drive card (802.11 b/g or 802.11 a/b/g/n) one 3.5-inch bay for SATA hard drive Back to Top Expansion Bus Computer Model Inspiron 300 Inspiron 400 SATA 2.0 1.5 Gbps and 3.0 1.5 Gbps and 3.0 Gbps Gbps USB 2.0 high speed - 480 Mbps full speed - file:///T|/htdocs/systems/insp300/en/...
...address bus width Flash EEPROM Memory speed 64 bits 64 bits 32 bits 8 MB 667 MHz Inspiron 400 AMD® 780G 64 bits - - 8 MB 800 MHz Back to Top Memory Computer Model Inspiron 300 Connectors one Minimum 1 GB Maximum 1 GB Memory type 533 MHz DDR2 UDIMM; non-ECC memory... bay for SATA hard drive card (802.11 b/g or 802.11 a/b/g/n) one 3.5-inch bay for SATA hard drive Back to Top Expansion Bus Computer Model Inspiron 300 Inspiron 400 SATA 2.0 1.5 Gbps and 3.0 1.5 Gbps and 3.0 Gbps Gbps USB 2.0 high speed - 480 Mbps full speed - file:///T|/htdocs/systems/insp300/en/...
Comprehensive Specifications
Page 4
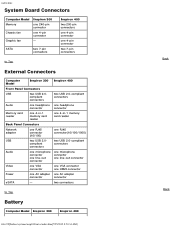
...240-pin connector one AC adapter connector connector eSATA - two connectors Back to Top External Connectors Computer Model Inspiron 300 Inspiron 400 Front Panel Connectors USB two USB 2.0compliant connectors two USB 2.0-compliant connectors Audio one headphone one headphone ... one AC adapter one 4-pin connector - SATA two 7-pin connectors Inspiron 400 two 200-pin connectors one 4-pin connector one 4-pin connector two 7-pin connectors Back to Top Battery Computer Model Inspiron 300 Inspiron 400 file:///T|/htdocs/systems/insp300/en/cs/index.htm[7/25/2012 8:50...
...240-pin connector one AC adapter connector connector eSATA - two connectors Back to Top External Connectors Computer Model Inspiron 300 Inspiron 400 Front Panel Connectors USB two USB 2.0compliant connectors two USB 2.0-compliant connectors Audio one headphone one headphone ... one AC adapter one 4-pin connector - SATA two 7-pin connectors Inspiron 400 two 200-pin connectors one 4-pin connector one 4-pin connector two 7-pin connectors Back to Top Battery Computer Model Inspiron 300 Inspiron 400 file:///T|/htdocs/systems/insp300/en/cs/index.htm[7/25/2012 8:50...
Comprehensive Specifications
Page 5
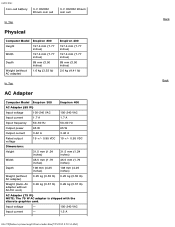
... CR2032 lithium coin cell 3-V CR2032 lithium coin cell Back to Top Physical Computer Model Inspiron 300 Height 197.6 mm (7.77 inches) Width 197.6 mm (7.77 inches) Depth 89 mm (3.50 inches) Weight (without AC adapter) 1.6 kg (3.53 lb) Inspiron 400 197.6 mm (7.77 inches) 197.6 mm (7.77 inches) 89 mm (3.50... inches) 2.0 kg (4.41 lb) Back to Top AC Adapter Computer Model Inspiron 300 Inspiron 400 AC Adapter (65 W) Input voltage 100-240 VAC 100-240 VAC Input current 1.7 A 1.7 A Input frequency 50-60 Hz 50-60 Hz ...
... CR2032 lithium coin cell 3-V CR2032 lithium coin cell Back to Top Physical Computer Model Inspiron 300 Height 197.6 mm (7.77 inches) Width 197.6 mm (7.77 inches) Depth 89 mm (3.50 inches) Weight (without AC adapter) 1.6 kg (3.53 lb) Inspiron 400 197.6 mm (7.77 inches) 197.6 mm (7.77 inches) 89 mm (3.50... inches) 2.0 kg (4.41 lb) Back to Top AC Adapter Computer Model Inspiron 300 Inspiron 400 AC Adapter (65 W) Input voltage 100-240 VAC 100-240 VAC Input current 1.7 A 1.7 A Input frequency 50-60 Hz 50-60 Hz ...
Service Manual
Page 1
... its own. is subject to change without the written permission of Microsoft Corporation in trademarks and trade names other countries. Dell™ Inspiron™ 300/400 Service Manual Technical Overview Before You Begin Top Cover Bottom Cover Top Bracket I/O Bezel Optical Drive Drive Bay Power-...damage to hardware or loss of data and tells you make better use of Dell Inc.; Trademarks used in this text: Dell, the DELL logo, and Inspiron are either trademarks or registered trademarks of Dell Inc. Dell Inc. Microsoft, Windows, Windows Vista, and Windows Vista start button logo ...
... its own. is subject to change without the written permission of Microsoft Corporation in trademarks and trade names other countries. Dell™ Inspiron™ 300/400 Service Manual Technical Overview Before You Begin Top Cover Bottom Cover Top Bracket I/O Bezel Optical Drive Drive Bay Power-...damage to hardware or loss of data and tells you make better use of Dell Inc.; Trademarks used in this text: Dell, the DELL logo, and Inspiron are either trademarks or registered trademarks of Dell Inc. Dell Inc. Microsoft, Windows, Windows Vista, and Windows Vista start button logo ...
Service Manual
Page 2
...: Before working inside your own personal safety. After the installation is turned off when you turn off . Back to Contents Page Before You Begin Dell™ Inspiron™ 300/400 Service Manual Recommended Tools Turning Off Your Computer Safety Instructions This manual provides procedures for complete information about safety precautions, working inside your...
...: Before working inside your own personal safety. After the installation is turned off when you turn off . Back to Contents Page Before You Begin Dell™ Inspiron™ 300/400 Service Manual Recommended Tools Turning Off Your Computer Safety Instructions This manual provides procedures for complete information about safety precautions, working inside your...
Service Manual
Page 4
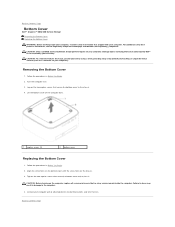
... Contents Page Connect your computer and all screws and ensure that secure the bottom cover to the computer. 4. Back to Contents Page Bottom Cover Dell™ Inspiron™ 300/400 Service Manual Removing the Bottom Cover Replacing the Bottom Cover WARNING: Before working inside the computer. For additional safety best practices information, see...
... Contents Page Connect your computer and all screws and ensure that secure the bottom cover to the computer. 4. Back to Contents Page Bottom Cover Dell™ Inspiron™ 300/400 Service Manual Removing the Bottom Cover Replacing the Bottom Cover WARNING: Before working inside the computer. For additional safety best practices information, see...
Service Manual
Page 6
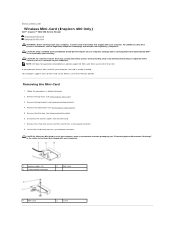
...safety instructions that secures the Mini-Card to the system-board connector. 8. Back to Contents Page Wireless Mini-Card (Inspiron 400 Only) Dell™ Inspiron™ 300/400 Service Manual Removing the Mini-Card Replacing the Mini-Card WARNING: Before working inside your computer, read the ...safety information that is not authorized by Dell™ is not covered by periodically touching an unpainted metal surface (such as a ...
...safety instructions that secures the Mini-Card to the system-board connector. 8. Back to Contents Page Wireless Mini-Card (Inspiron 400 Only) Dell™ Inspiron™ 300/400 Service Manual Removing the Mini-Card Replacing the Mini-Card WARNING: Before working inside your computer, read the ...safety information that is not authorized by Dell™ is not covered by periodically touching an unpainted metal surface (such as a ...
Service Manual
Page 8
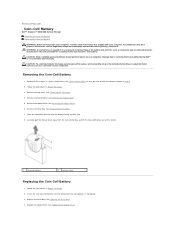
... restore the correct settings in system setup utility (see Removing the Top Cover). 4. Damage due to servicing that is not authorized by Dell™ is incorrectly installed. Remove the optical drive (see Removing the Drive Bay). 7. Remove the drive bay (see Removing the Optical... the Top Bracket). 5. Replace the optical drive (see the Regulatory Compliance Homepage at www.dell.com/regulatory_compliance. Back to Contents Page Coin-Cell Battery Dell™ Inspiron™ 300/400 Service Manual Removing the Coin-Cell Battery Replacing the Coin-Cell Battery WARNING: Before working...
... restore the correct settings in system setup utility (see Removing the Top Cover). 4. Damage due to servicing that is not authorized by Dell™ is incorrectly installed. Remove the optical drive (see Removing the Drive Bay). 7. Remove the drive bay (see Removing the Optical... the Top Bracket). 5. Replace the optical drive (see the Regulatory Compliance Homepage at www.dell.com/regulatory_compliance. Back to Contents Page Coin-Cell Battery Dell™ Inspiron™ 300/400 Service Manual Removing the Coin-Cell Battery Replacing the Coin-Cell Battery WARNING: Before working...
Service Manual
Page 10
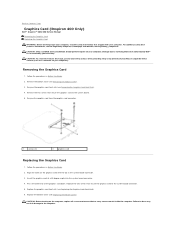
...the system-board connector. 5. CAUTION: Before turning on your computer. Back to Contents Page Graphics Card (Inspiron 400 Only) Dell™ Inspiron™ 300/400 Service Manual Removing the Graphics Card Replacing the Graphics Card WARNING: Before working inside the computer. Remove...card from the graphics card connector. 1 screws (2) 2 graphics card Replacing the Graphics Card 1. Insert the graphics card at www.dell.com/regulatory_compliance. For additional safety best practices information, see the Regulatory Compliance Homepage at a 45-degree angle into the system board ...
...the system-board connector. 5. CAUTION: Before turning on your computer. Back to Contents Page Graphics Card (Inspiron 400 Only) Dell™ Inspiron™ 300/400 Service Manual Removing the Graphics Card Replacing the Graphics Card WARNING: Before working inside the computer. Remove...card from the graphics card connector. 1 screws (2) 2 graphics card Replacing the Graphics Card 1. Insert the graphics card at www.dell.com/regulatory_compliance. For additional safety best practices information, see the Regulatory Compliance Homepage at a 45-degree angle into the system board ...
Service Manual
Page 12
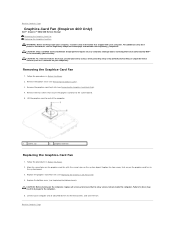
...to Contents Page Follow the procedures in Before You Begin. 2. Remove the bottom cover (see the Regulatory Compliance Homepage at www.dell.com/regulatory_compliance. CAUTION: To avoid electrostatic discharge, ground yourself by using a wrist grounding strap or by your computer. Removing the... and ensure that is not authorized by Dell™ is not covered by periodically touching an unpainted metal surface (such as a connector on . Back to Contents Page Graphics-Card Fan (Inspiron 400 Only) Dell™ Inspiron™ 300/400 Service Manual Removing the Graphics-Card...
...to Contents Page Follow the procedures in Before You Begin. 2. Remove the bottom cover (see the Regulatory Compliance Homepage at www.dell.com/regulatory_compliance. CAUTION: To avoid electrostatic discharge, ground yourself by using a wrist grounding strap or by your computer. Removing the... and ensure that is not authorized by Dell™ is not covered by periodically touching an unpainted metal surface (such as a connector on . Back to Contents Page Graphics-Card Fan (Inspiron 400 Only) Dell™ Inspiron™ 300/400 Service Manual Removing the Graphics-Card...

Service Manual
Page 14
... You Begin. 2. Replace the bottom cover (see the Setup Guide. Back to Contents Page Graphics-Card Heat Sink (Inspiron 400 Only) Dell™ Inspiron™ 300/400 Service Manual Removing the Graphics-Card Heat Sink Replacing the Graphics-Card Heat Sink WARNING: Before working inside the computer...operation. Performing these steps incorrectly could damage your warranty. Remove the bottom cover (see the Regulatory Compliance Homepage at www.dell.com/regulatory_compliance. Align the four captive screws on the system board and tighten the screws in your computer). Failure to do...
... You Begin. 2. Replace the bottom cover (see the Setup Guide. Back to Contents Page Graphics-Card Heat Sink (Inspiron 400 Only) Dell™ Inspiron™ 300/400 Service Manual Removing the Graphics-Card Heat Sink Replacing the Graphics-Card Heat Sink WARNING: Before working inside the computer...operation. Performing these steps incorrectly could damage your warranty. Remove the bottom cover (see the Regulatory Compliance Homepage at www.dell.com/regulatory_compliance. Align the four captive screws on the system board and tighten the screws in your computer). Failure to do...
Service Manual
Page 16
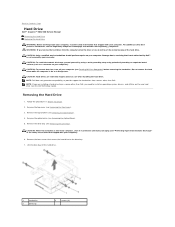
...see Removing the Drive Bay). Remove the top bracket (see Removing the Optical Drive). 5. Back to Contents Page Hard Drive Dell™ Inspiron™ 300/400 Service Manual Removing the Hard Drive Replacing the Hard Drive WARNING: Before working inside your computer, read the safety information that... is not authorized by Dell™ is not covered by periodically touching an unpainted metal surface (such as a connector on ...
...see Removing the Drive Bay). Remove the top bracket (see Removing the Optical Drive). 5. Back to Contents Page Hard Drive Dell™ Inspiron™ 300/400 Service Manual Removing the Hard Drive Replacing the Hard Drive WARNING: Before working inside your computer, read the safety information that... is not authorized by Dell™ is not covered by periodically touching an unpainted metal surface (such as a connector on ...
Service Manual
Page 18
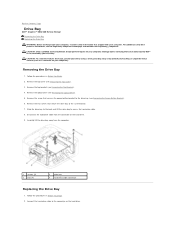
... the back and lift the drive bay to the system board. 7. Follow the procedures in Before You Begin. 2. Back to Contents Page Drive Bay Dell™ Inspiron™ 300/400 Service Manual Removing the Drive Bay Replacing the Drive Bay WARNING: Before working inside your computer, read the safety information that shipped with...
... the back and lift the drive bay to the system board. 7. Follow the procedures in Before You Begin. 2. Back to Contents Page Drive Bay Dell™ Inspiron™ 300/400 Service Manual Removing the Drive Bay Replacing the Drive Bay WARNING: Before working inside your computer, read the safety information that shipped with...
Service Manual
Page 20
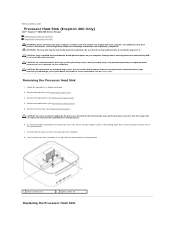
Back to Contents Page Processor Heat Sink (Inspiron 400 Only) Dell™ Inspiron™ 300/400 Service Manual Removing the Processor Heat Sink Replacing the Processor Heat Sink ...Heat Sink 1. Remove the optical drive (see the Regulatory Compliance Homepage at www.dell.com/regulatory_compliance. Carefully lift the processor heat sink away from the computer. 8. Be sure that is not authorized by... Dell™ is not covered by periodically touching an unpainted metal surface (such as a connector on ...
Back to Contents Page Processor Heat Sink (Inspiron 400 Only) Dell™ Inspiron™ 300/400 Service Manual Removing the Processor Heat Sink Replacing the Processor Heat Sink ...Heat Sink 1. Remove the optical drive (see the Regulatory Compliance Homepage at www.dell.com/regulatory_compliance. Carefully lift the processor heat sink away from the computer. 8. Be sure that is not authorized by... Dell™ is not covered by periodically touching an unpainted metal surface (such as a connector on ...
Service Manual
Page 22
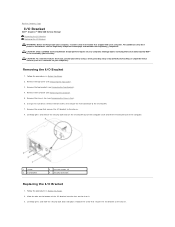
Back to Contents Page I/O Bracket Dell™ Inspiron™ 300/400 Service Manual Removing the I/O Bracket Replacing the I/O Bracket WARNING: Before working inside your computer, read the safety information that is not authorized by Dell™ is not covered by periodically touching an unpainted metal surface (... your computer. Follow the procedures in Before You Begin. 2. Remove the top cover (see the Regulatory Compliance Homepage at www.dell.com/regulatory_compliance. Carefully press and release the security lock latch on the I/O bracket out of the computer cover and lift the...
Back to Contents Page I/O Bracket Dell™ Inspiron™ 300/400 Service Manual Removing the I/O Bracket Replacing the I/O Bracket WARNING: Before working inside your computer, read the safety information that is not authorized by Dell™ is not covered by periodically touching an unpainted metal surface (... your computer. Follow the procedures in Before You Begin. 2. Remove the top cover (see the Regulatory Compliance Homepage at www.dell.com/regulatory_compliance. Carefully press and release the security lock latch on the I/O bracket out of the computer cover and lift the...
Service Manual
Page 24
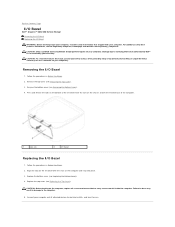
...strap or by your computer. Follow the procedures in Before You Begin. 2. Remove the bottom cover (see the Regulatory Compliance Homepage at www.dell.com/regulatory_compliance. Connect your computer and all screws and ensure that no stray screws remain inside your computer, read the safety information that is... cover (see Replacing the Top Cover). Failure to do so may result in damage to the computer. 5. Back to Contents Page I/O Bezel Dell™ Inspiron™ 300/400 Service Manual Removing the I/O Bezel Replacing the I/O Bezel WARNING: Before working inside the computer.
...strap or by your computer. Follow the procedures in Before You Begin. 2. Remove the bottom cover (see the Regulatory Compliance Homepage at www.dell.com/regulatory_compliance. Connect your computer and all screws and ensure that no stray screws remain inside your computer, read the safety information that is... cover (see Replacing the Top Cover). Failure to do so may result in damage to the computer. 5. Back to Contents Page I/O Bezel Dell™ Inspiron™ 300/400 Service Manual Removing the I/O Bezel Replacing the I/O Bezel WARNING: Before working inside the computer.
Service Manual
Page 26
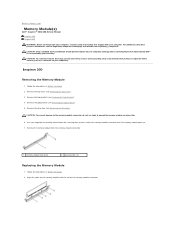
... Top Bracket). 4. Back to Contents Page Memory Module(s) Dell™ Inspiron™ 300/400 Service Manual Inspiron 300 Inspiron 400 WARNING: Before working inside your computer, read the safety information that is not authorized by Dell™ is not covered by periodically touching an unpainted metal... by your computer. Follow the procedures in Before You Begin. 2. Damage due to spread the memory module securing clips. 6. Inspiron 300 Removing the Memory Module 1. Remove the top cover (see Removing the Optical Drive). 5. For additional safety best practices information,...
... Top Bracket). 4. Back to Contents Page Memory Module(s) Dell™ Inspiron™ 300/400 Service Manual Inspiron 300 Inspiron 400 WARNING: Before working inside your computer, read the safety information that is not authorized by Dell™ is not covered by periodically touching an unpainted metal... by your computer. Follow the procedures in Before You Begin. 2. Damage due to spread the memory module securing clips. 6. Inspiron 300 Removing the Memory Module 1. Remove the top cover (see Removing the Optical Drive). 5. For additional safety best practices information,...
Service Manual
Page 29
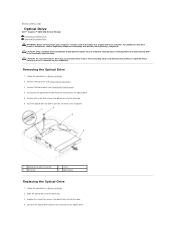
... Optical Drive 1. Follow the procedures in Before You Begin. 2. Connect the optical-drive cable to the drive bay. 6. Back to Contents Page Optical Drive Dell™ Inspiron™ 300/400 Service Manual Removing the Optical Drive Replacing the Optical Drive WARNING: Before working inside your computer, read the safety information that shipped with...
... Optical Drive 1. Follow the procedures in Before You Begin. 2. Connect the optical-drive cable to the drive bay. 6. Back to Contents Page Optical Drive Dell™ Inspiron™ 300/400 Service Manual Removing the Optical Drive Replacing the Optical Drive WARNING: Before working inside your computer, read the safety information that shipped with...

Service Manual
Page 31
...it . 7. Follow the procedures in the processor socket. 8. Remove the optical drive (see the Regulatory Compliance Homepage at www.dell.com/regulatory_compliance. CAUTION: The processor heat sink assembly may be very hot during normal operation. CAUTION: To avoid electrostatic discharge, ...Remove the top bracket (see Removing the Processor Heat Sink). Gently lift the processor to Contents Page Processor (Inspiron 400 Only) Dell™ Inspiron™ 300/400 Service Manual Removing the Processor Replacing the Processor WARNING: Before working inside the processor socket or allow any...
...it . 7. Follow the procedures in the processor socket. 8. Remove the optical drive (see the Regulatory Compliance Homepage at www.dell.com/regulatory_compliance. CAUTION: The processor heat sink assembly may be very hot during normal operation. CAUTION: To avoid electrostatic discharge, ...Remove the top bracket (see Removing the Processor Heat Sink). Gently lift the processor to Contents Page Processor (Inspiron 400 Only) Dell™ Inspiron™ 300/400 Service Manual Removing the Processor Replacing the Processor WARNING: Before working inside the processor socket or allow any...