
Service Manual
Page 27
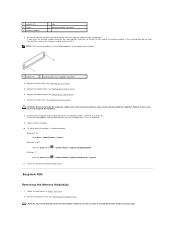
Failure to do so may not boot. 1 cutouts (2) 2 securing clips (2) (snapped in position) 4. Check the amount of the memory module. Remove the bottom cover (see Replacing the Top Cover). Insert the memory ...) listed. Windows Vista®: Click the Start button Windows 7: ® Control Panel® System and Maintenance. Replace the drive bay (see Replacing the Drive Bay). 5. Inspiron 400 Removing the Memory Module(s) 1.
Failure to do so may not boot. 1 cutouts (2) 2 securing clips (2) (snapped in position) 4. Check the amount of the memory module. Remove the bottom cover (see Replacing the Top Cover). Insert the memory ...) listed. Windows Vista®: Click the Start button Windows 7: ® Control Panel® System and Maintenance. Replace the drive bay (see Replacing the Drive Bay). 5. Inspiron 400 Removing the Memory Module(s) 1.
Service Manual
Page 28
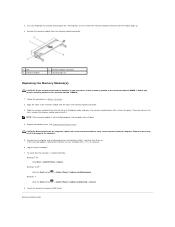
... the tab in damage to install memory modules in two connectors, install a memory module in the connector labeled "DIMM 1" before you do so may not boot. 4. Replace the bottom cover (see Replacing the Bottom Cover). If the message appears stating that the memory is not installed properly, the computer may result...
... the tab in damage to install memory modules in two connectors, install a memory module in the connector labeled "DIMM 1" before you do so may not boot. 4. Replace the bottom cover (see Replacing the Bottom Cover). If the message appears stating that the memory is not installed properly, the computer may result...

Service Manual
Page 42
...errors when set to Report Default is Report Advanced Settings Inspiron 300 CPU Feature Integrated Graphics Configuration Integrated Peripherals Configuration Inspiron 400 CPU Feature Integrated Graphics Configuration Integrated Peripherals Configuration USB Device Setting Numlock Key Fast Boot l Limit CPUID Value-Enabled or Disabled (Disabled by... by default) Enabled or Disabled (Enabled by default) Power Management ACPI Suspend Type AC Recovery Low Power Mode (applicable for Inspiron 400 computer only) Remote Wake Up Auto Power On Auto Power On Date (Displays only when "Auto Power On" is set...
...errors when set to Report Default is Report Advanced Settings Inspiron 300 CPU Feature Integrated Graphics Configuration Integrated Peripherals Configuration Inspiron 400 CPU Feature Integrated Graphics Configuration Integrated Peripherals Configuration USB Device Setting Numlock Key Fast Boot l Limit CPUID Value-Enabled or Disabled (Disabled by... by default) Enabled or Disabled (Enabled by default) Power Management ACPI Suspend Type AC Recovery Low Power Mode (applicable for Inspiron 400 computer only) Remote Wake Up Auto Power On Auto Power On Date (Displays only when "Auto Power On" is set...
Service Manual
Page 43
... to a USB memory key, highlight USB Flash Device and press . NOTE: To boot to a USB connector. 2. User Password Boot Sequence 1st Boot Device 2nd Boot Device 3rd Boot Device 4th Boot Device 5th Boot Device Hard Disk Drives USB Drives CD/DVD Drives Removable Drives Network Drives Exit Exit ...the CD/DVD drive. The Boot Device Menu appears, listing all available boot devices. 4. Disabled (CD/DVD by default) Specifies the boot sequence from the CD/DVD drive to boot from the available devices Hard Disk; Network; The computer attempts to run the Dell Diagnostics on the drive, ...
... to a USB memory key, highlight USB Flash Device and press . NOTE: To boot to a USB connector. 2. User Password Boot Sequence 1st Boot Device 2nd Boot Device 3rd Boot Device 4th Boot Device 5th Boot Device Hard Disk Drives USB Drives CD/DVD Drives Removable Drives Network Drives Exit Exit ...the CD/DVD drive. The Boot Device Menu appears, listing all available boot devices. 4. Disabled (CD/DVD by default) Specifies the boot sequence from the CD/DVD drive to boot from the available devices Hard Disk; Network; The computer attempts to run the Dell Diagnostics on the drive, ...

Service Manual
Page 44
... Press plus (+) or minus (-) to change the boot priority of the procedures in Before You Begin. 2. Damage due to access the menu. Follow the procedures in this section, follow the safety instructions that is not authorized by Dell™ is not covered by periodically touching an unpainted... metal surface (such as a connector on pins 2 and 3. Remove the top cover (see Removing the Drive Bay). 6. Remove the drive bay (see Removing the Top Cover). 3. Inspiron 300
... Press plus (+) or minus (-) to change the boot priority of the procedures in Before You Begin. 2. Damage due to access the menu. Follow the procedures in this section, follow the safety instructions that is not authorized by Dell™ is not covered by periodically touching an unpainted... metal surface (such as a connector on pins 2 and 3. Remove the top cover (see Removing the Drive Bay). 6. Remove the drive bay (see Removing the Top Cover). 3. Inspiron 300
SETUP GUIDE
Page 41
... Manual on page 59) for assistance. Contact Dell (see "Contacting Dell" on the Dell Support website at booting this checkpoint and contact Dell Technical Support - For help you identify the cause and action needed to complete the boot routine three consecutive times for assistance. 39 Possible... failure or RTC battery low. CPU fan failure - CPU fan needs replacement. Possible hard disk drive failure during HDD boot test. Contact Dell (see the documentation for assistance. Alert! The computer failed to resolve the issue. Battery needs replacement. Possible hard disk...
... Manual on page 59) for assistance. Contact Dell (see "Contacting Dell" on the Dell Support website at booting this checkpoint and contact Dell Technical Support - For help you identify the cause and action needed to complete the boot routine three consecutive times for assistance. 39 Possible... failure or RTC battery low. CPU fan failure - CPU fan needs replacement. Possible hard disk drive failure during HDD boot test. Contact Dell (see the documentation for assistance. Alert! The computer failed to resolve the issue. Battery needs replacement. Possible hard disk...
SETUP GUIDE
Page 42
... A parameter out of them. See the Service Manual on the Dell Support website at support.dell.com/manuals or contact Dell (see "Contacting Dell" on the Dell Support website at support.dell.com/manuals. Dell recommends that the boot sequence information is installed properly and partitioned as a boot device. • Enter system setup and ensure that you back up...
... A parameter out of them. See the Service Manual on the Dell Support website at support.dell.com/manuals or contact Dell (see "Contacting Dell" on the Dell Support website at support.dell.com/manuals. Dell recommends that the boot sequence information is installed properly and partitioned as a boot device. • Enter system setup and ensure that you back up...
SETUP GUIDE
Page 44
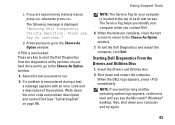
... that is invoked: a. If Pre-boot System Assessment (PSA) is known to continue? (Recommended)." 42 When the DELL™ logo appears, press immediately. The PSA starts running tests. Using Support Tools Starting Dell Diagnostics From Your Hard Drive The Dell Diagnostics is located on a hidden diagnostic...® Windows® desktop; Do you want to an electrical outlet that the computer is connected to run the Dell Diagnostics from the boot menu and press . Select Diagnostics from the Drivers and Utilities disc. If the PSA completes successfully, you will take...
... that is invoked: a. If Pre-boot System Assessment (PSA) is known to continue? (Recommended)." 42 When the DELL™ logo appears, press immediately. The PSA starts running tests. Using Support Tools Starting Dell Diagnostics From Your Hard Drive The Dell Diagnostics is located on a hidden diagnostic...® Windows® desktop; Do you want to an electrical outlet that the computer is connected to run the Dell Diagnostics from the boot menu and press . Select Diagnostics from the Drivers and Utilities disc. If the PSA completes successfully, you will take...
SETUP GUIDE
Page 45
...the Choose An Option window. When the tests are experiencing memory issues, press otherwise press . Select the test you see "Contacting Dell" on your computer is not invoked: Press any key to the Choose An Option window. 4. Write down and restart the computer... a description of each test screen. d. When the DELL logo appears, press immediately. The Service Tag helps you identify your computer and try again. 43 If a problem is displayed "Booting Dell Diagnostic Utility Partition. To exit the Dell Diagnostics and restart the computer, click Exit. Using Support...
...the Choose An Option window. When the tests are experiencing memory issues, press otherwise press . Select the test you see "Contacting Dell" on your computer is not invoked: Press any key to the Choose An Option window. 4. Write down and restart the computer... a description of each test screen. d. When the DELL logo appears, press immediately. The Service Tag helps you identify your computer and try again. 43 If a problem is displayed "Booting Dell Diagnostic Utility Partition. To exit the Dell Diagnostics and restart the computer, click Exit. Using Support...

SETUP GUIDE
Page 46
...to the devices specified in the system setup program. 3. Write down the error code and problem description and contact Dell (see "Contacting Dell" on page 59). Select the Boot from CD-ROM option from the numbered list. If multiple versions are complete, close the test screen to return ...to run. 8. To exit the Dell Diagnostics and restart the computer, click Exit. 11. Using Support Tools NOTE: The next steps change the boot sequence for your computer. 7. Remove the Drivers and Utilities disc. 44 When the tests ...
...to the devices specified in the system setup program. 3. Write down the error code and problem description and contact Dell (see "Contacting Dell" on page 59). Select the Boot from CD-ROM option from the numbered list. If multiple versions are complete, close the test screen to return ...to run. 8. To exit the Dell Diagnostics and restart the computer, click Exit. 11. Using Support Tools NOTE: The next steps change the boot sequence for your computer. 7. Remove the Drivers and Utilities disc. 44 When the tests ...

SETUP GUIDE
Page 50
... drive to wait until you purchased the computer. Performing Dell Factory Image Restore 1. then, shut down your operating system problem. Use Dell Factory Image Restore only as the last method to access the Advanced Boot Options Window. Any programs or files added since you received... your computer. Select Repair Your Computer. 3. Restoring Your Operating System Dell Factory Image Restore CAUTION: Using Dell Factory Image Restore permanently deletes all data before ...
... drive to wait until you purchased the computer. Performing Dell Factory Image Restore 1. then, shut down your operating system problem. Use Dell Factory Image Restore only as the last method to access the Advanced Boot Options Window. Any programs or files added since you received... your computer. Select Repair Your Computer. 3. Restoring Your Operating System Dell Factory Image Restore CAUTION: Using Dell Factory Image Restore permanently deletes all data before ...
SETUP GUIDE
Page 53
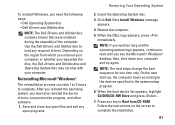
... NOTE: If you wait too long and the operating system logo appears, continue to Boot from which you ordered your computer and try again. Press any key to wait until you requested the disc, the Dell Drivers and Utilities disc and Operating System disc may not ship with your computer. Follow... drivers, virus protection program, and other software. 1. Click Exit if the Install Windows message appears. 4. On the next start-up, the computer boots according to complete. Use the Dell Drivers and Utilities disc to complete the installation. 51 NOTE: The next steps change the...
... NOTE: If you wait too long and the operating system logo appears, continue to Boot from which you ordered your computer and try again. Press any key to wait until you requested the disc, the Dell Drivers and Utilities disc and Operating System disc may not ship with your computer. Follow... drivers, virus protection program, and other software. 1. Click Exit if the Install Windows message appears. 4. On the next start-up, the computer boots according to complete. Use the Dell Drivers and Utilities disc to complete the installation. 51 NOTE: The next steps change the...
Ubuntu Quick Reference Guide
Page 22
...that shipped with your computer to reinstall your operating system. Turn off the computer. 2. Turn on the screen to Boot from CD-ROM. When the DELL logo appears, press immediately. The next time your computer. Connect an external USB optical drive into an available USB ...connector on your computer boots, the boot sequence will change the boot sequence. When the boot device list appears, highlight CD/DVD/CD-RW and press...
...that shipped with your computer to reinstall your operating system. Turn off the computer. 2. Turn on the screen to Boot from CD-ROM. When the DELL logo appears, press immediately. The next time your computer. Connect an external USB optical drive into an available USB ...connector on your computer boots, the boot sequence will change the boot sequence. When the boot device list appears, highlight CD/DVD/CD-RW and press...

