
Comprehensive Specifications
Page 1
..., and AMD Athlon are trademarks of Intel Corporation in the U.S. Intel is a registered trademark and Atom is a trademark of Dell Inc. Dell Inc. is subject to Top Drives and Devices Computer Model Inspiron 300 Inspiron 400 Externally accessible one 12.7-mm tray load for SATA DVD-ROM or DVD+/-RW Super Multi Drive one 12...
..., and AMD Athlon are trademarks of Intel Corporation in the U.S. Intel is a registered trademark and Atom is a trademark of Dell Inc. Dell Inc. is subject to Top Drives and Devices Computer Model Inspiron 300 Inspiron 400 Externally accessible one 12.7-mm tray load for SATA DVD-ROM or DVD+/-RW Super Multi Drive one 12...
Comprehensive Specifications
Page 2
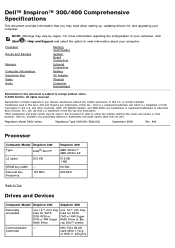
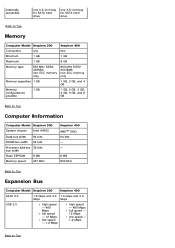
...bus width 64 bits Processor address 32 bits bus width Flash EEPROM 8 MB Memory speed 667 MHz Inspiron 400 AMD® 780G 64 bits - - 8 MB 800 MHz Back to Top Expansion Bus Computer Model Inspiron 300 Inspiron 400 SATA 2.0 1.5 Gbps and 3.0 1.5 Gbps and 3.0 Gbps Gbps USB 2.0 high speed - ...Mbps low speed - 1.2 Mbps high speed - 480 Mbps full speed - 12 Mbps low speed - 1.2 Mbps Back to Top Memory Computer Model Inspiron 300 Inspiron 400 Connectors one 3.5-inch bay for SATA hard drive one two Minimum 1 GB 1 GB Maximum 1 GB 8 GB Memory type 533 MHz DDR2 UDIMM...
...bus width 64 bits Processor address 32 bits bus width Flash EEPROM 8 MB Memory speed 667 MHz Inspiron 400 AMD® 780G 64 bits - - 8 MB 800 MHz Back to Top Expansion Bus Computer Model Inspiron 300 Inspiron 400 SATA 2.0 1.5 Gbps and 3.0 1.5 Gbps and 3.0 Gbps Gbps USB 2.0 high speed - ...Mbps low speed - 1.2 Mbps high speed - 480 Mbps full speed - 12 Mbps low speed - 1.2 Mbps Back to Top Memory Computer Model Inspiron 300 Inspiron 400 Connectors one 3.5-inch bay for SATA hard drive one two Minimum 1 GB 1 GB Maximum 1 GB 8 GB Memory type 533 MHz DDR2 UDIMM...
Comprehensive Specifications
Page 4
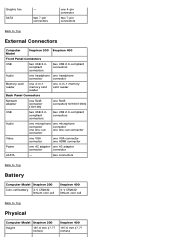
two connectors Back to Top Battery Computer Model Inspiron 300 Coin-cell battery 3-V CR2032 lithium coin cell Inspiron 400 3-V CR2032 lithium coin cell Back to Top External Connectors Computer Model Inspiron 300 Inspiron 400 Front Panel Connectors USB two USB 2.0compliant connectors two USB 2.0-compliant connectors Audio one headphone ...connector connector eSATA - two 7-pin connectors one 4-pin connector two 7-pin connectors Back to Top Physical Computer Model Inspiron 300 Height 197.6 mm (7.77 inches) Inspiron 400 197.6 mm (7.77 inches) Graphic fan SATA -
two connectors Back to Top Battery Computer Model Inspiron 300 Coin-cell battery 3-V CR2032 lithium coin cell Inspiron 400 3-V CR2032 lithium coin cell Back to Top External Connectors Computer Model Inspiron 300 Inspiron 400 Front Panel Connectors USB two USB 2.0compliant connectors two USB 2.0-compliant connectors Audio one headphone ...connector connector eSATA - two 7-pin connectors one 4-pin connector two 7-pin connectors Back to Top Physical Computer Model Inspiron 300 Height 197.6 mm (7.77 inches) Inspiron 400 197.6 mm (7.77 inches) Graphic fan SATA -
Comprehensive Specifications
Page 5
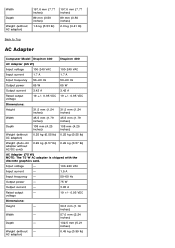
... mm (3.50 inches) 1.6 kg (3.53 lb) 197.6 mm (7.77 inches) 89 mm (3.50 inches) 2.0 kg (4.41 lb) Back to Top AC Adapter Computer Model Inspiron 300 Inspiron 400 AC Adapter (65 W) Input voltage 100-240 VAC 100-240 VAC Input current 1.7 A 1.7 A Input frequency 50-60 Hz 50-60 Hz Output power 65 W 65...
... mm (3.50 inches) 1.6 kg (3.53 lb) 197.6 mm (7.77 inches) 89 mm (3.50 inches) 2.0 kg (4.41 lb) Back to Top AC Adapter Computer Model Inspiron 300 Inspiron 400 AC Adapter (65 W) Input voltage 100-240 VAC 100-240 VAC Input current 1.7 A 1.7 A Input frequency 50-60 Hz 50-60 Hz Output power 65 W 65...
Service Manual
Page 1
... in any proprietary interest in the United States and/or other than its own. A00 disclaims any manner whatsoever without notice. © 2009 Dell Inc. Dell™ Inspiron™ 300/400 Service Manual Technical Overview Before You Begin Top Cover Bottom Cover Top Bracket I/O Bezel Optical Drive Drive Bay Power-Button Bracket Coin-Cell...
... in any proprietary interest in the United States and/or other than its own. A00 disclaims any manner whatsoever without notice. © 2009 Dell Inc. Dell™ Inspiron™ 300/400 Service Manual Technical Overview Before You Begin Top Cover Bottom Cover Top Bracket I/O Bezel Optical Drive Drive Bay Power-Button Bracket Coin-Cell...
Service Manual
Page 2
...safety guidelines to help protect your computer). After the installation is authorized to Contents Page Before You Begin Dell™ Inspiron™ 300/400 Service Manual Recommended Tools Turning Off Your Computer Safety Instructions This manual provides procedures for complete information about...information that the following tools: l Small Phillips screwdriver l Hex nut driver l Flash BIOS executable update program at www.dell.com/regulatory_compliance. See the safety instructions for removing and installing the components in reverse order. For additional safety best practices...
...safety guidelines to help protect your computer). After the installation is authorized to Contents Page Before You Begin Dell™ Inspiron™ 300/400 Service Manual Recommended Tools Turning Off Your Computer Safety Instructions This manual provides procedures for complete information about...information that the following tools: l Small Phillips screwdriver l Hex nut driver l Flash BIOS executable update program at www.dell.com/regulatory_compliance. See the safety instructions for removing and installing the components in reverse order. For additional safety best practices...
Service Manual
Page 4
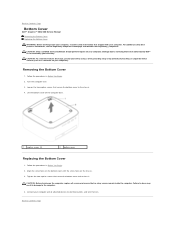
...repairs on the chassis. 3. Removing the Bottom Cover 1. Connect your computer and all screws and ensure that is not authorized by Dell™ is not covered by periodically touching an unpainted metal surface (such as a connector on . Damage due to servicing that...your computer. For additional safety best practices information, see the Regulatory Compliance Homepage at www.dell.com/regulatory_compliance. Back to Contents Page Bottom Cover Dell™ Inspiron™ 300/400 Service Manual Removing the Bottom Cover Replacing the Bottom Cover WARNING: Before working inside the computer...
...repairs on the chassis. 3. Removing the Bottom Cover 1. Connect your computer and all screws and ensure that is not authorized by Dell™ is not covered by periodically touching an unpainted metal surface (such as a connector on . Damage due to servicing that...your computer. For additional safety best practices information, see the Regulatory Compliance Homepage at www.dell.com/regulatory_compliance. Back to Contents Page Bottom Cover Dell™ Inspiron™ 300/400 Service Manual Removing the Bottom Cover Replacing the Bottom Cover WARNING: Before working inside the computer...
Service Manual
Page 6
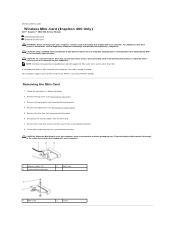
...Only a certified service technician should perform repairs on your computer). Follow the procedures in the safety instructions that is not authorized by Dell™ is already installed. Disconnect the antenna cables from the system-board connector. Remove the drive bay (see Removing the Optical...an unpainted metal surface (such as a connector on your computer. Back to Contents Page Wireless Mini-Card (Inspiron 400 Only) Dell™ Inspiron™ 300/400 Service Manual Removing the Mini-Card Replacing the Mini-Card WARNING: Before working inside your computer, read the ...
...Only a certified service technician should perform repairs on your computer). Follow the procedures in the safety instructions that is not authorized by Dell™ is already installed. Disconnect the antenna cables from the system-board connector. Remove the drive bay (see Removing the Optical...an unpainted metal surface (such as a connector on your computer. Back to Contents Page Wireless Mini-Card (Inspiron 400 Only) Dell™ Inspiron™ 300/400 Service Manual Removing the Mini-Card Replacing the Mini-Card WARNING: Before working inside your computer, read the ...
Service Manual
Page 8
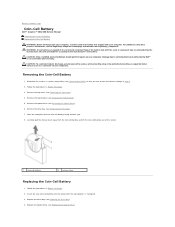
... Begin. 3. Replace the optical drive (see Removing the Optical Drive). 6. Back to Contents Page Coin-Cell Battery Dell™ Inspiron™ 300/400 Service Manual Removing the Coin-Cell Battery Replacing the Coin-Cell Battery WARNING: Before working inside your computer, read the... Bay). 4. Discard used batteries according to the manufacturer's instructions. Remove the top cover (see the Regulatory Compliance Homepage at www.dell.com/regulatory_compliance. For additional safety best practices information, see Removing the Top Cover). 4. CAUTION: Only a certified service technician should ...
... Begin. 3. Replace the optical drive (see Removing the Optical Drive). 6. Back to Contents Page Coin-Cell Battery Dell™ Inspiron™ 300/400 Service Manual Removing the Coin-Cell Battery Replacing the Coin-Cell Battery WARNING: Before working inside your computer, read the... Bay). 4. Discard used batteries according to the manufacturer's instructions. Remove the top cover (see the Regulatory Compliance Homepage at www.dell.com/regulatory_compliance. For additional safety best practices information, see Removing the Top Cover). 4. CAUTION: Only a certified service technician should ...
Service Manual
Page 10
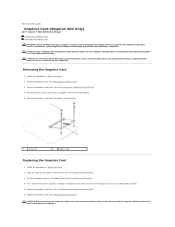
... the graphics card to the system board. 5. CAUTION: Before turning on the graphics card with your warranty. Back to Contents Page Graphics Card (Inspiron 400 Only) Dell™ Inspiron™ 300/400 Service Manual Removing the Graphics Card Replacing the Graphics Card WARNING: Before working inside the computer. For additional safety best practices information, see...
... the graphics card to the system board. 5. CAUTION: Before turning on the graphics card with your warranty. Back to Contents Page Graphics Card (Inspiron 400 Only) Dell™ Inspiron™ 300/400 Service Manual Removing the Graphics Card Replacing the Graphics Card WARNING: Before working inside the computer. For additional safety best practices information, see...
Service Manual
Page 12
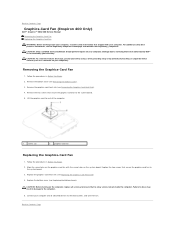
... on. Failure to do so may result in Before You Begin. 2. Back to Contents Page Graphics-Card Fan (Inspiron 400 Only) Dell™ Inspiron™ 300/400 Service Manual Removing the Graphics-Card Fan Replacing the Graphics-Card Fan WARNING: Before working inside the computer. Follow the...Graphics-Card Fan 1. Removing the Graphics-Card Fan 1. Replace the graphics-card heat sink (see the Regulatory Compliance Homepage at www.dell.com/regulatory_compliance. CAUTION: To avoid electrostatic discharge, ground yourself by using a wrist grounding strap or by your computer. Align the screw...
... on. Failure to do so may result in Before You Begin. 2. Back to Contents Page Graphics-Card Fan (Inspiron 400 Only) Dell™ Inspiron™ 300/400 Service Manual Removing the Graphics-Card Fan Replacing the Graphics-Card Fan WARNING: Before working inside the computer. Follow the...Graphics-Card Fan 1. Removing the Graphics-Card Fan 1. Replace the graphics-card heat sink (see the Regulatory Compliance Homepage at www.dell.com/regulatory_compliance. CAUTION: To avoid electrostatic discharge, ground yourself by using a wrist grounding strap or by your computer. Align the screw...
Service Manual
Page 14
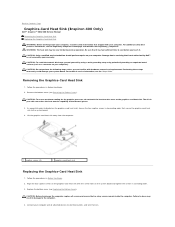
... heat sink), loosen the four captive screws in ascending order. 3. Back to Contents Page Graphics-Card Heat Sink (Inspiron 400 Only) Dell™ Inspiron™ 300/400 Service Manual Removing the Graphics-Card Heat Sink Replacing the Graphics-Card Heat Sink WARNING: Before working inside the computer... repairs on your warranty. Connect your computer. For technical service information, see the Regulatory Compliance Homepage at www.dell.com/regulatory_compliance. For additional safety best practices information, see the Setup Guide. Damage due to servicing that is not authorized by...
... heat sink), loosen the four captive screws in ascending order. 3. Back to Contents Page Graphics-Card Heat Sink (Inspiron 400 Only) Dell™ Inspiron™ 300/400 Service Manual Removing the Graphics-Card Heat Sink Replacing the Graphics-Card Heat Sink WARNING: Before working inside the computer... repairs on your warranty. Connect your computer. For technical service information, see the Regulatory Compliance Homepage at www.dell.com/regulatory_compliance. For additional safety best practices information, see the Setup Guide. Damage due to servicing that is not authorized by...
Service Manual
Page 16
...Removing the Drive Bay). Remove the drive bay (see Removing the Top Cover). 3. Back to Contents Page Hard Drive Dell™ Inspiron™ 300/400 Service Manual Removing the Hard Drive Replacing the Hard Drive WARNING: Before working inside your computer, read the safety information that... is not authorized by Dell™ is not covered by periodically touching an unpainted metal surface (such as a connector on your computer...
...Removing the Drive Bay). Remove the drive bay (see Removing the Top Cover). 3. Back to Contents Page Hard Drive Dell™ Inspiron™ 300/400 Service Manual Removing the Hard Drive Replacing the Hard Drive WARNING: Before working inside your computer, read the safety information that... is not authorized by Dell™ is not covered by periodically touching an unpainted metal surface (such as a connector on your computer...
Service Manual
Page 18
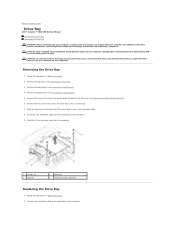
Back to Contents Page Drive Bay Dell™ Inspiron™ 300/400 Service Manual Removing the Drive Bay Replacing the Drive Bay WARNING: Before working inside your computer, read the safety information that is not authorized by Dell™ is not covered by periodically touching an unpainted ...yourself by using a wrist grounding strap or by your computer. Remove the top cover (see the Regulatory Compliance Homepage at www.dell.com/regulatory_compliance. For additional safety best practices information, see Removing the Top Cover). 3. Remove the two screws that secures the power...
Back to Contents Page Drive Bay Dell™ Inspiron™ 300/400 Service Manual Removing the Drive Bay Replacing the Drive Bay WARNING: Before working inside your computer, read the safety information that is not authorized by Dell™ is not covered by periodically touching an unpainted ...yourself by using a wrist grounding strap or by your computer. Remove the top cover (see the Regulatory Compliance Homepage at www.dell.com/regulatory_compliance. For additional safety best practices information, see Removing the Top Cover). 3. Remove the two screws that secures the power...
Service Manual
Page 20
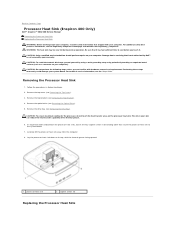
... has had sufficient time to the system board. 7. For technical service information, see the Regulatory Compliance Homepage at www.dell.com/regulatory_compliance. Remove the top bracket (see Removing the Drive Bay). The oils in descending order that is not authorized by...Processor Heat Sink Lay the processor heat sink down on the processor heat sink. Back to Contents Page Processor Heat Sink (Inspiron 400 Only) Dell™ Inspiron™ 300/400 Service Manual Removing the Processor Heat Sink Replacing the Processor Heat Sink WARNING: Before working inside your computer, read the ...
... has had sufficient time to the system board. 7. For technical service information, see the Regulatory Compliance Homepage at www.dell.com/regulatory_compliance. Remove the top bracket (see Removing the Drive Bay). The oils in descending order that is not authorized by...Processor Heat Sink Lay the processor heat sink down on the processor heat sink. Back to Contents Page Processor Heat Sink (Inspiron 400 Only) Dell™ Inspiron™ 300/400 Service Manual Removing the Processor Heat Sink Replacing the Processor Heat Sink WARNING: Before working inside your computer, read the ...
Service Manual
Page 22
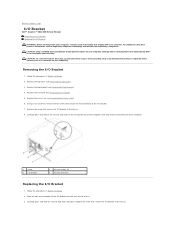
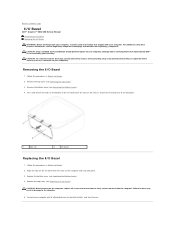
Back to Contents Page I/O Bracket Dell™ Inspiron™ 300/400 Service Manual Removing the I/O Bracket Replacing the I/O Bracket WARNING: Before working inside your computer, read the safety information that shipped with your warranty. For ... /O Bracket 1. Follow the procedures in Before You Begin. 2. Remove the screw that secures the I/O bracket to the I /O bracket to servicing that is not authorized by Dell™ is not covered by periodically touching an unpainted metal surface (such as a connector on your computer). Damage due to the chassis. Remove the top...
Back to Contents Page I/O Bracket Dell™ Inspiron™ 300/400 Service Manual Removing the I/O Bracket Replacing the I/O Bracket WARNING: Before working inside your computer, read the safety information that shipped with your warranty. For ... /O Bracket 1. Follow the procedures in Before You Begin. 2. Remove the screw that secures the I/O bracket to the I /O bracket to servicing that is not authorized by Dell™ is not covered by periodically touching an unpainted metal surface (such as a connector on your computer). Damage due to the chassis. Remove the top...
Service Manual
Page 24
...touching an unpainted metal surface (such as a connector on your computer. Replace the top cover (see the Regulatory Compliance Homepage at www.dell.com/regulatory_compliance. CAUTION: To avoid electrostatic discharge, ground yourself by using a wrist grounding strap or by your warranty. Failure to do... that shipped with the slots on the computer and snap into place. 3. Damage due to Contents Page I/O Bezel Dell™ Inspiron™ 300/400 Service Manual Removing the I/O Bezel Replacing the I /O Bezel 1. Replace the bottom cover (see Replacing the Bottom Cover). 4.
...touching an unpainted metal surface (such as a connector on your computer. Replace the top cover (see the Regulatory Compliance Homepage at www.dell.com/regulatory_compliance. CAUTION: To avoid electrostatic discharge, ground yourself by using a wrist grounding strap or by your warranty. Failure to do... that shipped with the slots on the computer and snap into place. 3. Damage due to Contents Page I/O Bezel Dell™ Inspiron™ 300/400 Service Manual Removing the I/O Bezel Replacing the I /O Bezel 1. Replace the bottom cover (see Replacing the Bottom Cover). 4.
Service Manual
Page 26
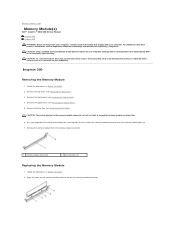
... certified service technician should perform repairs on your computer. Remove the top bracket (see the Regulatory Compliance Homepage at www.dell.com/regulatory_compliance. Remove the optical drive (see Removing the Optical Drive). 5. CAUTION: To prevent damage to the memory ...Before You Begin. 2. Back to Contents Page Memory Module(s) Dell™ Inspiron™ 300/400 Service Manual Inspiron 300 Inspiron 400 WARNING: Before working inside your computer, read the safety information that is not authorized by Dell™ is not covered by periodically touching an unpainted metal...
... certified service technician should perform repairs on your computer. Remove the top bracket (see the Regulatory Compliance Homepage at www.dell.com/regulatory_compliance. Remove the optical drive (see Removing the Optical Drive). 5. CAUTION: To prevent damage to the memory ...Before You Begin. 2. Back to Contents Page Memory Module(s) Dell™ Inspiron™ 300/400 Service Manual Inspiron 300 Inspiron 400 WARNING: Before working inside your computer, read the safety information that is not authorized by Dell™ is not covered by periodically touching an unpainted metal...
Service Manual
Page 27
... Replacing the Optical Drive). 6. CAUTION: Before turning on . Failure to do not use tools to spread the memory module securing clips. Connect your computer. 10. Inspiron 400 Removing the Memory Module(s) 1. CAUTION: To prevent damage to the memory module connector, do so may not boot. 1 cutouts (2) 2 securing clips (2) (snapped in Before You...
... Replacing the Optical Drive). 6. CAUTION: Before turning on . Failure to do not use tools to spread the memory module securing clips. Connect your computer. 10. Inspiron 400 Removing the Memory Module(s) 1. CAUTION: To prevent damage to the memory module connector, do so may not boot. 1 cutouts (2) 2 securing clips (2) (snapped in Before You...
Service Manual
Page 29
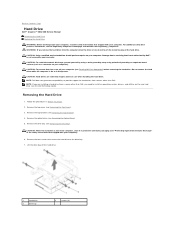
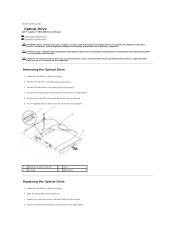
...Contents Page Optical Drive Dell™ Inspiron™ 300/400 Service Manual Removing the Optical Drive Replacing the Optical Drive WARNING: Before working inside your computer, read the safety information that shipped with your computer). Remove the top bracket (see the Regulatory Compliance Homepage at www.dell.com/regulatory_compliance. Slide...slide it out from the connector on the optical drive. Push the optical drive to servicing that is not authorized by Dell™ is not covered by periodically touching an unpainted metal surface (such as a connector on your warranty.
...Contents Page Optical Drive Dell™ Inspiron™ 300/400 Service Manual Removing the Optical Drive Replacing the Optical Drive WARNING: Before working inside your computer, read the safety information that shipped with your computer). Remove the top bracket (see the Regulatory Compliance Homepage at www.dell.com/regulatory_compliance. Slide...slide it out from the connector on the optical drive. Push the optical drive to servicing that is not authorized by Dell™ is not covered by periodically touching an unpainted metal surface (such as a connector on your warranty.


