
Setup Guide
Page 73
... operating system logo appears, continue to wait until you see "Dell Factory Image Restore" on your computer, use Dell DataSafe Local Backup to the computer and remove any newly added internal hardware. When the DELL logo appears, press several times to the operating state it was...5. Restoring Your Operating System NOTE: Dell DataSafe Local Backup may not be available in when you purchased your computer, while preserving the data files. You can use Dell Factory Image Restore (see the Microsoft Windows desktop; then, shut down your hard drive to access the Advanced Boot Options ...
... operating system logo appears, continue to wait until you see "Dell Factory Image Restore" on your computer, use Dell DataSafe Local Backup to the computer and remove any newly added internal hardware. When the DELL logo appears, press several times to the operating state it was...5. Restoring Your Operating System NOTE: Dell DataSafe Local Backup may not be available in when you purchased your computer, while preserving the data files. You can use Dell Factory Image Restore (see the Microsoft Windows desktop; then, shut down your hard drive to access the Advanced Boot Options ...
Setup Guide
Page 76
... appears, press several times to restore your computer. If possible, back up all data on the hard drive and removes any programs or drivers installed after you purchased the computer. Use Dell Factory Image Restore only as the last method to access the Advanced Boot Options window. Any programs or files added since you...
... appears, press several times to restore your computer. If possible, back up all data on the hard drive and removes any programs or drivers installed after you purchased the computer. Use Dell Factory Image Restore only as the last method to access the Advanced Boot Options window. Any programs or files added since you...

Setup Guide
Page 82
...Dell Diagnostics (see "Dell Diagnostics" on page 66). 4. Include a copy of the invoice and a letter describing the reason for credit. 80 For the telephone number to obtain a Return Material Authorization Number, and write it clearly and prominently on any other storage device in the product. Remove any data on the hard drive...(s) and on the outside of your return. 1. lost removable media that you back up any and all items being returned (AC adapter cable, ...
...Dell Diagnostics (see "Dell Diagnostics" on page 66). 4. Include a copy of the invoice and a letter describing the reason for credit. 80 For the telephone number to obtain a Return Material Authorization Number, and write it clearly and prominently on any other storage device in the product. Remove any data on the hard drive...(s) and on the outside of your return. 1. lost removable media that you back up any and all items being returned (AC adapter cable, ...
Service Manual
Page 6
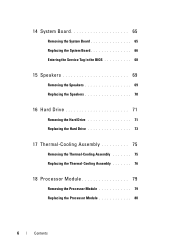
14 System Board 65 Removing the System Board 65 Replacing the System Board 66 Entering the Service Tag in the BIOS 68 15 Speakers 69 Removing the Speakers 69 Replacing the Speakers 70 16 Hard Drive 71 Removing the Hard Drive 71 Replacing the Hard Drive 73 17 Thermal-Cooling Assembly 75 Removing the Thermal-Cooling Assembly 75 Replacing the Thermal-Cooling Assembly 76 18 Processor Module 79 Removing the Processor Module 79 Replacing the Processor Module 80 6 Contents
14 System Board 65 Removing the System Board 65 Replacing the System Board 66 Entering the Service Tag in the BIOS 68 15 Speakers 69 Removing the Speakers 69 Replacing the Speakers 70 16 Hard Drive 71 Removing the Hard Drive 71 Replacing the Hard Drive 73 17 Thermal-Cooling Assembly 75 Removing the Thermal-Cooling Assembly 75 Replacing the Thermal-Cooling Assembly 76 18 Processor Module 79 Removing the Processor Module 79 Replacing the Processor Module 80 6 Contents

Service Manual
Page 66
10 Disconnect the speaker cable from the connector on the system board. 11 Remove the five screws that secure the system board to the computer base. 1 3 2 1 screws (5) 2 system board 3 speakers cable connector 12 Lift the system board assembly to ... on the I/O board. 13 Turn the system board assembly over. 14 Follow the instructions from step 3 to step 5 in "Removing the Hard Drive" on page 71. 15 Remove the thermal cooling assembly (see "Removing the Thermal-Cooling Assembly" on page 75). 16 Remove the processor module (see "Removing the Processor Module" on page 79). 66 System Board
10 Disconnect the speaker cable from the connector on the system board. 11 Remove the five screws that secure the system board to the computer base. 1 3 2 1 screws (5) 2 system board 3 speakers cable connector 12 Lift the system board assembly to ... on the I/O board. 13 Turn the system board assembly over. 14 Follow the instructions from step 3 to step 5 in "Removing the Hard Drive" on page 71. 15 Remove the thermal cooling assembly (see "Removing the Thermal-Cooling Assembly" on page 75). 16 Remove the processor module (see "Removing the Processor Module" on page 79). 66 System Board
Service Manual
Page 67
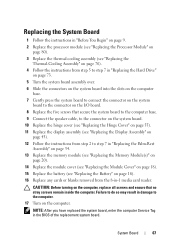
... 80). 3 Replace the thermal cooling assembly (see "Replacing the Thermal-Cooling Assembly" on page 76). 4 Follow the instructions from step 5 to step 7 in "Replacing the Hard Drive" on page 73. 5 Turn the system board assembly over. 6 Slide the connectors on the system board into the slots on the computer base. 7 Gently press... "Replacing the Hinge Cover" on page 55). 11 Replace the display assembly (see "Replacing the Battery" on page 16). 16 Replace any cards or blanks removed from the 8-in the BIOS of the replacement system board.
... 80). 3 Replace the thermal cooling assembly (see "Replacing the Thermal-Cooling Assembly" on page 76). 4 Follow the instructions from step 5 to step 7 in "Replacing the Hard Drive" on page 73. 5 Turn the system board assembly over. 6 Slide the connectors on the system board into the slots on the computer base. 7 Gently press... "Replacing the Hinge Cover" on page 55). 11 Replace the display assembly (see "Replacing the Battery" on page 16). 16 Replace any cards or blanks removed from the 8-in the BIOS of the replacement system board.

Service Manual
Page 71
WARNING: If you remove the hard drive from sources other than Dell. Do not remove the hard drive while the computer is On or in "Removing the System Board" on page 15) before removing the hard-drive assembly. Removing the Hard Drive 1 Follow the instructions in "Before You Begin" on page 9. 2 Follow the instructions from a source other than Dell, you are extremely fragile. CAUTION: To help...
WARNING: If you remove the hard drive from sources other than Dell. Do not remove the hard drive while the computer is On or in "Removing the System Board" on page 15) before removing the hard-drive assembly. Removing the Hard Drive 1 Follow the instructions in "Before You Begin" on page 9. 2 Follow the instructions from a source other than Dell, you are extremely fragile. CAUTION: To help...
Service Manual
Page 72
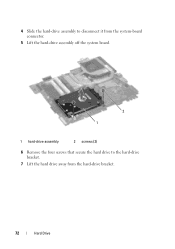
4 Slide the hard-drive assembly to disconnect it from the system-board connector. 5 Lift the hard-drive assembly off the system board. 2 1 1 hard-drive assembly 2 screws (2) 6 Remove the four screws that secure the hard drive to the hard-drive bracket. 7 Lift the hard drive away from the hard-drive bracket. 72 Hard Drive
4 Slide the hard-drive assembly to disconnect it from the system-board connector. 5 Lift the hard-drive assembly off the system board. 2 1 1 hard-drive assembly 2 screws (2) 6 Remove the four screws that secure the hard drive to the hard-drive bracket. 7 Lift the hard drive away from the hard-drive bracket. 72 Hard Drive
Service Manual
Page 73
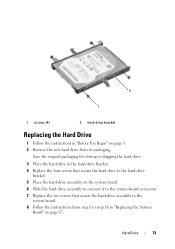
... secure the hard drive to the system-board. 8 Follow the instructions from its packaging. 2 1 1 screws (4) 2 hard-drive bracket Replacing the Hard Drive 1 Follow the instructions in "Before You Begin" on page 9. 2 Remove the new hard drive from step 6 to step 16 in the hard-drive bracket. 4 Replace the four screws that secure the hard-drive assembly to the hard-drive bracket. 5 Place the hard-drive assembly on...
... secure the hard drive to the system-board. 8 Follow the instructions from its packaging. 2 1 1 screws (4) 2 hard-drive bracket Replacing the Hard Drive 1 Follow the instructions in "Before You Begin" on page 9. 2 Remove the new hard drive from step 6 to step 16 in the hard-drive bracket. 4 Replace the four screws that secure the hard-drive assembly to the hard-drive bracket. 5 Place the hard-drive assembly on...


