Inspiron Duo Service Manual
Page 2
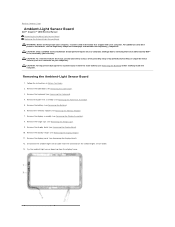
... display bezel (see Removing the Display Assembly). 8. Damage due to the system board, remove the main battery (see the Regulatory Compliance Homepage at www.dell.com/regulatory_compliance. CAUTION: To help prevent damage to servicing that shipped with your computer. Remove the label ... assembly (see Removing the Hinge Caps). 9. Back to Contents Page Ambient-Light Sensor Board Dell™ Inspiron™ 1090 Service Manual Removing the Ambient-Light Sensor Board Replacing the Ambient-Light Sensor Board WARNING: Before working inside your computer, read the safety information ...
... display bezel (see Removing the Display Assembly). 8. Damage due to the system board, remove the main battery (see the Regulatory Compliance Homepage at www.dell.com/regulatory_compliance. CAUTION: To help prevent damage to servicing that shipped with your computer. Remove the label ... assembly (see Removing the Hinge Caps). 9. Back to Contents Page Ambient-Light Sensor Board Dell™ Inspiron™ 1090 Service Manual Removing the Ambient-Light Sensor Board Replacing the Ambient-Light Sensor Board WARNING: Before working inside your computer, read the safety information ...
Inspiron Duo Service Manual
Page 3
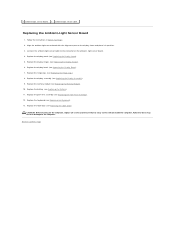
... screws remain inside the computer. CAUTION: Before turning on the ambient- Replace the hinge caps (see Replacing the Battery). 11. Replace the palm-rest assembly (see Replacing the Memory Module). 10. Replace the memory module (see Replacing the Palm-Rest Assembly). 12. Replace the display assembly (see Replacing the Keyboard). 13. Align the ambient light-sensor board with the...
... screws remain inside the computer. CAUTION: Before turning on the ambient- Replace the hinge caps (see Replacing the Battery). 11. Replace the palm-rest assembly (see Replacing the Memory Module). 10. Replace the memory module (see Replacing the Palm-Rest Assembly). 12. Replace the display assembly (see Replacing the Keyboard). 13. Align the ambient light-sensor board with the...
Inspiron Duo Service Manual
Page 4
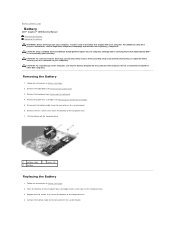
... avoid damage to the computer, use batteries designed for this particular Dell computer. Remove the five screws that secure the battery to the computer base. 4. Place the battery on the computer base and align it with your warranty. Back to Contents Page Battery Dell™ Inspiron™ 1090 Service Manual Removing the Battery Replacing the Battery WARNING: Before working inside your...
... avoid damage to the computer, use batteries designed for this particular Dell computer. Remove the five screws that secure the battery to the computer base. 4. Place the battery on the computer base and align it with your warranty. Back to Contents Page Battery Dell™ Inspiron™ 1090 Service Manual Removing the Battery Replacing the Battery WARNING: Before working inside your...
Inspiron Duo Service Manual
Page 9
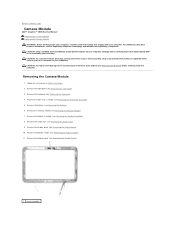
...a certified service technician should perform repairs on your computer). CAUTION: To help prevent damage to the system board, remove the main battery (see Removing the Label Door). 3. Removing the Camera Module 1. Remove the display assembly (see Removing the Display Panel). 1 ...5. Remove the display bezel (see Removing the Display Hinges). 11. Back to Contents Page Camera Module Dell™ Inspiron™ 1090 Service Manual Removing the Camera Module Replacing the Camera Module WARNING: Before working inside your computer, read the safety information that is not authorized by...
...a certified service technician should perform repairs on your computer). CAUTION: To help prevent damage to the system board, remove the main battery (see Removing the Label Door). 3. Removing the Camera Module 1. Remove the display assembly (see Removing the Display Panel). 1 ...5. Remove the display bezel (see Removing the Display Hinges). 11. Back to Contents Page Camera Module Dell™ Inspiron™ 1090 Service Manual Removing the Camera Module Replacing the Camera Module WARNING: Before working inside your computer, read the safety information that is not authorized by...
Inspiron Duo Service Manual
Page 10
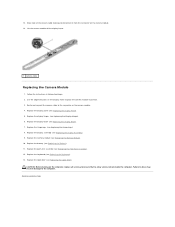
... Assembly). 12. Follow the instructions in position. 3. Replace the palm-rest assembly (see Replacing the Display Panel). 5. Replace the keyboard (see Replacing the Hinge Caps). 8. CAUTION: Before turning on the camera module. 13. 12. Replace the hinge caps (see Replacing the Keyboard). 13. Replace the display assembly (see Replacing the Battery). 11. Failure to do so may result in...
... Assembly). 12. Follow the instructions in position. 3. Replace the palm-rest assembly (see Replacing the Display Panel). 5. Replace the keyboard (see Replacing the Hinge Caps). 8. CAUTION: Before turning on the camera module. 13. 12. Replace the hinge caps (see Replacing the Keyboard). 13. Replace the display assembly (see Replacing the Battery). 11. Failure to do so may result in...
Inspiron Duo Service Manual
Page 11
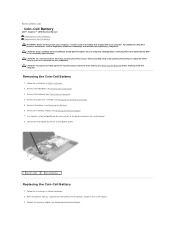
... Palm-Rest Assembly). 5. Follow the instructions in Before You Begin. 2. Remove the palm-rest assembly (see Removing the Battery). 6. Back to Contents Page Coin-Cell Battery Dell™ Inspiron™ 1090 Service Manual Removing the Coin-Cell Battery Replacing the Coin-Cell Battery WARNING: Before working inside your computer, read the safety information that is not authorized by...
... Palm-Rest Assembly). 5. Follow the instructions in Before You Begin. 2. Remove the palm-rest assembly (see Removing the Battery). 6. Back to Contents Page Coin-Cell Battery Dell™ Inspiron™ 1090 Service Manual Removing the Coin-Cell Battery Replacing the Coin-Cell Battery WARNING: Before working inside your computer, read the safety information that is not authorized by...
Inspiron Duo Service Manual
Page 12
Replace the battery (see Replacing the Keyboard). 7. Replace the keyboard (see Replacing the Battery). 5. Back to the computer. Replace the label door (see Replacing the Palm-Rest Assembly). 6. CAUTION: Before turning on the computer, replace all screws and ensure that no stray screws remain inside the computer. Failure to do so may result in damage to Contents Page 4. Replace the palm-rest assembly (see Replacing the Label Door).
Replace the battery (see Replacing the Keyboard). 7. Replace the keyboard (see Replacing the Battery). 5. Back to the computer. Replace the label door (see Replacing the Palm-Rest Assembly). 6. CAUTION: Before turning on the computer, replace all screws and ensure that no stray screws remain inside the computer. Failure to do so may result in damage to Contents Page 4. Replace the palm-rest assembly (see Replacing the Label Door).
Inspiron Duo Service Manual
Page 13
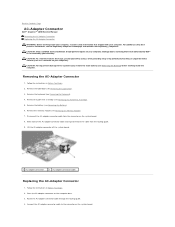
Back to Contents Page AC-Adapter Connector Dell™ Inspiron™ 1090 Service Manual Removing the AC-Adapter Connector Replacing the AC-Adapter Connector WARNING: Before working inside your computer, read the safety information that is not authorized by Dell™ is not covered by periodically...AC-adapter connector cable from the routing guide. 9. Remove the palm-rest assembly (see Removing the Memory Module). 7. Remove the battery (see Removing the Keyboard). 4. Connect the AC-adapter connector cable to servicing that shipped with your computer. CAUTION: To avoid ...
Back to Contents Page AC-Adapter Connector Dell™ Inspiron™ 1090 Service Manual Removing the AC-Adapter Connector Replacing the AC-Adapter Connector WARNING: Before working inside your computer, read the safety information that is not authorized by Dell™ is not covered by periodically...AC-adapter connector cable from the routing guide. 9. Remove the palm-rest assembly (see Removing the Memory Module). 7. Remove the battery (see Removing the Keyboard). 4. Connect the AC-adapter connector cable to servicing that shipped with your computer. CAUTION: To avoid ...
Inspiron Duo Service Manual
Page 14
Replace the palm-rest assembly (see Replacing the Keyboard). 9. CAUTION: Before turning on the computer, replace all screws and ensure that no stray screws remain inside the computer. Replace the keyboard (see Replacing the Palm-Rest Assembly). 8. Replace the memory module (see Replacing the Battery). 7. Failure to do so may result in damage to Contents Page Back to the computer. Replace the battery (see Replacing the Memory Module). 6. Replace the label door (see Replacing the Label Door). 5.
Replace the palm-rest assembly (see Replacing the Keyboard). 9. CAUTION: Before turning on the computer, replace all screws and ensure that no stray screws remain inside the computer. Replace the keyboard (see Replacing the Palm-Rest Assembly). 8. Replace the memory module (see Replacing the Battery). 7. Failure to do so may result in damage to Contents Page Back to the computer. Replace the battery (see Replacing the Memory Module). 6. Replace the label door (see Replacing the Label Door). 5.
Inspiron Duo Service Manual
Page 16
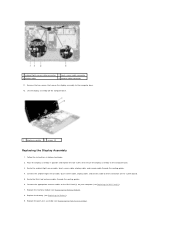
... assembly 2 screws (2) Replacing the Display Assembly 1. Route the Mini-Card antenna cables through the routing guides. 4. 1 ambient light-sensor cable connector 3 display cable 2 touch-screen cable connector 4 camera-cable connector 11. Connect the appropriate antenna cables to the computer base. 3. Place the display assembly in Before You Begin. 2. Replace the battery (see Replacing the Mini-Card(s)). 7.
... assembly 2 screws (2) Replacing the Display Assembly 1. Route the Mini-Card antenna cables through the routing guides. 4. 1 ambient light-sensor cable connector 3 display cable 2 touch-screen cable connector 4 camera-cable connector 11. Connect the appropriate antenna cables to the computer base. 3. Place the display assembly in Before You Begin. 2. Replace the battery (see Replacing the Mini-Card(s)). 7.
Inspiron Duo Service Manual
Page 23
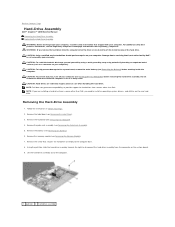
...computer is On or in Before You Begin. 2. Exercise care when handling the hard drive. Remove the battery (see the Regulatory Compliance Homepage at www.dell.com/regulatory_compliance. Remove the memory module (see Removing the Keyboard). 4. Damage due to servicing that is not...). 3. Remove the screw that shipped with your warranty. Back to Contents Page Hard-Drive Assembly Dell™ Inspiron™ 1090 Service Manual Removing the Hard-Drive Assembly Replacing the Hard-Drive Assembly WARNING: Before working inside your computer, read the safety information that secures the...
...computer is On or in Before You Begin. 2. Exercise care when handling the hard drive. Remove the battery (see the Regulatory Compliance Homepage at www.dell.com/regulatory_compliance. Remove the memory module (see Removing the Keyboard). 4. Damage due to servicing that is not...). 3. Remove the screw that shipped with your warranty. Back to Contents Page Hard-Drive Assembly Dell™ Inspiron™ 1090 Service Manual Removing the Hard-Drive Assembly Replacing the Hard-Drive Assembly WARNING: Before working inside your computer, read the safety information that secures the...
Inspiron Duo Service Manual
Page 24
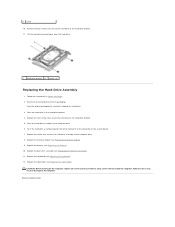
...result in the hard-drive bracket. 4. Replace the palm-rest assembly (see Replacing the Label Door). Replace the label door (see Replacing the Palm-Rest Assembly). 11. Place the hard drive in damage to the computer base. 8. Replace the battery (see Replacing the Battery). 10. Push the hard-drive assembly ...towards the left to connect it to the hard-drive bracket. 11. Remove the four screws that secure the hard drive to the connector on the computer, replace all screws and ensure...
...result in the hard-drive bracket. 4. Replace the palm-rest assembly (see Replacing the Label Door). Replace the label door (see Replacing the Palm-Rest Assembly). 11. Place the hard drive in damage to the computer base. 8. Replace the battery (see Replacing the Battery). 10. Push the hard-drive assembly ...towards the left to connect it to the hard-drive bracket. 11. Remove the four screws that secure the hard drive to the connector on the computer, replace all screws and ensure...

Inspiron Duo Service Manual
Page 25
...the memory module (see Removing the Battery). 6. If the processor fan and heat-sink assembly is replaced, use the thermal grease provided in Before You Begin. 2. Back to Contents Page Processor Fan and Heat-Sink Assembly Dell™ Inspiron™ 1090 Service Manual Removing the Processor Fan ...and Heat-Sink Assembly Replacing the Processor Fan and Heat-Sink Assembly WARNING: Before working inside your computer, read the...
...the memory module (see Removing the Battery). 6. If the processor fan and heat-sink assembly is replaced, use the thermal grease provided in Before You Begin. 2. Back to Contents Page Processor Fan and Heat-Sink Assembly Dell™ Inspiron™ 1090 Service Manual Removing the Processor Fan ...and Heat-Sink Assembly Replacing the Processor Fan and Heat-Sink Assembly WARNING: Before working inside your computer, read the...
Inspiron Duo Service Manual
Page 26
...Rest Assembly). 8. Clean the thermal grease from the bottom of the processor fan and heat-sink assembly and reapply it. 3. Replace the palm-rest assembly (see Replacing the Battery). 7. CAUTION: Before turning on the system board. 5. Back to the computer. Failure to do so may result in damage... to Contents Page Connect the processor fan and heat-sink assembly cable to the connector on the computer, replace all screws and ensure...
...Rest Assembly). 8. Clean the thermal grease from the bottom of the processor fan and heat-sink assembly and reapply it. 3. Replace the palm-rest assembly (see Replacing the Battery). 7. CAUTION: Before turning on the system board. 5. Back to the computer. Failure to do so may result in damage... to Contents Page Connect the processor fan and heat-sink assembly cable to the connector on the computer, replace all screws and ensure...
Inspiron Duo Service Manual
Page 27
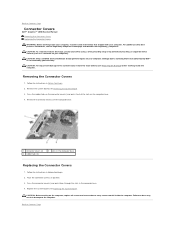
...(s) in damage to Contents Page Connector Covers Dell™ Inspiron™ 1090 Service Manual Removing the Connector Covers Replacing the Connector Covers WARNING: Before working inside your computer, read the safety information that no stray screws remain inside the computer. Back to the system board, remove the main battery (see the Regulatory Compliance Homepage at...
...(s) in damage to Contents Page Connector Covers Dell™ Inspiron™ 1090 Service Manual Removing the Connector Covers Replacing the Connector Covers WARNING: Before working inside your computer, read the safety information that no stray screws remain inside the computer. Back to the system board, remove the main battery (see the Regulatory Compliance Homepage at...
Inspiron Duo Service Manual
Page 33
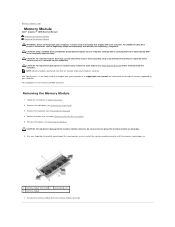
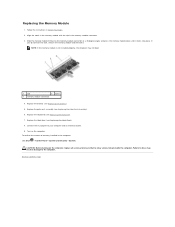
... safety best practices information, see Removing the Keyboard). 4. Remove the battery (see Removing the Label Door). 3. Remove the palm-rest assembly (Removing the Palm-Rest Assembly). 5. Back to Contents Page Memory Module Dell™ Inspiron™ 1090 Service Manual Removing the Memory Module Replacing the Memory Module WARNING: Before working inside your computer, read the...
... safety best practices information, see Removing the Keyboard). 4. Remove the battery (see Removing the Label Door). 3. Remove the palm-rest assembly (Removing the Palm-Rest Assembly). 5. Back to Contents Page Memory Module Dell™ Inspiron™ 1090 Service Manual Removing the Memory Module Replacing the Memory Module WARNING: Before working inside your computer, read the...
Inspiron Duo Service Manual
Page 34
... so may not boot. 1 tab 2 notch 3 memory-module connector 4. Replace the keyboard (see Replacing the Label Door). 8. Replace the label door (see Replacing the Keyboard). 7. Replace the palm-rest assembly (see Replacing the Battery). 5. CAUTION: Before turning on the computer. Follow the instructions in the ...computer: Click Start ® Control Panel® System and Security® System. Replace the battery (see Replacing the Palm-Rest Assembly). 6. NOTE: If the memory module is not installed properly, the computer may result ...
... so may not boot. 1 tab 2 notch 3 memory-module connector 4. Replace the keyboard (see Replacing the Label Door). 8. Replace the label door (see Replacing the Keyboard). 7. Replace the palm-rest assembly (see Replacing the Battery). 5. CAUTION: Before turning on the computer. Follow the instructions in the ...computer: Click Start ® Control Panel® System and Security® System. Replace the battery (see Replacing the Palm-Rest Assembly). 6. NOTE: If the memory module is not installed properly, the computer may result ...
Inspiron Duo Service Manual
Page 35
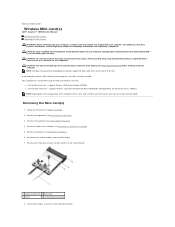
... the system board, remove the main battery (see Removing the Keyboard). 4. CAUTION: To avoid electrostatic discharge, ground yourself by using a wrist grounding strap or by your computer. l One half Mini-Card slot - Back to Contents Page Wireless Mini-Card(s) Dell™ Inspiron™ 1090 Service Manual Removing the Mini-Card(s) Replacing the Mini-Card(s) WARNING: Before working inside your...
... the system board, remove the main battery (see Removing the Keyboard). 4. CAUTION: To avoid electrostatic discharge, ground yourself by using a wrist grounding strap or by your computer. l One half Mini-Card slot - Back to Contents Page Wireless Mini-Card(s) Dell™ Inspiron™ 1090 Service Manual Removing the Mini-Card(s) Replacing the Mini-Card(s) WARNING: Before working inside your...
Inspiron Duo Service Manual
Page 36
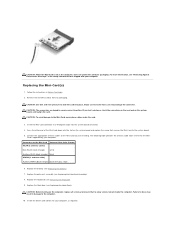
... result in the safety information that no stray screws remain inside the computer. Replace the battery (see Removing the Keyboard). 9. Install the drivers and utilities for the MiniCards supported by your computer. CAUTION: Use firm and even pressure to the Mini-Card, never place cables under the card. 3. If you use excessive force...
... result in the safety information that no stray screws remain inside the computer. Replace the battery (see Removing the Keyboard). 9. Install the drivers and utilities for the MiniCards supported by your computer. CAUTION: Use firm and even pressure to the Mini-Card, never place cables under the card. 3. If you use excessive force...
Inspiron Duo Service Manual
Page 38
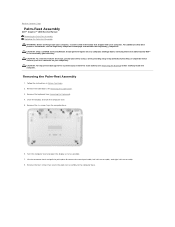
... best practices information, see Removing the Keyboard). 4. Remove the label door (see Removing the Battery) before working inside the computer. Back to Contents Page Palm-Rest Assembly Dell™ Inspiron™ 1090 Service Manual Removing the Palm-Rest Assembly Replacing the Palm-Rest Assembly WARNING: Before working inside your computer, read the safety information that...
... best practices information, see Removing the Keyboard). 4. Remove the label door (see Removing the Battery) before working inside the computer. Back to Contents Page Palm-Rest Assembly Dell™ Inspiron™ 1090 Service Manual Removing the Palm-Rest Assembly Replacing the Palm-Rest Assembly WARNING: Before working inside your computer, read the safety information that...


