Inspiron Mini 9 Ubuntur Quick Reference Guide
Page 6
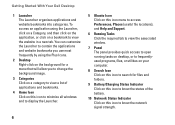
... search for a menu that will allow you to change the background image. 3 Categories Click on a category to view a list of the battery. 10 Network Status Indicator Click on a bookmark to know the network signal strength. 6 To access an application using the Plus Icons. 2 ...Desktop Right-click on the background for files and folders. 9 Battery/Charging Status Indicator Click on this icon to view the website in a new tab. Getting Started With Your Dell Desktop 1 Launcher The Launcher organizes applications and website bookmarks into categories.
... search for a menu that will allow you to change the background image. 3 Categories Click on a category to view a list of the battery. 10 Network Status Indicator Click on a bookmark to know the network signal strength. 6 To access an application using the Plus Icons. 2 ...Desktop Right-click on the background for files and folders. 9 Battery/Charging Status Indicator Click on this icon to view the website in a new tab. Getting Started With Your Dell Desktop 1 Launcher The Launcher organizes applications and website bookmarks into categories.
Inspiron Mini 9 Service Manual
Page 1
... claiming the marks and names or their products. is a registered trademark owned by Dell under license. Model PP39S August 2008 Rev. Dell Inc. Dell™ Inspiron™ 910 Service Manual Before You Begin Module Cover Memory Module Solid-state Drive Communication Cards Keyboard... Palm Rest Internal Card With Bluetooth® Wireless Technology Power Button Board Display Speaker Camera (Optional) System Board Microphone Coin-Cell Battery...
... claiming the marks and names or their products. is a registered trademark owned by Dell under license. Model PP39S August 2008 Rev. Dell Inc. Dell™ Inspiron™ 910 Service Manual Before You Begin Module Cover Memory Module Solid-state Drive Communication Cards Keyboard... Palm Rest Internal Card With Bluetooth® Wireless Technology Power Button Board Display Speaker Camera (Optional) System Board Microphone Coin-Cell Battery...
Inspiron Mini 9 Service Manual
Page 2
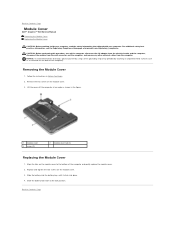
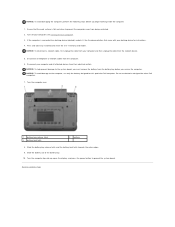
... surface (such as shown in Before You Begin. 2. Slide the battery into the battery bay, until it clicks into place. 4. Removing the Module Cover 1. Back to Contents Page Module Cover Dell™ Inspiron™ 910 Service Manual Removing the Module Cover Replacing the Module Cover CAUTION: Before... tabs on the back of the computer and gently replace the module cover. 2. Remove the two screws on the module cover. 3. Slide the battery-lock latch to the bottom of the computer). Follow the instructions in the figure. 1 module cover 3 screw (2) 2 module cover tab (3) ...
... surface (such as shown in Before You Begin. 2. Slide the battery into the battery bay, until it clicks into place. 4. Removing the Module Cover 1. Back to Contents Page Module Cover Dell™ Inspiron™ 910 Service Manual Removing the Module Cover Replacing the Module Cover CAUTION: Before... tabs on the back of the computer and gently replace the module cover. 2. Remove the two screws on the module cover. 3. Slide the battery-lock latch to the bottom of the computer). Follow the instructions in the figure. 1 module cover 3 screw (2) 2 module cover tab (3) ...
Inspiron Mini 9 Service Manual
Page 4
... scratched. 2. If the computer is flat and clean to the system board, you must remove the battery from the computer. 6. Do not use only the battery designed for this particular Dell computer. Turn the computer top-side up, open the display, and press the power button to ...a docking device (docked), undock it. Back to the computer, use batteries designed for instructions. 4. Turn off your docking device for other Dell computers. 7. NOTICE: To disconnect a network cable, first unplug the cable from your computer and all telephone or...
... scratched. 2. If the computer is flat and clean to the system board, you must remove the battery from the computer. 6. Do not use only the battery designed for this particular Dell computer. Turn the computer top-side up, open the display, and press the power button to ...a docking device (docked), undock it. Back to the computer, use batteries designed for instructions. 4. Turn off your docking device for other Dell computers. 7. NOTICE: To disconnect a network cable, first unplug the cable from your computer and all telephone or...
Inspiron Mini 9 Service Manual
Page 5
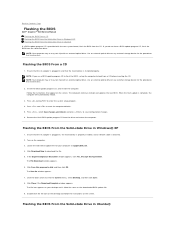
... may not ship with an external optical drive. Insert the BIOS-update program CD, and restart the computer. Follow the instructions that the main battery is installed properly. Press during POST to boot from the solid-state drive. Flashing the BIOS From the Solid-state Drive in Ubuntu®...click Save. 8. Click Save this Agreement. Click the down arrow to disk and then click OK. Back to Contents Page Flashing the BIOS Dell™ Inspiron™ 910 Service Manual Flashing the BIOS From a CD Flashing the BIOS From the Solid-state Drive in Windows® XP Flashing the BIOS From the...
... may not ship with an external optical drive. Insert the BIOS-update program CD, and restart the computer. Follow the instructions that the main battery is installed properly. Press during POST to boot from the solid-state drive. Flashing the BIOS From the Solid-state Drive in Ubuntu®...click Save. 8. Click Save this Agreement. Click the down arrow to disk and then click OK. Back to Contents Page Flashing the BIOS Dell™ Inspiron™ 910 Service Manual Flashing the BIOS From a CD Flashing the BIOS From the Solid-state Drive in Windows® XP Flashing the BIOS From the...
Inspiron Mini 9 Service Manual
Page 6
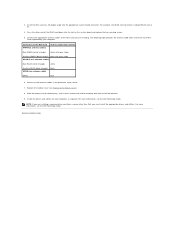
...device for your password c. 1. Locate the latest BIOS update file for the procedures that the AC adapter is plugged in and the main battery is complete. Click Save this Agreement. The Save In window appears. 9. Type sudo -s b. The computer will restart automatically once the ...Click the down arrow to Contents Page Type cd Documents d. Click Close if the Download Complete window appears. 11. Type your computer at support.dell.com. 6. string appears. NOTE: Your computer may or may not ship with an external optical drive. Type cd BIOS e. The File Download...
...device for your password c. 1. Locate the latest BIOS update file for the procedures that the AC adapter is plugged in and the main battery is complete. Click Save this Agreement. The Save In window appears. 9. Type sudo -s b. The computer will restart automatically once the ...Click the down arrow to Contents Page Type cd Documents d. Click Close if the Download Complete window appears. 11. Type your computer at support.dell.com. 6. string appears. NOTE: Your computer may or may not ship with an external optical drive. Type cd BIOS e. The File Download...

Inspiron Mini 9 Service Manual
Page 8
Slide the battery into the battery bay, until it clicks in place and slide the battery-lock latch towards the lock position. Replace the module cover (see Replacing the Module Cover). 6. Back to Contents Page 5.
Slide the battery into the battery bay, until it clicks in place and slide the battery-lock latch towards the lock position. Replace the module cover (see Replacing the Module Cover). 6. Back to Contents Page 5.
Inspiron Mini 9 Service Manual
Page 9
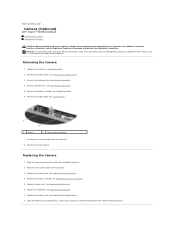
...holes and gently replace it clicks in Before You Begin. 2. Reconnect the camera cable to Contents Page Camera (Optional) Dell™ Inspiron™ 910 Service Manual Removing the Camera Replacing the Camera CAUTION: Before working inside your computer, read the safety information that shipped ...rest (see Display Assembly). 6. Remove the display assembly (see Removing the Palm Rest). 5. Follow the instructions in place and slide the battery-lock latch towards the lock position. Remove the keyboard (see Replacing the Palm Rest). 6. Remove the camera board. Replacing the Camera 1....
...holes and gently replace it clicks in Before You Begin. 2. Reconnect the camera cable to Contents Page Camera (Optional) Dell™ Inspiron™ 910 Service Manual Removing the Camera Replacing the Camera CAUTION: Before working inside your computer, read the safety information that shipped ...rest (see Display Assembly). 6. Remove the display assembly (see Removing the Palm Rest). 5. Follow the instructions in place and slide the battery-lock latch towards the lock position. Remove the keyboard (see Replacing the Palm Rest). 6. Remove the camera board. Replacing the Camera 1....
Inspiron Mini 9 Service Manual
Page 11
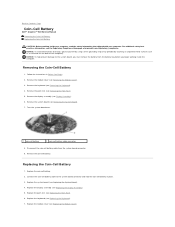
... assembly (see the Regulatory Compliance Homepage at www.dell.com/regulatory_compliance. Remove the coin-cell battery. Replace the display assembly (see Removing the System Board). 7. Disconnect the coin-cell battery cable from the battery bay before you begin working inside the computer. ...to the system board, you must remove the battery from the system board connector. 9. Back to Contents Page Coin-Cell Battery Dell™ Inspiron™ 910 Service Manual Removing the Coin-Cell Battery Replacing the Coin-Cell Battery CAUTION: Before working inside your computer, read...
... assembly (see the Regulatory Compliance Homepage at www.dell.com/regulatory_compliance. Remove the coin-cell battery. Replace the display assembly (see Removing the System Board). 7. Disconnect the coin-cell battery cable from the battery bay before you begin working inside the computer. ...to the system board, you must remove the battery from the system board connector. 9. Back to Contents Page Coin-Cell Battery Dell™ Inspiron™ 910 Service Manual Removing the Coin-Cell Battery Replacing the Coin-Cell Battery CAUTION: Before working inside your computer, read...

Inspiron Mini 9 Service Manual
Page 12
Back to Contents Page 8. Slide the main battery into the battery bay, until it clicks in place and slide the battery-lock latch towards the lock position.
Back to Contents Page 8. Slide the main battery into the battery bay, until it clicks in place and slide the battery-lock latch towards the lock position.
Inspiron Mini 9 Service Manual
Page 13
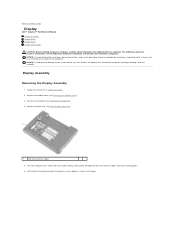
...connector on the back of the cable routing, and carefully dislodge the Mini-Card antenna cables from the battery bay before you begin working inside the computer. NOTICE: To help prevent damage to Contents Page Display Dell™ Inspiron™ 910 Service Manual Display Assembly Display Bezel Display Panel Display Panel Cable CAUTION:...practices information, see Removing the Module Cover). 3. Follow the instructions in the figure. Back to the system board, you must remove the battery from their routing guides. 6. Remove the module cover (see the Regulatory Compliance Homepage at www...
...connector on the back of the cable routing, and carefully dislodge the Mini-Card antenna cables from the battery bay before you begin working inside the computer. NOTICE: To help prevent damage to Contents Page Display Dell™ Inspiron™ 910 Service Manual Display Assembly Display Bezel Display Panel Display Panel Cable CAUTION:...practices information, see Removing the Module Cover). 3. Follow the instructions in the figure. Back to the system board, you must remove the battery from their routing guides. 6. Remove the module cover (see the Regulatory Compliance Homepage at www...
Inspiron Mini 9 Service Manual
Page 14
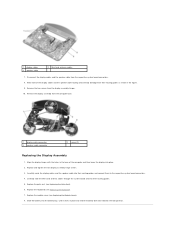
...the computer and then lower the display into the battery bay, until it clicks in place and slide the battery-lock latch towards the lock position. Align the display hinges with the holes in the figure. 9. Carefully slide the Mini-Card antenna cables through the system board and into... their routing guides. 5. Slide the battery into place. 2. Carefully route the display cables and the speaker cable into their routing guides and...
...the computer and then lower the display into the battery bay, until it clicks in place and slide the battery-lock latch towards the lock position. Align the display hinges with the holes in the figure. 9. Carefully slide the Mini-Card antenna cables through the system board and into... their routing guides. 5. Slide the battery into place. 2. Carefully route the display cables and the speaker cable into their routing guides and...
Inspiron Mini 9 Service Manual
Page 18
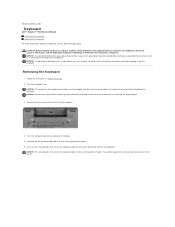
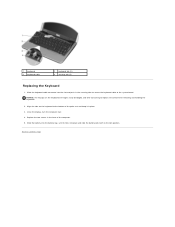
NOTICE: To help prevent damage to the system board, you must remove the battery from the base of the computer). Remove the two screws from the battery bay before you begin working inside the computer. NOTICE: The securing tabs that secure the keyboard cable to the system board ... dislodged, and time-consuming to replace. Turn the computer top-side up and open the display. 5. Back to Contents Page Keyboard Dell™ Inspiron™ 910 Service Manual Removing the Keyboard Replacing the Keyboard For more information about the keyboard, see the Regulatory Compliance Homepage at www...
NOTICE: To help prevent damage to the system board, you must remove the battery from the base of the computer). Remove the two screws from the battery bay before you begin working inside the computer. NOTICE: The securing tabs that secure the keyboard cable to the system board ... dislodged, and time-consuming to replace. Turn the computer top-side up and open the display. 5. Back to Contents Page Keyboard Dell™ Inspiron™ 910 Service Manual Removing the Keyboard Replacing the Keyboard For more information about the keyboard, see the Regulatory Compliance Homepage at www...
Inspiron Mini 9 Service Manual
Page 19
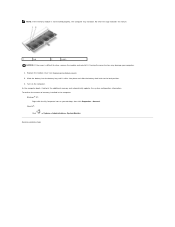
..., and time-consuming to the system board. Replace the two screws in the securing tabs to secure the keyboard cable to replace. Slide the battery into the battery bay, until it clicks into the slot and push in the base of the palm rest and keep it in place. 3. Slide the keyboard... cable connector into place and slide the battery-lock latch to the bottom of the computer. 5. Close the display, turn the computer over. 4. NOTICE: The keycaps on the keyboard to the lock position...
..., and time-consuming to the system board. Replace the two screws in the securing tabs to secure the keyboard cable to replace. Slide the battery into the battery bay, until it clicks into the slot and push in the base of the palm rest and keep it in place. 3. Slide the keyboard... cable connector into place and slide the battery-lock latch to the bottom of the computer. 5. Close the display, turn the computer over. 4. NOTICE: The keycaps on the keyboard to the lock position...
Inspiron Mini 9 Service Manual
Page 21
... module is difficult to close , remove the module and reinstall it detects the additional memory and automatically updates the system configuration information. Slide the battery into the battery bay until it clicks into place and slide the battery-lock latch to Contents Page Ubuntu®: Click ® System® Administration® System Monitor.
... module is difficult to close , remove the module and reinstall it detects the additional memory and automatically updates the system configuration information. Slide the battery into the battery bay until it clicks into place and slide the battery-lock latch to Contents Page Ubuntu®: Click ® System® Administration® System Monitor.
Inspiron Mini 9 Service Manual
Page 22
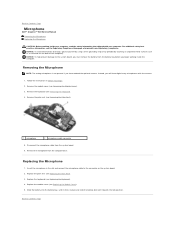
...the optional camera. Disconnect the microphone cable from the computer base. Back to the system board, you must remove the battery from the battery bay before you have digital array microphones with your computer, read the safety information that shipped with the camera. 1. Remove...(see Removing the Keyboard). 4. Insert the microphone in the slot and connect the microphone cable to Contents Page Microphone Dell™ Inspiron™ 910 Service Manual Removing the Microphone Replacing the Microphone CAUTION: Before working inside your computer. Back to the connector on the ...
...the optional camera. Disconnect the microphone cable from the computer base. Back to the system board, you must remove the battery from the battery bay before you have digital array microphones with your computer, read the safety information that shipped with the camera. 1. Remove...(see Removing the Keyboard). 4. Insert the microphone in the slot and connect the microphone cable to Contents Page Microphone Dell™ Inspiron™ 910 Service Manual Removing the Microphone Replacing the Microphone CAUTION: Before working inside your computer. Back to the connector on the ...
Inspiron Mini 9 Service Manual
Page 24
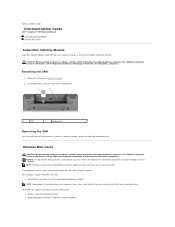
... card is partially ejected, remove the SIM from sources other than Dell. Your computer supports two Mini-Card slots: l Two Full Mini-Card slots - for Mini-Cards from the battery bay. For additional safety best practices information, see the Regulatory Compliance...Wireless Wide Area Network (WWAN) NOTICE: To help prevent damage to Contents Page Communication Cards Dell™ Inspiron™ 910 Service Manual Subscriber Identity Module Wireless Mini-Cards Subscriber Identity Module Subscriber Identity Modules (SIM) identify users uniquely through an International Mobile ...
... card is partially ejected, remove the SIM from sources other than Dell. Your computer supports two Mini-Card slots: l Two Full Mini-Card slots - for Mini-Cards from the battery bay. For additional safety best practices information, see the Regulatory Compliance...Wireless Wide Area Network (WWAN) NOTICE: To help prevent damage to Contents Page Communication Cards Dell™ Inspiron™ 910 Service Manual Subscriber Identity Module Wireless Mini-Cards Subscriber Identity Module Subscriber Identity Modules (SIM) identify users uniquely through an International Mobile ...
Inspiron Mini 9 Service Manual
Page 26
... system board connector. NOTE: If you must install the appropriate drivers and utilities. Insert the Mini-Card at a 45-degree angle into the battery bay, until it clicks in the protective mylar sleeve. 7. Press the other than Dell, you are installing. Install the drivers and utilities for each MiniCard supported by your computer...
... system board connector. NOTE: If you must install the appropriate drivers and utilities. Insert the Mini-Card at a 45-degree angle into the battery bay, until it clicks in the protective mylar sleeve. 7. Press the other than Dell, you are installing. Install the drivers and utilities for each MiniCard supported by your computer...
Inspiron Mini 9 Service Manual
Page 29
Turn the computer over and replace the nine screws in place and slide the battery-lock latch towards the lock position. Replace the keyboard (see Replacing the Module Cover). 10. Replace the module cover (see Replacing the Keyboard). 9. Back to Contents Page Slide the battery into the battery bay, until it clicks in the computer base. 7. 6. Replace the left and right rubber bumpers. 8.
Turn the computer over and replace the nine screws in place and slide the battery-lock latch towards the lock position. Replace the keyboard (see Replacing the Module Cover). 10. Replace the module cover (see Replacing the Keyboard). 9. Back to Contents Page Slide the battery into the battery bay, until it clicks in the computer base. 7. 6. Replace the left and right rubber bumpers. 8.

Inspiron Mini 9 Service Manual
Page 31
6. Slide the battery into the battery bay, until it clicks in place and slide the battery-lock latch towards the lock position. Back to Contents Page
6. Slide the battery into the battery bay, until it clicks in place and slide the battery-lock latch towards the lock position. Back to Contents Page

