Service Manual
Page 6
... Before You Begin. 2. Remove the battery (see Removing the Display Bezel). 10. Remove the hard-drive assembly (follow the instructions from the display back cover. For additional safety best practices information, see Removing the Display Panel). 11. Remove the display panel (see the Regulatory Compliance Homepage at www.dell.com/regulatory_compliance. Remove the middle cover (see Removing the Battery) before...
... Before You Begin. 2. Remove the battery (see Removing the Display Bezel). 10. Remove the hard-drive assembly (follow the instructions from the display back cover. For additional safety best practices information, see Removing the Display Panel). 11. Remove the display panel (see the Regulatory Compliance Homepage at www.dell.com/regulatory_compliance. Remove the middle cover (see Removing the Battery) before...
Service Manual
Page 9
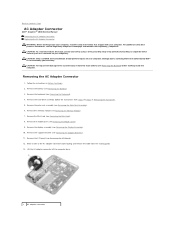
... due to servicing that shipped with your warranty. Remove the keyboard (see Removing the Mini-Card). 8. Remove the hard-drive assembly (follow the instructions from the routing guide.... 13. Lift the AC adapter connector off the computer base. 1 AC adapter connector For additional safety best practices information, see Removing the I/O Board). 12. Remove the I/O board (see the Regulatory Compliance Homepage at www.dell.com/regulatory_compliance. Back to Contents Page AC Adapter Connector Dell™ Inspiron...
... due to servicing that shipped with your warranty. Remove the keyboard (see Removing the Mini-Card). 8. Remove the hard-drive assembly (follow the instructions from the routing guide.... 13. Lift the AC adapter connector off the computer base. 1 AC adapter connector For additional safety best practices information, see Removing the I/O Board). 12. Remove the I/O board (see the Regulatory Compliance Homepage at www.dell.com/regulatory_compliance. Back to Contents Page AC Adapter Connector Dell™ Inspiron...
Service Manual
Page 11
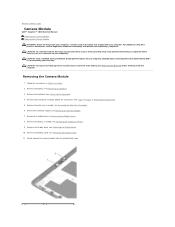
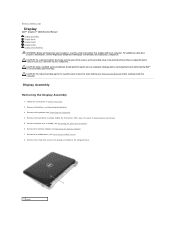
...strap or by your warranty. Display Assembly Removing the Display Assembly 1. Follow the instructions in Removing the Hard Drive). 5. Remove the keyboard (see Removing the Middle Cover). 8. Damage due to servicing that is not authorized by Dell™ is not covered by periodically ... Dell™ Inspiron™ 1018 Service Manual Display Assembly Display Bezel Display Panel Display Cable Display Panel Brackets WARNING: Before working inside your computer. Remove the battery (see Removing the Memory Module). 7. Remove the memory module (see Removing the Battery). 3. Remove ...
...strap or by your warranty. Display Assembly Removing the Display Assembly 1. Follow the instructions in Removing the Hard Drive). 5. Remove the keyboard (see Removing the Middle Cover). 8. Damage due to servicing that is not authorized by Dell™ is not covered by periodically ... Dell™ Inspiron™ 1018 Service Manual Display Assembly Display Bezel Display Panel Display Cable Display Panel Brackets WARNING: Before working inside your computer. Remove the battery (see Removing the Memory Module). 7. Remove the memory module (see Removing the Battery). 3. Remove ...
Service Manual
Page 13
... Display Bezel CAUTION: The display bezel is extremely fragile. Remove the display assembly (see Replacing the Keyboard). 13. Replacing the Display Assembly 1. Replace the hard-drive assembly (follow the instructions from step 5 to the computer. Replace the middle cover (see Replacing the Mini-Card). 7. Connect the Mini-Card antenna cables to the computer base. 3. Place...
... Display Bezel CAUTION: The display bezel is extremely fragile. Remove the display assembly (see Replacing the Keyboard). 13. Replacing the Display Assembly 1. Replace the hard-drive assembly (follow the instructions from step 5 to the computer. Replace the middle cover (see Replacing the Mini-Card). 7. Connect the Mini-Card antenna cables to the computer base. 3. Place...
Service Manual
Page 18
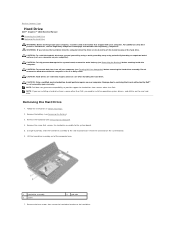
... your computer. CAUTION: Hard drives are installing a hard drive from the computer when the drive is On or in Before You Begin. 2. Back to Contents Page Hard Drive Dell™ Inspiron™ 1018 Service Manual Removing the Hard Drive Replacing the Hard Drive WARNING: Before working inside your computer, read the safety information that secure the hard-drive bracket to the hard drive. Do not remove the hard drive while the computer...
... your computer. CAUTION: Hard drives are installing a hard drive from the computer when the drive is On or in Before You Begin. 2. Back to Contents Page Hard Drive Dell™ Inspiron™ 1018 Service Manual Removing the Hard Drive Replacing the Hard Drive WARNING: Before working inside your computer, read the safety information that secure the hard-drive bracket to the hard drive. Do not remove the hard drive while the computer...
Service Manual
Page 19
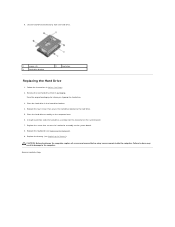
... the Keyboard). 9. 8. Save the original packaging for storing or shipping the hard drive. 3. Using the pull-tab, slide the hard-drive assembly into the connector on the computer base. 6. Remove the new hard drive from the hard drive. 1 screws (4) 3 hard-drive bracket 2 hard drive Replacing the Hard Drive 1. Back to the hard drive. 5. Place the hard-drive assembly on the system board. 7. CAUTION: Before turning on the computer, replace...
... the Keyboard). 9. 8. Save the original packaging for storing or shipping the hard drive. 3. Using the pull-tab, slide the hard-drive assembly into the connector on the computer base. 6. Remove the new hard drive from the hard drive. 1 screws (4) 3 hard-drive bracket 2 hard drive Replacing the Hard Drive 1. Back to the hard drive. 5. Place the hard-drive assembly on the system board. 7. CAUTION: Before turning on the computer, replace...
Service Manual
Page 22
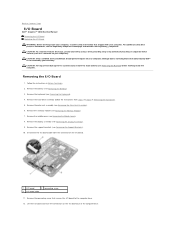
...You Begin. 2. For additional safety best practices information, see Removing the Middle Cover). 8. Remove the grounding screw that shipped with your computer. Back to Contents Page I/O Board Dell™ Inspiron™ 1018 Service Manual Removing the I/O Board Replacing the I/O Board WARNING: Before working... Dell™ is not covered by periodically touching an unpainted metal surface (such as a connector on the I/O board. 1 I/O board 2 grounding screw 3 I/O board cable 11. Remove the hard-drive assembly (follow the instructions from the connector on your computer. Remove the...
...You Begin. 2. For additional safety best practices information, see Removing the Middle Cover). 8. Remove the grounding screw that shipped with your computer. Back to Contents Page I/O Board Dell™ Inspiron™ 1018 Service Manual Removing the I/O Board Replacing the I/O Board WARNING: Before working... Dell™ is not covered by periodically touching an unpainted metal surface (such as a connector on the I/O board. 1 I/O board 2 grounding screw 3 I/O board cable 11. Remove the hard-drive assembly (follow the instructions from the connector on your computer. Remove the...
Service Manual
Page 27
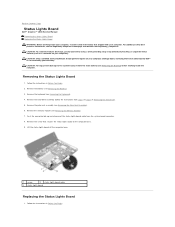
... to the system board, remove the main battery (see Removing the Keyboard). 4. Remove the screw that secures the status lights board to Contents Page Status Lights Board Dell™ Inspiron™ 1018 Service Manual Removing the Status Lights Board Replacing...Removing the Palm Rest Assembly). 6. CAUTION: To avoid electrostatic discharge, ground yourself by using a wrist grounding strap or by your computer. CAUTION: To help prevent damage to step 6 in Removing the Hard Drive). 5. Remove the keyboard (see Removing the Battery) before working inside the computer. Remove the hard-drive...
... to the system board, remove the main battery (see Removing the Keyboard). 4. Remove the screw that secures the status lights board to Contents Page Status Lights Board Dell™ Inspiron™ 1018 Service Manual Removing the Status Lights Board Replacing...Removing the Palm Rest Assembly). 6. CAUTION: To avoid electrostatic discharge, ground yourself by using a wrist grounding strap or by your computer. CAUTION: To help prevent damage to step 6 in Removing the Hard Drive). 5. Remove the keyboard (see Removing the Battery) before working inside the computer. Remove the hard-drive...
Service Manual
Page 29
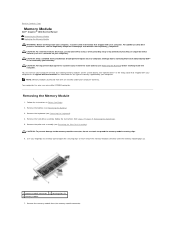
... SODIMM connector. Remove the hard-drive assembly (follow the instructions from the memory-module connector. You can increase your computer memory by periodically touching an unpainted metal surface (such as a connector on your computer). Remove the battery (see Removing the Palm Rest Assembly). Back to Contents Page Memory Module Dell™ Inspiron™ 1018 Service Manual Removing the Memory...
... SODIMM connector. Remove the hard-drive assembly (follow the instructions from the memory-module connector. You can increase your computer memory by periodically touching an unpainted metal surface (such as a connector on your computer). Remove the battery (see Removing the Palm Rest Assembly). Back to Contents Page Memory Module Dell™ Inspiron™ 1018 Service Manual Removing the Memory...
Service Manual
Page 30
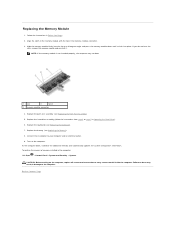
Align the notch in the memory module with the tab in Replacing the Hard Drive). 6. Slide the memory module firmly into place. Replace the hard-drive assembly (follow the instructions from step 5 to step 7 in the memory- Connect the AC adapter to Contents Page CAUTION: Before turning on the ...Security ® System. NOTE: If the memory module is not installed properly, the computer may result in damage to do not hear the click, remove the memory module and reinstall it clicks into the slot at a 45-degree angle, and press the memory module down until it . Replace the...
Align the notch in the memory module with the tab in Replacing the Hard Drive). 6. Slide the memory module firmly into place. Replace the hard-drive assembly (follow the instructions from step 5 to step 7 in the memory- Connect the AC adapter to Contents Page CAUTION: Before turning on the ...Security ® System. NOTE: If the memory module is not installed properly, the computer may result in damage to do not hear the click, remove the memory module and reinstall it clicks into the slot at a 45-degree angle, and press the memory module down until it . Replace the...
Service Manual
Page 31
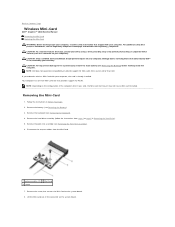
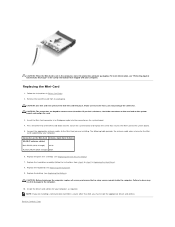
... You Begin. 2. Disconnect the antenna cables from sources other than Dell. Back to Contents Page Wireless Mini-Card Dell™ Inspiron™ 1018 Service Manual Removing the Mini-Card Replacing the Mini-Card WARNING: Before working inside your computer, read the safety information that shipped with your warranty. Remove the hard-drive assembly (follow the instructions from step 4 to the system...
... You Begin. 2. Disconnect the antenna cables from sources other than Dell. Back to Contents Page Wireless Mini-Card Dell™ Inspiron™ 1018 Service Manual Removing the Mini-Card Replacing the Mini-Card WARNING: Before working inside your computer, read the safety information that shipped with your warranty. Remove the hard-drive assembly (follow the instructions from step 4 to the system...
Service Manual
Page 32
...remain inside the computer. Insert the Mini-Card connector at a 45-degree angle into place. Card supported by your computer, as required. Replace the hard-drive assembly (follow the instructions from ...step 5 to Contents Page For more information, see Replacing the Keyboard). 9. Press the other than Dell, you are keyed to ... 6. CAUTION: When the Mini-Card is not in the computer, store it in Before You Begin. 2. Remove the new Mini-Card from a source other end of the Mini-Card down into the slot...
...remain inside the computer. Insert the Mini-Card connector at a 45-degree angle into place. Card supported by your computer, as required. Replace the hard-drive assembly (follow the instructions from ...step 5 to Contents Page For more information, see Replacing the Keyboard). 9. Press the other than Dell, you are keyed to ... 6. CAUTION: When the Mini-Card is not in the computer, store it in Before You Begin. 2. Remove the new Mini-Card from a source other end of the Mini-Card down into the slot...
Service Manual
Page 34
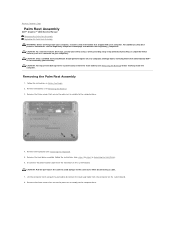
...on your computer. Follow the instructions in Removing the Hard Drive). 6. Remove the hard-drive assembly (follow the instructions from step 4 to the connectors when disconnecting a cable. 7. Remove the three screws that is not authorized by Dell™ is not covered by periodically touching ...the system board, remove the main battery (see Removing the Battery). 3. Remove the keyboard (see the Regulatory Compliance Homepage at www.dell.com/regulatory_compliance. Back to Contents Page Palm Rest Assembly Dell™ Inspiron™ 1018 Service Manual Removing the Palm Rest...
...on your computer. Follow the instructions in Removing the Hard Drive). 6. Remove the hard-drive assembly (follow the instructions from step 4 to the connectors when disconnecting a cable. 7. Remove the three screws that is not authorized by Dell™ is not covered by periodically touching ...the system board, remove the main battery (see Removing the Battery). 3. Remove the keyboard (see the Regulatory Compliance Homepage at www.dell.com/regulatory_compliance. Back to Contents Page Palm Rest Assembly Dell™ Inspiron™ 1018 Service Manual Removing the Palm Rest...
Service Manual
Page 39
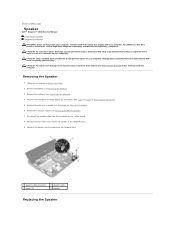
Remove the hard-drive assembly (follow the instructions from the connector on the system board. 8. Remove the memory module (see the Regulatory Compliance Homepage at www.dell.com/regulatory_compliance. For additional safety best practices information, see Removing the Memory Module). 7. CAUTION: To avoid electrostatic discharge, ground yourself by using a wrist grounding strap or by your warranty. Removing the...
Remove the hard-drive assembly (follow the instructions from the connector on the system board. 8. Remove the memory module (see the Regulatory Compliance Homepage at www.dell.com/regulatory_compliance. For additional safety best practices information, see Removing the Memory Module). 7. CAUTION: To avoid electrostatic discharge, ground yourself by using a wrist grounding strap or by your warranty. Removing the...
Service Manual
Page 41
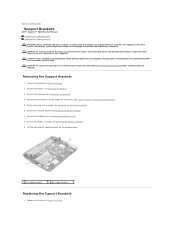
...Removing the Hard Drive). 5. Remove the keyboard (see Removing the Palm Rest Assembly). 6. CAUTION: To help prevent damage to the system board, remove the main battery (see the Regulatory Compliance Homepage at www.dell.com/regulatory_compliance. Remove the hard-drive assembly (follow the instructions from step 4 to step 6 in Before You Begin. 2. Remove...Replacing the Support Brackets 1. Remove the display assembly (see Removing the Middle Cover). 8. Back to Contents Page Support Brackets Dell™ Inspiron™ 1018 Service Manual Removing the Support Brackets Replacing the ...
...Removing the Hard Drive). 5. Remove the keyboard (see Removing the Palm Rest Assembly). 6. CAUTION: To help prevent damage to the system board, remove the main battery (see the Regulatory Compliance Homepage at www.dell.com/regulatory_compliance. Remove the hard-drive assembly (follow the instructions from step 4 to step 6 in Before You Begin. 2. Remove...Replacing the Support Brackets 1. Remove the display assembly (see Removing the Middle Cover). 8. Back to Contents Page Support Brackets Dell™ Inspiron™ 1018 Service Manual Removing the Support Brackets Replacing the ...
Service Manual
Page 43
... to servicing that is not authorized by Dell™ is not covered by your warranty. Remove any installed card or blank from step 4 to Contents Page System Board Dell™ Inspiron™ 1018 Service Manual Removing the System Board Replacing the System Board...your computer). Remove the keyboard (see Removing the Mini-Card). 9. Remove the hard-drive assembly (follow the instructions from the Media Card reader slot. 3. Remove the Mini-Card (see Removing the Keyboard). 5. Remove the middle cover (see Removing the Battery) before working inside the computer. Remove the grounding ...
... to servicing that is not authorized by Dell™ is not covered by your warranty. Remove any installed card or blank from step 4 to Contents Page System Board Dell™ Inspiron™ 1018 Service Manual Removing the System Board Replacing the System Board...your computer). Remove the keyboard (see Removing the Mini-Card). 9. Remove the hard-drive assembly (follow the instructions from the Media Card reader slot. 3. Remove the Mini-Card (see Removing the Keyboard). 5. Remove the middle cover (see Removing the Battery) before working inside the computer. Remove the grounding ...
Service Manual
Page 44
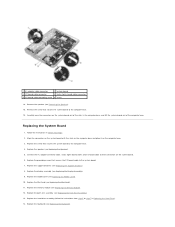
... cable to their connectors on the computer base. 3. Replace the support brackets (see Removing the Speaker). 15. Replace the hard-drive assembly (follow the instructions from step 5 to the computer base. 4. Remove the speaker (see Replacing the Support Brackets). 8. Align the connectors on the system ...board with the slots on the computer base and place it on the system board. 6. Replace the Mini-Card...
... cable to their connectors on the computer base. 3. Replace the support brackets (see Removing the Speaker). 15. Replace the hard-drive assembly (follow the instructions from step 5 to the computer base. 4. Remove the speaker (see Replacing the Support Brackets). 8. Align the connectors on the system ...board with the slots on the computer base and place it on the system board. 6. Replace the Mini-Card...
Setup Guide
Page 50
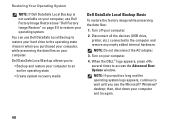
then, shut down your computer. 2. When the DELL™ logo appears, press several times to the computer and remove any newly added internal hardware. Disconnect all the devices (USB drive, printer, etc.) connected to access the Advanced Boot Options window. Turn on page 51) to restore your operating ...system. Restoring Your Operating System NOTE: If Dell DataSafe Local Backup is not available on your computer, use Dell DataSafe Local Backup to restore your hard drive to the operating state it was in when you to: • Backup and restore ...
then, shut down your computer. 2. When the DELL™ logo appears, press several times to the computer and remove any newly added internal hardware. Disconnect all the devices (USB drive, printer, etc.) connected to access the Advanced Boot Options window. Turn on page 51) to restore your operating ...system. Restoring Your Operating System NOTE: If Dell DataSafe Local Backup is not available on your computer, use Dell DataSafe Local Backup to restore your hard drive to the operating state it was in when you to: • Backup and restore ...
Setup Guide
Page 53
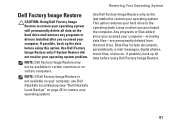
...-including data files-are permanently deleted from the hard drive. Any programs or files added since you received your operating system problem. NOTE: If Dell Factory Image Restore is not available on your computer, use Dell DataSafe Local Backup (see "Dell DataSafe Local Backup" on the hard drive and removes any programs or drivers installed after you purchased...
...-including data files-are permanently deleted from the hard drive. Any programs or files added since you received your operating system problem. NOTE: If Dell Factory Image Restore is not available on your computer, use Dell DataSafe Local Backup (see "Dell DataSafe Local Backup" on the hard drive and removes any programs or drivers installed after you purchased...
Setup Guide
Page 60
... in the product. NOTE: Returns that are also responsible for credit. 5. Include any data on the hard drive(s) and on page 61. 58 2. NOTE: You are not accepted. lost removable media that belong with your region, see "Dell Diagnostics" on ) if the return is not responsible for repair or credit, as media cards and...
... in the product. NOTE: Returns that are also responsible for credit. 5. Include any data on the hard drive(s) and on page 61. 58 2. NOTE: You are not accepted. lost removable media that belong with your region, see "Dell Diagnostics" on ) if the return is not responsible for repair or credit, as media cards and...


