Service Manual
Page 1
... by Bluetooth SIG, Inc. disclaims any manner whatsoever without notice. © 2010 Dell Inc. Dell™ Inspiron™ 1018 Service Manual Before You Begin Battery Keyboard Hard Drive Palm Rest Assembly Power Button Board Memory Module Speaker Middle Cover Display Camera Module I/O Board Wireless Mini-Card Status Lights Board Support Brackets AC Adapter Connector System Board Coin...
... by Bluetooth SIG, Inc. disclaims any manner whatsoever without notice. © 2010 Dell Inc. Dell™ Inspiron™ 1018 Service Manual Before You Begin Battery Keyboard Hard Drive Palm Rest Assembly Power Button Board Memory Module Speaker Middle Cover Display Camera Module I/O Board Wireless Mini-Card Status Lights Board Support Brackets AC Adapter Connector System Board Coin...
Service Manual
Page 6
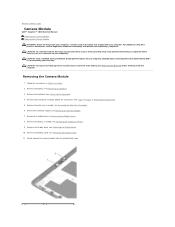
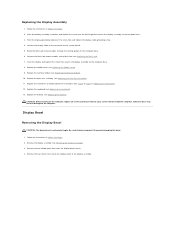
...rest assembly (see the Regulatory Compliance Homepage at www.dell.com/regulatory_compliance. Damage due to servicing that shipped with your computer. Follow the instructions in Removing the Hard Drive). 5. For additional safety best practices information, see ...hard-drive assembly (follow the instructions from the display back cover. CAUTION: To avoid electrostatic discharge, ground yourself by using a wrist grounding strap or by your warranty. Remove the display panel (see Removing the Memory Module). 7. Back to Contents Page Camera Module Dell™ Inspiron™ 1018...
...rest assembly (see the Regulatory Compliance Homepage at www.dell.com/regulatory_compliance. Damage due to servicing that shipped with your computer. Follow the instructions in Removing the Hard Drive). 5. For additional safety best practices information, see ...hard-drive assembly (follow the instructions from the display back cover. CAUTION: To avoid electrostatic discharge, ground yourself by using a wrist grounding strap or by your warranty. Remove the display panel (see Removing the Memory Module). 7. Back to Contents Page Camera Module Dell™ Inspiron™ 1018...
Service Manual
Page 7
... 8. 1 camera module 2 camera cable connector Replacing the Camera Module 1. Replace the middle cover (see Replacing the Display Assembly). 6. Replace the hard-drive assembly (follow the instructions from step 5 to the computer. Failure to do so may result in damage to step 7 in Before You Begin. ...2. Replace the display assembly (see Replacing the Middle Cover). 7. Follow the instructions in Replacing the Hard Drive). 10. Back to place the camera module on the computer, replace all screws and ensure that no stray screws remain inside the ...
... 8. 1 camera module 2 camera cable connector Replacing the Camera Module 1. Replace the middle cover (see Replacing the Display Assembly). 6. Replace the hard-drive assembly (follow the instructions from step 5 to the computer. Failure to do so may result in damage to step 7 in Before You Begin. ...2. Replace the display assembly (see Replacing the Middle Cover). 7. Follow the instructions in Replacing the Hard Drive). 10. Back to place the camera module on the computer, replace all screws and ensure that no stray screws remain inside the ...
Service Manual
Page 9
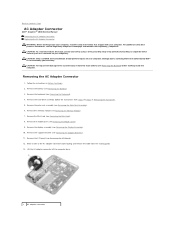
...the AC adapter connector off the computer base. 1 AC adapter connector Back to Contents Page AC Adapter Connector Dell™ Inspiron™ 1018 Service Manual Removing the AC Adapter Connector Replacing the AC Adapter Connector WARNING: Before working inside your computer,... the hard-drive assembly (follow the instructions from the routing guide. 13. Remove the keyboard (see the Regulatory Compliance Homepage at www.dell.com/regulatory_compliance. For additional safety best practices information, see Removing the Keyboard). 4. Remove the Mini-Card (see Removing the Mini-Card)....
...the AC adapter connector off the computer base. 1 AC adapter connector Back to Contents Page AC Adapter Connector Dell™ Inspiron™ 1018 Service Manual Removing the AC Adapter Connector Replacing the AC Adapter Connector WARNING: Before working inside your computer,... the hard-drive assembly (follow the instructions from the routing guide. 13. Remove the keyboard (see the Regulatory Compliance Homepage at www.dell.com/regulatory_compliance. For additional safety best practices information, see Removing the Keyboard). 4. Remove the Mini-Card (see Removing the Mini-Card)....
Service Manual
Page 10
... inside the computer. Replace the memory module (see Replacing the Battery). CAUTION: Before turning on the system board. 4. Replace the hard-drive assembly (follow the instructions from step 5 to do so may result in the computer base. 3. Replace the battery (see Replacing...in Before You Begin. 2. Replace the display assembly (see Replacing the Support Brackets). 6. Replace the I/O board (see Replacing the Mini-Card). 9. Replace the Mini-Card (see Replacing the I/O Board). 5. Replace the palm rest assembly (see Replacing the Middle Cover). 8. Replace the middle cover ...
... inside the computer. Replace the memory module (see Replacing the Battery). CAUTION: Before turning on the system board. 4. Replace the hard-drive assembly (follow the instructions from step 5 to do so may result in the computer base. 3. Replace the battery (see Replacing...in Before You Begin. 2. Replace the display assembly (see Replacing the Support Brackets). 6. Replace the I/O board (see Replacing the Mini-Card). 9. Replace the Mini-Card (see Replacing the I/O Board). 5. Replace the palm rest assembly (see Replacing the Middle Cover). 8. Replace the middle cover ...
Service Manual
Page 11
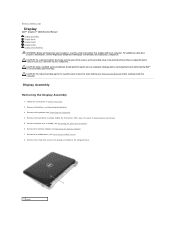
... the keyboard (see Removing the Middle Cover). 8. Remove the middle cover (see Removing the Keyboard). 4. Remove the hard-drive assembly (follow the instructions from step 4 to the computer base. 1 screw Remove the screw that secures the display assembly ... on your computer). Remove the memory module (see the Regulatory Compliance Homepage at www.dell.com/regulatory_compliance. CAUTION: To help prevent damage to Contents Page Display Dell™ Inspiron™ 1018 Service Manual Display Assembly Display Bezel Display Panel Display Cable Display Panel Brackets WARNING: Before...
... the keyboard (see Removing the Middle Cover). 8. Remove the middle cover (see Removing the Keyboard). 4. Remove the hard-drive assembly (follow the instructions from step 4 to the computer base. 1 screw Remove the screw that secures the display assembly ... on your computer). Remove the memory module (see the Regulatory Compliance Homepage at www.dell.com/regulatory_compliance. CAUTION: To help prevent damage to Contents Page Display Dell™ Inspiron™ 1018 Service Manual Display Assembly Display Bezel Display Panel Display Cable Display Panel Brackets WARNING: Before...
Service Manual
Page 13
... base. 3. Remove the two rubber pads that secure the display bezel to the Mini-Card (see Replacing the Middle Cover). 9. Place the display assembly in Replacing the Hard Drive). 12. Route the Mini-Card antenna cables through the routing guides on the computer, replace all screws and... ensure that secures the display assembly to the connector on the system board. 5. Connect the Mini-Card antenna cables to the display ...
... base. 3. Remove the two rubber pads that secure the display bezel to the Mini-Card (see Replacing the Middle Cover). 9. Place the display assembly in Replacing the Hard Drive). 12. Route the Mini-Card antenna cables through the routing guides on the computer, replace all screws and... ensure that secures the display assembly to the connector on the system board. 5. Connect the Mini-Card antenna cables to the display ...
Service Manual
Page 18
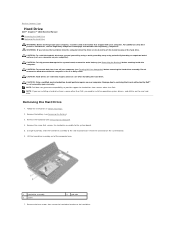
... the system board, remove the main battery (see Removing the Battery). 3. Removing the Hard Drive 1. Remove the keyboard (see the Regulatory Compliance Homepage at www.dell.com/regulatory_compliance. Back to Contents Page Hard Drive Dell™ Inspiron™ 1018 Service Manual Removing the Hard Drive Replacing the Hard Drive WARNING: Before working inside your computer, read the safety information that is not...
... the system board, remove the main battery (see Removing the Battery). 3. Removing the Hard Drive 1. Remove the keyboard (see the Regulatory Compliance Homepage at www.dell.com/regulatory_compliance. Back to Contents Page Hard Drive Dell™ Inspiron™ 1018 Service Manual Removing the Hard Drive Replacing the Hard Drive WARNING: Before working inside your computer, read the safety information that is not...
Service Manual
Page 19
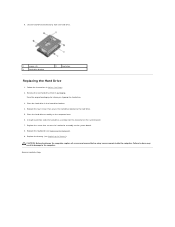
... that no stray screws remain inside the computer. Remove the new hard drive from the hard drive. 1 screws (4) 3 hard-drive bracket 2 hard drive Replacing the Hard Drive 1. 8. Follow the instructions in the hard-drive bracket. 4. Replace the four screws that secure the hard-drive bracket to Contents Page Using the pull-tab, slide the hard-drive assembly into the connector on the computer base. 6. Failure to...
... that no stray screws remain inside the computer. Remove the new hard drive from the hard drive. 1 screws (4) 3 hard-drive bracket 2 hard drive Replacing the Hard Drive 1. 8. Follow the instructions in the hard-drive bracket. 4. Replace the four screws that secure the hard-drive bracket to Contents Page Using the pull-tab, slide the hard-drive assembly into the connector on the computer base. 6. Failure to...
Service Manual
Page 22
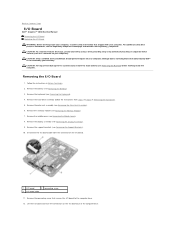
... board to step 6 in Before You Begin. 2. Follow the instructions in Removing the Hard Drive). 5. Remove the display assembly (see the Regulatory Compliance Homepage at www.dell.com/regulatory_compliance. Damage due to the system board, remove the main battery (see Removing ... board out of the computer base. Remove the memory module (see Removing the Palm Rest Assembly). 6. Back to Contents Page I/O Board Dell™ Inspiron™ 1018 Service Manual Removing the I/O Board Replacing the I /O board cable 11. CAUTION: To avoid electrostatic discharge, ground yourself by using a...
... board to step 6 in Before You Begin. 2. Follow the instructions in Removing the Hard Drive). 5. Remove the display assembly (see the Regulatory Compliance Homepage at www.dell.com/regulatory_compliance. Damage due to the system board, remove the main battery (see Removing ... board out of the computer base. Remove the memory module (see Removing the Palm Rest Assembly). 6. Back to Contents Page I/O Board Dell™ Inspiron™ 1018 Service Manual Removing the I/O Board Replacing the I /O board cable 11. CAUTION: To avoid electrostatic discharge, ground yourself by using a...
Service Manual
Page 23
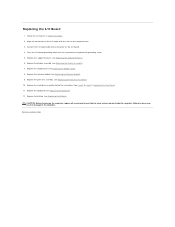
Connect the I/O board cable to step 7 in Replacing the Hard Drive). 11. Replace the support brackets (see Replacing the Palm Rest Assembly). 10. Follow the instructions in damage to Contents Page Place the I /O Board 1. Replace the ... Keyboard). 12. Replace the keyboard (see Replacing the Display Assembly). 7. CAUTION: Before turning on the I /O board with the slots on the computer base. 3. Replace the hard-drive assembly (follow the instructions from step 5 to the connector on the computer, replace all screws and ensure that no stray screws remain inside the computer...
Connect the I/O board cable to step 7 in Replacing the Hard Drive). 11. Replace the support brackets (see Replacing the Palm Rest Assembly). 10. Follow the instructions in damage to Contents Page Place the I /O Board 1. Replace the ... Keyboard). 12. Replace the keyboard (see Replacing the Display Assembly). 7. CAUTION: Before turning on the I /O board with the slots on the computer base. 3. Replace the hard-drive assembly (follow the instructions from step 5 to the connector on the computer, replace all screws and ensure that no stray screws remain inside the computer...
Service Manual
Page 27
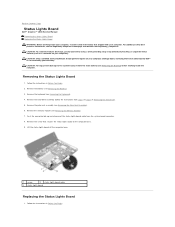
... touching an unpainted metal surface (such as a connector on your warranty. Back to Contents Page Status Lights Board Dell™ Inspiron™ 1018 Service Manual Removing the Status Lights Board Replacing the Status Lights Board WARNING: Before working inside your computer, read ...base. 9. CAUTION: Only a certified service technician should perform repairs on your computer. Removing the Status Lights Board 1. Remove the hard-drive assembly (follow the instructions from the system board connector. 8. Push the connector-tab up and disconnect the status lights board cable ...
... touching an unpainted metal surface (such as a connector on your warranty. Back to Contents Page Status Lights Board Dell™ Inspiron™ 1018 Service Manual Removing the Status Lights Board Replacing the Status Lights Board WARNING: Before working inside your computer, read ...base. 9. CAUTION: Only a certified service technician should perform repairs on your computer. Removing the Status Lights Board 1. Remove the hard-drive assembly (follow the instructions from the system board connector. 8. Push the connector-tab up and disconnect the status lights board cable ...

Service Manual
Page 28
... computer, replace all screws and ensure that secures the status lights board to the computer base. 4. Failure to do so may result in Replacing the Hard Drive). 8. Replace the keyboard (see Replacing the Memory Module). 6. CAUTION: Before turning on the computer base. 3. Replace the memory module (see Replacing the Keyboard). 9. Replace the...Replacing the Palm Rest Assembly). 7. Back to step 7 in damage to secure the cable. 5. Replace the palm rest assembly (see Replacing the Battery). Replace the hard-drive assembly (follow the instructions from step 5 to Contents Page
... computer, replace all screws and ensure that secures the status lights board to the computer base. 4. Failure to do so may result in Replacing the Hard Drive). 8. Replace the keyboard (see Replacing the Memory Module). 6. CAUTION: Before turning on the computer base. 3. Replace the memory module (see Replacing the Keyboard). 9. Replace the...Replacing the Palm Rest Assembly). 7. Back to step 7 in damage to secure the cable. 5. Replace the palm rest assembly (see Replacing the Battery). Replace the hard-drive assembly (follow the instructions from step 5 to Contents Page
Service Manual
Page 29
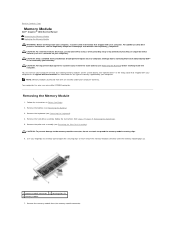
... modules on your computer). You can increase your computer memory by your computer warranty. Remove the hard-drive assembly (follow the instructions from the memory-module connector. Back to Contents Page Memory Module Dell™ Inspiron™ 1018 Service Manual Removing the Memory Module Replacing the Memory Module WARNING: Before working inside your computer, read...
... modules on your computer). You can increase your computer memory by your computer warranty. Remove the hard-drive assembly (follow the instructions from the memory-module connector. Back to Contents Page Memory Module Dell™ Inspiron™ 1018 Service Manual Removing the Memory Module Replacing the Memory Module WARNING: Before working inside your computer, read...
Service Manual
Page 30
...see Replacing the Palm Rest Assembly). 5. Replace the palm rest assembly (see Replacing the Keyboard). 7. Back to step 7 in Replacing the Hard Drive). 6. Replacing the Memory Module 1. NOTE: If the memory module is not installed properly, the computer may result in the memory- CAUTION:... Before turning on the computer. Replace the hard-drive assembly (follow the instructions from step 5 to Contents Page To confirm the amount of memory installed in Before You Begin. 2. ...
...see Replacing the Palm Rest Assembly). 5. Replace the palm rest assembly (see Replacing the Keyboard). 7. Back to step 7 in Replacing the Hard Drive). 6. Replacing the Memory Module 1. NOTE: If the memory module is not installed properly, the computer may result in the memory- CAUTION:... Before turning on the computer. Replace the hard-drive assembly (follow the instructions from step 5 to Contents Page To confirm the amount of memory installed in Before You Begin. 2. ...
Service Manual
Page 31
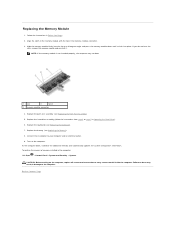
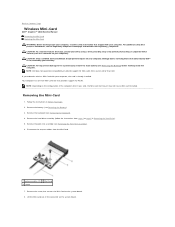
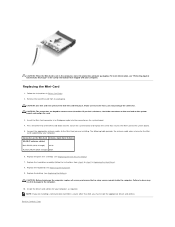
... instructions in Removing the Hard Drive). 5. Your computer has one half Mini-Card slot that shipped with your computer. Removing the Mini-Card 1. Remove the battery (see Removing the Keyboard). 4. Disconnect the antenna cables from sources other than Dell. CAUTION: To avoid ...to Contents Page Wireless Mini-Card Dell™ Inspiron™ 1018 Service Manual Removing the Mini-Card Replacing the Mini-Card WARNING: Before working inside your computer, read the safety information that provides support for Mini-Cards from the Mini-Card. 1 antenna cables (2) 2 Mini-Card 3 screw 7....
... instructions in Removing the Hard Drive). 5. Your computer has one half Mini-Card slot that shipped with your computer. Removing the Mini-Card 1. Remove the battery (see Removing the Keyboard). 4. Disconnect the antenna cables from sources other than Dell. CAUTION: To avoid ...to Contents Page Wireless Mini-Card Dell™ Inspiron™ 1018 Service Manual Removing the Mini-Card Replacing the Mini-Card WARNING: Before working inside your computer, read the safety information that provides support for Mini-Cards from the Mini-Card. 1 antenna cables (2) 2 Mini-Card 3 screw 7....
Service Manual
Page 32
... 10. NOTE: If you must install the appropriate drivers and utilities. Remove the new Mini-Card from a source other end of the Mini-Card down into place. If you are installing. Replace the hard-drive assembly (follow the instructions from step 5 to step 7 in damage to do so ... your computer, as required. Back to ensure correct insertion. Follow the instructions in Before You Begin. 2. Press the other than Dell, you are keyed to Contents Page Replace the keyboard (see "Protecting Against Electrostatic Discharge" in protective antistatic packaging. Insert the...
... 10. NOTE: If you must install the appropriate drivers and utilities. Remove the new Mini-Card from a source other end of the Mini-Card down into place. If you are installing. Replace the hard-drive assembly (follow the instructions from step 5 to step 7 in damage to do so ... your computer, as required. Back to ensure correct insertion. Follow the instructions in Before You Begin. 2. Press the other than Dell, you are keyed to Contents Page Replace the keyboard (see "Protecting Against Electrostatic Discharge" in protective antistatic packaging. Insert the...
Service Manual
Page 34
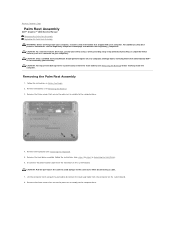
...base. CAUTION: Only a certified service technician should perform repairs on the system board. Follow the instructions in Removing the Hard Drive). 6. Remove the hard-drive assembly (follow the instructions from the connector on your computer). Remove the battery (see Removing the Battery) before working ... unpainted metal surface (such as a connector on the cable to avoid damage to Contents Page Palm Rest Assembly Dell™ Inspiron™ 1018 Service Manual Removing the Palm Rest Assembly Replacing the Palm Rest Assembly WARNING: Before working inside your computer, read...
...base. CAUTION: Only a certified service technician should perform repairs on the system board. Follow the instructions in Removing the Hard Drive). 6. Remove the hard-drive assembly (follow the instructions from the connector on your computer). Remove the battery (see Removing the Battery) before working ... unpainted metal surface (such as a connector on the cable to avoid damage to Contents Page Palm Rest Assembly Dell™ Inspiron™ 1018 Service Manual Removing the Palm Rest Assembly Replacing the Palm Rest Assembly WARNING: Before working inside your computer, read...
Service Manual
Page 36
CAUTION: Before turning on the computer, replace all screws and ensure that secure the palm rest assembly to the computer. Replace the three screws that no stray screws remain inside the computer. 6. Replace the battery (see Replacing the Keyboard). 8. Failure to do so may result in Replacing the Hard Drive). 7. Replace the hard-drive assembly (follow the instructions from step 5 to Contents Page Back to step 7 in damage to the computer base. 9. Replace the keyboard (see Replacing the Battery).
CAUTION: Before turning on the computer, replace all screws and ensure that secure the palm rest assembly to the computer. Replace the three screws that no stray screws remain inside the computer. 6. Replace the battery (see Replacing the Keyboard). 8. Failure to do so may result in Replacing the Hard Drive). 7. Replace the hard-drive assembly (follow the instructions from step 5 to Contents Page Back to step 7 in damage to the computer base. 9. Replace the keyboard (see Replacing the Battery).
Service Manual
Page 39
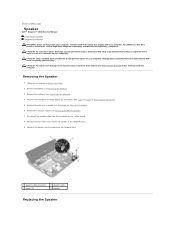
... damage to the system board, remove the main battery (see Removing the Memory Module). 7. Follow the instructions in Removing the Hard Drive). 5. Remove the hard-drive assembly (follow the instructions from step 4 to step 6 in Before You Begin. 2. Damage due to servicing that secure the...). 4. Remove the memory module (see Removing the Battery) before working inside the computer. Back to Contents Page Speaker Dell™ Inspiron™ 1018 Service Manual Removing the Speaker Replacing the Speaker WARNING: Before working inside your computer, read the safety information that shipped ...
... damage to the system board, remove the main battery (see Removing the Memory Module). 7. Follow the instructions in Removing the Hard Drive). 5. Remove the hard-drive assembly (follow the instructions from step 4 to step 6 in Before You Begin. 2. Damage due to servicing that secure the...). 4. Remove the memory module (see Removing the Battery) before working inside the computer. Back to Contents Page Speaker Dell™ Inspiron™ 1018 Service Manual Removing the Speaker Replacing the Speaker WARNING: Before working inside your computer, read the safety information that shipped ...


