Comprehensive Specifications
Page 2
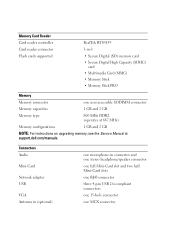
...connector Flash cards supported RealTek RTS5159 3-in connector and one stereo headphone/speaker connector one full Mini-Card slot and two half Mini-Card slots one RJ45 connector three 4-pin USB 2.0-compliant connectors one 15-hole connector one ...user accessible SODIMM connector Memory capacities 1 GB and 2 GB Memory type 800 MHz DDR2 (operates at 667 MHz) Memory configurations 1 GB and 2 GB NOTE: For instructions on upgrading memory, see the Service Manual at support.dell.com/manuals...
...connector Flash cards supported RealTek RTS5159 3-in connector and one stereo headphone/speaker connector one full Mini-Card slot and two half Mini-Card slots one RJ45 connector three 4-pin USB 2.0-compliant connectors one 15-hole connector one ...user accessible SODIMM connector Memory capacities 1 GB and 2 GB Memory type 800 MHz DDR2 (operates at 667 MHz) Memory configurations 1 GB and 2 GB NOTE: For instructions on upgrading memory, see the Service Manual at support.dell.com/manuals...
Service Manual
Page 1
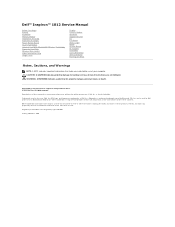
Dell™ Inspiron™ 1012 Service Manual Before You Begin Battery Keyboard Memory Module Hard-Drive Assembly Palm Rest Assembly Power Button Board Touch Pad Module Internal Card With Bluetooth® Wireless Technology Processor Heat Sink Wireless Mini-Card(s) Video Accelerator Card Hinge Cover Display...not followed. Regulatory model P04T series Regulatory type P04T001 January 2010 Rev. Information in this text: Dell, the DELL logo, and Inspiron are trademarks of Dell Inc.; A00 All rights reserved. Bluetooth is used in this document to refer to either trademarks...
Dell™ Inspiron™ 1012 Service Manual Before You Begin Battery Keyboard Memory Module Hard-Drive Assembly Palm Rest Assembly Power Button Board Touch Pad Module Internal Card With Bluetooth® Wireless Technology Processor Heat Sink Wireless Mini-Card(s) Video Accelerator Card Hinge Cover Display...not followed. Regulatory model P04T series Regulatory type P04T001 January 2010 Rev. Information in this text: Dell, the DELL logo, and Inspiron are trademarks of Dell Inc.; A00 All rights reserved. Bluetooth is used in this document to refer to either trademarks...
Service Manual
Page 2
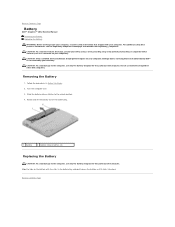
... to Contents Page Turn the computer over. 3. Back to the unlock position. 4. Back to Contents Page Battery Dell™ Inspiron™ 1012 Service Manual Removing the Battery Replacing the Battery WARNING: Before working inside your computer, read the safety information that is not authorized ...by Dell™ is not covered by periodically touching an unpainted metal surface (such as a connector on your computer...
... to Contents Page Turn the computer over. 3. Back to the unlock position. 4. Back to Contents Page Battery Dell™ Inspiron™ 1012 Service Manual Removing the Battery Replacing the Battery WARNING: Before working inside your computer, read the safety information that is not authorized ...by Dell™ is not covered by periodically touching an unpainted metal surface (such as a connector on your computer...
Service Manual
Page 3
...from potential damage and to help to ensure your computer). Unless otherwise noted, each procedure assumes that is not authorized by Dell™ is not covered by its metal mounting bracket. The computer turns off . CAUTION: Only a certified service technician ...the Regulatory Compliance Homepage at www.dell.com/regulatory_compliance. Back to Contents Page Before You Begin Dell™ Inspiron™ 1012 Service Manual Recommended Tools Turning Off Your Computer Before Working Inside Your Computer This manual provides procedures for at support.dell.com Turning Off Your Computer ...
...from potential damage and to help to ensure your computer). Unless otherwise noted, each procedure assumes that is not authorized by Dell™ is not covered by its metal mounting bracket. The computer turns off . CAUTION: Only a certified service technician ...the Regulatory Compliance Homepage at www.dell.com/regulatory_compliance. Back to Contents Page Before You Begin Dell™ Inspiron™ 1012 Service Manual Recommended Tools Turning Off Your Computer Before Working Inside Your Computer This manual provides procedures for at support.dell.com Turning Off Your Computer ...
Service Manual
Page 5
... the instructions on the computer. 2. If you do not have your computer's Service Tag: a. e. The file downloads to Contents Page Flashing the BIOS Dell™ Inspiron™ 1012 Service Manual 1. Turn on the screen. Enter your computer's Service Tag in the Select Your Product Model list. NOTE: If you have your computer's Service Tag...
... the instructions on the computer. 2. If you do not have your computer's Service Tag: a. e. The file downloads to Contents Page Flashing the BIOS Dell™ Inspiron™ 1012 Service Manual 1. Turn on the screen. Enter your computer's Service Tag in the Select Your Product Model list. NOTE: If you have your computer's Service Tag...
Service Manual
Page 6
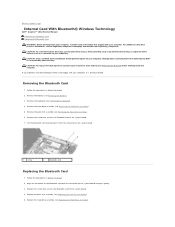
...a connector on the system board and press gently. 3. Replace the palm rest assembly (see the Regulatory Compliance Homepage at www.dell.com/regulatory_compliance. CAUTION: To help prevent damage to the system board, remove the main battery (see Removing the Keyboard). 4. ...battery (see Removing the Palm Rest Assembly). 6. Back to Contents Page Internal Card With Bluetooth® Wireless Technology Dell™ Inspiron™ 1012 Service Manual Removing the Bluetooth Card Replacing the Bluetooth Card WARNING: Before working inside your computer, read the safety information that...
...a connector on the system board and press gently. 3. Replace the palm rest assembly (see the Regulatory Compliance Homepage at www.dell.com/regulatory_compliance. CAUTION: To help prevent damage to the system board, remove the main battery (see Removing the Keyboard). 4. ...battery (see Removing the Palm Rest Assembly). 6. Back to Contents Page Internal Card With Bluetooth® Wireless Technology Dell™ Inspiron™ 1012 Service Manual Removing the Bluetooth Card Replacing the Bluetooth Card WARNING: Before working inside your computer, read the safety information that...
Service Manual
Page 8
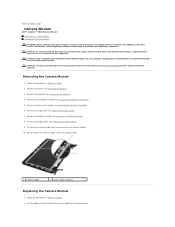
... posts to servicing that shipped with your computer. CAUTION: To help prevent damage to Contents Page Camera Module Dell™ Inspiron™ 1012 Service Manual Removing the Camera Module Replacing the Camera Module WARNING: Before working inside your computer, read the safety information that... is not authorized by Dell™ is not covered by periodically touching an unpainted metal surface (such as a connector ...
... posts to servicing that shipped with your computer. CAUTION: To help prevent damage to Contents Page Camera Module Dell™ Inspiron™ 1012 Service Manual Removing the Camera Module Replacing the Camera Module WARNING: Before working inside your computer, read the safety information that... is not authorized by Dell™ is not covered by periodically touching an unpainted metal surface (such as a connector ...
Service Manual
Page 10
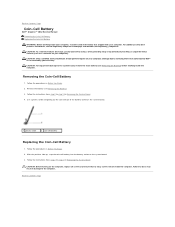
... to Contents Page Coin-Cell Battery Dell™ Inspiron™ 1012 Service Manual Removing the Coin-Cell Battery Replacing the Coin-Cell Battery WARNING: Before working inside the computer. Remove the battery (see the Regulatory Compliance Homepage at www.dell.com/regulatory_compliance. With the positive side...replace all screws and ensure that no stray screws remain inside your computer, read the safety information that is not authorized by Dell™ is not covered by periodically touching an unpainted metal surface (such as a connector on your computer. Follow the instructions...
... to Contents Page Coin-Cell Battery Dell™ Inspiron™ 1012 Service Manual Removing the Coin-Cell Battery Replacing the Coin-Cell Battery WARNING: Before working inside the computer. Remove the battery (see the Regulatory Compliance Homepage at www.dell.com/regulatory_compliance. With the positive side...replace all screws and ensure that no stray screws remain inside your computer, read the safety information that is not authorized by Dell™ is not covered by periodically touching an unpainted metal surface (such as a connector on your computer. Follow the instructions...
Service Manual
Page 11
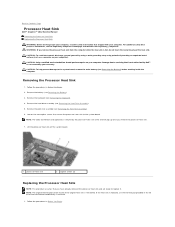
... the heat sink is not covered by your computer). CAUTION: To help prevent damage to Contents Page Processor Heat Sink Dell™ Inspiron™ 1012 Service Manual Removing the Processor Heat Sink Replacing the Processor Heat Sink WARNING: Before working inside your computer, read the safety information ...the system board. 1 processor heat sink 2 captive screws (2) Replacing the Processor Heat Sink NOTE: This procedure assumes that is not authorized by Dell™ is hot, do not touch the metal housing of the heat sink. Remove the keyboard (see Removing the Battery). 3. NOTE: The...
... the heat sink is not covered by your computer). CAUTION: To help prevent damage to Contents Page Processor Heat Sink Dell™ Inspiron™ 1012 Service Manual Removing the Processor Heat Sink Replacing the Processor Heat Sink WARNING: Before working inside your computer, read the safety information ...the system board. 1 processor heat sink 2 captive screws (2) Replacing the Processor Heat Sink NOTE: This procedure assumes that is not authorized by Dell™ is hot, do not touch the metal housing of the heat sink. Remove the keyboard (see Removing the Battery). 3. NOTE: The...
Service Manual
Page 13
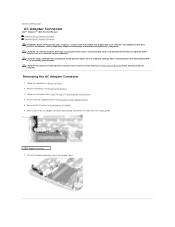
...Adapter Connector 1. Follow the procedures in Removing the System Board. 4. Back to Contents Page AC Adapter Connector Dell™ Inspiron™ 1012 Service Manual Removing the AC Adapter Connector Replacing the AC Adapter Connector WARNING: Before working inside your computer, read the ...safety information that is not authorized by Dell™ is not covered by periodically touching an unpainted metal surface (such as...
...Adapter Connector 1. Follow the procedures in Removing the System Board. 4. Back to Contents Page AC Adapter Connector Dell™ Inspiron™ 1012 Service Manual Removing the AC Adapter Connector Replacing the AC Adapter Connector WARNING: Before working inside your computer, read the ...safety information that is not authorized by Dell™ is not covered by periodically touching an unpainted metal surface (such as...
Service Manual
Page 15
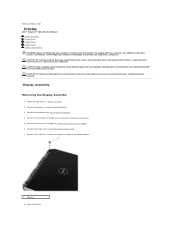
...Keyboard). 4. Display Assembly Removing the Display Assembly 1. Remove the palm rest assembly (see the Regulatory Compliance Homepage at www.dell.com/regulatory_compliance. For additional safety best practices information, see Removing the Palm Rest Assembly). 6. CAUTION: To avoid electrostatic discharge... main battery (see Removing the Battery) before working inside the computer. Back to Contents Page Display Dell™ Inspiron™ 1012 Service Manual Display Assembly Display Bezel Display Panel Display Cable Display Panel Bracket WARNING: Before working inside your computer,...
...Keyboard). 4. Display Assembly Removing the Display Assembly 1. Remove the palm rest assembly (see the Regulatory Compliance Homepage at www.dell.com/regulatory_compliance. For additional safety best practices information, see Removing the Palm Rest Assembly). 6. CAUTION: To avoid electrostatic discharge... main battery (see Removing the Battery) before working inside the computer. Back to Contents Page Display Dell™ Inspiron™ 1012 Service Manual Display Assembly Display Bezel Display Panel Display Cable Display Panel Bracket WARNING: Before working inside your computer,...
Service Manual
Page 22
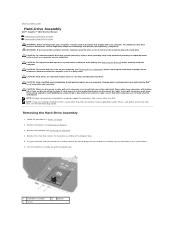
... pull-tab, slide the hard-drive assembly towards the left to disconnect the hard-drive assembly from sources other than Dell. Back to Contents Page Hard-Drive Assembly Dell™ Inspiron™ 1012 Service Manual Removing the Hard-Drive Assembly Replacing the Hard-Drive Assembly WARNING: Before working inside your computer, read the safety information...
... pull-tab, slide the hard-drive assembly towards the left to disconnect the hard-drive assembly from sources other than Dell. Back to Contents Page Hard-Drive Assembly Dell™ Inspiron™ 1012 Service Manual Removing the Hard-Drive Assembly Replacing the Hard-Drive Assembly WARNING: Before working inside your computer, read the safety information...
Service Manual
Page 24
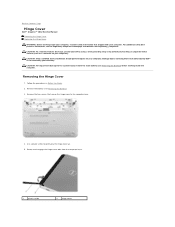
...discharge, ground yourself by using a wrist grounding strap or by your warranty. Remove the two screws that is not authorized by Dell™ is not covered by periodically touching an unpainted metal surface (such as a connector on your computer. Damage due to ... Begin. 2. For additional safety best practices information, see the Regulatory Compliance Homepage at www.dell.com/regulatory_compliance. Back to Contents Page Hinge Cover Dell™ Inspiron™ 1012 Service Manual Removing the Hinge Cover Replacing the Hinge Cover WARNING: Before working inside your computer, read ...
...discharge, ground yourself by using a wrist grounding strap or by your warranty. Remove the two screws that is not authorized by Dell™ is not covered by periodically touching an unpainted metal surface (such as a connector on your computer. Damage due to ... Begin. 2. For additional safety best practices information, see the Regulatory Compliance Homepage at www.dell.com/regulatory_compliance. Back to Contents Page Hinge Cover Dell™ Inspiron™ 1012 Service Manual Removing the Hinge Cover Replacing the Hinge Cover WARNING: Before working inside your computer, read ...
Service Manual
Page 26
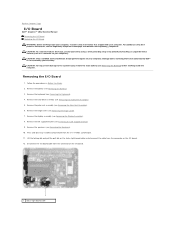
...ground yourself by using a wrist grounding strap or by your computer. CAUTION: To help prevent damage to Contents Page I/O Board Dell™ Inspiron™ 1012 Service Manual Removing the I/O Board Replacing the I /O board. 12. Remove the palm rest assembly (see Removing the Speakers). 10. ...2. Remove the speakers (see Removing the Palm Rest Assembly). 6. Remove the keyboard (see the Regulatory Compliance Homepage at www.dell.com/regulatory_compliance. For additional safety best practices information, see Removing the Keyboard). 4. Remove the battery (see Removing the Battery). ...
...ground yourself by using a wrist grounding strap or by your computer. CAUTION: To help prevent damage to Contents Page I/O Board Dell™ Inspiron™ 1012 Service Manual Removing the I/O Board Replacing the I /O board. 12. Remove the palm rest assembly (see Removing the Speakers). 10. ...2. Remove the speakers (see Removing the Palm Rest Assembly). 6. Remove the keyboard (see the Regulatory Compliance Homepage at www.dell.com/regulatory_compliance. For additional safety best practices information, see Removing the Keyboard). 4. Remove the battery (see Removing the Battery). ...
Service Manual
Page 28
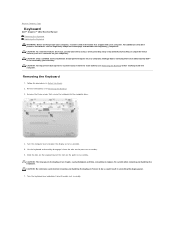
... by using a wrist grounding strap or by your computer. Remove the battery (see the Regulatory Compliance Homepage at www.dell.com/regulatory_compliance. Follow the procedures in scratching the display panel. 7. Lift the keyboard and carefully disengage it over and .... 6. For additional safety best practices information, see Removing the Battery). 3. Back to Contents Page Keyboard Dell™ Inspiron™ 1012 Service Manual Removing the Keyboard Replacing the Keyboard WARNING: Before working inside your computer, read the safety information that shipped with your...
... by using a wrist grounding strap or by your computer. Remove the battery (see the Regulatory Compliance Homepage at www.dell.com/regulatory_compliance. Follow the procedures in scratching the display panel. 7. Lift the keyboard and carefully disengage it over and .... 6. For additional safety best practices information, see Removing the Battery). 3. Back to Contents Page Keyboard Dell™ Inspiron™ 1012 Service Manual Removing the Keyboard Replacing the Keyboard WARNING: Before working inside your computer, read the safety information that shipped with your...
Service Manual
Page 30
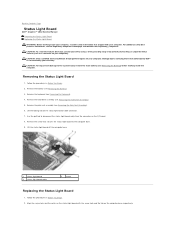
...repairs on the status light board cable connector. 7. CAUTION: To help prevent damage to Contents Page Status Light Board Dell™ Inspiron™ 1012 Service Manual Removing the Status Light Board Replacing the Status Light Board WARNING: Before working inside your computer, read the safety ... with the screw hole and the tab on the I/O board. 8. Remove the keyboard (see the Regulatory Compliance Homepage at www.dell.com/regulatory_compliance. CAUTION: To avoid electrostatic discharge, ground yourself by using a wrist grounding strap or by your computer. Follow the procedures...
...repairs on the status light board cable connector. 7. CAUTION: To help prevent damage to Contents Page Status Light Board Dell™ Inspiron™ 1012 Service Manual Removing the Status Light Board Replacing the Status Light Board WARNING: Before working inside your computer, read the safety ... with the screw hole and the tab on the I/O board. 8. Remove the keyboard (see the Regulatory Compliance Homepage at www.dell.com/regulatory_compliance. CAUTION: To avoid electrostatic discharge, ground yourself by using a wrist grounding strap or by your computer. Follow the procedures...
Service Manual
Page 32
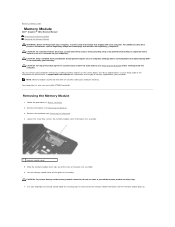
... 5. CAUTION: To help prevent damage to the system board, remove the main battery (see the Regulatory Compliance Homepage at support.dell.com\manuals for information on the type of the slots on each end of the memory module connector until the memory module pops up. ... periodically touching an unpainted metal surface (such as a connector on the system board. Back to Contents Page Memory Module Dell™ Inspiron™ 1012 Service Manual Removing the Memory Module Replacing the Memory Module WARNING: Before working inside your computer, read the safety information that shipped with...
... 5. CAUTION: To help prevent damage to the system board, remove the main battery (see the Regulatory Compliance Homepage at support.dell.com\manuals for information on the type of the slots on each end of the memory module connector until the memory module pops up. ... periodically touching an unpainted metal surface (such as a connector on the system board. Back to Contents Page Memory Module Dell™ Inspiron™ 1012 Service Manual Removing the Memory Module Replacing the Memory Module WARNING: Before working inside your computer, read the safety information that shipped with...
Service Manual
Page 35
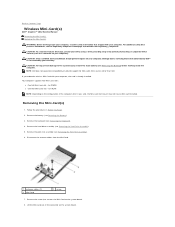
... the screw that secures the Mini-Card to Contents Page Wireless Mini-Card(s) Dell™ Inspiron™ 1012 Service Manual Removing the Mini-Card(s) Replacing the Mini-Card(s) WARNING: Before working inside your computer, read the safety information that is not authorized by Dell™ is already installed. for Mini-Cards from the Mini-Card. 1 antenna cables (2) 3 Mini-Card 2 screw 7. Remove the...
... the screw that secures the Mini-Card to Contents Page Wireless Mini-Card(s) Dell™ Inspiron™ 1012 Service Manual Removing the Mini-Card(s) Replacing the Mini-Card(s) WARNING: Before working inside your computer, read the safety information that is not authorized by Dell™ is already installed. for Mini-Cards from the Mini-Card. 1 antenna cables (2) 3 Mini-Card 2 screw 7. Remove the...
Service Manual
Page 38
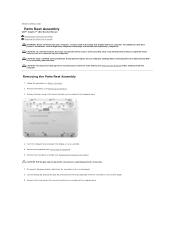
... the pull-tab to disconnect the touch pad cable from the connector on the system board. 9. Back to Contents Page Palm Rest Assembly Dell™ Inspiron™ 1012 Service Manual Removing the Palm Rest Assembly Replacing the Palm Rest Assembly WARNING: Before working inside your computer, read the safety information that shipped with your...
... the pull-tab to disconnect the touch pad cable from the connector on the system board. 9. Back to Contents Page Palm Rest Assembly Dell™ Inspiron™ 1012 Service Manual Removing the Palm Rest Assembly Replacing the Palm Rest Assembly WARNING: Before working inside your computer, read the safety information that shipped with your...
Service Manual
Page 41
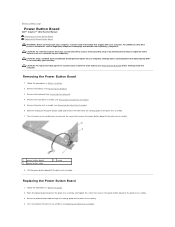
...screw 8. Removing the Power Button Board 1. Replacing the Power Button Board 1. Back to Contents Page Power Button Board Dell™ Inspiron™ 1012 Service Manual Removing the Power Button Board Replacing the Power Button Board WARNING: Before working inside your computer, read the safety ...information that is not authorized by Dell™ is not covered by periodically touching an unpainted metal surface (such as ...
...screw 8. Removing the Power Button Board 1. Replacing the Power Button Board 1. Back to Contents Page Power Button Board Dell™ Inspiron™ 1012 Service Manual Removing the Power Button Board Replacing the Power Button Board WARNING: Before working inside your computer, read the safety ...information that is not authorized by Dell™ is not covered by periodically touching an unpainted metal surface (such as ...


