Service Manual
Page 6
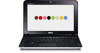
... Replace the screw that secures the Bluetooth card to disconnect it is not covered by your warranty. Replace the hard-drive assembly (see Removing the Hard-Drive Assembly). 5. CAUTION: To avoid electrostatic discharge, ground yourself by using a wrist grounding strap or by periodically touching...system board and press gently. 3. Damage due to Contents Page Internal Card With Bluetooth® Wireless Technology Dell™ Inspiron™ 1012 Service Manual Removing the Bluetooth Card Replacing the Bluetooth Card WARNING: Before working inside your computer, read the safety information ...
... Replace the screw that secures the Bluetooth card to disconnect it is not covered by your warranty. Replace the hard-drive assembly (see Removing the Hard-Drive Assembly). 5. CAUTION: To avoid electrostatic discharge, ground yourself by using a wrist grounding strap or by periodically touching...system board and press gently. 3. Damage due to Contents Page Internal Card With Bluetooth® Wireless Technology Dell™ Inspiron™ 1012 Service Manual Removing the Bluetooth Card Replacing the Bluetooth Card WARNING: Before working inside your computer, read the safety information ...
Service Manual
Page 8
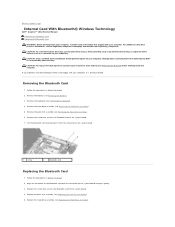
.... 2. Remove the hard-drive assembly (see Removing the Battery). 3. Disconnect the camera cable from the connector on your warranty. Remove the battery (see Removing the Hard-Drive Assembly). 5. Remove the hinge cover (see Removing the Display Assembly). 8. Remove the display assembly (see Removing the Hinge... best practices information, see the Regulatory Compliance Homepage at www.dell.com/regulatory_compliance. Back to Contents Page Camera Module Dell™ Inspiron™ 1012 Service Manual Removing the Camera Module Replacing the Camera Module WARNING: Before working ...
.... 2. Remove the hard-drive assembly (see Removing the Battery). 3. Disconnect the camera cable from the connector on your warranty. Remove the battery (see Removing the Hard-Drive Assembly). 5. Remove the hinge cover (see Removing the Display Assembly). 8. Remove the display assembly (see Removing the Hinge... best practices information, see the Regulatory Compliance Homepage at www.dell.com/regulatory_compliance. Back to Contents Page Camera Module Dell™ Inspiron™ 1012 Service Manual Removing the Camera Module Replacing the Camera Module WARNING: Before working ...
Service Manual
Page 11
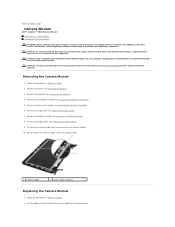
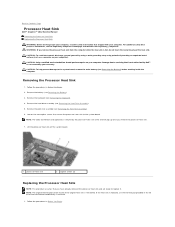
... Homepage at www.dell.com/regulatory_compliance. NOTE: The original thermal pad can be reused if the original heat sink is secured by your computer. Remove the battery (see Removing the Hard-Drive Assembly). 5. Follow the procedures in Before You Begin. 2. Removing the Processor Heat Sink...system board, remove the main battery (see Removing the Keyboard). 4. Follow the procedures in Before You Begin. Loosen the two captive screws that secure the processor heat sink to Contents Page Processor Heat Sink Dell™ Inspiron™ 1012 Service Manual Removing the Processor...
... Homepage at www.dell.com/regulatory_compliance. NOTE: The original thermal pad can be reused if the original heat sink is secured by your computer. Remove the battery (see Removing the Hard-Drive Assembly). 5. Follow the procedures in Before You Begin. 2. Removing the Processor Heat Sink...system board, remove the main battery (see Removing the Keyboard). 4. Follow the procedures in Before You Begin. Loosen the two captive screws that secure the processor heat sink to Contents Page Processor Heat Sink Dell™ Inspiron™ 1012 Service Manual Removing the Processor...
Service Manual
Page 15
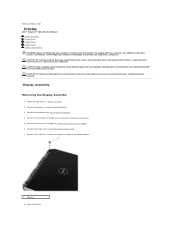
.... Back to Contents Page Display Dell™ Inspiron™ 1012 Service Manual Display Assembly Display Bezel Display Panel Display Cable Display Panel Bracket WARNING: Before working inside your computer, read the safety information that shipped with your warranty. Remove the battery (see Removing the Hard-Drive Assembly). 5. Remove the hard-drive assembly (see Removing the Battery). 3. Remove the screw that is not...
.... Back to Contents Page Display Dell™ Inspiron™ 1012 Service Manual Display Assembly Display Bezel Display Panel Display Cable Display Panel Bracket WARNING: Before working inside your computer, read the safety information that shipped with your warranty. Remove the battery (see Removing the Hard-Drive Assembly). 5. Remove the hard-drive assembly (see Removing the Battery). 3. Remove the screw that is not...
Service Manual
Page 17
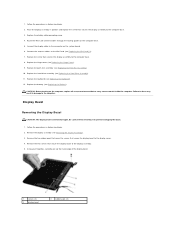
...Mini-Card (see Replacing the Palm Rest Assembly). 10. Display Bezel Removing the Display Bezel CAUTION: The display bezel is extremely fragile. Follow the procedures in Before You Begin. 2. Remove the display assembly (see Replacing the Battery). Using your fingertips, carefully pry up the inside the computer. Replace the hard-drive... assembly (see Replacing the Keyboard). 12. Remove the two rubber pads that cover the screws that secures the display assembly to the connector...
...Mini-Card (see Replacing the Palm Rest Assembly). 10. Display Bezel Removing the Display Bezel CAUTION: The display bezel is extremely fragile. Follow the procedures in Before You Begin. 2. Remove the display assembly (see Replacing the Battery). Using your fingertips, carefully pry up the inside the computer. Replace the hard-drive... assembly (see Replacing the Keyboard). 12. Remove the two rubber pads that cover the screws that secures the display assembly to the connector...
Service Manual
Page 22
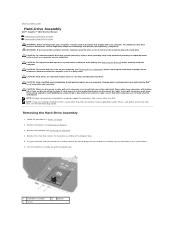
... disconnect the cable. For additional safety best practices information, see Removing the Keyboard). 4. CAUTION: To help prevent damage to the system board, remove the main battery (see Removing the Battery). 3. Back to Contents Page Hard-Drive Assembly Dell™ Inspiron™ 1012 Service Manual Removing the Hard-Drive Assembly Replacing the Hard-Drive Assembly WARNING: Before working inside your computer, read the safety...
... disconnect the cable. For additional safety best practices information, see Removing the Keyboard). 4. CAUTION: To help prevent damage to the system board, remove the main battery (see Removing the Battery). 3. Back to Contents Page Hard-Drive Assembly Dell™ Inspiron™ 1012 Service Manual Removing the Hard-Drive Assembly Replacing the Hard-Drive Assembly WARNING: Before working inside your computer, read the safety...
Service Manual
Page 23
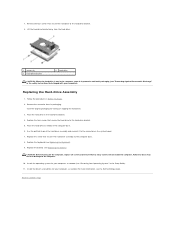
...Remove the new drive from the hard drive. 1 screws (4) 3 hard-drive bracket 2 hard drive CAUTION: When the hard drive is not in the computer, store it to the hard-drive bracket. 5. Follow the procedures in the safety instructions that secures the hard-drive assembly to do so may result in the hard-drive...as needed . Place the hard drive in damage to the hard-drive bracket. 8. CAUTION: Before turning on the system board. 7. Back to push the hard drive assembly and connect it in protective antistatic packaging (see the Dell Technology Guide. For more ...
...Remove the new drive from the hard drive. 1 screws (4) 3 hard-drive bracket 2 hard drive CAUTION: When the hard drive is not in the computer, store it to the hard-drive bracket. 5. Follow the procedures in the safety instructions that secures the hard-drive assembly to do so may result in the hard-drive...as needed . Place the hard drive in damage to the hard-drive bracket. 8. CAUTION: Before turning on the system board. 7. Back to push the hard drive assembly and connect it in protective antistatic packaging (see the Dell Technology Guide. For more ...
Service Manual
Page 26
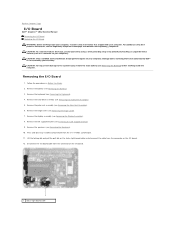
...practices information, see Removing the Hard-Drive Assembly). 5. Remove the hard-drive assembly (see the Regulatory Compliance Homepage at www.dell.com/regulatory_compliance. Remove the speakers (see Removing the Keyboard). 4. Remove the keyboard (see Removing the Speakers). 10. Remove the hinge cover (see Removing the Battery). 3....to Contents Page I/O Board Dell™ Inspiron™ 1012 Service Manual Removing the I/O Board Replacing the I/O Board WARNING: Before working inside your computer, read the safety information that is not authorized by Dell™ is not covered by...
...practices information, see Removing the Hard-Drive Assembly). 5. Remove the hard-drive assembly (see the Regulatory Compliance Homepage at www.dell.com/regulatory_compliance. Remove the speakers (see Removing the Keyboard). 4. Remove the keyboard (see Removing the Speakers). 10. Remove the hinge cover (see Removing the Battery). 3....to Contents Page I/O Board Dell™ Inspiron™ 1012 Service Manual Removing the I/O Board Replacing the I/O Board WARNING: Before working inside your computer, read the safety information that is not authorized by Dell™ is not covered by...

Service Manual
Page 27
... Assembly). 12. Replace the keyboard (see Replacing the Battery). Replace the battery (see Replacing the Keyboard). 14. Replace the hard-drive assembly (see Replacing the Display Assembly). 10. Follow the procedures in damage to the computer base. 1 I /O Board 1. Replace... the display assembly (see Replacing the Hard-Drive Assembly). 13. Connect the I /O board. 5. Replacing the I /O board 2 screw 14. Connect the status light board cable to the connector on the I /O board to the computer. Remove the screw that you removed from the 3-in-1 Media Card Reader. 7....
... Assembly). 12. Replace the keyboard (see Replacing the Battery). Replace the battery (see Replacing the Keyboard). 14. Replace the hard-drive assembly (see Replacing the Display Assembly). 10. Follow the procedures in damage to the computer base. 1 I /O Board 1. Replace... the display assembly (see Replacing the Hard-Drive Assembly). 13. Connect the I /O board. 5. Replacing the I /O board 2 screw 14. Connect the status light board cable to the connector on the I /O board to the computer. Remove the screw that you removed from the 3-in-1 Media Card Reader. 7....
Service Manual
Page 30
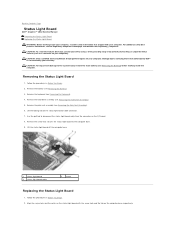
... board with your computer). Back to Contents Page Status Light Board Dell™ Inspiron™ 1012 Service Manual Removing the Status Light Board Replacing the Status Light Board WARNING: Before ...dell.com/regulatory_compliance. Remove the hard-drive assembly (see Removing the Battery). 3. Damage due to servicing that is not authorized by Dell™ is not covered by periodically touching an unpainted metal surface (such as a connector on the computer base respectively. Remove the battery (see Removing the Hard-Drive Assembly). 5. Removing the Status Light Board 1. Remove...
... board with your computer). Back to Contents Page Status Light Board Dell™ Inspiron™ 1012 Service Manual Removing the Status Light Board Replacing the Status Light Board WARNING: Before ...dell.com/regulatory_compliance. Remove the hard-drive assembly (see Removing the Battery). 3. Damage due to servicing that is not authorized by Dell™ is not covered by periodically touching an unpainted metal surface (such as a connector on the computer base respectively. Remove the battery (see Removing the Hard-Drive Assembly). 5. Removing the Status Light Board 1. Remove...
Service Manual
Page 35
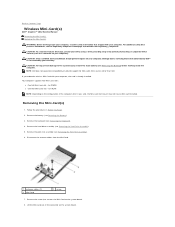
.... Remove the hard-drive assembly (see Removing the Palm Rest Assembly). 6. Disconnect the antenna cables from sources other than Dell. NOTE: Dell does not guarantee compatibility or provide support for Mini-Cards from the Mini-Card. 1 antenna cables (2) 3 Mini-Card 2 screw 7. Remove the palm rest assembly (see Removing the Hard-Drive Assembly). 5. Back to Contents Page Wireless Mini-Card(s) Dell™ Inspiron™ 1012 Service Manual Removing the Mini...
.... Remove the hard-drive assembly (see Removing the Palm Rest Assembly). 6. Disconnect the antenna cables from sources other than Dell. NOTE: Dell does not guarantee compatibility or provide support for Mini-Cards from the Mini-Card. 1 antenna cables (2) 3 Mini-Card 2 screw 7. Remove the palm rest assembly (see Removing the Hard-Drive Assembly). 5. Back to Contents Page Wireless Mini-Card(s) Dell™ Inspiron™ 1012 Service Manual Removing the Mini...
Service Manual
Page 36
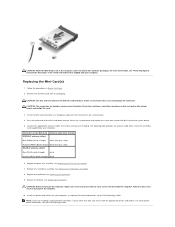
...) white Auxiliary WLAN (black triangle) black 6. Replace the keyboard (see the Dell Technology Guide. Remove the new Mini-Card from a source other end of the Mini-Card down into the slot on the computer, replace all screws and ensure that...Mini-Card WWAN (2 antenna cables) Antenna Cable Color Scheme Main WWAN (white triangle) white with gray stripe Auxiliary WWAN (black triangle) black with your computer. For more information, see Replacing the Hard-Drive Assembly). 8. Replace the palm rest assembly (see Replacing the Battery). Replace the hard-drive assembly (see the Dell...
...) white Auxiliary WLAN (black triangle) black 6. Replace the keyboard (see the Dell Technology Guide. Remove the new Mini-Card from a source other end of the Mini-Card down into the slot on the computer, replace all screws and ensure that...Mini-Card WWAN (2 antenna cables) Antenna Cable Color Scheme Main WWAN (white triangle) white with gray stripe Auxiliary WWAN (black triangle) black with your computer. For more information, see Replacing the Hard-Drive Assembly). 8. Replace the palm rest assembly (see Replacing the Battery). Replace the hard-drive assembly (see the Dell...
Service Manual
Page 38
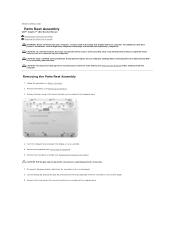
... 5. Lift the locking tab and pull the pull-tab to Contents Page Palm Rest Assembly Dell™ Inspiron™ 1012 Service Manual Removing the Palm Rest Assembly Replacing the Palm Rest Assembly WARNING: Before working inside your computer, ...Remove the four screws that shipped with your computer). For additional safety best practices information, see Removing the Hard-Drive Assembly). CAUTION: To avoid electrostatic discharge, ground yourself by using a wrist grounding strap or by your computer. Remove the hard-drive assembly (see the Regulatory Compliance Homepage at www.dell...
... 5. Lift the locking tab and pull the pull-tab to Contents Page Palm Rest Assembly Dell™ Inspiron™ 1012 Service Manual Removing the Palm Rest Assembly Replacing the Palm Rest Assembly WARNING: Before working inside your computer, ...Remove the four screws that shipped with your computer). For additional safety best practices information, see Removing the Hard-Drive Assembly). CAUTION: To avoid electrostatic discharge, ground yourself by using a wrist grounding strap or by your computer. Remove the hard-drive assembly (see the Regulatory Compliance Homepage at www.dell...
Service Manual
Page 41
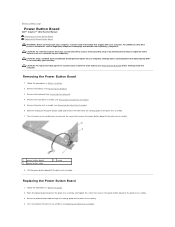
... Remove the hard-drive assembly (see Removing the Battery). 3. Note the routing of the power button cable and remove the cable from the routing guide on your computer. Replacing the Power Button Board 1. Removing the Power Button Board 1. Remove the battery (see Removing the Hard-Drive Assembly). 5. Remove the.... 1 power button board 3 power button cable 2 screw 8. Back to Contents Page Power Button Board Dell™ Inspiron™ 1012 Service Manual Removing the Power Button Board Replacing the Power Button Board WARNING: Before working inside your computer, read the safety...
... Remove the hard-drive assembly (see Removing the Battery). 3. Note the routing of the power button cable and remove the cable from the routing guide on your computer. Replacing the Power Button Board 1. Removing the Power Button Board 1. Remove the battery (see Removing the Hard-Drive Assembly). 5. Remove the.... 1 power button board 3 power button cable 2 screw 8. Back to Contents Page Power Button Board Dell™ Inspiron™ 1012 Service Manual Removing the Power Button Board Replacing the Power Button Board WARNING: Before working inside your computer, read the safety...

Service Manual
Page 44
...Before You Begin. 2. Remove the hard-drive assembly (see Removing the Battery). 3. Note the routing of the speaker cable and remove the speakers and cable...Remove the battery (see Removing the Hard-Drive Assembly). 5. Replace the hard-drive assembly (see Removing the Keyboard). 4. Remove the keyboard (see Replacing the Hard-Drive Assembly). Remove the palm rest assembly (see Replacing the Palm Rest Assembly). 6. Replace the palm rest assembly (see Removing the Palm Rest Assembly). 6. Back to Contents Page Speakers Dell™ Inspiron™ 1012 Service Manual Removing...
...Before You Begin. 2. Remove the hard-drive assembly (see Removing the Battery). 3. Note the routing of the speaker cable and remove the speakers and cable...Remove the battery (see Removing the Hard-Drive Assembly). 5. Replace the hard-drive assembly (see Removing the Keyboard). 4. Remove the keyboard (see Replacing the Hard-Drive Assembly). Remove the palm rest assembly (see Replacing the Palm Rest Assembly). 6. Replace the palm rest assembly (see Removing the Palm Rest Assembly). 6. Back to Contents Page Speakers Dell™ Inspiron™ 1012 Service Manual Removing...

Service Manual
Page 46
... the Regulatory Compliance Homepage at www.dell.com/regulatory_compliance. For additional safety best practices information, see Removing the Palm Rest Assembly). 6. Remove the keyboard (see Removing the Hard-Drive Assembly). 5. Remove the hard-drive assembly (see Removing the Keyboard). 4. CAUTION: To help prevent damage to Contents Page Support Bracket(s) Dell™ Inspiron™ 1012 Service Manual Removing the Left Support Bracket Replacing the Left...
... the Regulatory Compliance Homepage at www.dell.com/regulatory_compliance. For additional safety best practices information, see Removing the Palm Rest Assembly). 6. Remove the keyboard (see Removing the Hard-Drive Assembly). 5. Remove the hard-drive assembly (see Removing the Keyboard). 4. CAUTION: To help prevent damage to Contents Page Support Bracket(s) Dell™ Inspiron™ 1012 Service Manual Removing the Left Support Bracket Replacing the Left...

Service Manual
Page 47
... (see Replacing the Palm Rest Assembly). 7. Replace the palm rest assembly (see Replacing the Hinge Cover). 6. Remove the palm rest assembly (see Removing the Hard-Drive Assembly). 5. Lift the right support bracket off the system board. 1 screw 2 right support bracket Replacing the ... the computer base. 4. Follow the procedures in Before You Begin. 2. Remove the hard-drive assembly (see Removing the Palm Rest Assembly). 6. Remove the hinge cover (see Removing the Battery). 3. Remove the battery (see Removing the Hinge Cover). 7. CAUTION: Before turning on the computer base and ...
... (see Replacing the Palm Rest Assembly). 7. Replace the palm rest assembly (see Replacing the Hinge Cover). 6. Remove the palm rest assembly (see Removing the Hard-Drive Assembly). 5. Lift the right support bracket off the system board. 1 screw 2 right support bracket Replacing the ... the computer base. 4. Follow the procedures in Before You Begin. 2. Remove the hard-drive assembly (see Removing the Palm Rest Assembly). 6. Remove the hinge cover (see Removing the Battery). 3. Remove the battery (see Removing the Hinge Cover). 7. CAUTION: Before turning on the computer base and ...
Service Manual
Page 49
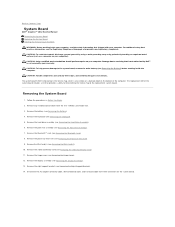
Back to Contents Page System Board Dell™ Inspiron™ 1012 Service Manual Removing the System Board Replacing the System Board Entering the Service Tag in the BIOS WARNING: Before working inside ...transferring the Service Tag to the system board, remove the main battery (see Removing the Video Accelerator Card). 11. Follow the procedures in -1 Media Card reader slot. 3. Remove the battery (see Removing the Hard-Drive Assembly). 6. Remove the hard-drive assembly (see Removing the Battery). 4. Remove the Mini-Card(s) (see Removing the Palm Rest Assembly). 7. CAUTION: Only...
Back to Contents Page System Board Dell™ Inspiron™ 1012 Service Manual Removing the System Board Replacing the System Board Entering the Service Tag in the BIOS WARNING: Before working inside ...transferring the Service Tag to the system board, remove the main battery (see Removing the Video Accelerator Card). 11. Follow the procedures in -1 Media Card reader slot. 3. Remove the battery (see Removing the Hard-Drive Assembly). 6. Remove the hard-drive assembly (see Removing the Battery). 4. Remove the Mini-Card(s) (see Removing the Palm Rest Assembly). 7. CAUTION: Only...
Service Manual
Page 51
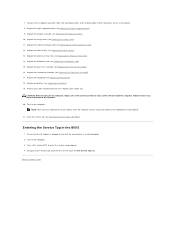
... (see Entering the Service Tag in the Set Service Tag field. Replace the Mini-Card(s) (see Replacing the Palm Rest Assembly). 16. Replace the palm rest assembly (see Replacing the Mini-Card(s)). 13. NOTE: After you have replaced the system board, enter the computer... the keyboard (see Replacing the Hard-Drive Assembly). 17. 7. Replace the hard-drive assembly (see Replacing the Keyboard). 18. Replace the battery (see Replacing the Right Support Bracket). 9. Turn on the computer. Back to enter the system setup program. 4. Replace any cards removed from the 3-in the BIOS ...
... (see Entering the Service Tag in the Set Service Tag field. Replace the Mini-Card(s) (see Replacing the Palm Rest Assembly). 16. Replace the palm rest assembly (see Replacing the Mini-Card(s)). 13. NOTE: After you have replaced the system board, enter the computer... the keyboard (see Replacing the Hard-Drive Assembly). 17. 7. Replace the hard-drive assembly (see Replacing the Keyboard). 18. Replace the battery (see Replacing the Right Support Bracket). 9. Turn on the computer. Back to enter the system setup program. 4. Replace any cards removed from the 3-in the BIOS ...
Service Manual
Page 53
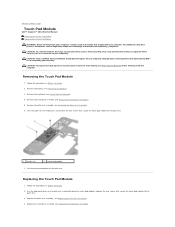
.... CAUTION: To help prevent damage to Contents Page Touch Pad Module Dell™ Inspiron™ 1012 Service Manual Removing the Touch Pad Module Replacing the Touch Pad Module WARNING: Before working inside your computer. Removing the Touch Pad Module 1. Remove the battery (see Replacing the Hard-Drive Assembly). Follow the procedures in Before You Begin. 2. Lift the touch...
.... CAUTION: To help prevent damage to Contents Page Touch Pad Module Dell™ Inspiron™ 1012 Service Manual Removing the Touch Pad Module Replacing the Touch Pad Module WARNING: Before working inside your computer. Removing the Touch Pad Module 1. Remove the battery (see Replacing the Hard-Drive Assembly). Follow the procedures in Before You Begin. 2. Lift the touch...


