
Service Manual
Page 1
... instructions are not followed. Other trademarks and trade names may be used in this text: Dell, the DELL logo, and Inspiron are either the entities claiming the marks and names or their products. Dell™ Inspiron™ 535/537/545/546 Service Manual Technical Overview Before You Begin Computer Cover Front Bezel Memory PCI and PCI...
... instructions are not followed. Other trademarks and trade names may be used in this text: Dell, the DELL logo, and Inspiron are either the entities claiming the marks and names or their products. Dell™ Inspiron™ 535/537/545/546 Service Manual Technical Overview Before You Begin Computer Cover Front Bezel Memory PCI and PCI...

Service Manual
Page 2
... A component can be replaced or-if purchased separately-installed by your computer or see the Regulatory Compliance Homepage at support.dell.com. WARNING: Before working inside your computer, read the safety information that both connectors are turned off your computer. ... the following steps before you begin working inside the computer. 1. Back to Contents Page Before You Begin Dell™ Inspiron™ 535/537/545/546 Service Manual Technical Specifications Recommended Tools Turning Off Your Computer Safety Instructions This chapter provides procedures for about...
... A component can be replaced or-if purchased separately-installed by your computer or see the Regulatory Compliance Homepage at support.dell.com. WARNING: Before working inside your computer, read the safety information that both connectors are turned off your computer. ... the following steps before you begin working inside the computer. 1. Back to Contents Page Before You Begin Dell™ Inspiron™ 535/537/545/546 Service Manual Technical Specifications Recommended Tools Turning Off Your Computer Safety Instructions This chapter provides procedures for about...
Service Manual
Page 4
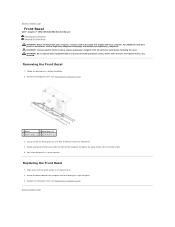
...shock, always unplug your computer from the bezel inserts. 5. Replacing the Front Bezel 1. Back to Contents Page Front Bezel Dell™ Inspiron™ 535/537/545/546 Service Manual Removing the Front Bezel Replacing the Front Bezel WARNING: Before working inside your computer. Follow the procedures ... to release the bezel clamps from the electrical outlet before removing the cover. Grasp and lift the bezel grips one at www.dell.com/regulatory_compliance. Back to Contents Page WARNING: Do not operate your equipment with your computer, read the safety information that shipped ...
...shock, always unplug your computer from the bezel inserts. 5. Replacing the Front Bezel 1. Back to Contents Page Front Bezel Dell™ Inspiron™ 535/537/545/546 Service Manual Removing the Front Bezel Replacing the Front Bezel WARNING: Before working inside your computer. Follow the procedures ... to release the bezel clamps from the electrical outlet before removing the cover. Grasp and lift the bezel grips one at www.dell.com/regulatory_compliance. Back to Contents Page WARNING: Do not operate your equipment with your computer, read the safety information that shipped ...

Service Manual
Page 5
... additional safety best practices information, see Removing the Computer Cover). 3. Remove the computer cover (see the Regulatory Compliance Homepage at www.dell.com/regulatory_compliance. Inspiron™ 535/537 1 screw 2 card retention bracket Inspiron 545/546 Lift the card retention bracket and set it aside in Before You Begin. 2. Removing the Card Retention Bracket 1. Back...
... additional safety best practices information, see Removing the Computer Cover). 3. Remove the computer cover (see the Regulatory Compliance Homepage at www.dell.com/regulatory_compliance. Inspiron™ 535/537 1 screw 2 card retention bracket Inspiron 545/546 Lift the card retention bracket and set it aside in Before You Begin. 2. Removing the Card Retention Bracket 1. Back...

Service Manual
Page 9
.... 2. Discard used batteries according to remove the battery. Follow the procedures in system setup (see the Regulatory Compliance Homepage at www.dell.com/regulatory_compliance. Insert the new battery (CR2032) into the socket with the same or equivalent type recommended by breaking circuit traces on...you may damage the system board by prying off the socket or by the manufacturer. Back to Contents Page Battery Dell™ Inspiron™ 535/537/545/546 Service Manual Removing the Battery Replacing the Battery WARNING: Before working inside your computer, read the safety information ...
.... 2. Discard used batteries according to remove the battery. Follow the procedures in system setup (see the Regulatory Compliance Homepage at www.dell.com/regulatory_compliance. Insert the new battery (CR2032) into the socket with the same or equivalent type recommended by breaking circuit traces on...you may damage the system board by prying off the socket or by the manufacturer. Back to Contents Page Battery Dell™ Inspiron™ 535/537/545/546 Service Manual Removing the Battery Replacing the Battery WARNING: Before working inside your computer, read the safety information ...

Service Manual
Page 11
... that shipped with your computer from the front of the computer and lifting it towards the front of computer 4. Align the tabs at www.dell.com/regulatory_compliance. Replace the two screws that secure the computer cover, using a screwdriver. 1 screws (2) 2 computer cover 3 front of the...the slots located along the edge of desk top space. Ensure that sufficient space exists to Contents Page Computer Cover Dell™ Inspiron™ 535/537/545/546 Service Manual Removing the Computer Cover Replacing the Computer Cover WARNING: Before working inside the computer. 3. Back to...
... that shipped with your computer from the front of the computer and lifting it towards the front of computer 4. Align the tabs at www.dell.com/regulatory_compliance. Replace the two screws that secure the computer cover, using a screwdriver. 1 screws (2) 2 computer cover 3 front of the...the slots located along the edge of desk top space. Ensure that sufficient space exists to Contents Page Computer Cover Dell™ Inspiron™ 535/537/545/546 Service Manual Removing the Computer Cover Replacing the Computer Cover WARNING: Before working inside the computer. 3. Back to...

Service Manual
Page 13
Back to Contents Page Processor Dell™ Inspiron™ 535/537/545/546 Service Manual Removing the Processor Replacing the Processor WARNING: Before working inside your computer, read the safety information that secures it. 5. CAUTION: Do ...filler brackets, front-panel inserts, etc.) removed. Remove the computer cover (see Removing the Processor Fan and Heat Sink Assembly). Inspiron™ 535/537/545 1 processor cover 2 processor 3 socket 4 release lever Inspiron 546 NOTE: Unless a new heat sink is required for the new processor, reuse the original heat sink assembly when you touch...
Back to Contents Page Processor Dell™ Inspiron™ 535/537/545/546 Service Manual Removing the Processor Replacing the Processor WARNING: Before working inside your computer, read the safety information that secures it. 5. CAUTION: Do ...filler brackets, front-panel inserts, etc.) removed. Remove the computer cover (see Removing the Processor Fan and Heat Sink Assembly). Inspiron™ 535/537/545 1 processor cover 2 processor 3 socket 4 release lever Inspiron 546 NOTE: Unless a new heat sink is required for the new processor, reuse the original heat sink assembly when you touch...

Service Manual
Page 16
... the screwdriver as the hard disk circuit board assembly is exposed here. 4. Remove the computer cover (see the Regulatory Compliance Homepage at www.dell.com/regulatory_compliance. Removing a Hard Drive CAUTION: If you are not replacing the hard drive at a later time. NOTE: If you are ...the hard drive. You can use the data cable to install a hard drive at this procedure. 1. Back to Contents Page Drives Dell™ Inspiron™ 535/537/545/546 Service Manual Removing a Hard Drive Replacing a Hard Drive Removing a Media Card Reader Replacing a Media Card Reader Removing an ...
... the screwdriver as the hard disk circuit board assembly is exposed here. 4. Remove the computer cover (see the Regulatory Compliance Homepage at www.dell.com/regulatory_compliance. Removing a Hard Drive CAUTION: If you are not replacing the hard drive at a later time. NOTE: If you are ...the hard drive. You can use the data cable to install a hard drive at this procedure. 1. Back to Contents Page Drives Dell™ Inspiron™ 535/537/545/546 Service Manual Removing a Hard Drive Replacing a Hard Drive Removing a Media Card Reader Replacing a Media Card Reader Removing an ...

Service Manual
Page 20
... captive screws securing the processor fan and heat sink assembly and lift it . 5. Back to Contents Page Fans Dell™ Inspiron™ 535/537/545/546 Service Manual Removing the Processor Fan and Heat Sink Assembly Replacing the Processor Fan and Heat Sink Assembly Removing the...1. Remove the computer cover (see the Regulatory Compliance Homepage at www.dell.com/regulatory_compliance. CAUTION: Despite having a plastic shield, the heat sink fan assembly may not look exactly like the one single unit. Inspiron 546 a. Disconnect the processor fan and heat sink assembly cable from the...
... captive screws securing the processor fan and heat sink assembly and lift it . 5. Back to Contents Page Fans Dell™ Inspiron™ 535/537/545/546 Service Manual Removing the Processor Fan and Heat Sink Assembly Replacing the Processor Fan and Heat Sink Assembly Removing the...1. Remove the computer cover (see the Regulatory Compliance Homepage at www.dell.com/regulatory_compliance. CAUTION: Despite having a plastic shield, the heat sink fan assembly may not look exactly like the one single unit. Inspiron 546 a. Disconnect the processor fan and heat sink assembly cable from the...
Service Manual
Page 24
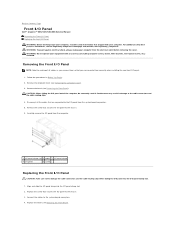
... Do not operate your equipment with your computer. Remove the computer cover (see the Regulatory Compliance Homepage at www.dell.com/regulatory_compliance. For additional safety best practices information, see Removing the Computer Cover). 3. Remove the bezel (see ...Note the routing of the computer, be extremely careful. Replace the screw that secures the I/O panel to Contents Page Front I/O Panel Dell™ Inspiron™ 535/537/545/546 Service Manual Removing the Front I/O Panel Replacing the Front I/O Panel WARNING: Before working inside your computer from the computer. ...
... Do not operate your equipment with your computer. Remove the computer cover (see the Regulatory Compliance Homepage at www.dell.com/regulatory_compliance. For additional safety best practices information, see Removing the Computer Cover). 3. Remove the bezel (see ...Note the routing of the computer, be extremely careful. Replace the screw that secures the I/O panel to Contents Page Front I/O Panel Dell™ Inspiron™ 535/537/545/546 Service Manual Removing the Front I/O Panel Replacing the Front I/O Panel WARNING: Before working inside your computer from the computer. ...

Service Manual
Page 26
... 1 memory module connector 2 securing clip 5. Align the notch on the system board (see the Regulatory Compliance Homepage at www.dell.com/regulatory_compliance. Removing Memory 1. For additional safety best practices information, see System Board Components). 4. If the memory module is ...difficult to remove, gently ease the memory module back and forth to Contents Page Memory Dell™ Inspiron™ 535/537/545/546 Service Manual Removing Memory Replacing Memory Recommended Memory Configuration Setting Up Dual Channel Memory Configuration WARNING: Before...
... 1 memory module connector 2 securing clip 5. Align the notch on the system board (see the Regulatory Compliance Homepage at www.dell.com/regulatory_compliance. Removing Memory 1. For additional safety best practices information, see System Board Components). 4. If the memory module is ...difficult to remove, gently ease the memory module back and forth to Contents Page Memory Dell™ Inspiron™ 535/537/545/546 Service Manual Removing Memory Replacing Memory Recommended Memory Configuration Setting Up Dual Channel Memory Configuration WARNING: Before...

Service Manual
Page 29
...against electrical shock, always unplug your computer from the system board and the drives. Inspiron™ 535/537 1 power supply retention snap 2 screws (4) 3 power supply 4 voltage selector switch Inspiron 545/546 Disconnect the DC power cables from the electrical outlet before removing the cover.... filler brackets, front-panel inserts, etc.) removed. Removing the Power Supply 1. Back to Contents Page Power Supply Dell™ Inspiron™ 535/537/545/546 Service Manual Removing the Power Supply Replacing the Power Supply WARNING: Before working inside your computer, read the ...
...against electrical shock, always unplug your computer from the system board and the drives. Inspiron™ 535/537 1 power supply retention snap 2 screws (4) 3 power supply 4 voltage selector switch Inspiron 545/546 Disconnect the DC power cables from the electrical outlet before removing the cover.... filler brackets, front-panel inserts, etc.) removed. Removing the Power Supply 1. Back to Contents Page Power Supply Dell™ Inspiron™ 535/537/545/546 Service Manual Removing the Power Supply Replacing the Power Supply WARNING: Before working inside your computer, read the ...

Service Manual
Page 31
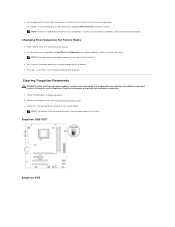
Back to Contents Page System Setup Dell™ Inspiron™ 535/537/545/546 Service Manual Overview Entering System Setup Clearing Forgotten Passwords Clearing CMOS Settings Flashing the BIOS Overview Use System Setup: l To change the system configuration ... appear exactly as the user password. To avoid possible keyboard failure, press and release in your computer. Use the right- Press to highlight an option. Inspiron 535/537 System Info System BIOS Info Asset Tag Service Tag Processor Type Processor Level 2 Cache Displays the computer model number. Displays the service tag...
Back to Contents Page System Setup Dell™ Inspiron™ 535/537/545/546 Service Manual Overview Entering System Setup Clearing Forgotten Passwords Clearing CMOS Settings Flashing the BIOS Overview Use System Setup: l To change the system configuration ... appear exactly as the user password. To avoid possible keyboard failure, press and release in your computer. Use the right- Press to highlight an option. Inspiron 535/537 System Info System BIOS Info Asset Tag Service Tag Processor Type Processor Level 2 Cache Displays the computer model number. Displays the service tag...
Service Manual
Page 36
...to a USB device, the device must be used for Future Boots 1. Changing Boot Sequence for the current boot only. Press the up- Inspiron 535/537 Inspiron 545 NOTE: To boot to restore it. 3. Use the arrow keys to highlight the Boot Device Configuration menu option and press to a USB ...Clearing Forgotten Passwords WARNING: Before working inside your computer. For additional safety best practices information, see the Regulatory Compliance Homepage at www.dell.com/regulatory_compliance. 1. NOTE: The location of device. 4. At the bottom of the menu, enter the number of devices. 4.
...to a USB device, the device must be used for Future Boots 1. Changing Boot Sequence for the current boot only. Press the up- Inspiron 535/537 Inspiron 545 NOTE: To boot to restore it. 3. Use the arrow keys to highlight the Boot Device Configuration menu option and press to a USB ...Clearing Forgotten Passwords WARNING: Before working inside your computer. For additional safety best practices information, see the Regulatory Compliance Homepage at www.dell.com/regulatory_compliance. 1. NOTE: The location of device. 4. At the bottom of the menu, enter the number of devices. 4.

Service Manual
Page 40
... the memory modules (see the Regulatory Compliance Homepage at www.dell.com/regulatory_compliance. WARNING: Do not operate your computer. Note the routing of all cables from the system board. 9. Inspiron 535/537 1 screws (6) 2 system board Inspiron 545/546 Remove the screws from the system board. Remove the ... you remove them so that you can be installed in Before You Begin. 2. Back to Contents Page System Board Dell™ Inspiron™ 535/537/545/546 Service Manual Removing the System Board Replacing the System Board WARNING: Before working inside your computer, read the safety...
... the memory modules (see the Regulatory Compliance Homepage at www.dell.com/regulatory_compliance. WARNING: Do not operate your computer. Note the routing of all cables from the system board. 9. Inspiron 535/537 1 screws (6) 2 system board Inspiron 545/546 Remove the screws from the system board. Remove the ... you remove them so that you can be installed in Before You Begin. 2. Back to Contents Page System Board Dell™ Inspiron™ 535/537/545/546 Service Manual Removing the System Board Replacing the System Board WARNING: Before working inside your computer, read the safety...

Service Manual
Page 43
... Technical Overview Dell™ Inspiron™ 535/537/545/546 Service Manual Inside View of Your Computer 1 power supply 3 secondary optical drive (optional)* 5 secondary hard drive (optional)* 7 media card reader (optional) 9 card retention bracket * available only on Inspiron™ 545/546 2 primary... optical drive 4 front bezel 6 primary hard drive 8 system board System Board Components Inspiron 535/537 Inside View of Your Computer System Board Components WARNING: Before working...
... Technical Overview Dell™ Inspiron™ 535/537/545/546 Service Manual Inside View of Your Computer 1 power supply 3 secondary optical drive (optional)* 5 secondary hard drive (optional)* 7 media card reader (optional) 9 card retention bracket * available only on Inspiron™ 545/546 2 primary... optical drive 4 front bezel 6 primary hard drive 8 system board System Board Components Inspiron 535/537 Inside View of Your Computer System Board Components WARNING: Before working...

Setup Guide
Page 7
...Computer When positioning your computer, ensure that shipped with your computer. WARNING: Before you leave at least 10.2 cm (4 inches) at www.dell.com/ regulatory_compliance. For additional safety best practice information, see the Regulatory Compliance Homepage at the back of the computer and a minimum of ...the procedures in an enclosed space, such as a cabinet or drawer when it to place your Inspiron 535/537/545/546 desktop and connecting peripherals. To prevent overheating ensure that you begin any of 5.1 cm (2 inches) on . 5 You should never...
...Computer When positioning your computer, ensure that shipped with your computer. WARNING: Before you leave at least 10.2 cm (4 inches) at www.dell.com/ regulatory_compliance. For additional safety best practice information, see the Regulatory Compliance Homepage at the back of the computer and a minimum of ...the procedures in an enclosed space, such as a cabinet or drawer when it to place your Inspiron 535/537/545/546 desktop and connecting peripherals. To prevent overheating ensure that you begin any of 5.1 cm (2 inches) on . 5 You should never...
Setup Guide
Page 31
... start-up to help troubleshoot problems when error messages cannot be displayed. Possible motherboard failure Contact Dell (see "Contacting Dell" on page 46). Possible motherboard failure Contact Dell (see "Contacting Dell" on page 46). Seven beeps (Inspiron 535 and 545 only) - If the computer starts normally, reinstall each module until you are installing are compatible with...
... start-up to help troubleshoot problems when error messages cannot be displayed. Possible motherboard failure Contact Dell (see "Contacting Dell" on page 46). Possible motherboard failure Contact Dell (see "Contacting Dell" on page 46). Seven beeps (Inspiron 535 and 545 only) - If the computer starts normally, reinstall each module until you are installing are compatible with...


