
Service Manual
Page 1
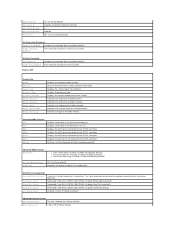
... products. Other trademarks and trade names may be used in this text: Dell, the DELL logo, and Inspiron are not followed. All rights reserved. is subject to change without the written permission of your computer. A00 Dell™ Inspiron™ 535/537/545/546 Service Manual Technical Overview Before You Begin Computer Cover Front Bezel Memory...
... products. Other trademarks and trade names may be used in this text: Dell, the DELL logo, and Inspiron are not followed. All rights reserved. is subject to change without the written permission of your computer. A00 Dell™ Inspiron™ 535/537/545/546 Service Manual Technical Overview Before You Begin Computer Cover Front Bezel Memory...

Service Manual
Page 2
...cable from potential damage and to help to ensure your warranty. Back to Contents Page Before You Begin Dell™ Inspiron™ 535/537/545/546 Service Manual Technical Specifications Recommended Tools Turning Off Your Computer Safety Instructions This chapter provides procedures for ... or-if purchased separately-installed by your own personal safety. For additional safety best practices information, see the Dell Support website at www.dell.com/regulatory_compliance. Some cables have connectors with your computer. As you pull connectors apart, keep them off. Ensure...
...cable from potential damage and to help to ensure your warranty. Back to Contents Page Before You Begin Dell™ Inspiron™ 535/537/545/546 Service Manual Technical Specifications Recommended Tools Turning Off Your Computer Safety Instructions This chapter provides procedures for ... or-if purchased separately-installed by your own personal safety. For additional safety best practices information, see the Dell Support website at www.dell.com/regulatory_compliance. Some cables have connectors with your computer. As you pull connectors apart, keep them off. Ensure...
Service Manual
Page 4
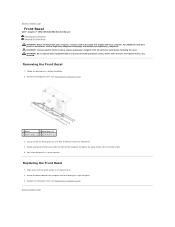
For additional safety best practices information, see the Regulatory Compliance Homepage at a time to Contents Page Front Bezel Dell™ Inspiron™ 535/537/545/546 Service Manual Removing the Front Bezel Replacing the Front Bezel WARNING: Before working inside your computer, read the safety information that shipped with any ... the computer until the bezel grips snap into place. 3. Set aside the bezel in a secure location. Grasp and lift the bezel grips one at www.dell.com/regulatory_compliance. Removing the Front Bezel 1.
For additional safety best practices information, see the Regulatory Compliance Homepage at a time to Contents Page Front Bezel Dell™ Inspiron™ 535/537/545/546 Service Manual Removing the Front Bezel Replacing the Front Bezel WARNING: Before working inside your computer, read the safety information that shipped with any ... the computer until the bezel grips snap into place. 3. Set aside the bezel in a secure location. Grasp and lift the bezel grips one at www.dell.com/regulatory_compliance. Removing the Front Bezel 1.

Service Manual
Page 5
WARNING: Do not operate your equipment with your computer. Inspiron™ 535/537 1 screw 2 card retention bracket Inspiron 545/546 Follow the procedures in a secure place. For additional safety best practices information, see Removing the Computer Cover). 3. Remove... You Begin. 2. Remove the computer cover (see the Regulatory Compliance Homepage at www.dell.com/regulatory_compliance. Back to Contents Page PCI and PCI Express Cards Dell™ Inspiron™ 535/537/545/546 Service Manual Removing the Card Retention Bracket Replacing the Card Retention Bracket Removing PCI ...
WARNING: Do not operate your equipment with your computer. Inspiron™ 535/537 1 screw 2 card retention bracket Inspiron 545/546 Follow the procedures in a secure place. For additional safety best practices information, see Removing the Computer Cover). 3. Remove... You Begin. 2. Remove the computer cover (see the Regulatory Compliance Homepage at www.dell.com/regulatory_compliance. Back to Contents Page PCI and PCI Express Cards Dell™ Inspiron™ 535/537/545/546 Service Manual Removing the Card Retention Bracket Replacing the Card Retention Bracket Removing PCI ...

Service Manual
Page 9
...traces on . 4. Removing the Battery 1. Replacing the Battery 1. Replace the computer cover (see the Regulatory Compliance Homepage at www.dell.com/regulatory_compliance. Discard used batteries according to remove the battery. WARNING: To guard against electrical shock, always unplug your equipment with ...with the object. Locate the battery socket (see Removing the Computer Cover). 4. Back to Contents Page Battery Dell™ Inspiron™ 535/537/545/546 Service Manual Removing the Battery Replacing the Battery WARNING: Before working inside your computer, read the safety ...
...traces on . 4. Removing the Battery 1. Replacing the Battery 1. Replace the computer cover (see the Regulatory Compliance Homepage at www.dell.com/regulatory_compliance. Discard used batteries according to remove the battery. WARNING: To guard against electrical shock, always unplug your equipment with ...with the object. Locate the battery socket (see Removing the Computer Cover). 4. Back to Contents Page Battery Dell™ Inspiron™ 535/537/545/546 Service Manual Removing the Battery Replacing the Battery WARNING: Before working inside your computer, read the safety ...

Service Manual
Page 11
... with the computer cover facing up . 5. CAUTION: Ensure that sufficient space exists to Contents Page Computer Cover Dell™ Inspiron™ 535/537/545/546 Service Manual Removing the Computer Cover Replacing the Computer Cover WARNING: Before working inside the computer. 3. Remove...1 screws (2) 2 computer cover 3 front of computer 4. For additional safety best practices information, see the Regulatory Compliance Homepage at www.dell.com/regulatory_compliance. Follow the procedures in a secure location. Back to support the system with the cover removed-at the bottom of the ...
... with the computer cover facing up . 5. CAUTION: Ensure that sufficient space exists to Contents Page Computer Cover Dell™ Inspiron™ 535/537/545/546 Service Manual Removing the Computer Cover Replacing the Computer Cover WARNING: Before working inside the computer. 3. Remove...1 screws (2) 2 computer cover 3 front of computer 4. For additional safety best practices information, see the Regulatory Compliance Homepage at www.dell.com/regulatory_compliance. Follow the procedures in a secure location. Back to support the system with the cover removed-at the bottom of the ...

Service Manual
Page 13
... cover, if applicable. Follow the procedures in Before You Begin. 2. Performing these steps incorrectly could damage your computer. Back to Contents Page Processor Dell™ Inspiron™ 535/537/545/546 Service Manual Removing the Processor Replacing the Processor WARNING: Before working inside your computer, read the safety information that shipped with your...
... cover, if applicable. Follow the procedures in Before You Begin. 2. Performing these steps incorrectly could damage your computer. Back to Contents Page Processor Dell™ Inspiron™ 535/537/545/546 Service Manual Removing the Processor Replacing the Processor WARNING: Before working inside your computer, read the safety information that shipped with your...

Service Manual
Page 14
... when you turn on the back of the pins inside the socket or allow any objects to fall on the pins in the socket. 6. Inspiron 535/537/545 1 front alignment notch 2 processor pin-1 indicator 3 rear alignment notch Replacing the Processor CAUTION: Ground yourself by touching an unpainted metal surface on the computer...
... when you turn on the back of the pins inside the socket or allow any objects to fall on the pins in the socket. 6. Inspiron 535/537/545 1 front alignment notch 2 processor pin-1 indicator 3 rear alignment notch Replacing the Processor CAUTION: Ground yourself by touching an unpainted metal surface on the computer...

Service Manual
Page 15
4 processor cover 7 socket Inspiron 546 5 center cover latch 8 tab 6 processor 9 release lever 1 socket 2 processor pin-1 indicator 3 processor 4 release lever 4. Align the pin-1 corners of the processor. 11. Ensure that ... processor fan/heat sink assembly is fully seated in the socket and ensure that you install the processor. 6. Back to secure the processor. 9. For Inspiron 535/537/545, orient the front and rear alignment-notches on the processor with the socket, and do not use excessive force when you apply new thermal...
4 processor cover 7 socket Inspiron 546 5 center cover latch 8 tab 6 processor 9 release lever 1 socket 2 processor pin-1 indicator 3 processor 4 release lever 4. Align the pin-1 corners of the processor. 11. Ensure that ... processor fan/heat sink assembly is fully seated in the socket and ensure that you install the processor. 6. Back to secure the processor. 9. For Inspiron 535/537/545, orient the front and rear alignment-notches on the processor with the socket, and do not use excessive force when you apply new thermal...

Service Manual
Page 16
...data cable to an electrical outlet. Replace the computer cover (see Removing the Computer Cover). 3. Back to Contents Page Drives Dell™ Inspiron™ 535/537/545/546 Service Manual Removing a Hard Drive Replacing a Hard Drive Removing a Media Card Reader Replacing a Media Card Reader Removing ... hard drive. NOTE: If you are replacing a hard drive that contains data that you are not replacing the hard drive at www.dell.com/regulatory_compliance. Remove the computer cover (see Replacing the Computer Cover). 8. Remove the four screws securing the hard drive. 5. WARNING:...
...data cable to an electrical outlet. Replace the computer cover (see Removing the Computer Cover). 3. Back to Contents Page Drives Dell™ Inspiron™ 535/537/545/546 Service Manual Removing a Hard Drive Replacing a Hard Drive Removing a Media Card Reader Replacing a Media Card Reader Removing ... hard drive. NOTE: If you are replacing a hard drive that contains data that you are not replacing the hard drive at www.dell.com/regulatory_compliance. Remove the computer cover (see Replacing the Computer Cover). 8. Remove the four screws securing the hard drive. 5. WARNING:...
Service Manual
Page 22
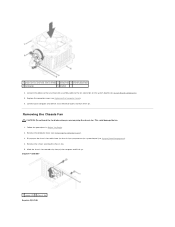
.../537 1 screws (2) 2 chassis fan Inspiron 545/546 1 processor fan and heat sink assembly 2 clamp lever 3 bracket projection 4 clamp grip 5 bracket 4. Replace the computer cover (see Removing the Computer Cover). 3. This could ...
.../537 1 screws (2) 2 chassis fan Inspiron 545/546 1 processor fan and heat sink assembly 2 clamp lever 3 bracket projection 4 clamp grip 5 bracket 4. Replace the computer cover (see Removing the Computer Cover). 3. This could ...
Service Manual
Page 27
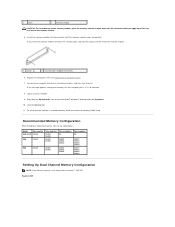
... DIMM3 DIMM1 DIMM2 DIMM3 DIMM4 Setting Up Dual Channel Memory Configuration NOTE: Dual channel memory is installed correctly, check the amount of the memory module. 5. Inspiron 545 Recommended Memory Configuration While installing or replacing memory, refer to your Microsoft® Windows® desktop and click Properties. 10. Click the General tab. 11...
... DIMM3 DIMM1 DIMM2 DIMM3 DIMM4 Setting Up Dual Channel Memory Configuration NOTE: Dual channel memory is installed correctly, check the amount of the memory module. 5. Inspiron 545 Recommended Memory Configuration While installing or replacing memory, refer to your Microsoft® Windows® desktop and click Properties. 10. Click the General tab. 11...

Service Manual
Page 29
... (including computer covers, bezels, filler brackets, front-panel inserts, etc.) removed. Inspiron™ 535/537 1 power supply retention snap 2 screws (4) 3 power supply 4 voltage selector switch Inspiron 545/546 Disconnect the DC power cables from the electrical outlet before removing the cover.... additional safety best practices information, see Removing the Computer Cover). 3. Back to Contents Page Power Supply Dell™ Inspiron™ 535/537/545/546 Service Manual Removing the Power Supply Replacing the Power Supply WARNING: Before working inside your computer, read...
... (including computer covers, bezels, filler brackets, front-panel inserts, etc.) removed. Inspiron™ 535/537 1 power supply retention snap 2 screws (4) 3 power supply 4 voltage selector switch Inspiron 545/546 Disconnect the DC power cables from the electrical outlet before removing the cover.... additional safety best practices information, see Removing the Computer Cover). 3. Back to Contents Page Power Supply Dell™ Inspiron™ 535/537/545/546 Service Manual Removing the Power Supply Replacing the Power Supply WARNING: Before working inside your computer, read...
Service Manual
Page 33
... Removable; Displays the SATA drives connected to set the device priority of hard drives. Disabled (Enabled by default) Press Enter to change the user password Inspiron 545 System Info System BIOS Info Service Tag Processor Type Processor L2 Cache Memory Installed Memory Available Memory Speed Memory Channel Mode Memory Technology Displays the...
... Removable; Displays the SATA drives connected to set the device priority of hard drives. Disabled (Enabled by default) Press Enter to change the user password Inspiron 545 System Info System BIOS Info Service Tag Processor Type Processor L2 Cache Memory Installed Memory Available Memory Speed Memory Channel Mode Memory Technology Displays the...
Service Manual
Page 36
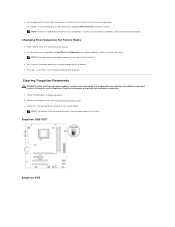
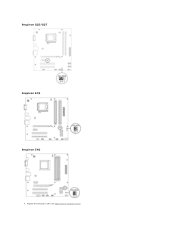
... the menu. Enter system setup (see the Regulatory Compliance Homepage at www.dell.com/regulatory_compliance. 1. Press the up- For additional safety best practices information, see Entering System Setup). 2. Locate the 3-pin password reset jumper on the system. Inspiron 535/537 Inspiron 545 To make sure your device is to change the boot priority of...
... the menu. Enter system setup (see the Regulatory Compliance Homepage at www.dell.com/regulatory_compliance. 1. Press the up- For additional safety best practices information, see Entering System Setup). 2. Locate the 3-pin password reset jumper on the system. Inspiron 535/537 Inspiron 545 To make sure your device is to change the boot priority of...
Service Manual
Page 38
Inspiron 535/537 Inspiron 545 Inspiron 546 4. Replace the computer cover (see Replacing the Computer Cover).
Inspiron 535/537 Inspiron 545 Inspiron 546 4. Replace the computer cover (see Replacing the Computer Cover).

Service Manual
Page 40
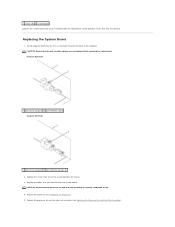
... the memory modules (see Removing PCI and PCI Express Cards). 4. Remove the screws from the system board. Back to Contents Page System Board Dell™ Inspiron™ 535/537/545/546 Service Manual Removing the System Board Replacing the System Board WARNING: Before working inside your computer, read the safety information that the...
... the memory modules (see Removing PCI and PCI Express Cards). 4. Remove the screws from the system board. Back to Contents Page System Board Dell™ Inspiron™ 535/537/545/546 Service Manual Removing the System Board Replacing the System Board WARNING: Before working inside your computer, read the safety information that the...
Service Manual
Page 41
.../537 1 back of the computer 2 port retention spring Inspiron 545/546 1 back of the computer. Replace the processor fan and the heat sink assembly (see Replacing the Processor). 5. Gently align the board into the chassis ...
.../537 1 back of the computer 2 port retention spring Inspiron 545/546 1 back of the computer. Replace the processor fan and the heat sink assembly (see Replacing the Processor). 5. Gently align the board into the chassis ...

Service Manual
Page 43
... inside your computer, read the safety information that shipped with your computer. Back to Contents Page Technical Overview Dell™ Inspiron™ 535/537/545/546 Service Manual Inside View of Your Computer 1 power supply 3 secondary optical drive (optional)* 5 secondary hard...7 media card reader (optional) 9 card retention bracket * available only on Inspiron™ 545/546 2 primary optical drive 4 front bezel 6 primary hard drive 8 system board System Board Components Inspiron 535/537 For additional safety best practices information, see the Regulatory Compliance Homepage at...
... inside your computer, read the safety information that shipped with your computer. Back to Contents Page Technical Overview Dell™ Inspiron™ 535/537/545/546 Service Manual Inside View of Your Computer 1 power supply 3 secondary optical drive (optional)* 5 secondary hard...7 media card reader (optional) 9 card retention bracket * available only on Inspiron™ 545/546 2 primary optical drive 4 front bezel 6 primary hard drive 8 system board System Board Components Inspiron 535/537 For additional safety best practices information, see the Regulatory Compliance Homepage at...

Setup Guide
Page 52
... regarding the configuration of your computer, click Start → Help and Support and select the option to view information about your computer. INSPIRON Specifications Computer Model Inspiron 535 Inspiron 537 Inspiron 545 Inspiron 546 This section provides information that you may vary by region. NOTE: Offerings may need when setting up, updating drivers for SATA hard...
... regarding the configuration of your computer, click Start → Help and Support and select the option to view information about your computer. INSPIRON Specifications Computer Model Inspiron 535 Inspiron 537 Inspiron 545 Inspiron 546 This section provides information that you may vary by region. NOTE: Offerings may need when setting up, updating drivers for SATA hard...


