Microsoft Windows 7: Getting Started Guide
Page 3
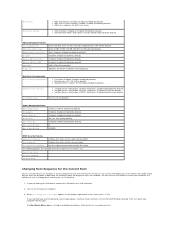
... Personalize, to open the Change the visuals and sounds on your computer window and learn more about your desktop. Windows 7 Basic Features Customizing the Desktop You can customize your desktop to change the appearance, resolution, wallpaper, screensaver, or other features of connection to complete the setup. Transferring Information to a New Computer To transfer...
... Personalize, to open the Change the visuals and sounds on your computer window and learn more about your desktop. Windows 7 Basic Features Customizing the Desktop You can customize your desktop to change the appearance, resolution, wallpaper, screensaver, or other features of connection to complete the setup. Transferring Information to a New Computer To transfer...
Microsoft Windows 7: Getting Started Guide
Page 4
... hours to change the boot sequence for one time only. Reinstalling Windows 7 The reinstallation process may be used in this text: Dell and the DELL logo are either the entities claiming the marks and names or their products. then, shut down your computer and try again. .... 2 Insert the Operating System disc. 3 Click Exit if the Install Windows message appears. 4 Restart the computer. 5 When the DELL logo appears, press immediately. After you reinstall the operating system, you see the Microsoft Windows desktop; Printed in trademarks and trade names other software.
... hours to change the boot sequence for one time only. Reinstalling Windows 7 The reinstallation process may be used in this text: Dell and the DELL logo are either the entities claiming the marks and names or their products. then, shut down your computer and try again. .... 2 Insert the Operating System disc. 3 Click Exit if the Install Windows message appears. 4 Restart the computer. 5 When the DELL logo appears, press immediately. After you reinstall the operating system, you see the Microsoft Windows desktop; Printed in trademarks and trade names other software.

Service Manual
Page 31
... changed, press to continue. 8. Connect your computer and devices to electrical outlets, and then turn them on to your Microsoft® Windows® desktop and click Properties. 10. Log on . Click the General tab. 11. If you apply equal force to each end of the memory module.... connector while you insert the memory module correctly, the securing clips snap into position. Right-click the My Computer icon on Inspiron™ 535s/537s. Inspiron 545s Replace the computer cover (see Replacing the Computer Cover). 7. Insert the memory module into the connector until the memory ...
... changed, press to continue. 8. Connect your computer and devices to electrical outlets, and then turn them on to your Microsoft® Windows® desktop and click Properties. 10. Log on . Click the General tab. 11. If you apply equal force to each end of the memory module.... connector while you insert the memory module correctly, the securing clips snap into position. Right-click the My Computer icon on Inspiron™ 535s/537s. Inspiron 545s Replace the computer cover (see Replacing the Computer Cover). 7. Insert the memory module into the connector until the memory ...
Service Manual
Page 35
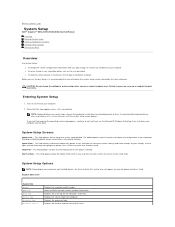
Back to Contents Page System Setup Dell™ Inspiron™ 535s/537s/545s/546s Service Manual Overview Entering System Setup Clearing ...your computer and installed devices, the items listed in this field you see the Microsoft® Windows® desktop, then shut down your settings. Displays the amount of time. CAUTION: Do not change , or remove ...computer to your computer and try again. Certain changes can view your computer. Entering System Setup 1. Inspiron 535s/537s System Info System BIOS Info Asset Tag Service Tag Processor Type Processor Level 2 Displays the computer ...
Back to Contents Page System Setup Dell™ Inspiron™ 535s/537s/545s/546s Service Manual Overview Entering System Setup Clearing ...your computer and installed devices, the items listed in this field you see the Microsoft® Windows® desktop, then shut down your settings. Displays the amount of time. CAUTION: Do not change , or remove ...computer to your computer and try again. Certain changes can view your computer. Entering System Setup 1. Inspiron 535s/537s System Info System BIOS Info Asset Tag Service Tag Processor Type Processor Level 2 Displays the computer ...
Service Manual
Page 39
...of the supervisor password. Off; Enabled (Disabled by default). Set the supervisor password through this feature, for the Current Boot You can run the Dell Diagnostics on (or restart) your computer and try again. You can also use this menu. right corner of the user password. The Boot ...Password Set Supervisor Password Displays the status of the screen, press . Turn on the Drivers and Utilities media, but you see the Microsoft Windows desktop. If you wait too long and the operating system logo appears, continue to wait until you want the computer to it. Then shut down ...
...of the supervisor password. Off; Enabled (Disabled by default). Set the supervisor password through this feature, for the Current Boot You can run the Dell Diagnostics on (or restart) your computer and try again. You can also use this menu. right corner of the user password. The Boot ...Password Set Supervisor Password Displays the status of the screen, press . Turn on the Drivers and Utilities media, but you see the Microsoft Windows desktop. If you wait too long and the operating system logo appears, continue to wait until you want the computer to it. Then shut down ...

Service Manual
Page 43
.... Click Close when the Download Complete window appears. 5. Turn on your computer and devices to your computer at the Dell Support website at support.dell.com. 3. Locate the BIOS update file for your desktop. 7. Click Save this Agreement. The Save In window appears. 6. If the Export Compliance Disclaimer window appears, click Yes, I Accept...
.... Click Close when the Download Complete window appears. 5. Turn on your computer and devices to your computer at the Dell Support website at support.dell.com. 3. Locate the BIOS update file for your desktop. 7. Click Save this Agreement. The Save In window appears. 6. If the Export Compliance Disclaimer window appears, click Yes, I Accept...
SETUP GUIDE
Page 5
... Power Cables to Your Display and Computer 11 Windows Vista® Setup 12 Connect to the Internet (Optional 12 Using Your Inspiron™ Desktop 16 Front View Features 16 Back View Features 18 Software Features 20 Solving Problems 23 Network Problems 23 Power Problems 25 Memory Problems... 26 Lockups and Software Problems 27 Using Support Tools 30 Dell Support Center 30 Beep Codes 31 System Messages 32 Hardware Troubleshooter 34 Dell Diagnostics 34 System Recovery Options 37 System Restore 38 Dell Factory Image Restore 39 Operating System Reinstallation 40 3
... Power Cables to Your Display and Computer 11 Windows Vista® Setup 12 Connect to the Internet (Optional 12 Using Your Inspiron™ Desktop 16 Front View Features 16 Back View Features 18 Software Features 20 Solving Problems 23 Network Problems 23 Power Problems 25 Memory Problems... 26 Lockups and Software Problems 27 Using Support Tools 30 Dell Support Center 30 Beep Codes 31 System Messages 32 Hardware Troubleshooter 34 Dell Diagnostics 34 System Recovery Options 37 System Restore 38 Dell Factory Image Restore 39 Operating System Reinstallation 40 3
SETUP GUIDE
Page 7
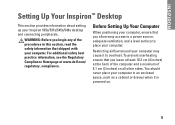
...at www.dell.com/ regulatory_compliance. Restricting airflow around your computer. You should never place your computer in this section, read the safety information that shipped with your computer may cause it is powered on all other sides. INSPIRON Setting Up Your Inspiron™ Desktop This ... computer and a minimum of the procedures in an enclosed space, such as a cabinet or drawer when it to place your Inspiron 535s/537s/545s/546s desktop and connecting peripherals. To prevent overheating ensure that you begin any of 5.1 cm (2 inches) on . 5 WARNING: Before ...
...at www.dell.com/ regulatory_compliance. Restricting airflow around your computer. You should never place your computer in this section, read the safety information that shipped with your computer may cause it is powered on all other sides. INSPIRON Setting Up Your Inspiron™ Desktop This ... computer and a minimum of the procedures in an enclosed space, such as a cabinet or drawer when it to place your Inspiron 535s/537s/545s/546s desktop and connecting peripherals. To prevent overheating ensure that you begin any of 5.1 cm (2 inches) on . 5 WARNING: Before ...

SETUP GUIDE
Page 8
Setting Up Your Inspiron™ Desktop Extend the Rear Stabilizing Feet With the computer sitting in an upright position, carefully lift the rear of the computer, and rotate the stabilizing feet outwards. The extended feet ensure maximum system stability. 6
Setting Up Your Inspiron™ Desktop Extend the Rear Stabilizing Feet With the computer sitting in an upright position, carefully lift the rear of the computer, and rotate the stabilizing feet outwards. The extended feet ensure maximum system stability. 6

SETUP GUIDE
Page 9
... connector, or the DVI connector. 7 Refer to the following table when identifying the connectors on your display and computer to the display. Setting Up Your Inspiron™ Desktop Connect the Display Your computer has an integrated VGA video connector.
... connector, or the DVI connector. 7 Refer to the following table when identifying the connectors on your display and computer to the display. Setting Up Your Inspiron™ Desktop Connect the Display Your computer has an integrated VGA video connector.

SETUP GUIDE
Page 10
Connect Using the DVI Connector If your display has a DVI connector, use a VGA cable (with blue connectors at www.dell.com. 8 NOTE: You can purchase an HDMI-to-DVI adapter from the Dell website at both ends) with an HDMI-to -VGA adapter. NOTE: You can purchase a DVI-to-VGA adapter from the Dell website at both ends) with a DVI-to -DVI adapter. Setting Up Your Inspiron™ Desktop Connect Using the HDMI Connector If your display has a VGA connector, use a DVI cable (with white connectors at www.dell.com.
Connect Using the DVI Connector If your display has a DVI connector, use a VGA cable (with blue connectors at www.dell.com. 8 NOTE: You can purchase an HDMI-to-DVI adapter from the Dell website at both ends) with an HDMI-to -VGA adapter. NOTE: You can purchase a DVI-to-VGA adapter from the Dell website at both ends) with a DVI-to -DVI adapter. Setting Up Your Inspiron™ Desktop Connect Using the HDMI Connector If your display has a VGA connector, use a DVI cable (with white connectors at www.dell.com.

SETUP GUIDE
Page 11
Setting Up Your Inspiron™ Desktop 9 NOTE: The exact location of the computer to connect a USB keyboard and mouse. Connect the Keyboard and Mouse Use the USB connectors on the back panel of connectors may be different than what is shown.
Setting Up Your Inspiron™ Desktop 9 NOTE: The exact location of the computer to connect a USB keyboard and mouse. Connect the Keyboard and Mouse Use the USB connectors on the back panel of connectors may be different than what is shown.

SETUP GUIDE
Page 12
Setting Up Your Inspiron™ Desktop Connect the Network Cable (Optional) NOTE: The exact location of connectors may be different than what is not required to complete your computer setup, but ...
Setting Up Your Inspiron™ Desktop Connect the Network Cable (Optional) NOTE: The exact location of connectors may be different than what is not required to complete your computer setup, but ...

SETUP GUIDE
Page 13
Setting Up Your Inspiron™ Desktop Connect the Power Cables to Your Press the Power Button on Your Display and Computer Computer and Display 11
Setting Up Your Inspiron™ Desktop Connect the Power Cables to Your Press the Power Button on Your Display and Computer Computer and Display 11

SETUP GUIDE
Page 14
... use your computer unusable. With a DSL connection, you need an external modem or network connection and an Internet service provider (ISP). Setting Up Your Inspiron™ Desktop Windows Vista® Setup To set up an Internet connection. These steps are mandatory and may render your telephone on the screen. CAUTION: Do not...
... use your computer unusable. With a DSL connection, you need an external modem or network connection and an Internet service provider (ISP). Setting Up Your Inspiron™ Desktop Windows Vista® Setup To set up an Internet connection. These steps are mandatory and may render your telephone on the screen. CAUTION: Do not...
SETUP GUIDE
Page 15
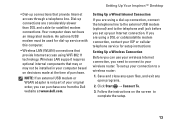
...optional internal components that may or may not be used for setup instructions. Click Start → Connect To. 3. Setting Up Your Inspiron™ Desktop • Dial-up connections are considerably slower than DSL and cable (or satellite) modem connections. Setting Up a Wireless Connection Before you... can purchase one from the Dell website at the time of your original order, you set up your wireless router. Dial&#...
...optional internal components that may or may not be used for setup instructions. Click Start → Connect To. 3. Setting Up Your Inspiron™ Desktop • Dial-up connections are considerably slower than DSL and cable (or satellite) modem connections. Setting Up a Wireless Connection Before you... can purchase one from the Dell website at the time of your original order, you set up your wireless router. Dial&#...

SETUP GUIDE
Page 16
... not have a service outage. If you do not have an ISP icon on your desktop or if you do not know which type of connection to set up modem or ISDN. Setting Up Your Inspiron™ Desktop Setting Up Your Internet Connection To set up an Internet connection with a provided ISP... desktop shortcut: 1. If you want to connect: --Choose Broadband if you will use an optional USB ...
... not have a service outage. If you do not have an ISP icon on your desktop or if you do not know which type of connection to set up modem or ISDN. Setting Up Your Inspiron™ Desktop Setting Up Your Internet Connection To set up an Internet connection with a provided ISP... desktop shortcut: 1. If you want to connect: --Choose Broadband if you will use an optional USB ...

SETUP GUIDE
Page 18
INSPIRON Using Your Inspiron™ Desktop Your computer has indicators and buttons that provide information and enable you to Front View Features perform common tasks. The connectors on 9 1 your computer provide the option of attaching additional devices. 8 2 3 4 7 5 6 16
INSPIRON Using Your Inspiron™ Desktop Your computer has indicators and buttons that provide information and enable you to Front View Features perform common tasks. The connectors on 9 1 your computer provide the option of attaching additional devices. 8 2 3 4 7 5 6 16

SETUP GUIDE
Page 19
... - The hard drive activity light is in the center of your computer. 6 Hard drive activity light - Press to the hard drive. 7 Microphone connector - Using Your Inspiron™ Desktop 5 Headphone connector - Connects to a microphone for audio input. 8 Optical drive panel - Press to an audio cable for voice or to open or close the...
... - The hard drive activity light is in the center of your computer. 6 Hard drive activity light - Press to the hard drive. 7 Microphone connector - Using Your Inspiron™ Desktop 5 Headphone connector - Connects to a microphone for audio input. 8 Optical drive panel - Press to an audio cable for voice or to open or close the...
SETUP GUIDE
Page 20
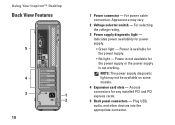
For selecting the voltage rating. 3 Power supply diagnostic light - Power is not available for power supply. • Green light - Using Your Inspiron™ Desktop Back View Features 5 4 3 1 2 18 1 Power connector - Indicates power availability for the power supply or the power supply is available for any installed PCI and PCI ...
For selecting the voltage rating. 3 Power supply diagnostic light - Power is not available for power supply. • Green light - Using Your Inspiron™ Desktop Back View Features 5 4 3 1 2 18 1 Power connector - Indicates power availability for the power supply or the power supply is available for any installed PCI and PCI ...


