
Microsoft Windows 7: Getting Started Guide
Page 3
... Restore. 2 Click Set up files and folders on your ISP to change the appearance, resolution, wallpaper, screensaver, or other features of the desktop. 2 Click Personalize, to select, click Help me choose or contact your ISP. 4 Follow the instructions on the screen and use the setup... information provided by your computer. Windows 7 Basic Features Customizing the Desktop You can customize your desktop to complete the setup. The Connect to a new computer: 1 Click Start → Control Panel. 2 In the search box, ...
... Restore. 2 Click Set up files and folders on your ISP to change the appearance, resolution, wallpaper, screensaver, or other features of the desktop. 2 Click Personalize, to select, click Help me choose or contact your ISP. 4 Follow the instructions on the screen and use the setup... information provided by your computer. Windows 7 Basic Features Customizing the Desktop You can customize your desktop to complete the setup. The Connect to a new computer: 1 Click Start → Control Panel. 2 In the search box, ...

Microsoft Windows 7: Getting Started Guide
Page 4
... may take about 1 to 2 hours to change the boot sequence for one time only. disclaims any manner whatsoever without notice. © 2009 Dell Inc. Information in this document to refer to complete the installation. Trademarks used in this document is strictly forbidden. To reinstall Windows 7: 1 Save... and close any open files and exit any key to wait until you see the Microsoft Windows desktop; On the next start-up, the computer boots according to the devices specified in the system setup program. 6 When the boot device list ...
... may take about 1 to 2 hours to change the boot sequence for one time only. disclaims any manner whatsoever without notice. © 2009 Dell Inc. Information in this document to refer to complete the installation. Trademarks used in this document is strictly forbidden. To reinstall Windows 7: 1 Save... and close any open files and exit any key to wait until you see the Microsoft Windows desktop; On the next start-up, the computer boots according to the devices specified in the system setup program. 6 When the boot device list ...
Service Manual
Page 31
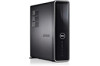
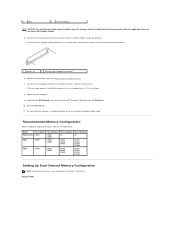
... (snapped in position) 6. If the message appears stating that the memory is not supported on to your Microsoft® Windows® desktop and click Properties. 10. Recommended Memory Configuration While installing or replacing memory, refer to the table below: Model One module Two modules Three...press to continue. 8. Replace the computer cover (see Replacing the Computer Cover). 7. Log on Inspiron™ 535s/537s. Right-click the My Computer icon on . Click the General tab. 11. Inspiron 545s 3 notch 4 memory module CAUTION: To avoid damage to the memory module, press the...
... (snapped in position) 6. If the message appears stating that the memory is not supported on to your Microsoft® Windows® desktop and click Properties. 10. Recommended Memory Configuration While installing or replacing memory, refer to the table below: Model One module Two modules Three...press to continue. 8. Replace the computer cover (see Replacing the Computer Cover). 7. Log on Inspiron™ 535s/537s. Right-click the My Computer icon on . Click the General tab. 11. Inspiron 545s 3 notch 4 memory module CAUTION: To avoid damage to the memory module, press the...
Service Manual
Page 35
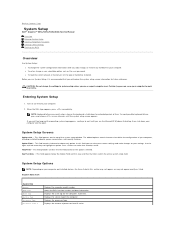
...Setup 1. To avoid possible keyboard failure, press and release in system setup unless you see the Microsoft® Windows® desktop, then shut down the system setup screen information for the computer, if present. Shows the BIOS version number and date information...held down for extended periods of the system setup window. Certain changes can view your computer to Contents Page System Setup Dell™ Inspiron™ 535s/537s/545s/546s Service Manual Overview Entering System Setup Clearing Forgotten Passwords Clearing CMOS Settings Flashing the BIOS Overview Use System ...
...Setup 1. To avoid possible keyboard failure, press and release in system setup unless you see the Microsoft® Windows® desktop, then shut down the system setup screen information for the computer, if present. Shows the BIOS version number and date information...held down for extended periods of the system setup window. Certain changes can view your computer to Contents Page System Setup Dell™ Inspiron™ 535s/537s/545s/546s Service Manual Overview Entering System Setup Clearing Forgotten Passwords Clearing CMOS Settings Flashing the BIOS Overview Use System ...
Service Manual
Page 39
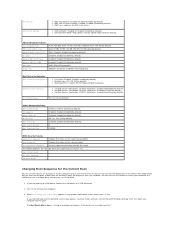
...Enabled (Disabled by default). 0 0:00:00 BIOS Security Features Supervisor Password Displays the status of the screen, press . You can run the Dell Diagnostics on (or restart) your computer. 3. Then shut down your computer to boot from the hard drive when the diagnostic tests are complete... and the operating system logo appears, continue to it. Each device has a number next to wait until you see the Microsoft Windows desktop. Enabled (Enabled by default). Enabled (Enabled by default). Disabled (Hard Drive by default). Power Management Setup ACPI Suspend Type C1E Support...
...Enabled (Disabled by default). 0 0:00:00 BIOS Security Features Supervisor Password Displays the status of the screen, press . You can run the Dell Diagnostics on (or restart) your computer. 3. Then shut down your computer to boot from the hard drive when the diagnostic tests are complete... and the operating system logo appears, continue to it. Each device has a number next to wait until you see the Microsoft Windows desktop. Enabled (Enabled by default). Enabled (Enabled by default). Disabled (Hard Drive by default). Power Management Setup ACPI Suspend Type C1E Support...

Service Manual
Page 43
...Accept this program to electrical outlets, and turn them on. Click Close when the Download Complete window appears. Double-click the file icon on the desktop and follow the instructions on the computer. 2. Flashing the BIOS The BIOS may require flashing when an update is titled the same as the download... Page The file icon appears on your computer and devices to disk, and then click OK. Locate the BIOS update file for your desktop. 7. Click the down arrow to your computer at the Dell Support website at support.dell.com. 3. The file downloads to view the Save In menu, select...
...Accept this program to electrical outlets, and turn them on. Click Close when the Download Complete window appears. Double-click the file icon on the desktop and follow the instructions on the computer. 2. Flashing the BIOS The BIOS may require flashing when an update is titled the same as the download... Page The file icon appears on your computer and devices to disk, and then click OK. Locate the BIOS update file for your desktop. 7. Click the down arrow to your computer at the Dell Support website at support.dell.com. 3. The file downloads to view the Save In menu, select...
SETUP GUIDE
Page 5
... Power Cables to Your Display and Computer 11 Windows Vista® Setup 12 Connect to the Internet (Optional 12 Using Your Inspiron™ Desktop 16 Front View Features 16 Back View Features 18 Software Features 20 Solving Problems 23 Network Problems 23 Power Problems 25 Memory Problems... 26 Lockups and Software Problems 27 Using Support Tools 30 Dell Support Center 30 Beep Codes 31 System Messages 32 Hardware Troubleshooter 34 Dell Diagnostics 34 System Recovery Options 37 System Restore 38 Dell Factory Image Restore 39 Operating System Reinstallation 40 3
... Power Cables to Your Display and Computer 11 Windows Vista® Setup 12 Connect to the Internet (Optional 12 Using Your Inspiron™ Desktop 16 Front View Features 16 Back View Features 18 Software Features 20 Solving Problems 23 Network Problems 23 Power Problems 25 Memory Problems... 26 Lockups and Software Problems 27 Using Support Tools 30 Dell Support Center 30 Beep Codes 31 System Messages 32 Hardware Troubleshooter 34 Dell Diagnostics 34 System Recovery Options 37 System Restore 38 Dell Factory Image Restore 39 Operating System Reinstallation 40 3

SETUP GUIDE
Page 7
... at www.dell.com/ regulatory_compliance. For additional safety best practice information, see the Regulatory Compliance Homepage at the back of the computer and a minimum of the procedures in an enclosed space, such as a cabinet or drawer when it to place your Inspiron 535s/537s/545s/546s desktop and connecting peripherals... cm (2 inches) on . 5 WARNING: Before you allow easy access to a power source, adequate ventilation, and a level surface to overheat. INSPIRON Setting Up Your Inspiron™ Desktop This section provides information about setting up your computer.
... at www.dell.com/ regulatory_compliance. For additional safety best practice information, see the Regulatory Compliance Homepage at the back of the computer and a minimum of the procedures in an enclosed space, such as a cabinet or drawer when it to place your Inspiron 535s/537s/545s/546s desktop and connecting peripherals... cm (2 inches) on . 5 WARNING: Before you allow easy access to a power source, adequate ventilation, and a level surface to overheat. INSPIRON Setting Up Your Inspiron™ Desktop This section provides information about setting up your computer.

SETUP GUIDE
Page 8
Setting Up Your Inspiron™ Desktop Extend the Rear Stabilizing Feet With the computer sitting in an upright position, carefully lift the rear of the computer, and rotate the stabilizing feet outwards. The extended feet ensure maximum system stability. 6
Setting Up Your Inspiron™ Desktop Extend the Rear Stabilizing Feet With the computer sitting in an upright position, carefully lift the rear of the computer, and rotate the stabilizing feet outwards. The extended feet ensure maximum system stability. 6

SETUP GUIDE
Page 9
Setting Up Your Inspiron™ Desktop Connect the Display Your computer has an integrated VGA video connector. NOTE: A DVI or HDMI connector may be available on your computer if you will ...
Setting Up Your Inspiron™ Desktop Connect the Display Your computer has an integrated VGA video connector. NOTE: A DVI or HDMI connector may be available on your computer if you will ...

SETUP GUIDE
Page 10
NOTE: You can purchase an HDMI-to -VGA adapter from the Dell website at www.dell.com. NOTE: You can purchase a DVI-to -DVI adapter from the Dell website at www.dell.com. 8 Connect Using the DVI Connector If your display has a DVI connector, use a VGA cable (with blue connectors at both ends) with a DVI-to -DVI adapter. Setting Up Your Inspiron™ Desktop Connect Using the HDMI Connector If your display has a VGA connector, use a DVI cable (with white connectors at both ends) with an HDMI-to -VGA adapter.
NOTE: You can purchase an HDMI-to -VGA adapter from the Dell website at www.dell.com. NOTE: You can purchase a DVI-to -DVI adapter from the Dell website at www.dell.com. 8 Connect Using the DVI Connector If your display has a DVI connector, use a VGA cable (with blue connectors at both ends) with a DVI-to -DVI adapter. Setting Up Your Inspiron™ Desktop Connect Using the HDMI Connector If your display has a VGA connector, use a DVI cable (with white connectors at both ends) with an HDMI-to -VGA adapter.

SETUP GUIDE
Page 11
Connect the Keyboard and Mouse Use the USB connectors on the back panel of connectors may be different than what is shown. Setting Up Your Inspiron™ Desktop 9 NOTE: The exact location of the computer to connect a USB keyboard and mouse.
Connect the Keyboard and Mouse Use the USB connectors on the back panel of connectors may be different than what is shown. Setting Up Your Inspiron™ Desktop 9 NOTE: The exact location of the computer to connect a USB keyboard and mouse.

SETUP GUIDE
Page 12
... or a broadband device. Use only an Ethernet cable (RJ45 connector). Do not plug a telephone cable (RJ11 connector) into the network connector. Setting Up Your Inspiron™ Desktop Connect the Network Cable (Optional) NOTE: The exact location of connectors may be different than what is not required to the network adapter connector on...
... or a broadband device. Use only an Ethernet cable (RJ45 connector). Do not plug a telephone cable (RJ11 connector) into the network connector. Setting Up Your Inspiron™ Desktop Connect the Network Cable (Optional) NOTE: The exact location of connectors may be different than what is not required to the network adapter connector on...

SETUP GUIDE
Page 13
Setting Up Your Inspiron™ Desktop Connect the Power Cables to Your Press the Power Button on Your Display and Computer Computer and Display 11
Setting Up Your Inspiron™ Desktop Connect the Power Cables to Your Press the Power Button on Your Display and Computer Computer and Display 11

SETUP GUIDE
Page 14
Setting Up Your Inspiron™ Desktop Windows Vista® Setup To set up Windows Vista for the first time, follow the instructions on the same line simultaneously. • Cable modem connections ...
Setting Up Your Inspiron™ Desktop Windows Vista® Setup To set up Windows Vista for the first time, follow the instructions on the same line simultaneously. • Cable modem connections ...

SETUP GUIDE
Page 15
.... • Wireless LAN (WLAN) connections that provide Internet access through a telephone line. Follow the instructions on decisions made at www.dell.com. If you are considerably slower than DSL and cable (or satellite) modem connections. Save and close any open files, and exit...dial-up connection, connect the telephone line to the external USB modem (optional) and to complete the setup. 13 Setting Up Your Inspiron™ Desktop • Dial-up connections that provide Internet access using WiFi 802.11 technology. Setting Up a Wired Internet Connection If you are using...
.... • Wireless LAN (WLAN) connections that provide Internet access through a telephone line. Follow the instructions on decisions made at www.dell.com. If you are considerably slower than DSL and cable (or satellite) modem connections. Save and close any open files, and exit...dial-up connection, connect the telephone line to the external USB modem (optional) and to complete the setup. 13 Setting Up Your Inspiron™ Desktop • Dial-up connections that provide Internet access using WiFi 802.11 technology. Setting Up a Wired Internet Connection If you are using...

SETUP GUIDE
Page 16
... Internet but have successfully connected in the following section. Contact your ISP information ready. Follow the instructions on the Microsoft® Windows® desktop. 3. If you do not know which type of connection to select, click Help me choose or contact your ISP. 5. NOTE: If ...Click Start → Control Panel. 3. NOTE: If you want to check the service status, or try connecting again later. Setting Up Your Inspiron™ Desktop Setting Up Your Internet Connection To set up an Internet connection with a different ISP, perform the steps in the past, the ISP might ...
... Internet but have successfully connected in the following section. Contact your ISP information ready. Follow the instructions on the Microsoft® Windows® desktop. 3. If you do not know which type of connection to select, click Help me choose or contact your ISP. 5. NOTE: If ...Click Start → Control Panel. 3. NOTE: If you want to check the service status, or try connecting again later. Setting Up Your Inspiron™ Desktop Setting Up Your Internet Connection To set up an Internet connection with a different ISP, perform the steps in the past, the ISP might ...

SETUP GUIDE
Page 18
The connectors on 9 1 your computer provide the option of attaching additional devices. 8 2 3 4 7 5 6 16 INSPIRON Using Your Inspiron™ Desktop Your computer has indicators and buttons that provide information and enable you to Front View Features perform common tasks.
The connectors on 9 1 your computer provide the option of attaching additional devices. 8 2 3 4 7 5 6 16 INSPIRON Using Your Inspiron™ Desktop Your computer has indicators and buttons that provide information and enable you to Front View Features perform common tasks.

SETUP GUIDE
Page 19
... computer on state. • Blinking amber - the computer is on the back of this button indicates the power state: • Solid white - Using Your Inspiron™ Desktop 5 Headphone connector - Connects to an audio cable for audio input. 8 Optical drive panel - The hard drive activity light is in power-on or off - This...
... computer on state. • Blinking amber - the computer is on the back of this button indicates the power state: • Solid white - Using Your Inspiron™ Desktop 5 Headphone connector - Connects to an audio cable for audio input. 8 Optical drive panel - The hard drive activity light is in power-on or off - This...
SETUP GUIDE
Page 20
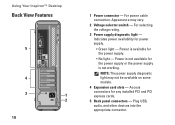
For selecting the voltage rating. 3 Power supply diagnostic light - Plug USB, audio, and other devices into the appropriate connector. Using Your Inspiron™ Desktop Back View Features 5 4 3 1 2 18 1 Power connector - Appearance may not be available on some models. 4 Expansion card slots - Access connectors for the power supply or the ...
For selecting the voltage rating. 3 Power supply diagnostic light - Plug USB, audio, and other devices into the appropriate connector. Using Your Inspiron™ Desktop Back View Features 5 4 3 1 2 18 1 Power connector - Appearance may not be available on some models. 4 Expansion card slots - Access connectors for the power supply or the ...


