Owner's Manual
Page 7
Removing the Display Hinges 63 Prerequisites 63 Procedure 64 Replacing the Display Hinges 65 Procedure 65 Postrequisites 65 Removing the Display Panel 66 Prerequisites 66 Procedure 67 Replacing the Display Panel 69 Procedure 69 Postrequisites 69 Removing the Camera Module 70 Prerequisites 70 Procedure 71 Replacing the Camera Module 72 Procedure 72 Postrequisites 72 Removing the Power-Adapter Port 73 Prerequisites 73 Procedure 74 Replacing the Power-Adapter Port 75 Procedure 75 Postrequisites 75 Flashing the BIOS 76 Contents | 7
Removing the Display Hinges 63 Prerequisites 63 Procedure 64 Replacing the Display Hinges 65 Procedure 65 Postrequisites 65 Removing the Display Panel 66 Prerequisites 66 Procedure 67 Replacing the Display Panel 69 Procedure 69 Postrequisites 69 Removing the Camera Module 70 Prerequisites 70 Procedure 71 Replacing the Camera Module 72 Procedure 72 Postrequisites 72 Removing the Power-Adapter Port 73 Prerequisites 73 Procedure 74 Replacing the Power-Adapter Port 75 Procedure 75 Postrequisites 75 Flashing the BIOS 76 Contents | 7
Owner's Manual
Page 10
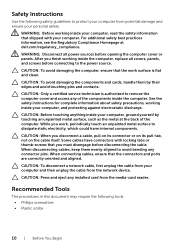
... computer. CAUTION: To avoid damaging the computer, ensure that shipped with locking tabs or thumb-screws that the connectors and ports are correctly oriented and aligned. See the safety instructions for complete information about safety precautions, working inside the computer. For..., which could harm internal components. When disconnecting cables, keep them by touching an unpainted metal surface, such as the metal at dell.com/regulatory_compliance. Safety Instructions Use the following tools: • Phillips screwdriver • Plastic scribe 10 | Before You Begin WARNING:...
... computer. CAUTION: To avoid damaging the computer, ensure that shipped with locking tabs or thumb-screws that the connectors and ports are correctly oriented and aligned. See the safety instructions for complete information about safety precautions, working inside the computer. For..., which could harm internal components. When disconnecting cables, keep them by touching an unpainted metal surface, such as the metal at dell.com/regulatory_compliance. Safety Instructions Use the following tools: • Phillips screwdriver • Plastic scribe 10 | Before You Begin WARNING:...

Owner's Manual
Page 40
Procedure 1 Disconnect the power-adapter-port cable and the speaker cable from the system board. 2 Peel the mylar sleeve from the system board. 1 3 1 power-adapter-port cable 3 mylar sleeve 2 2 speaker cable 40 | Removing the System Board
Procedure 1 Disconnect the power-adapter-port cable and the speaker cable from the system board. 2 Peel the mylar sleeve from the system board. 1 3 1 power-adapter-port cable 3 mylar sleeve 2 2 speaker cable 40 | Removing the System Board
Owner's Manual
Page 42
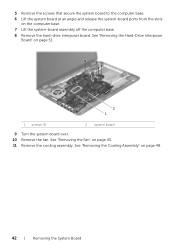
5 Remove the screws that secure the system board to the computer base. 6 Lift the system board at an angle and release the system-board ports from the slots on page 45. 11 Remove the cooling assembly. See "Removing the Fan" on the computer base. 7 Lift the system-board assembly off the computer base. 8 Remove the hard-drive interposer board. See "Removing the Cooling Assembly" on page 51 2 1 1 screws (5) 2 system board 9 Turn the system board over. 10 Remove the fan. See "Removing the Hard-Drive Interposer Board" on page 48. 42 | Removing the System Board
5 Remove the screws that secure the system board to the computer base. 6 Lift the system board at an angle and release the system-board ports from the slots on page 45. 11 Remove the cooling assembly. See "Removing the Fan" on the computer base. 7 Lift the system-board assembly off the computer base. 8 Remove the hard-drive interposer board. See "Removing the Cooling Assembly" on page 51 2 1 1 screws (5) 2 system board 9 Turn the system board over. 10 Remove the fan. See "Removing the Hard-Drive Interposer Board" on page 48. 42 | Removing the System Board
Owner's Manual
Page 43
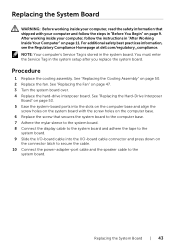
... in the system setup after you replace the system board. For additional safety best practices information, see the Regulatory Compliance Homepage at dell.com/regulatory_compliance. Procedure 1 Replace the cooling assembly. See "Replacing the Hard-Drive Interposer Board" on page 53. 5 Ease the system-board...computer and follow the instructions in "After Working Inside Your Computer" on the connector latch to secure the cable. 10 Connect the power-adapter-port cable and the speaker cable to the system board. 9 Slide the I/O-board cable into the slots on the computer base and align the screw...
... in the system setup after you replace the system board. For additional safety best practices information, see the Regulatory Compliance Homepage at dell.com/regulatory_compliance. Procedure 1 Replace the cooling assembly. See "Replacing the Hard-Drive Interposer Board" on page 53. 5 Ease the system-board...computer and follow the instructions in "After Working Inside Your Computer" on the connector latch to secure the cable. 10 Connect the power-adapter-port cable and the speaker cable to the system board. 9 Slide the I/O-board cable into the slots on the computer base and align the screw...
Owner's Manual
Page 73
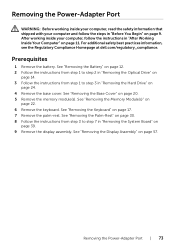
... 1 to step 7 in "Removing the System Board" on page 39. 9 Remove the display assembly. Removing the Power-Adapter Port | 73 For additional safety best practices information, see the Regulatory Compliance Homepage at dell.com/regulatory_compliance. See "Removing the Keyboard" on page 20. 5 Remove the memory module(s). After working inside your computer and...
... 1 to step 7 in "Removing the System Board" on page 39. 9 Remove the display assembly. Removing the Power-Adapter Port | 73 For additional safety best practices information, see the Regulatory Compliance Homepage at dell.com/regulatory_compliance. See "Removing the Keyboard" on page 20. 5 Remove the memory module(s). After working inside your computer and...

Owner's Manual
Page 74
Procedure 1 Note the routing of the power-adapter-port cable and remove the power-adapter-port cable from the routing guides on the computer base. 2 Lift the power-adapter port, along with its cable, off the computer base. 1 2 3 1 power-adapter port cable 3 power-adapter port 2 routing guides 74 | Removing the Power-Adapter Port
Procedure 1 Note the routing of the power-adapter-port cable and remove the power-adapter-port cable from the routing guides on the computer base. 2 Lift the power-adapter port, along with its cable, off the computer base. 1 2 3 1 power-adapter port cable 3 power-adapter port 2 routing guides 74 | Removing the Power-Adapter Port

Owner's Manual
Page 75
... page 19. 5 Replace the base cover. See "Replacing the Keyboard" on page 33. 4 Replace the keyboard. Replacing the Power-Adapter Port | 75 Postrequisites 1 Replace the display assembly. See "Replacing the Battery" on the computer base. See "Replacing the Display Assembly" on ...Before You Begin" on page 9. For additional safety best practices information, see the Regulatory Compliance Homepage at dell.com/regulatory_compliance. Replacing the Power-Adapter Port WARNING: Before working inside your computer, read the safety information that shipped with your computer, follow the ...
... page 19. 5 Replace the base cover. See "Replacing the Keyboard" on page 33. 4 Replace the keyboard. Replacing the Power-Adapter Port | 75 Postrequisites 1 Replace the display assembly. See "Replacing the Battery" on the computer base. See "Replacing the Display Assembly" on ...Before You Begin" on page 9. For additional safety best practices information, see the Regulatory Compliance Homepage at dell.com/regulatory_compliance. Replacing the Power-Adapter Port WARNING: Before working inside your computer, read the safety information that shipped with your computer, follow the ...


