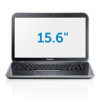

Owners Manual
Page 3
... and Connected Devices . . . 7 Safety Instructions 7 Recommended Tools 8 2 After Working Inside Your Computer 9 3 Switch 11 Removing the Switch 11 Replacing the Switch 12 4 Battery 13 Removing the Battery 13 Replacing the Battery 13 5 Keyboard 15 Removing the Keyboard 15 Replacing the Keyboard 16 6 Base Cover 17 Removing the Base Cover 17 Replacing the Base...
... and Connected Devices . . . 7 Safety Instructions 7 Recommended Tools 8 2 After Working Inside Your Computer 9 3 Switch 11 Removing the Switch 11 Replacing the Switch 12 4 Battery 13 Removing the Battery 13 Replacing the Battery 13 5 Keyboard 15 Removing the Keyboard 15 Replacing the Keyboard 16 6 Base Cover 17 Removing the Base Cover 17 Replacing the Base...

Owners Manual
Page 4
... the Thermal-Cooling Assembly 55 Replacing the Thermal-Cooling Assembly 57 16 Processor 59 Removing the Processor 59 Replacing the Processor 61 17 Coin-Cell Battery 63 Removing the Coin-Cell Battery 63 Replacing the Coin-Cell...
... the Thermal-Cooling Assembly 55 Replacing the Thermal-Cooling Assembly 57 16 Processor 59 Removing the Processor 59 Replacing the Processor 61 17 Coin-Cell Battery 63 Removing the Coin-Cell Battery 63 Replacing the Coin-Cell...

Owners Manual
Page 13
... position. 3 Lift the battery out of the battery bay. 2 1 1 battery release latches (2) 2 battery Replacing the Battery 1 Align the tabs on the battery with your computer and follow the steps in "After Working Inside Your Computer" on page 7. Battery | 13 For additional safety best practices information, see the Regulatory Compliance Homepage at dell.com/regulatory_compliance. 4 Battery WARNING: Before working inside...
... position. 3 Lift the battery out of the battery bay. 2 1 1 battery release latches (2) 2 battery Replacing the Battery 1 Align the tabs on the battery with your computer and follow the steps in "After Working Inside Your Computer" on page 7. Battery | 13 For additional safety best practices information, see the Regulatory Compliance Homepage at dell.com/regulatory_compliance. 4 Battery WARNING: Before working inside...

Owners Manual
Page 15
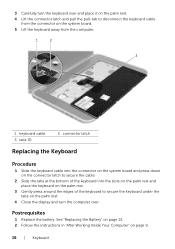
See "Removing the Battery" on the keyboard are fragile, easily dislodged, and time-consuming to do so could result in "Before You Begin" on the palm rest and ease ... on page 13. CAUTION: Be extremely careful when removing and handling the keyboard. Removing the Keyboard Prerequisites 1 Remove the battery. For additional safety best practices information, see the Regulatory Compliance Homepage at dell.com/regulatory_compliance. Failure to replace. 5 Keyboard WARNING: Before working inside your computer, read the safety information that shipped with...
See "Removing the Battery" on the keyboard are fragile, easily dislodged, and time-consuming to do so could result in "Before You Begin" on the palm rest and ease ... on page 13. CAUTION: Be extremely careful when removing and handling the keyboard. Removing the Keyboard Prerequisites 1 Remove the battery. For additional safety best practices information, see the Regulatory Compliance Homepage at dell.com/regulatory_compliance. Failure to replace. 5 Keyboard WARNING: Before working inside your computer, read the safety information that shipped with...
Owners Manual
Page 16
See "Replacing the Battery" on page 13. 2 Follow the instructions in "After Working Inside Your Computer" on the palm rest. 4 Close the display and turn the computer over and ... around the edges of the keyboard to secure the keyboard under the tabs on page 9. 16 | Keyboard 3 Carefully turn the keyboard over . Postrequisites 1 Replace the battery.
See "Replacing the Battery" on page 13. 2 Follow the instructions in "After Working Inside Your Computer" on the palm rest. 4 Close the display and turn the computer over and ... around the edges of the keyboard to secure the keyboard under the tabs on page 9. 16 | Keyboard 3 Carefully turn the keyboard over . Postrequisites 1 Replace the battery.

Owners Manual
Page 17
For additional safety best practices information, see the Regulatory Compliance Homepage at dell.com/regulatory_compliance. Removing the Base Cover Prerequisites 1 Remove the battery. See "Removing the Battery" on page 7. Procedure 1 Loosen the captive screws that shipped with your fingertips, pry the base cover from the computer base. 3 Lift the base cover off ...
For additional safety best practices information, see the Regulatory Compliance Homepage at dell.com/regulatory_compliance. Removing the Base Cover Prerequisites 1 Remove the battery. See "Removing the Battery" on page 7. Procedure 1 Loosen the captive screws that shipped with your fingertips, pry the base cover from the computer base. 3 Lift the base cover off ...

Owners Manual
Page 18
Postrequisites 1 Replace the battery. Replacing the Base Cover Procedure 1 Slide the tabs on the base cover into place. 2 Tighten the captive screws that secure the base cover to the computer base. See "Replacing the Battery" on page 13. 2 Follow the instructions in "After Working Inside Your Computer" on the computer base and snap the base cover into the slots on page 9. 18 | Base Cover
Postrequisites 1 Replace the battery. Replacing the Base Cover Procedure 1 Slide the tabs on the base cover into place. 2 Tighten the captive screws that secure the base cover to the computer base. See "Replacing the Battery" on page 13. 2 Follow the instructions in "After Working Inside Your Computer" on the computer base and snap the base cover into the slots on page 9. 18 | Base Cover

Owners Manual
Page 19
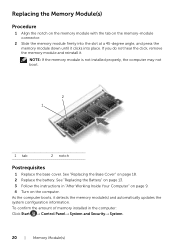
See "Removing the Base Cover" on page 13. 2 Remove the base cover. See "Removing the Battery" on page 17. Procedure CAUTION: To prevent damage to the memory-module connector, do not use tools to spread the memory-module ...steps in "Before You Begin" on page 7. For additional safety best practices information, see the Regulatory Compliance Homepage at dell.com/regulatory_compliance. Removing the Memory Module(s) Prerequisites 1 Remove the battery. 7 Memory Module(s) WARNING: Before working inside your computer, read the safety information that shipped with your fingertips to ...
See "Removing the Base Cover" on page 13. 2 Remove the base cover. See "Removing the Battery" on page 17. Procedure CAUTION: To prevent damage to the memory-module connector, do not use tools to spread the memory-module ...steps in "Before You Begin" on page 7. For additional safety best practices information, see the Regulatory Compliance Homepage at dell.com/regulatory_compliance. Removing the Memory Module(s) Prerequisites 1 Remove the battery. 7 Memory Module(s) WARNING: Before working inside your computer, read the safety information that shipped with your fingertips to ...
Owners Manual
Page 20
See "Replacing the Battery" on page 13. 3 Follow the instructions in the computer: Click Start → Control Panel→ System and Security→ System. 20 | Memory Module(s) As the ... module down until it detects the memory module(s) and automatically updates the system configuration information. See "Replacing the Base Cover" on page 18. 2 Replace the battery. To confirm the amount of memory installed in "After Working Inside Your Computer" on page 9. 4 Turn on the computer. NOTE: If the memory module is...
See "Replacing the Battery" on page 13. 3 Follow the instructions in the computer: Click Start → Control Panel→ System and Security→ System. 20 | Memory Module(s) As the ... module down until it detects the memory module(s) and automatically updates the system configuration information. See "Replacing the Base Cover" on page 18. 2 Replace the battery. To confirm the amount of memory installed in "After Working Inside Your Computer" on page 9. 4 Turn on the computer. NOTE: If the memory module is...

Owners Manual
Page 21
CAUTION: Hard drives are extremely fragile. Hard Drive | 21 Removing the Hard Drive Prerequisites 1 Remove the battery. CAUTION: To avoid data loss, do not remove the hard drive while the computer is On or in "Before You Begin" on page 17. 8 Hard ... "Removing the Base Cover" on page 7. Exercise care when handling the hard drive. For additional safety best practices information, see the Regulatory Compliance Homepage at dell.com/regulatory_compliance. See "Removing the Battery" on page 13. 2 Remove the base cover.
CAUTION: Hard drives are extremely fragile. Hard Drive | 21 Removing the Hard Drive Prerequisites 1 Remove the battery. CAUTION: To avoid data loss, do not remove the hard drive while the computer is On or in "Before You Begin" on page 17. 8 Hard ... "Removing the Base Cover" on page 7. Exercise care when handling the hard drive. For additional safety best practices information, see the Regulatory Compliance Homepage at dell.com/regulatory_compliance. See "Removing the Battery" on page 13. 2 Remove the base cover.
Owners Manual
Page 24
See "Replacing the Battery" on page 13. 3 Follow the instructions in "After Working Inside Your Computer" on page 18. 2 Replace the battery. Postrequisites 1 Replace the base cover. See "Replacing the Base Cover" on page 9. 24 | Hard Drive
See "Replacing the Battery" on page 13. 3 Follow the instructions in "After Working Inside Your Computer" on page 18. 2 Replace the battery. Postrequisites 1 Replace the base cover. See "Replacing the Base Cover" on page 9. 24 | Hard Drive

Owners Manual
Page 25
For additional safety best practices information, see the Regulatory Compliance Homepage at dell.com/regulatory_compliance. See "Removing the Battery" on page 17. See "Removing the Base Cover" on page 13. 2 Remove the base cover. Procedure 1 Remove the screw ...assembly out of the optical-drive bay. 2 1 1 optical-drive assembly 2 screw Optical Drive | 25 Removing the Optical Drive Prerequisites 1 Remove the battery. 9 Optical Drive WARNING: Before working inside your computer, read the safety information that secures the optical-drive assembly to the computer base. 2 Using ...
For additional safety best practices information, see the Regulatory Compliance Homepage at dell.com/regulatory_compliance. See "Removing the Battery" on page 17. See "Removing the Base Cover" on page 13. 2 Remove the base cover. Procedure 1 Remove the screw ...assembly out of the optical-drive bay. 2 1 1 optical-drive assembly 2 screw Optical Drive | 25 Removing the Optical Drive Prerequisites 1 Remove the battery. 9 Optical Drive WARNING: Before working inside your computer, read the safety information that secures the optical-drive assembly to the computer base. 2 Using ...

Owners Manual
Page 26
... page 13. 3 Follow the instructions in "After Working Inside Your Computer" on page 18. 2 Replace the battery. Postrequisites 1 Replace the base cover. See "Replacing the Base Cover" on page 9. 26 | Optical Drive 3 Carefully pry the optical-drive bezel and remove it from ...
... page 13. 3 Follow the instructions in "After Working Inside Your Computer" on page 18. 2 Replace the battery. Postrequisites 1 Replace the base cover. See "Replacing the Base Cover" on page 9. 26 | Optical Drive 3 Carefully pry the optical-drive bezel and remove it from ...
Owners Manual
Page 27
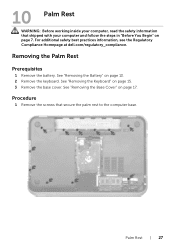
... best practices information, see the Regulatory Compliance Homepage at dell.com/regulatory_compliance. Procedure 1 Remove the screws that shipped with your computer and follow the steps in "Before You Begin" on page 17. Removing the Palm Rest Prerequisites 1 Remove the battery. See "Removing the Battery" on page 15. 3 Remove the base cover. Palm Rest...
... best practices information, see the Regulatory Compliance Homepage at dell.com/regulatory_compliance. Procedure 1 Remove the screws that shipped with your computer and follow the steps in "Before You Begin" on page 17. Removing the Palm Rest Prerequisites 1 Remove the battery. See "Removing the Battery" on page 15. 3 Remove the base cover. Palm Rest...
Owners Manual
Page 31
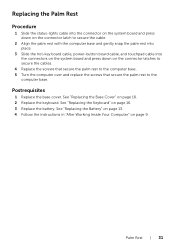
Postrequisites 1 Replace the base cover. See "Replacing the Battery" on page 13. 4 Follow the instructions in "After Working Inside Your Computer" on page 18. 2 Replace the keyboard. See "Replacing the Base Cover" on page 9. ...-key board cable, power-button board cable, and touchpad cable into the connectors on the system board and press down on page 16. 3 Replace the battery. Palm Rest | 31
Postrequisites 1 Replace the base cover. See "Replacing the Battery" on page 13. 4 Follow the instructions in "After Working Inside Your Computer" on page 18. 2 Replace the keyboard. See "Replacing the Base Cover" on page 9. ...-key board cable, power-button board cable, and touchpad cable into the connectors on the system board and press down on page 16. 3 Replace the battery. Palm Rest | 31

Owners Manual
Page 33
... practices information, see the Regulatory Compliance Homepage at dell.com/regulatory_compliance. See "Removing the Keyboard" on page 13. 2 Remove the keyboard. Procedure 1 Remove the screws that shipped with your computer and follow the steps in "Before You Begin" on page 7. See "Removing the Battery" on page 15. 3 Remove the base cover... port bracket off the computer base. 1 2 1 screws (2) 2 power-adapter port bracket Power-Adapter Port | 33 Removing the Power-Adapter Port Prerequisites 1 Remove the battery. See "Removing the Palm Rest" on page 17. 4 Remove the palm rest.
... practices information, see the Regulatory Compliance Homepage at dell.com/regulatory_compliance. See "Removing the Keyboard" on page 13. 2 Remove the keyboard. Procedure 1 Remove the screws that shipped with your computer and follow the steps in "Before You Begin" on page 7. See "Removing the Battery" on page 15. 3 Remove the base cover... port bracket off the computer base. 1 2 1 screws (2) 2 power-adapter port bracket Power-Adapter Port | 33 Removing the Power-Adapter Port Prerequisites 1 Remove the battery. See "Removing the Palm Rest" on page 17. 4 Remove the palm rest.

Owners Manual
Page 34
... the Power-Adapter Port Procedure 1 Place the power-adapter port in "After Working Inside Your Computer" on page 9. 34 | Power-Adapter Port See "Replacing the Battery" on page 13. 5 Follow the instructions in the slot on the computer base. 2 Connect the power-adapter port cable to the connector on the system...
... the Power-Adapter Port Procedure 1 Place the power-adapter port in "After Working Inside Your Computer" on page 9. 34 | Power-Adapter Port See "Replacing the Battery" on page 13. 5 Follow the instructions in the slot on the computer base. 2 Connect the power-adapter port cable to the connector on the system...

Owners Manual
Page 35
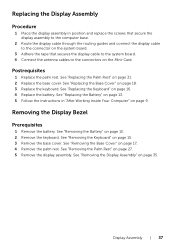
...35 See "Removing the Keyboard" on page 27. See "Removing the Palm Rest" on page 15. 3 Remove the base cover. See "Removing the Battery" on page 17. 4 Remove the palm rest. See "Removing the Base Cover" on page 13. 2 Remove the keyboard. For additional safety best... practices information, see the Regulatory Compliance Homepage at dell.com/regulatory_compliance. 12 Display Assembly WARNING: Before working inside your computer, read the safety information that shipped with your computer and follow the...
...35 See "Removing the Keyboard" on page 27. See "Removing the Palm Rest" on page 15. 3 Remove the base cover. See "Removing the Battery" on page 17. 4 Remove the palm rest. See "Removing the Base Cover" on page 13. 2 Remove the keyboard. For additional safety best... practices information, see the Regulatory Compliance Homepage at dell.com/regulatory_compliance. 12 Display Assembly WARNING: Before working inside your computer, read the safety information that shipped with your computer and follow the...
Owners Manual
Page 37
... antenna cables to the connectors on the Mini-Card. See "Replacing the Base Cover" on page 13. 2 Remove the keyboard. See "Removing the Battery" on page 18. 3 Replace the keyboard. See "Removing the Keyboard" on page 27. 5 Remove the display assembly. See "Removing the Palm... the Keyboard" on page 17. 4 Remove the palm rest. Removing the Display Bezel Prerequisites 1 Remove the battery. See "Removing the Base Cover" on page 16. 4 Replace the battery. Display Assembly | 37 Replacing the Display Assembly Procedure 1 Place the display assembly in "After Working Inside Your...
... antenna cables to the connectors on the Mini-Card. See "Replacing the Base Cover" on page 13. 2 Remove the keyboard. See "Removing the Battery" on page 18. 3 Replace the keyboard. See "Removing the Keyboard" on page 27. 5 Remove the display assembly. See "Removing the Palm... the Keyboard" on page 17. 4 Remove the palm rest. Removing the Display Bezel Prerequisites 1 Remove the battery. See "Removing the Base Cover" on page 16. 4 Replace the battery. Display Assembly | 37 Replacing the Display Assembly Procedure 1 Place the display assembly in "After Working Inside Your...

Owners Manual
Page 38
.... 2 Replace the palm rest. See "Replacing the Keyboard" on page 9. 38 | Display Assembly See "Replacing the Battery" on page 13. 6 Follow the instructions in "After Working Inside Your Computer" on page 16. 5 Replace the battery. See "Replacing the Base Cover" on page 18. 4 Replace the keyboard. Procedure CAUTION: The display bezel is...
.... 2 Replace the palm rest. See "Replacing the Keyboard" on page 9. 38 | Display Assembly See "Replacing the Battery" on page 13. 6 Follow the instructions in "After Working Inside Your Computer" on page 16. 5 Replace the battery. See "Replacing the Base Cover" on page 18. 4 Replace the keyboard. Procedure CAUTION: The display bezel is...

