
Me and My Dell
Page 4
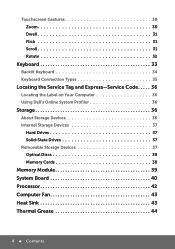
Touchscreen Gestures 30 Zoom 30 Dwell 31 Flick 31 Scroll 31 Rotate 32 Keyboard 33 Backlit Keyboard 34 Keyboard Connection Types 35 Locating the Service Tag and Express-Service Code 36 Locating the Label on Your Computer 36 Using Dell's Online System Profiler 36 Storage 36 About Storage Devices 36 Internal Storage Devices 37 Hard Drives 37 Solid-State Drives 37 Removable Storage Devices 37 Optical Discs 38 Memory Cards 38 Memory Module 39 System Board 40 Processor 42 Computer Fan 43 Heat Sink 43 Thermal Grease 44 4 Contents
Touchscreen Gestures 30 Zoom 30 Dwell 31 Flick 31 Scroll 31 Rotate 32 Keyboard 33 Backlit Keyboard 34 Keyboard Connection Types 35 Locating the Service Tag and Express-Service Code 36 Locating the Label on Your Computer 36 Using Dell's Online System Profiler 36 Storage 36 About Storage Devices 36 Internal Storage Devices 37 Hard Drives 37 Solid-State Drives 37 Removable Storage Devices 37 Optical Discs 38 Memory Cards 38 Memory Module 39 System Board 40 Processor 42 Computer Fan 43 Heat Sink 43 Thermal Grease 44 4 Contents
Me and My Dell
Page 90
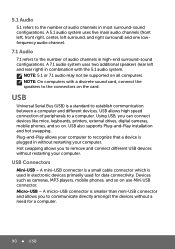
NOTE: On computers with the 5.1 audio system. USB allows high speed connection of peripherals to remove and connect different USB devices without restarting your computer. Hot swapping allows you to a computer. Devices such as cameras, MP3 players, mobile phones,...USB Universal Serial Bus (USB) is a standard to recognize that a device is smaller than mini-USB connector and allows you can connect devices like mice, keyboards, printers, external drives, digital cameras, mobile phones, and so on the card. 5.1 Audio 5.1 refers to the number of audio channels in high-end ...
NOTE: On computers with the 5.1 audio system. USB allows high speed connection of peripherals to remove and connect different USB devices without restarting your computer. Hot swapping allows you to a computer. Devices such as cameras, MP3 players, mobile phones,...USB Universal Serial Bus (USB) is a standard to recognize that a device is smaller than mini-USB connector and allows you can connect devices like mice, keyboards, printers, external drives, digital cameras, mobile phones, and so on the card. 5.1 Audio 5.1 refers to the number of audio channels in high-end ...
Me and My Dell
Page 132
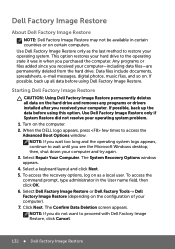
... deletes all data before using Dell Factory Image Restore. If possible, back up all data on certain computers. Select Repair Your Computer. To access the command prompt, type administrator in certain countries or on the hard drive and removes any programs or drivers installed ...Dell Factory Image Restore NOTE: Dell Factory Image Restore may not be available in the User name field, then click OK. 6. If possible, back up the data before using this option. Use Dell Factory Image Restore only as a local user. The System Recovery Options window appears. 4. Select a keyboard...
... deletes all data before using Dell Factory Image Restore. If possible, back up all data on certain computers. Select Repair Your Computer. To access the command prompt, type administrator in certain countries or on the hard drive and removes any programs or drivers installed ...Dell Factory Image Restore NOTE: Dell Factory Image Restore may not be available in the User name field, then click OK. 6. If possible, back up the data before using this option. Use Dell Factory Image Restore only as a local user. The System Recovery Options window appears. 4. Select a keyboard...
Me and My Dell
Page 147
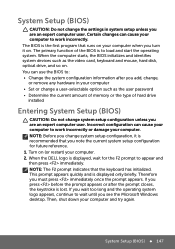
... continue to work incorrectly or damage your computer. Therefore you press before the prompt appears or after you add, change, or remove any hardware in system setup unless you note the current system setup configuration for the F2 prompt to work incorrectly. Incorrect configuration can... use the BIOS to load and start the operating system. NOTE: Before you are an expert computer user. When the DELL logo is recommended that the keyboard has initialized. System Setup (BIOS) 147 The primary function of hard drive installed Entering System Setup (BIOS) CAUTION...
... continue to work incorrectly or damage your computer. Therefore you press before the prompt appears or after you add, change, or remove any hardware in system setup unless you note the current system setup configuration for the F2 prompt to work incorrectly. Incorrect configuration can... use the BIOS to load and start the operating system. NOTE: Before you are an expert computer user. When the DELL logo is recommended that the keyboard has initialized. System Setup (BIOS) 147 The primary function of hard drive installed Entering System Setup (BIOS) CAUTION...
Owner's Manual
Page 3
... Optical-Drive Assembly . . . . . 15 Prerequisites 15 Procedure 15 6 Replacing the Optical-Drive Assembly . . . . . 17 Procedure 17 Postrequisites 17 7 Removing the Keyboard 19 Prerequisites 19 Procedure 19 8 Replacing the Keyboard 23 Procedure 23 Postrequisites 23 9 Removing the Palm-Rest Assembly 25 Prerequisites 25 Procedure 26 10 Replacing the Palm-Rest Assembly 29 Procedure 29 Contents | 3
... Optical-Drive Assembly . . . . . 15 Prerequisites 15 Procedure 15 6 Replacing the Optical-Drive Assembly . . . . . 17 Procedure 17 Postrequisites 17 7 Removing the Keyboard 19 Prerequisites 19 Procedure 19 8 Replacing the Keyboard 23 Procedure 23 Postrequisites 23 9 Removing the Palm-Rest Assembly 25 Prerequisites 25 Procedure 26 10 Replacing the Palm-Rest Assembly 29 Procedure 29 Contents | 3

Owner's Manual
Page 19
...: Before working inside your computer, read the safety information that is adhered to the system board. 1 1 label Removing the Keyboard | 19 See "Removing the Memory Module(s)" on page 11. Prerequisites Remove the memory module(s). After working inside your computer and follow the instructions in "Before You Begin" on page 7. For additional safety best practices...
...: Before working inside your computer, read the safety information that is adhered to the system board. 1 1 label Removing the Keyboard | 19 See "Removing the Memory Module(s)" on page 11. Prerequisites Remove the memory module(s). After working inside your computer and follow the instructions in "Before You Begin" on page 7. For additional safety best practices...

Owner's Manual
Page 20
2 Remove the screw that secures the keyboard to the system board. 1 1 screw 20 | Removing the Keyboard
2 Remove the screw that secures the keyboard to the system board. 1 1 screw 20 | Removing the Keyboard

Owner's Manual
Page 21
3 Turn the computer over and open the display as far as possible. 4 Using a plastic scribe, release the keyboard from the tabs on the palm-rest assembly. 1 2 3 1 plastic scribe 3 keyboard 2 tabs (3) Removing the Keyboard | 21
3 Turn the computer over and open the display as far as possible. 4 Using a plastic scribe, release the keyboard from the tabs on the palm-rest assembly. 1 2 3 1 plastic scribe 3 keyboard 2 tabs (3) Removing the Keyboard | 21

Owner's Manual
Page 22
5 Turn the keyboard over and place it over the palm-rest assembly. 6 Lift the connector latch and disconnect the keyboard cable from the connector on the system board. 7 Lift the keyboard off the palm-rest assembly. 1 4 2 3 1 connector latch 3 keyboard 2 keyboard cable 4 tabs (4) 22 | Removing the Keyboard
5 Turn the keyboard over and place it over the palm-rest assembly. 6 Lift the connector latch and disconnect the keyboard cable from the connector on the system board. 7 Lift the keyboard off the palm-rest assembly. 1 4 2 3 1 connector latch 3 keyboard 2 keyboard cable 4 tabs (4) 22 | Removing the Keyboard

Owner's Manual
Page 25
... in "After Working Inside Your Computer" on page 9. For additional safety best practices information, see the Regulatory Compliance Homepage at dell.com/ regulatory_compliance. See "Removing the Keyboard" on page 11. 2 Remove the optical drive. Prerequisites 1 Remove the memory module(s). After working inside your computer and follow the instructions in "Before You Begin" on page 15...
... in "After Working Inside Your Computer" on page 9. For additional safety best practices information, see the Regulatory Compliance Homepage at dell.com/ regulatory_compliance. See "Removing the Keyboard" on page 11. 2 Remove the optical drive. Prerequisites 1 Remove the memory module(s). After working inside your computer and follow the instructions in "Before You Begin" on page 15...
Owner's Manual
Page 31
...-Drive Assembly" on page 47. 4 Remove the palm-rest assembly. See "Removing the Daughter Board" on page 15. 3 Remove the keyboard. After working inside your computer and follow the instructions in "After Working Inside Your Computer" on page 9. Removing the Battery | 31 See "Removing the Palm-Rest Assembly" on page 11. 2 Remove the optical drive. Prerequisites 1 Follow...
...-Drive Assembly" on page 47. 4 Remove the palm-rest assembly. See "Removing the Daughter Board" on page 15. 3 Remove the keyboard. After working inside your computer and follow the instructions in "After Working Inside Your Computer" on page 9. Removing the Battery | 31 See "Removing the Palm-Rest Assembly" on page 11. 2 Remove the optical drive. Prerequisites 1 Follow...
Owner's Manual
Page 35
... computer, follow the steps in "Before You Begin" on page 7. For additional safety best practices information, see the Regulatory Compliance Homepage at dell.com/ regulatory_compliance. See "Removing the Keyboard" on page 11. 2 Remove the optical drive. Prerequisites 1 Follow the instructions from step 1 to step 3 in Sleep or On state. CAUTION: To avoid data loss...
... computer, follow the steps in "Before You Begin" on page 7. For additional safety best practices information, see the Regulatory Compliance Homepage at dell.com/ regulatory_compliance. See "Removing the Keyboard" on page 11. 2 Remove the optical drive. Prerequisites 1 Follow the instructions from step 1 to step 3 in Sleep or On state. CAUTION: To avoid data loss...
Owner's Manual
Page 39
... not guarantee compatibility or provide support for Mini-Cards from sources other than Dell. See "Removing the Keyboard" on page 15. 3 Remove the keyboard. If you ordered a wireless Mini-Card with your computer and follow the instructions in "Before You Begin...best practices information, see the Regulatory Compliance Homepage at dell.com/ regulatory_compliance. See "Removing the Memory Module(s)" on page 25. 5 Remove the battery. See "Removing the Palm-Rest Assembly" on page 11. 2 Remove the optical drive. 15 Removing the Wireless Mini-Card WARNING: Before working inside your...
... not guarantee compatibility or provide support for Mini-Cards from sources other than Dell. See "Removing the Keyboard" on page 15. 3 Remove the keyboard. If you ordered a wireless Mini-Card with your computer and follow the instructions in "Before You Begin...best practices information, see the Regulatory Compliance Homepage at dell.com/ regulatory_compliance. See "Removing the Memory Module(s)" on page 25. 5 Remove the battery. See "Removing the Palm-Rest Assembly" on page 11. 2 Remove the optical drive. 15 Removing the Wireless Mini-Card WARNING: Before working inside your...
Owner's Manual
Page 43
... palm-rest assembly. For additional safety best practices information, see the Regulatory Compliance Homepage at dell.com/ regulatory_compliance. See "Removing the Keyboard" on page 15. 3 Remove the keyboard. See "Removing the Palm-Rest Assembly" on page 7. 17 Removing the mSATA Card WARNING: Before working inside your computer, read the safety information that shipped with your computer, follow...
... palm-rest assembly. For additional safety best practices information, see the Regulatory Compliance Homepage at dell.com/ regulatory_compliance. See "Removing the Keyboard" on page 15. 3 Remove the keyboard. See "Removing the Palm-Rest Assembly" on page 7. 17 Removing the mSATA Card WARNING: Before working inside your computer, read the safety information that shipped with your computer, follow...

Owner's Manual
Page 47
..., see the Regulatory Compliance Homepage at dell.com/ regulatory_compliance. See "Removing the Memory Module(s)" on page 19. 4 Remove the palm-rest assembly. See "Removing the Keyboard" on page 11. 2 Remove the optical drive. Prerequisites 1 Remove the memory module(s). See "Removing the Palm-Rest Assembly" on page ...9. After working inside your computer and follow the instructions in "Before You Begin" on page 15. 3 Remove the keyboard. 19 Removing the Daughter Board WARNING: Before working inside your computer, read the safety information that shipped with your computer, ...
..., see the Regulatory Compliance Homepage at dell.com/ regulatory_compliance. See "Removing the Memory Module(s)" on page 19. 4 Remove the palm-rest assembly. See "Removing the Keyboard" on page 11. 2 Remove the optical drive. Prerequisites 1 Remove the memory module(s). See "Removing the Palm-Rest Assembly" on page ...9. After working inside your computer and follow the instructions in "Before You Begin" on page 15. 3 Remove the keyboard. 19 Removing the Daughter Board WARNING: Before working inside your computer, read the safety information that shipped with your computer, ...

Owner's Manual
Page 53
.... After working inside your computer and follow the instructions in "Before You Begin" on page 7. See "Removing the Optical-Drive Assembly" on page 31. 6 Remove the daughter board. For additional safety best practices information, see the Regulatory Compliance Homepage at dell.com/ regulatory_compliance. See "Removing the Battery" on page 15. 3 Remove the keyboard. Removing the Speakers | 53
.... After working inside your computer and follow the instructions in "Before You Begin" on page 7. See "Removing the Optical-Drive Assembly" on page 31. 6 Remove the daughter board. For additional safety best practices information, see the Regulatory Compliance Homepage at dell.com/ regulatory_compliance. See "Removing the Battery" on page 15. 3 Remove the keyboard. Removing the Speakers | 53
Owner's Manual
Page 57
... Compliance Homepage at dell.com/ regulatory_compliance. Prerequisites 1 Remove the memory module(s). See "Removing the Palm-Rest Assembly" on page 39. 8 Remove the mSATA card. See "Removing the Wireless Mini-Card" on page 25. 5 Remove the battery. Removing the System Board ...Removing the Memory Module(s)" on page 31. 6 Remove the hard drive. See "Removing the Battery" on page 11. 2 Remove the optical drive. See "Removing the Optical-Drive Assembly" on page 43. See "Removing the mSATA Card" on page 15. 3 Remove the keyboard. See "Removing the Keyboard" on page 35. 7 Remove...
... Compliance Homepage at dell.com/ regulatory_compliance. Prerequisites 1 Remove the memory module(s). See "Removing the Palm-Rest Assembly" on page 39. 8 Remove the mSATA card. See "Removing the Wireless Mini-Card" on page 25. 5 Remove the battery. Removing the System Board ...Removing the Memory Module(s)" on page 31. 6 Remove the hard drive. See "Removing the Battery" on page 11. 2 Remove the optical drive. See "Removing the Optical-Drive Assembly" on page 43. See "Removing the mSATA Card" on page 15. 3 Remove the keyboard. See "Removing the Keyboard" on page 35. 7 Remove...
Owner's Manual
Page 63
...installed incorrectly. It is recommended that shipped with the same or equivalent type. Prerequisites 1 Remove the memory module(s). See "Removing the Keyboard" on page 31. 6 Remove the hard drive. Removing the Coin-Cell Battery | 63 Replace the battery only with your computer and follow .... For additional safety best practices information, see the Regulatory Compliance Homepage at dell.com/ regulatory_compliance. See "Removing the Battery" on page 19. 4 Remove the palm-rest assembly. 25 Removing the Coin-Cell Battery WARNING: Before working inside your computer, read the safety...
...installed incorrectly. It is recommended that shipped with the same or equivalent type. Prerequisites 1 Remove the memory module(s). See "Removing the Keyboard" on page 31. 6 Remove the hard drive. Removing the Coin-Cell Battery | 63 Replace the battery only with your computer and follow .... For additional safety best practices information, see the Regulatory Compliance Homepage at dell.com/ regulatory_compliance. See "Removing the Battery" on page 19. 4 Remove the palm-rest assembly. 25 Removing the Coin-Cell Battery WARNING: Before working inside your computer, read the safety...

Owner's Manual
Page 67
... page 11. 2 Remove the optical drive. See "Removing the Palm-Rest Assembly" on page 19. 4 Remove the palm-rest assembly. See "Removing the Keyboard" on page 25. 5 Remove the battery. See "Removing the Hard Drive" on page 15. 3 Remove the keyboard. For additional safety best practices information, see the Regulatory Compliance Homepage at dell.com/ regulatory_compliance. See "Removing the Optical-Drive...
... page 11. 2 Remove the optical drive. See "Removing the Palm-Rest Assembly" on page 19. 4 Remove the palm-rest assembly. See "Removing the Keyboard" on page 25. 5 Remove the battery. See "Removing the Hard Drive" on page 15. 3 Remove the keyboard. For additional safety best practices information, see the Regulatory Compliance Homepage at dell.com/ regulatory_compliance. See "Removing the Optical-Drive...

Owner's Manual
Page 71
... Homepage at dell.com/ regulatory_compliance. See "Removing the Keyboard" on page 35. 7 Remove the wireless Mini-Card. Prerequisites 1 Remove the memory module(s). See "Removing the Hard Drive" on page 19. 4 Remove the palm-rest assembly. See "Removing the Optical-Drive Assembly" on page 39. 8 Remove the mSATA card. See "Removing the Wireless Mini-Card" on page 15. 3 Remove the keyboard. See "Removing the...
... Homepage at dell.com/ regulatory_compliance. See "Removing the Keyboard" on page 35. 7 Remove the wireless Mini-Card. Prerequisites 1 Remove the memory module(s). See "Removing the Hard Drive" on page 19. 4 Remove the palm-rest assembly. See "Removing the Optical-Drive Assembly" on page 39. 8 Remove the mSATA card. See "Removing the Wireless Mini-Card" on page 15. 3 Remove the keyboard. See "Removing the...


