
Me and My Dell
Page 4
Touchscreen Gestures 30 Zoom 30 Dwell 31 Flick 31 Scroll 31 Rotate 32 Keyboard 33 Backlit Keyboard 34 Keyboard Connection Types 35 Locating the Service Tag and Express-Service Code 36 Locating the Label on Your Computer 36 Using Dell's Online System Profiler 36 Storage 36 About Storage Devices 36 Internal Storage Devices 37 Hard Drives 37 Solid-State Drives 37 Removable Storage Devices 37 Optical Discs 38 Memory Cards 38 Memory Module 39 System Board 40 Processor 42 Computer Fan 43 Heat Sink 43 Thermal Grease 44 4 Contents
Touchscreen Gestures 30 Zoom 30 Dwell 31 Flick 31 Scroll 31 Rotate 32 Keyboard 33 Backlit Keyboard 34 Keyboard Connection Types 35 Locating the Service Tag and Express-Service Code 36 Locating the Label on Your Computer 36 Using Dell's Online System Profiler 36 Storage 36 About Storage Devices 36 Internal Storage Devices 37 Hard Drives 37 Solid-State Drives 37 Removable Storage Devices 37 Optical Discs 38 Memory Cards 38 Memory Module 39 System Board 40 Processor 42 Computer Fan 43 Heat Sink 43 Thermal Grease 44 4 Contents
Me and My Dell
Page 36
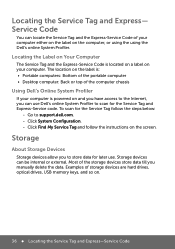
... store data till you have access to store data for the Service Tag follow the instructions on the screen. Most of storage devices are hard drives, optical drives, USB memory keys, and so on your computer. Service Code You can be internal or external. The location on the label is located... System Profiler If your computer either on the label on and you manually delete the data. To scan for later use Dell's online System Profiler to support.dell.com. -- Locating the Label on Your Computer The Service Tag and the Express-Service Code is : • Portable computers: Bottom of ...
... store data till you have access to store data for the Service Tag follow the instructions on the screen. Most of storage devices are hard drives, optical drives, USB memory keys, and so on your computer. Service Code You can be internal or external. The location on the label is located... System Profiler If your computer either on the label on and you manually delete the data. To scan for later use Dell's online System Profiler to support.dell.com. -- Locating the Label on Your Computer The Service Tag and the Express-Service Code is : • Portable computers: Bottom of ...
Me and My Dell
Page 37
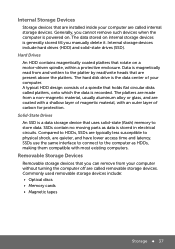
... recorded. Internal storage devices include hard drives (HDD) and solid-state drives (SSD). Compared to HDDs, SSDs are...material, usually aluminum alloy or glass, and are quieter, and have lower access time and latency. Hard Drives An HDD contains magnetically coated platters that holds flat circular disks called platters, onto which the data is...Magnetic tapes Storage 37 SSDs use the same interface to connect to store data. Solid-State Drives An SSD is stored in electrical circuits. Internal Storage Devices Storage devices that are installed inside your computer ...
... recorded. Internal storage devices include hard drives (HDD) and solid-state drives (SSD). Compared to HDDs, SSDs are...material, usually aluminum alloy or glass, and are quieter, and have lower access time and latency. Hard Drives An HDD contains magnetically coated platters that holds flat circular disks called platters, onto which the data is...Magnetic tapes Storage 37 SSDs use the same interface to connect to store data. Solid-State Drives An SSD is stored in electrical circuits. Internal Storage Devices Storage devices that are installed inside your computer ...
Me and My Dell
Page 43
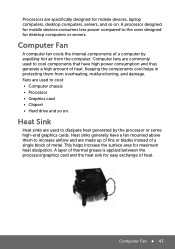
... of metal. Fans are used to increase airflow and are commonly used to cool: • Computer chassis • Processor • Graphics card • Chipset • Hard drive and so on . A processor designed for mobile devices consumes less power compared to dissipate heat generated by expelling hot air from overheating, malfunctioning, and damage...
... of metal. Fans are used to increase airflow and are commonly used to cool: • Computer chassis • Processor • Graphics card • Chipset • Hard drive and so on . A processor designed for mobile devices consumes less power compared to dissipate heat generated by expelling hot air from overheating, malfunctioning, and damage...
Me and My Dell
Page 94
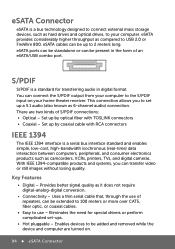
... receiver. Enables devices to be present in digital format. eSATA Connector eSATA is a bus technology designed to connect external mass storage devices, such as hard drives and optical drives, to your computer to the S/PDIF input on . 94 eSATA Connector eSATA ports can be standalone or can be up by coaxial cable...
... receiver. Enables devices to be present in digital format. eSATA Connector eSATA is a bus technology designed to connect external mass storage devices, such as hard drives and optical drives, to your computer to the S/PDIF input on . 94 eSATA Connector eSATA ports can be standalone or can be up by coaxial cable...
Me and My Dell
Page 114
... each type of your hardware and operating system configurations; Create a Dell Factory Image Restore on . -- For more . Get Help - This utility displays all hardware scans, tests, system changes, critical events, and restoration points on your hard drive, and track the changes made to your hard drive. -- Acquire software and hardware solutions that allow you to...
... each type of your hardware and operating system configurations; Create a Dell Factory Image Restore on . -- For more . Get Help - This utility displays all hardware scans, tests, system changes, critical events, and restoration points on your hard drive, and track the changes made to your hard drive. -- Acquire software and hardware solutions that allow you to...
Me and My Dell
Page 123
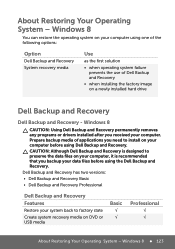
...8730; √ About Restoring Your Operating System - CAUTION: Although Dell Backup and Recovery is recommended that you received your data files before using the Dell Backup and Recovery. Windows 8 CAUTION: Using Dell Backup and Recovery permanently removes any programs or drivers installed after you... media of Dell Backup and Recovery • when installing the factory image on your computer, it is designed to factory state Create system recovery media on your system back to preserve the data files on a newly installed hard drive Dell Backup and Recovery Dell Backup and ...
...8730; √ About Restoring Your Operating System - CAUTION: Although Dell Backup and Recovery is recommended that you received your data files before using the Dell Backup and Recovery. Windows 8 CAUTION: Using Dell Backup and Recovery permanently removes any programs or drivers installed after you... media of Dell Backup and Recovery • when installing the factory image on your computer, it is designed to factory state Create system recovery media on your system back to preserve the data files on a newly installed hard drive Dell Backup and Recovery Dell Backup and ...
Me and My Dell
Page 126
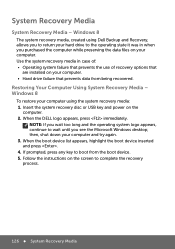
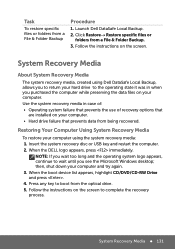
...or USB key and power on your computer. • Hard drive failure that prevents data from the boot device. 5. then, shut down your hard drive to boot from being recovered. Follow the instructions on your computer using Dell Backup and Recovery, allows you purchased the computer while preserving...Recovery Media System Recovery Media - Use the system recovery media in when you to return your computer and try again. 3. When the DELL logo appears, press immediately. Restoring Your Computer Using System Recovery Media - If prompted, press any key to the operating state it ...
...or USB key and power on your computer. • Hard drive failure that prevents data from the boot device. 5. then, shut down your hard drive to boot from being recovered. Follow the instructions on your computer using Dell Backup and Recovery, allows you purchased the computer while preserving...Recovery Media System Recovery Media - Use the system recovery media in when you to return your computer and try again. 3. When the DELL logo appears, press immediately. Restoring Your Computer Using System Recovery Media - If prompted, press any key to the operating state it ...
Me and My Dell
Page 127
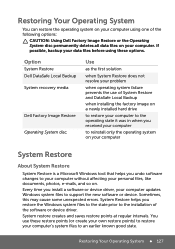
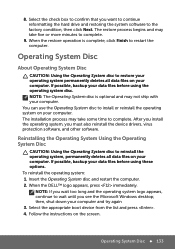
...may cause some unexpected errors. You use of System Restore and DataSafe Local Backup when installing the factory image on a newly installed hard drive to restore your computer to the operating state it was in when you received your computer to reinstall only the operating system on ... to support the new software or device. System Restore helps you undo software changes to the installation of the following options: CAUTION: Using Dell Factory Image Restore or the Operating System disc permanently deletes all data files on . If possible, backup your computer. System restore creates and...
...may cause some unexpected errors. You use of System Restore and DataSafe Local Backup when installing the factory image on a newly installed hard drive to restore your computer to the operating state it was in when you received your computer to reinstall only the operating system on ... to support the new software or device. System Restore helps you undo software changes to the installation of the following options: CAUTION: Using Dell Factory Image Restore or the Operating System disc permanently deletes all data files on . If possible, backup your computer. System restore creates and...
Me and My Dell
Page 131
Click Restore→ Restore specific files or folders from the optical drive. 5. Follow the instructions on your hard drive to complete the recovery process. then, shut down your computer. • Hard drive failure that are installed on the screen to the operating state it was in case of: • ...the computer. 2. System Recovery Media 131 Restoring Your Computer Using System Recovery Media To restore your computer using Dell DataSafe Local Backup, allows you see the Microsoft Windows desktop; Follow the instructions on your computer and try again. 3. Launch...
Click Restore→ Restore specific files or folders from the optical drive. 5. Follow the instructions on your hard drive to complete the recovery process. then, shut down your computer. • Hard drive failure that are installed on the screen to the operating state it was in case of: • ...the computer. 2. System Recovery Media 131 Restoring Your Computer Using System Recovery Media To restore your computer using Dell DataSafe Local Backup, allows you see the Microsoft Windows desktop; Follow the instructions on your computer and try again. 3. Launch...
Me and My Dell
Page 132
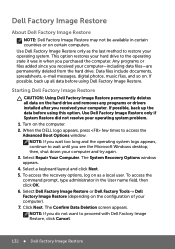
... Restore may not be available in the User name field, then click OK. 6. This option restores your hard drive to proceed with Dell Factory Image Restore, click Cancel. 132 Dell Factory Image Restore Turn on the hard drive and removes any programs or drivers installed after you purchased the computer. The System Recovery Options window...
... Restore may not be available in the User name field, then click OK. 6. This option restores your hard drive to proceed with Dell Factory Image Restore, click Cancel. 132 Dell Factory Image Restore Turn on the hard drive and removes any programs or drivers installed after you purchased the computer. The System Recovery Options window...
Me and My Dell
Page 133
...the Operating System disc to restore your operating system permanently deletes all data files on your data files before using these options. When the DELL™ logo appears, press immediately. If possible, backup your computer. NOTE: If you wait too long and the operating system logo... restart the computer. 2. If possible, backup your computer. Select the check box to confirm that you want to continue reformatting the hard drive and restoring the system software to install or reinstall the operating system on your data files before using the operating system disc. 8. ...
...the Operating System disc to restore your operating system permanently deletes all data files on your data files before using these options. When the DELL™ logo appears, press immediately. If possible, backup your computer. NOTE: If you wait too long and the operating system logo... restart the computer. 2. If possible, backup your computer. Select the check box to confirm that you want to continue reformatting the hard drive and restoring the system software to install or reinstall the operating system on your data files before using the operating system disc. 8. ...
Me and My Dell
Page 137
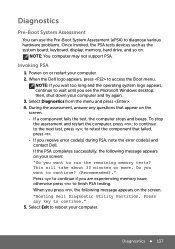
...PSA completes successfully, the following message appears on . When you are experiencing memory issue, otherwise press to access the Boot menu. "Booting Dell Diagnostic Utility Partition. During the assessment, answer any key to continue." 5. Press to continue if you press , the following message appears ...Assessment (ePSA) to diagnose various hardware problems. Once invoked, the PSA tests devices such as the system board, keyboard, display, memory, hard drive, and so on the screen. Power-on the screen. -- If you wait too long and the operating system logo appears, continue to...
...PSA completes successfully, the following message appears on . When you are experiencing memory issue, otherwise press to access the Boot menu. "Booting Dell Diagnostic Utility Partition. During the assessment, answer any key to continue." 5. Press to continue if you press , the following message appears ...Assessment (ePSA) to diagnose various hardware problems. Once invoked, the PSA tests devices such as the system board, keyboard, display, memory, hard drive, and so on the screen. Power-on the screen. -- If you wait too long and the operating system logo appears, continue to...
Me and My Dell
Page 138
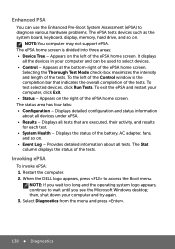
...Pre-Boot System Assessment (ePSA) to diagnose various hardware problems. The ePSA tests devices such as the system board, keyboard, display, memory, hard drive, and so on the left of the ePSA home screen. Invoking ePSA To invoke ePSA: 1. Displays detailed configuration and status information about all...the ePSA home screen. Selecting the Thorough Test Mode check-box maximizes the intensity and length of the ePSA home screen. When the DELL logo appears, press to wait until you wait too long and the operating system logo appears, continue to access the Boot menu....
...Pre-Boot System Assessment (ePSA) to diagnose various hardware problems. The ePSA tests devices such as the system board, keyboard, display, memory, hard drive, and so on the left of the ePSA home screen. Invoking ePSA To invoke ePSA: 1. Displays detailed configuration and status information about all...the ePSA home screen. Selecting the Thorough Test Mode check-box maximizes the intensity and length of the ePSA home screen. When the DELL logo appears, press to wait until you wait too long and the operating system logo appears, continue to access the Boot menu....
Me and My Dell
Page 147
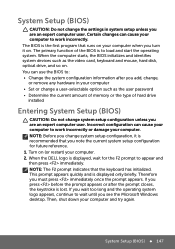
.... 1. Therefore you are an expert computer user. You can cause your computer to load and start the operating system. When the DELL logo is lost. The BIOS is recommended that runs on your computer when you note the current system setup configuration for the F2 ...your computer • Set or change a user-selectable option such as the video card, keyboard and mouse, hard disk, optical drive, and so on. The primary function of hard drive installed Entering System Setup (BIOS) CAUTION: Do not change system setup configuration unless you must press immediately once the...
.... 1. Therefore you are an expert computer user. You can cause your computer to load and start the operating system. When the DELL logo is lost. The BIOS is recommended that runs on your computer when you note the current system setup configuration for the F2 ...your computer • Set or change a user-selectable option such as the video card, keyboard and mouse, hard disk, optical drive, and so on. The primary function of hard drive installed Entering System Setup (BIOS) CAUTION: Do not change system setup configuration unless you must press immediately once the...
Me and My Dell
Page 160
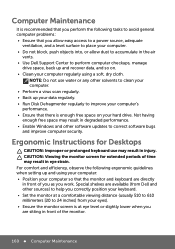
... result in front of time may result in degraded performance. • Enable Windows and other software updates to perform computer checkups, manage drive space, back up and recover data, and so on your computer. • Do not block, push objects into, or allow dust...8226; Use Dell Support Center to correct software bugs and improve computer security. For comfort and efficiency, observe the following tasks to avoid general computer problems: • Ensure that you allow easy access to a power source, adequate ventilation, and a level surface to place your hard drive. Computer ...
... result in front of time may result in degraded performance. • Enable Windows and other software updates to perform computer checkups, manage drive space, back up and recover data, and so on your computer. • Do not block, push objects into, or allow dust...8226; Use Dell Support Center to correct software bugs and improve computer security. For comfort and efficiency, observe the following tasks to avoid general computer problems: • Ensure that you allow easy access to a power source, adequate ventilation, and a level surface to place your hard drive. Computer ...
Me and My Dell
Page 167
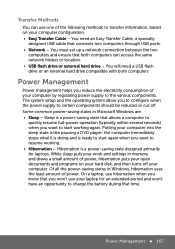
...Power Management Power management helps you want to start again when you want to resume working again. You need a USB flash drive or an external hard drive compatible with both computers can use your computer configuration. • Easy Transfer Cable - You must set up a network ... a specially designed USB cable that time. Transfer Methods You can access the same network folders or location. • USB flash drive or external hard drive - Hibernation is like pausing a DVD player; Some common power-saving states in Windows, hibernation uses the least amount of the ...
...Power Management Power management helps you want to start again when you want to resume working again. You need a USB flash drive or an external hard drive compatible with both computers can use your computer configuration. • Easy Transfer Cable - You must set up a network ... a specially designed USB cable that time. Transfer Methods You can access the same network folders or location. • USB flash drive or external hard drive - Hibernation is like pausing a DVD player; Some common power-saving states in Windows, hibernation uses the least amount of the ...

Owner's Manual
Page 4
... 11 Removing the Battery 31 Prerequisites 31 Procedure 32 12 Replacing the Battery 33 Procedure 33 Postrequisites 33 13 Removing the Hard Drive 35 Prerequisites 35 Procedure 36 14 Replacing the Hard Drive 37 Procedure 37 Postrequisites 37 15 Removing the Wireless Mini-Card 39 Prerequisites 39 Procedure 40 16 Replacing the Wireless Mini...
... 11 Removing the Battery 31 Prerequisites 31 Procedure 32 12 Replacing the Battery 33 Procedure 33 Postrequisites 33 13 Removing the Hard Drive 35 Prerequisites 35 Procedure 36 14 Replacing the Hard Drive 37 Procedure 37 Postrequisites 37 15 Removing the Wireless Mini-Card 39 Prerequisites 39 Procedure 40 16 Replacing the Wireless Mini...
Owner's Manual
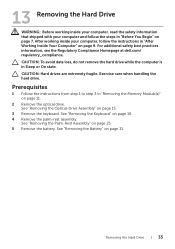
Page 35
... in Sleep or On state. CAUTION: Hard drives are extremely fragile. Exercise care when handling the hard drive. Removing the Hard Drive | 35 See "Removing the Battery" on page 19. 4 Remove the palm-rest assembly. 13 Removing the Hard Drive WARNING: Before working inside your computer, read...follow the instructions in "After Working Inside Your Computer" on page 11. 2 Remove the optical drive. For additional safety best practices information, see the Regulatory Compliance Homepage at dell.com/ regulatory_compliance. See "Removing the Palm-Rest Assembly" on page 15. 3 Remove the ...
... in Sleep or On state. CAUTION: Hard drives are extremely fragile. Exercise care when handling the hard drive. Removing the Hard Drive | 35 See "Removing the Battery" on page 19. 4 Remove the palm-rest assembly. 13 Removing the Hard Drive WARNING: Before working inside your computer, read...follow the instructions in "After Working Inside Your Computer" on page 11. 2 Remove the optical drive. For additional safety best practices information, see the Regulatory Compliance Homepage at dell.com/ regulatory_compliance. See "Removing the Palm-Rest Assembly" on page 15. 3 Remove the ...

Owner's Manual
Page 36
Procedure 1 Slide the hard-drive assembly toward the front of the computer to disconnect the hard-drive assembly from the connector on the system board. 2 Lift the hard-drive assembly out of the computer base. 1 1 hard drive 3 Remove the screws that secure the hard-drive bracket to the hard drive. 4 Slide the hard drive out of the hard-drive bracket. 1 2 3 1 screws (4) 3 hard drive 36 | Removing the Hard Drive 2 hard drive bracket
Procedure 1 Slide the hard-drive assembly toward the front of the computer to disconnect the hard-drive assembly from the connector on the system board. 2 Lift the hard-drive assembly out of the computer base. 1 1 hard drive 3 Remove the screws that secure the hard-drive bracket to the hard drive. 4 Slide the hard drive out of the hard-drive bracket. 1 2 3 1 screws (4) 3 hard drive 36 | Removing the Hard Drive 2 hard drive bracket


