
Inspiron 14 1440 Service Manual
Page 1
... products. Other trademarks and trade names may be used by Bluetooth SIG, Inc. is a registered trademark owned by Dell under license; Model PP42L June 2009 Rev. Dell™ Inspiron™ 1440 Service Manual Before You Begin Battery Hard Drive Optical Drive Module Cover Memory Module(s) Wireless Mini-Card Center Control Cover Keyboard Power Button Board...
... products. Other trademarks and trade names may be used by Bluetooth SIG, Inc. is a registered trademark owned by Dell under license; Model PP42L June 2009 Rev. Dell™ Inspiron™ 1440 Service Manual Before You Begin Battery Hard Drive Optical Drive Module Cover Memory Module(s) Wireless Mini-Card Center Control Cover Keyboard Power Button Board...

Inspiron 14 1440 Service Manual
Page 2
... Replacing the Battery). Damage due to servicing that shipped with the slots on the computer. Removing the Module Cover 1. CAUTION: Only a certified service technician should perform repairs on your computer. Lift the module cover off the computer at www.dell.com/regulatory_compliance. Back to Contents Page Module Cover Dell™ Inspiron™ 1440 Service Manual...
... Replacing the Battery). Damage due to servicing that shipped with the slots on the computer. Removing the Module Cover 1. CAUTION: Only a certified service technician should perform repairs on your computer. Lift the module cover off the computer at www.dell.com/regulatory_compliance. Back to Contents Page Module Cover Dell™ Inspiron™ 1440 Service Manual...

Inspiron 14 1440 Service Manual
Page 4
CAUTION: To disconnect a network cable, first unplug the cable from your computer and all telephone or network cables from the computer. 5. Disconnect your computer and then unplug the cable from the network device. 4. Remove the battery (see Removing the Battery). 8. Disconnect all attached devices from the ExpressCard slot or the 7-in-1 Media Card Reader. 6. Back to ground the system board. Turn the computer top-side up, open the display, and press the power button to Contents Page Press and eject any installed cards from their electrical outlets. 7.
CAUTION: To disconnect a network cable, first unplug the cable from your computer and all telephone or network cables from the computer. 5. Disconnect your computer and then unplug the cable from the network device. 4. Remove the battery (see Removing the Battery). 8. Disconnect all attached devices from the ExpressCard slot or the 7-in-1 Media Card Reader. 6. Back to ground the system board. Turn the computer top-side up, open the display, and press the power button to Contents Page Press and eject any installed cards from their electrical outlets. 7.
Inspiron 14 1440 Service Manual
Page 5
Follow the procedures that the main battery is attached. 2. When the flash update is titled the same as the downloaded BIOS update file. 13. Press , select Save changes and reboot, and press ... the BIOS From the Hard Drive 1. Click BIOS. 10. Back to boot and updates the new BIOS. Press to Contents Page Flashing the BIOS Dell™ Inspiron™ 1440 Service Manual Flashing the BIOS From a CD Flashing the BIOS From the Hard Drive If a BIOS-update program CD is provided with the new...
Follow the procedures that the main battery is attached. 2. When the flash update is titled the same as the downloaded BIOS update file. 13. Press , select Save changes and reboot, and press ... the BIOS From the Hard Drive 1. Click BIOS. 10. Back to boot and updates the new BIOS. Press to Contents Page Flashing the BIOS Dell™ Inspiron™ 1440 Service Manual Flashing the BIOS From a CD Flashing the BIOS From the Hard Drive If a BIOS-update program CD is provided with the new...

Inspiron 14 1440 Service Manual
Page 7
... electrostatic discharge, ground yourself by using a wrist grounding strap or by your computer. Remove the battery (see Removing the Center Control Cover). 8. Back to Contents Page Internal Card With Bluetooth® Wireless Technology Dell™ Inspiron™ 1440 Service Manual Removing the Bluetooth Card Replacing the Bluetooth Card WARNING: Before working inside your computer...
... electrostatic discharge, ground yourself by using a wrist grounding strap or by your computer. Remove the battery (see Removing the Center Control Cover). 8. Back to Contents Page Internal Card With Bluetooth® Wireless Technology Dell™ Inspiron™ 1440 Service Manual Removing the Bluetooth Card Replacing the Bluetooth Card WARNING: Before working inside your computer...

Inspiron 14 1440 Service Manual
Page 8
... the Optical Drive). 7. Back to Contents Page Replace the optical drive (see Replacing the Hard Drive). 8. Replace the battery (see Replacing the Module Cover). 10. Replace the module cover (see Replacing the Battery). Replace the palm rest (see Replacing the Center Control Cover). 6. Replace the center control cover (see Replacing the Palm...
... the Optical Drive). 7. Back to Contents Page Replace the optical drive (see Replacing the Hard Drive). 8. Replace the battery (see Replacing the Module Cover). 10. Replace the module cover (see Replacing the Battery). Replace the palm rest (see Replacing the Center Control Cover). 6. Replace the center control cover (see Replacing the Palm...

Inspiron 14 1440 Service Manual
Page 9
...the procedures in Before You Begin. 2. CAUTION: To help prevent damage to the system board, remove the main battery (see the Regulatory Compliance Homepage at www.dell.com/regulatory_compliance. Remove the camera module. 1 latches (2) 3 camera module 2 camera cable connector Replacing the Camera 1.... electrostatic discharge, ground yourself by using the latches on your computer. Back to Contents Page Camera (Optional) Dell™ Inspiron™ 1440 Service Manual Removing the Camera Replacing the Camera WARNING: Before working inside your computer, read the safety information ...
...the procedures in Before You Begin. 2. CAUTION: To help prevent damage to the system board, remove the main battery (see the Regulatory Compliance Homepage at www.dell.com/regulatory_compliance. Remove the camera module. 1 latches (2) 3 camera module 2 camera cable connector Replacing the Camera 1.... electrostatic discharge, ground yourself by using the latches on your computer. Back to Contents Page Camera (Optional) Dell™ Inspiron™ 1440 Service Manual Removing the Camera Replacing the Camera WARNING: Before working inside your computer, read the safety information ...

Inspiron 14 1440 Service Manual
Page 11
... to Contents Page CAUTION: To help prevent damage to the system board, remove the main battery (see Removing the Battery). 3. Back to Contents Page Center Control Cover Dell™ Inspiron™ 1440 Service Manual Removing the Center Control Cover Replacing the Center Control Cover WARNING: Before working inside your computer, read the safety information that...
... to Contents Page CAUTION: To help prevent damage to the system board, remove the main battery (see Removing the Battery). 3. Back to Contents Page Center Control Cover Dell™ Inspiron™ 1440 Service Manual Removing the Center Control Cover Replacing the Center Control Cover WARNING: Before working inside your computer, read the safety information that...

Inspiron 14 1440 Service Manual
Page 12
... grounding strap or by your warranty. Back to Contents Page Coin-Cell Battery Dell™ Inspiron™ 1440 Service Manual Removing the Coin-Cell Battery Replacing the Coin-Cell Battery WARNING: Before working inside your computer, read the safety information that is not authorized by Dell™ is not covered by periodically touching an unpainted metal surface...
... grounding strap or by your warranty. Back to Contents Page Coin-Cell Battery Dell™ Inspiron™ 1440 Service Manual Removing the Coin-Cell Battery Replacing the Coin-Cell Battery WARNING: Before working inside your computer, read the safety information that is not authorized by Dell™ is not covered by periodically touching an unpainted metal surface...

Inspiron 14 1440 Service Manual
Page 13
...to the system board, remove the main battery (see Removing the Battery) before working inside the computer. Follow the procedures in your computer. Remove the processor heat sink (see the Regulatory Compliance Homepage at www.dell.com/regulatory_compliance. CAUTION: To prevent intermittent ...an unpainted metal surface (such as the back panel) on your warranty. Damage due to Contents Page Processor Module Dell™ Inspiron™ 1440 Service Manual Removing the Processor Module Replacing the Processor Module WARNING: Before working inside your computer, read the safety...
...to the system board, remove the main battery (see Removing the Battery) before working inside the computer. Follow the procedures in your computer. Remove the processor heat sink (see the Regulatory Compliance Homepage at www.dell.com/regulatory_compliance. CAUTION: To prevent intermittent ...an unpainted metal surface (such as the back panel) on your warranty. Damage due to Contents Page Processor Module Dell™ Inspiron™ 1440 Service Manual Removing the Processor Module Replacing the Processor Module WARNING: Before working inside your computer, read the safety...

Inspiron 14 1440 Service Manual
Page 15
... the original processor and heat sink are ready to replace it. 1. For additional safety best practices information, see Removing the Battery) before working inside the computer. Disconnect the fan cable from the computer when the heat sink is not covered by periodically ... the system board. 1 processor heat sink 3 captive screws (5) 2 fan cable connector 5. Back to Contents Page Processor Heat Sink Dell™ Inspiron™ 1440 Service Manual Removing the Processor Heat Sink Replacing the Processor Heat Sink WARNING: Before working inside your computer. WARNING: If you have...
... the original processor and heat sink are ready to replace it. 1. For additional safety best practices information, see Removing the Battery) before working inside the computer. Disconnect the fan cable from the computer when the heat sink is not covered by periodically ... the system board. 1 processor heat sink 3 captive screws (5) 2 fan cable connector 5. Back to Contents Page Processor Heat Sink Dell™ Inspiron™ 1440 Service Manual Removing the Processor Heat Sink Replacing the Processor Heat Sink WARNING: Before working inside your computer. WARNING: If you have...

Inspiron 14 1440 Service Manual
Page 17
... system board, remove the main battery (see the Regulatory Compliance Homepage at www.dell.com/regulatory_compliance. Remove the system board (see Replacing the System Board). Damage due to servicing that secures the daughter board to the computer base. 3. Back to Contents Page Daughter Board Dell™ Inspiron™ 1440 Service Manual Removing the Daughter Board...
... system board, remove the main battery (see the Regulatory Compliance Homepage at www.dell.com/regulatory_compliance. Remove the system board (see Replacing the System Board). Damage due to servicing that secures the daughter board to the computer base. 3. Back to Contents Page Daughter Board Dell™ Inspiron™ 1440 Service Manual Removing the Daughter Board...

Inspiron 14 1440 Service Manual
Page 18
...see Removing the Module Cover). 4. Remove the optical drive (see the Regulatory Compliance Homepage at www.dell.com/regulatory_compliance. Back to Contents Page Display Dell™ Inspiron™ 1440 Service Manual Display Assembly Display Bezel Display Panel Display Panel Cable WARNING: Before working inside your computer,...Removing the Optical Drive). 7. CAUTION: To help prevent damage to the system board, remove the main battery (see Removing the Battery) before working inside the computer. Remove the battery (see Removing the Keyboard). 10. Remove the keyboard (see Removing the...
...see Removing the Module Cover). 4. Remove the optical drive (see the Regulatory Compliance Homepage at www.dell.com/regulatory_compliance. Back to Contents Page Display Dell™ Inspiron™ 1440 Service Manual Display Assembly Display Bezel Display Panel Display Panel Cable WARNING: Before working inside your computer,...Removing the Optical Drive). 7. CAUTION: To help prevent damage to the system board, remove the main battery (see Removing the Battery) before working inside the computer. Remove the battery (see Removing the Keyboard). 10. Remove the keyboard (see Removing the...

Inspiron 14 1440 Service Manual
Page 20
.... Remove the display bezel. Replace the display assembly (see Replacing the Optical Drive). 10. Replace the optical drive (see Replacing the Display Assembly). Replace the battery (see Replacing the Battery). Remove the Mini-Card cables, camera cable, and display cable from the hinge latches.
.... Remove the display bezel. Replace the display assembly (see Replacing the Optical Drive). 10. Replace the optical drive (see Replacing the Display Assembly). Replace the battery (see Replacing the Battery). Remove the Mini-Card cables, camera cable, and display cable from the hinge latches.
Inspiron 14 1440 Service Manual
Page 23
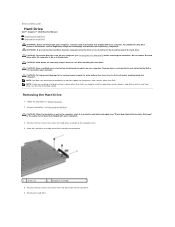
...compatibility or provide support for hard drives from sources other than Dell, you remove the hard drive from a source other than Dell. Back to Contents Page Hard Drive Dell™ Inspiron™ 1440 Service Manual Removing the Hard Drive Replacing the Hard Drive ...WARNING: Before working inside your computer, read the safety information that shipped with your computer). 3. CAUTION: To prevent data loss, turn off your computer (see Removing the Battery...
...compatibility or provide support for hard drives from sources other than Dell, you remove the hard drive from a source other than Dell. Back to Contents Page Hard Drive Dell™ Inspiron™ 1440 Service Manual Removing the Hard Drive Replacing the Hard Drive ...WARNING: Before working inside your computer, read the safety information that shipped with your computer). 3. CAUTION: To prevent data loss, turn off your computer (see Removing the Battery...

Inspiron 14 1440 Service Manual
Page 24
... that secure the hard drive bezel to the hard drive. 4. See "Restoring Your Operating System" in the Setup Guide. 8. For more information, see Replacing the Battery). 7. Slide the hard drive assembly into the hard drive compartment until it is fully seated. 5. Replace the two screws that secure the hard drive assembly... to Contents Page Save the original packaging for your computer, as needed . Install the operating system for storing or shipping the hard drive. 2. Replace the battery (see the Dell Technology Guide.
... that secure the hard drive bezel to the hard drive. 4. See "Restoring Your Operating System" in the Setup Guide. 8. For more information, see Replacing the Battery). 7. Slide the hard drive assembly into the hard drive compartment until it is fully seated. 5. Replace the two screws that secure the hard drive assembly... to Contents Page Save the original packaging for your computer, as needed . Install the operating system for storing or shipping the hard drive. 2. Replace the battery (see the Dell Technology Guide.

Inspiron 14 1440 Service Manual
Page 25
...dislodged, and time-consuming to Contents Page Keyboard Dell™ Inspiron™ 1440 Service Manual Removing the Keyboard Replacing the Keyboard WARNING: Before working inside your computer, read the safety information that is not authorized by Dell™ is not covered by periodically touching an... additional safety best practices information, see Removing the Center Control Cover). 4. Failure to the system board, remove the main battery (see Removing the Battery). 3. Ease the keyboard up until it towards the display. 8. CAUTION: To help prevent damage to do so could ...
...dislodged, and time-consuming to Contents Page Keyboard Dell™ Inspiron™ 1440 Service Manual Removing the Keyboard Replacing the Keyboard WARNING: Before working inside your computer, read the safety information that is not authorized by Dell™ is not covered by periodically touching an... additional safety best practices information, see Removing the Center Control Cover). 4. Failure to the system board, remove the main battery (see Removing the Battery). 3. Ease the keyboard up until it towards the display. 8. CAUTION: To help prevent damage to do so could ...

Inspiron 14 1440 Service Manual
Page 26
Replacing the Keyboard 1. Slide the keyboard cable into the connector on the palm rest. 3. Replace the center control cover (see Replacing the Battery). Replace the two screws that secures the keyboard cable to the system board connector. 2. Lift the keyboard off the palm rest. Align the ...five tabs on the keyboard with the slots on the system board. Back to the palm rest. 5. Replace the battery (see Replacing the Center Control Cover). 6. Place the keyboard on the connector latch that secure the keyboard to Contents Page Press down on the ...
Replacing the Keyboard 1. Slide the keyboard cable into the connector on the palm rest. 3. Replace the center control cover (see Replacing the Battery). Replace the two screws that secures the keyboard cable to the system board connector. 2. Lift the keyboard off the palm rest. Align the ...five tabs on the keyboard with the slots on the system board. Back to the palm rest. 5. Replace the battery (see Replacing the Center Control Cover). 6. Place the keyboard on the connector latch that secure the keyboard to Contents Page Press down on the ...

Inspiron 14 1440 Service Manual
Page 27
... with your computer. Using a small screwdriver, remove the latch spring on the battery latch assembly. 1 latch spring 2 plastic clips 5. Removing the Battery Latch Assembly 1. Back to Contents Page Battery Latch Assembly Dell™ Inspiron™ 1440 Service Manual Removing the Battery Latch Assembly Replacing the Battery Latch Assembly WARNING: Before working inside your computer, read the safety information...
... with your computer. Using a small screwdriver, remove the latch spring on the battery latch assembly. 1 latch spring 2 plastic clips 5. Removing the Battery Latch Assembly 1. Back to Contents Page Battery Latch Assembly Dell™ Inspiron™ 1440 Service Manual Removing the Battery Latch Assembly Replacing the Battery Latch Assembly WARNING: Before working inside your computer, read the safety information...

Inspiron 14 1440 Service Manual
Page 28
Push the plastic clips on the battery release latch into place. 2. Replace the system board (see Replacing the System Board). Slide the battery latch assembly into the hole on the computer base. 3. Back to secure the battery release latch. 4. 1. Using a small screwdriver, place the latch spring over the hook on the battery latch assembly to Contents Page
Push the plastic clips on the battery release latch into place. 2. Replace the system board (see Replacing the System Board). Slide the battery latch assembly into the hole on the computer base. 3. Back to secure the battery release latch. 4. 1. Using a small screwdriver, place the latch spring over the hook on the battery latch assembly to Contents Page

