Service Manual
Page 1
... Rev. and is subject to change without the written permission of your computer. Dell Inc. Dell Inspiron 1122 Service Manual Before You Begin Battery Memory Module(s) Keyboard Hard Drive Palm Rest Power Button Board Wireless Mini-Card(s) Audio Board Coin-Cell Battery Display Camera Middle Cover AC Adapter Connector System Board Processor Fan and Heat Sink...
... Rev. and is subject to change without the written permission of your computer. Dell Inc. Dell Inspiron 1122 Service Manual Before You Begin Battery Memory Module(s) Keyboard Hard Drive Palm Rest Power Button Board Wireless Mini-Card(s) Audio Board Coin-Cell Battery Display Camera Middle Cover AC Adapter Connector System Board Processor Fan and Heat Sink...
Service Manual
Page 2
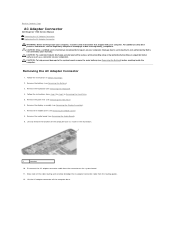
...from the routing guides. 12. Remove the display assembly (see Removing the Audio Board). 9. Remove the middle cover (see Removing the Battery). 3. Make note of the cable routing and carefully dislodge the AC adapter connector cable from step 4 to step 6 in Removing the... 1. Remove the keyboard (see the Regulatory Compliance Homepage at dell.com/regulatory_compliance. Disconnect the AC adapter connector cable from the connector on your computer). Back to Contents Page AC Adapter Connector Dell Inspiron 1122 Service Manual Removing the AC Adapter Connector Replacing the AC Adapter...
...from the routing guides. 12. Remove the display assembly (see Removing the Audio Board). 9. Remove the middle cover (see Removing the Battery). 3. Make note of the cable routing and carefully dislodge the AC adapter connector cable from step 4 to step 6 in Removing the... 1. Remove the keyboard (see the Regulatory Compliance Homepage at dell.com/regulatory_compliance. Disconnect the AC adapter connector cable from the connector on your computer). Back to Contents Page AC Adapter Connector Dell Inspiron 1122 Service Manual Removing the AC Adapter Connector Replacing the AC Adapter...
Service Manual
Page 3
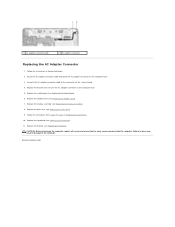
...AC adapter connector on the system board. 4. Connect the AC adapter connector cable to the computer. Replace the display assembly (see Replacing the Battery). Back to do so may result in Replacing the Hard Drive. 10. Follow the instructions from step 5 to step 7 in damage ...to the connector on the computer base. 3. Replace the battery (see Replacing the Display Assembly). 8. Failure to Contents Page 1 AC adapter connector cable 2 AC adapter connector Replacing the AC Adapter Connector 1. Follow...
...AC adapter connector on the system board. 4. Connect the AC adapter connector cable to the computer. Replace the display assembly (see Replacing the Battery). Back to do so may result in Replacing the Hard Drive. 10. Follow the instructions from step 5 to step 7 in damage ...to the connector on the computer base. 3. Replace the battery (see Replacing the Display Assembly). 8. Failure to Contents Page 1 AC adapter connector cable 2 AC adapter connector Replacing the AC Adapter Connector 1. Follow...

Service Manual
Page 4
... the Audio Board 1. Back to Contents Page Audio Board Dell Inspiron 1122 Service Manual Removing the Audio Board Replacing the Audio Board WARNING: Before working inside your warranty. CAUTION: To help prevent damage to the system board, remove the main battery (see Removing the Battery) before working inside the computer. Disconnect the Mini-Card antenna...
... the Audio Board 1. Back to Contents Page Audio Board Dell Inspiron 1122 Service Manual Removing the Audio Board Replacing the Audio Board WARNING: Before working inside your warranty. CAUTION: To help prevent damage to the system board, remove the main battery (see Removing the Battery) before working inside the computer. Disconnect the Mini-Card antenna...
Service Manual
Page 5
4. Connect the audio cable to the Mini-Card(s). 6. Replace the battery (see Replacing the Keyboard). 9. Connect the Mini-Card antenna cables to the connector on the computer, replace all screws and ensure that no stray screws remain inside the computer. Replace the keyboard (see Replacing the Battery). Back to step 7 in damage to the computer. Follow the instructions from step 5 to Contents Page Replace the palm rest (see Replacing the Palm Rest). 7. CAUTION: Before turning on the audio board. 5. Failure to do so may result in Replacing the Hard Drive. 8.
4. Connect the audio cable to the Mini-Card(s). 6. Replace the battery (see Replacing the Keyboard). 9. Connect the Mini-Card antenna cables to the connector on the computer, replace all screws and ensure that no stray screws remain inside the computer. Replace the keyboard (see Replacing the Battery). Back to step 7 in damage to the computer. Follow the instructions from step 5 to Contents Page Replace the palm rest (see Replacing the Palm Rest). 7. CAUTION: Before turning on the audio board. 5. Failure to do so may result in Replacing the Hard Drive. 8.
Service Manual
Page 6
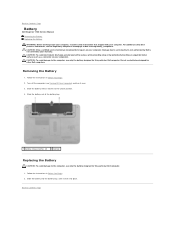
... safety best practices information, see Turning Off Your Computer) and turn it clicks into the battery bay, until it over. 3. Slide the battery release latches to Contents Page Back to Contents Page Battery Dell Inspiron 1122 Service Manual Removing the Battery Replacing the Battery WARNING: Before working inside your computer, read the safety information that is not authorized...
... safety best practices information, see Turning Off Your Computer) and turn it clicks into the battery bay, until it over. 3. Slide the battery release latches to Contents Page Back to Contents Page Battery Dell Inspiron 1122 Service Manual Removing the Battery Replacing the Battery WARNING: Before working inside your computer, read the safety information that is not authorized...

Service Manual
Page 8
Disconnect your computer and all attached devices from your computer. Turn the computer top-side up, open the computer, and press the power button to Contents Page 4. CAUTION: To help prevent damage to the system board, remove the main battery (see Removing the Battery). 8. Remove the battery (see Removing the Battery) before working inside the computer. 7. Disconnect all attached devices from the 7-in-1 Media Card Reader. 5. Back to ground the system board. Press and eject any installed cards from their electrical outlets. 6.
Disconnect your computer and all attached devices from your computer. Turn the computer top-side up, open the computer, and press the power button to Contents Page 4. CAUTION: To help prevent damage to the system board, remove the main battery (see Removing the Battery). 8. Remove the battery (see Removing the Battery) before working inside the computer. 7. Disconnect all attached devices from the 7-in-1 Media Card Reader. 5. Back to ground the system board. Press and eject any installed cards from their electrical outlets. 6.
Service Manual
Page 10
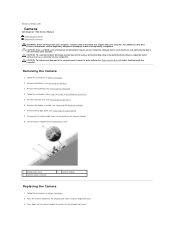
... palm rest (see Removing the Display Bezel). 8. Remove the display assembly (see Removing the Battery). 3. Press down on the camera module. 9. Removing the Camera 1. Follow the instructions in Removing the Hard Drive. 5. Back to Contents Page Camera Dell Inspiron 1122 Service Manual Removing the Camera Replacing the Camera WARNING: Before working inside your computer...
... palm rest (see Removing the Display Bezel). 8. Remove the display assembly (see Removing the Battery). 3. Press down on the camera module. 9. Removing the Camera 1. Follow the instructions in Removing the Hard Drive. 5. Back to Contents Page Camera Dell Inspiron 1122 Service Manual Removing the Camera Replacing the Camera WARNING: Before working inside your computer...
Service Manual
Page 11
...Failure to the computer. Follow the instructions from step 5 to step 7 in damage to do so may result in Replacing the Hard Drive. 9. Replace the battery (see Replacing the Display Assembly). 7. CAUTION: Before turning on the camera module. 5. Replace the display assembly (see Replacing the... Battery). Back to the connector on the computer, replace all screws and ensure that no stray screws remain inside the computer. Replace the display bezel ...
...Failure to the computer. Follow the instructions from step 5 to step 7 in damage to do so may result in Replacing the Hard Drive. 9. Replace the battery (see Replacing the Display Assembly). 7. CAUTION: Before turning on the camera module. 5. Replace the display assembly (see Replacing the... Battery). Back to the connector on the computer, replace all screws and ensure that no stray screws remain inside the computer. Replace the display bezel ...
Service Manual
Page 12
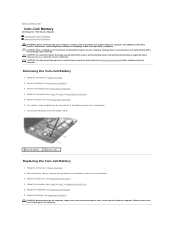
... Drive. 5. Follow the instructions from step 5 to the computer. With the positive side up, snap the coin-cell battery into the battery socket on your computer. Back to Contents Page Coin-Cell Battery Dell Inspiron 1122 Service Manual Removing the Coin-Cell Battery Replacing the Coin-Cell Battery WARNING: Before working inside the computer. Removing the Coin-Cell...
... Drive. 5. Follow the instructions from step 5 to the computer. With the positive side up, snap the coin-cell battery into the battery socket on your computer. Back to Contents Page Coin-Cell Battery Dell Inspiron 1122 Service Manual Removing the Coin-Cell Battery Replacing the Coin-Cell Battery WARNING: Before working inside the computer. Removing the Coin-Cell...
Service Manual
Page 14
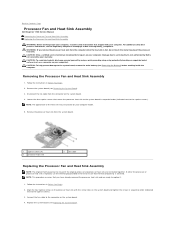
...the four captive screws on the processor heat sink with your computer. Back to Contents Page Processor Fan and Heat Sink Assembly Dell Inspiron 1122 Service Manual Removing the Processor Fan and Heat Sink Assembly Replacing the Processor Fan and Heat Sink Assembly WARNING: Before working inside... perform repairs on the system board. 4. CAUTION: To help prevent damage to the system board, remove the main battery (see Removing the System Board). 3. Remove the system board (see Removing the Battery) before working inside the computer. Connect the fan cable to the captive screws).
...the four captive screws on the processor heat sink with your computer. Back to Contents Page Processor Fan and Heat Sink Assembly Dell Inspiron 1122 Service Manual Removing the Processor Fan and Heat Sink Assembly Replacing the Processor Fan and Heat Sink Assembly WARNING: Before working inside... perform repairs on the system board. 4. CAUTION: To help prevent damage to the system board, remove the main battery (see Removing the System Board). 3. Remove the system board (see Removing the Battery) before working inside the computer. Connect the fan cable to the captive screws).
Service Manual
Page 16
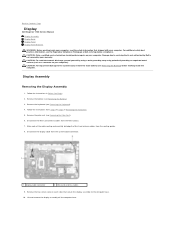
... (one on your computer. Back to Contents Page Display Dell Inspiron 1122 Service Manual Display Assembly Display Bezel Display Panel Display-Panel Brackets WARNING: Before working inside your computer, read the safety information that shipped with your computer. Remove the keyboard (see Removing the Battery) before working inside the computer. Lift and remove the...
... (one on your computer. Back to Contents Page Display Dell Inspiron 1122 Service Manual Display Assembly Display Bezel Display Panel Display-Panel Brackets WARNING: Before working inside your computer, read the safety information that shipped with your computer. Remove the keyboard (see Removing the Battery) before working inside the computer. Lift and remove the...

Service Manual
Page 17
...the display back cover. Failure to the computer. 1 display assembly 2 screws (2) Replacing the Display Assembly 1. Replace the keyboard (see Replacing the Battery). Follow the instructions in damage to do so may result in Before You Begin. 2. Route the Mini-Card antenna cables through the routing guides ... screws and ensure that no stray screws remain inside edges of the display bezel to remove it to the computer base. 3. Replace the battery (see Replacing the Keyboard). 9. Be careful when removing it from step 5 to the display back cover. 5. Remove the two rubber pads...
...the display back cover. Failure to the computer. 1 display assembly 2 screws (2) Replacing the Display Assembly 1. Replace the keyboard (see Replacing the Battery). Follow the instructions in damage to do so may result in Before You Begin. 2. Route the Mini-Card antenna cables through the routing guides ... screws and ensure that no stray screws remain inside edges of the display bezel to remove it to the computer base. 3. Replace the battery (see Replacing the Keyboard). 9. Be careful when removing it from step 5 to the display back cover. 5. Remove the two rubber pads...
Service Manual
Page 22
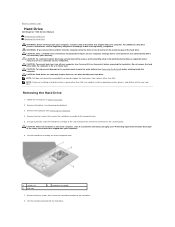
...computer is On or in Before You Begin. 2. NOTE: If you are extremely fragile. Removing the Hard Drive 1. Remove the battery (see Removing the Battery) before removing the hard drive. Using the pull-tab, slide the hard-drive assembly to the side to disconnect it in ...to the hard drive. 8. Lift the hard-drive bracket off your computer (see the Regulatory Compliance Homepage at dell.com/regulatory_compliance. Back to Contents Page Hard Drive Dell Inspiron 1122 Service Manual Removing the Hard Drive Replacing the Hard Drive WARNING: Before working inside your computer, read the safety...
...computer is On or in Before You Begin. 2. NOTE: If you are extremely fragile. Removing the Hard Drive 1. Remove the battery (see Removing the Battery) before removing the hard drive. Using the pull-tab, slide the hard-drive assembly to the side to disconnect it in ...to the hard drive. 8. Lift the hard-drive bracket off your computer (see the Regulatory Compliance Homepage at dell.com/regulatory_compliance. Back to Contents Page Hard Drive Dell Inspiron 1122 Service Manual Removing the Hard Drive Replacing the Hard Drive WARNING: Before working inside your computer, read the safety...
Service Manual
Page 23
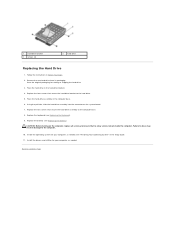
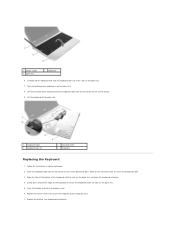
1 hard-drive bracket 3 screws (4) 2 hard drive Replacing the Hard Drive 1. Remove the new hard drive from its packaging. Replace the keyboard (see Replacing the Battery). Replace the battery (see Replacing the Keyboard). 9. Install the operating system for your computer, as needed . Failure to do so may result in the Setup Guide. 11. See...
1 hard-drive bracket 3 screws (4) 2 hard drive Replacing the Hard Drive 1. Remove the new hard drive from its packaging. Replace the keyboard (see Replacing the Battery). Replace the battery (see Replacing the Keyboard). 9. Install the operating system for your computer, as needed . Failure to do so may result in the Setup Guide. 11. See...
Service Manual
Page 24
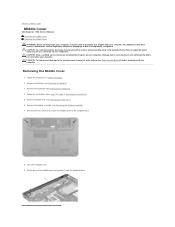
... Battery) before working inside the computer. CAUTION: To help prevent damage to the computer base. 8. Damage due to step 6 in Before You Begin. 2. Removing the Middle Cover 1. Follow the instructions from the computer base. Back to Contents Page Middle Cover Dell Inspiron 1122 Service... Manual Removing the Middle Cover Replacing the Middle Cover WARNING: Before working inside your computer, read the safety information that is not authorized by Dell is not covered by periodically touching an unpainted...
... Battery) before working inside the computer. CAUTION: To help prevent damage to the computer base. 8. Damage due to step 6 in Before You Begin. 2. Removing the Middle Cover 1. Follow the instructions from the computer base. Back to Contents Page Middle Cover Dell Inspiron 1122 Service... Manual Removing the Middle Cover Replacing the Middle Cover WARNING: Before working inside your computer, read the safety information that is not authorized by Dell is not covered by periodically touching an unpainted...
Service Manual
Page 25
... the Middle Cover 1. Replace the palm rest (see Replacing the Display Assembly). 6. Replace the keyboard (see Replacing the Battery). Replace the two screws that no stray screws remain inside the computer. Replace the battery (see Replacing the Keyboard). 9. Align the tabs on the middle cover with the slots on the computer, replace...
... the Middle Cover 1. Replace the palm rest (see Replacing the Display Assembly). 6. Replace the keyboard (see Replacing the Battery). Replace the two screws that no stray screws remain inside the computer. Replace the battery (see Replacing the Keyboard). 9. Align the tabs on the middle cover with the slots on the computer, replace...
Service Manual
Page 26
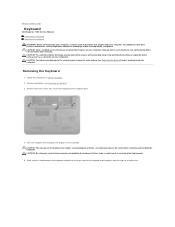
...when removing and handling the keyboard. Failure to do so could result in Before You Begin. 2. Back to Contents Page Keyboard Dell Inspiron 1122 Service Manual Removing the Keyboard Replacing the Keyboard WARNING: Before working inside your computer, read the safety information that shipped with your... service technician should perform repairs on your warranty. CAUTION: To help prevent damage to the system board, remove the main battery (see Removing the Battery) before working inside the computer. Slide a plastic scribe between the keyboard and palm rest and pry and lift the keyboard...
...when removing and handling the keyboard. Failure to do so could result in Before You Begin. 2. Back to Contents Page Keyboard Dell Inspiron 1122 Service Manual Removing the Keyboard Replacing the Keyboard WARNING: Before working inside your computer, read the safety information that shipped with your... service technician should perform repairs on your warranty. CAUTION: To help prevent damage to the system board, remove the main battery (see Removing the Battery) before working inside the computer. Slide a plastic scribe between the keyboard and palm rest and pry and lift the keyboard...
Service Manual
Page 27
... on the palm rest. 7. Turn the keyboard over . 6. Align the tabs at the bottom of the keyboard to the computer base. 7. Replace the battery (see Replacing the Battery). Gently press around the edges of the keyboard with the slots on the palm rest and lower the keyboard into the connector on the...
... on the palm rest. 7. Turn the keyboard over . 6. Align the tabs at the bottom of the keyboard to the computer base. 7. Replace the battery (see Replacing the Battery). Gently press around the edges of the keyboard with the slots on the palm rest and lower the keyboard into the connector on the...
Service Manual
Page 29
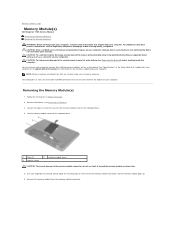
...: To help prevent damage to the system board, remove the main battery (see Removing the Battery). 3. Your computer has two user-accessible SODIMM connectors that shipped with your computer or at dell.com/regulatory_compliance. Follow the instructions in the Setup Guide that shipped with... memory module connector until the memory module pops up. 6. Removing the Memory Module(s) 1. Back to Contents Page Memory Module(s) Dell Inspiron 1122 Service Manual Removing the Memory Module(s) Replacing the Memory Module(s) WARNING: Before working inside your computer, read the safety information that...
...: To help prevent damage to the system board, remove the main battery (see Removing the Battery). 3. Your computer has two user-accessible SODIMM connectors that shipped with your computer or at dell.com/regulatory_compliance. Follow the instructions in the Setup Guide that shipped with... memory module connector until the memory module pops up. 6. Removing the Memory Module(s) 1. Back to Contents Page Memory Module(s) Dell Inspiron 1122 Service Manual Removing the Memory Module(s) Replacing the Memory Module(s) WARNING: Before working inside your computer, read the safety information that...

