
Users Guide
Page 11
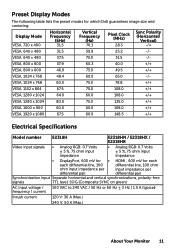
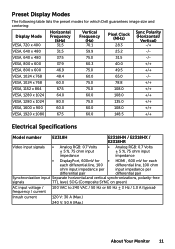
... +/+ VESA, 1600 x 900 60.0 60.0 108.0 +/+ VESA, 1920 x 1080 67.5 60.0 148.5 +/+ Electrical Specifications Model number E2318H E2318HN / E2318HX / E2318HR Video input signals • Analog RGB: 0.7 Volts ± 5 %, 75 ohm input impedance • Analog RGB: 0.7 Volts ± 5 %, 75 ohm input ...impedance • DisplayPort, 600 mV for • HDMI , 600 mV for which Dell guarantees image size and centering: Display Mode VESA,...
... +/+ VESA, 1600 x 900 60.0 60.0 108.0 +/+ VESA, 1920 x 1080 67.5 60.0 148.5 +/+ Electrical Specifications Model number E2318H E2318HN / E2318HX / E2318HR Video input signals • Analog RGB: 0.7 Volts ± 5 %, 75 ohm input impedance • Analog RGB: 0.7 Volts ± 5 %, 75 ohm input ...impedance • DisplayPort, 600 mV for • HDMI , 600 mV for which Dell guarantees image size and centering: Display Mode VESA,...
Users Guide
Page 12
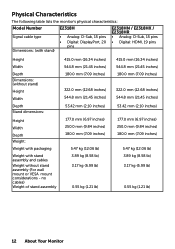
Physical Characteristics The following table lists the monitor's physical characteristics: Model Number Signal cable type Dimensions: (with stand) E2318H • Analog: D-Sub, 15 pins • Digital: DisplayPort, 20 pins E2318HN / E2318HX / E2318HR • Analog: D-Sub, 15 pins • Digital: HDMI, 19 pins Height Width Depth Dimensions: (without stand) Height Width Depth Stand dimensions: Height...
Physical Characteristics The following table lists the monitor's physical characteristics: Model Number Signal cable type Dimensions: (with stand) E2318H • Analog: D-Sub, 15 pins • Digital: DisplayPort, 20 pins E2318HN / E2318HX / E2318HR • Analog: D-Sub, 15 pins • Digital: HDMI, 19 pins Height Width Depth Dimensions: (without stand) Height Width Depth Stand dimensions: Height...
Users Guide
Page 17
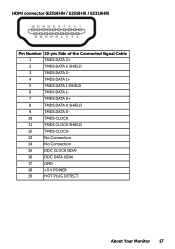
HDMI connector (E2318HN / E2318HX / E2318HR) Pin Number 19-pin Side of the Connected Signal Cable 1 TMDS DATA 2+ 2 TMDS DATA 2 SHIELD 3 TMDS DATA 2- 4 TMDS DATA 1+ 5 TMDS DATA 1 SHIELD 6 TMDS DATA 1- 7 TMDS DATA 0+ 8 TMDS DATA 0 SHIELD 9 TMDS DATA 0- 10 TMDS CLOCK 11 TMDS CLOCK SHIELD 12 TMDS CLOCK- 13 No Connection 14 No Connection 15 DDC CLOCK (SDA) 16 DDC DATA (SDA) 17 GND 18 +5 V POWER 19 HOT PLUG DETECT About Your Monitor 17
HDMI connector (E2318HN / E2318HX / E2318HR) Pin Number 19-pin Side of the Connected Signal Cable 1 TMDS DATA 2+ 2 TMDS DATA 2 SHIELD 3 TMDS DATA 2- 4 TMDS DATA 1+ 5 TMDS DATA 1 SHIELD 6 TMDS DATA 1- 7 TMDS DATA 0+ 8 TMDS DATA 0 SHIELD 9 TMDS DATA 0- 10 TMDS CLOCK 11 TMDS CLOCK SHIELD 12 TMDS CLOCK- 13 No Connection 14 No Connection 15 DDC CLOCK (SDA) 16 DDC DATA (SDA) 17 GND 18 +5 V POWER 19 HOT PLUG DETECT About Your Monitor 17
Users Guide
Page 28
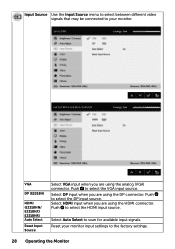
... between different video signals that may be connected to your monitor input settings to the factory settings. 28 Operating the Monitor Select HDMI input when you are using the analog (VGA) connector. Push to select the VGA input source. VGA DP (E2318H) HDMI (E2318HN/ E2318HX/ E2318HR) Auto ...Select Reset Input Source Select VGA input when you are using the HDMI connector. Push to select the HDMI input source. Select DP input when you are using the DP connector.
... between different video signals that may be connected to your monitor input settings to the factory settings. 28 Operating the Monitor Select HDMI input when you are using the analog (VGA) connector. Push to select the VGA input source. VGA DP (E2318H) HDMI (E2318HN/ E2318HX/ E2318HR) Auto ...Select Reset Input Source Select VGA input when you are using the HDMI connector. Push to select the HDMI input source. Select DP input when you are using the DP connector.
Users Guide
Page 46
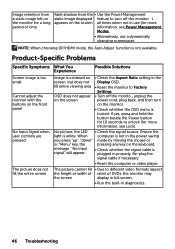
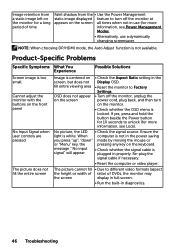
...Specific Symptoms What You Experience Possible Solutions Screen image is too small Cannot adjust the monitor with the buttons on the front panel No Input Signal when user controls are pressed The picture does not fill the entire screen Image is centered on screen, but does not fill entire viewing ... , unplug the power cord, plug back, and then turn on the monitor. • Check whether the OSD menu is white. NOTE: When choosing DP/HDMI mode, the Auto Adjust function is not available. If yes, press and hold the button beside the Power button for more information, see Lock). The...
...Specific Symptoms What You Experience Possible Solutions Screen image is too small Cannot adjust the monitor with the buttons on the front panel No Input Signal when user controls are pressed The picture does not fill the entire screen Image is centered on screen, but does not fill entire viewing ... , unplug the power cord, plug back, and then turn on the monitor. • Check whether the OSD menu is white. NOTE: When choosing DP/HDMI mode, the Auto Adjust function is not available. If yes, press and hold the button beside the Power button for more information, see Lock). The...
Users Guide 1
Page 11
... +/+ VESA, 1600 x 900 60.0 60.0 108.0 +/+ VESA, 1920 x 1080 67.5 60.0 148.5 +/+ Electrical Specifications Model number E2318H E2318HN / E2318HX / E2318HR Video input signals • Analog RGB: 0.7 Volts ± 5 %, 75 ohm input impedance • Analog RGB: 0.7 Volts ± 5 %, 75 ohm input ...impedance • DisplayPort, 600mV for • HDMI , 600 mV for which Dell guarantees image size and centering: Display Mode VESA,...
... +/+ VESA, 1600 x 900 60.0 60.0 108.0 +/+ VESA, 1920 x 1080 67.5 60.0 148.5 +/+ Electrical Specifications Model number E2318H E2318HN / E2318HX / E2318HR Video input signals • Analog RGB: 0.7 Volts ± 5 %, 75 ohm input impedance • Analog RGB: 0.7 Volts ± 5 %, 75 ohm input ...impedance • DisplayPort, 600mV for • HDMI , 600 mV for which Dell guarantees image size and centering: Display Mode VESA,...

Users Guide 1
Page 12
Physical Characteristics The following table lists the monitor's physical characteristics: Model Number Signal cable type Dimensions: (with stand) E2318H • Analog: D-Sub, 15 pins • Digital: DisplayPort, 20 pins E2318HN / E2318HX / E2318HR • Analog: D-Sub, 15 pins • Digital: HDMI, 19 pins Height Width Depth Dimensions: (without stand) Height Width Depth Stand dimensions: Height...
Physical Characteristics The following table lists the monitor's physical characteristics: Model Number Signal cable type Dimensions: (with stand) E2318H • Analog: D-Sub, 15 pins • Digital: DisplayPort, 20 pins E2318HN / E2318HX / E2318HR • Analog: D-Sub, 15 pins • Digital: HDMI, 19 pins Height Width Depth Dimensions: (without stand) Height Width Depth Stand dimensions: Height...

Users Guide 1
Page 17
HDMI connector (E2318HN / E2318HX / E2318HR) Pin Number 19-pin Side of the Connected Signal Cable 1 TMDS DATA 2+ 2 TMDS DATA 2 SHIELD 3 TMDS DATA 2- 4 TMDS DATA 1+ 5 TMDS DATA 1 SHIELD 6 TMDS DATA 1- 7 TMDS DATA 0+ 8 TMDS DATA 0 SHIELD 9 TMDS DATA 0- 10 TMDS CLOCK 11 TMDS CLOCK SHIELD 12 TMDS CLOCK- 13 No Connection 14 No Connection 15 DDC CLOCK (SDA) 16 DDC DATA (SDA) 17 GND 18 +5 V POWER 19 HOT PLUG DETECT About Your Monitor 17
HDMI connector (E2318HN / E2318HX / E2318HR) Pin Number 19-pin Side of the Connected Signal Cable 1 TMDS DATA 2+ 2 TMDS DATA 2 SHIELD 3 TMDS DATA 2- 4 TMDS DATA 1+ 5 TMDS DATA 1 SHIELD 6 TMDS DATA 1- 7 TMDS DATA 0+ 8 TMDS DATA 0 SHIELD 9 TMDS DATA 0- 10 TMDS CLOCK 11 TMDS CLOCK SHIELD 12 TMDS CLOCK- 13 No Connection 14 No Connection 15 DDC CLOCK (SDA) 16 DDC DATA (SDA) 17 GND 18 +5 V POWER 19 HOT PLUG DETECT About Your Monitor 17
Users Guide 1
Page 28
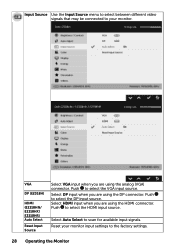
...the VGA input source. Select DP input when you are using the HDMI connector. Select HDMI input when you are using the DP connector. Input Source Use the Input Source menu to select between different video signals that may be connected to select the DP input source. Push ...to your monitor input settings to scan for available input signals. Select Auto Select to the factory settings. 28 Operating the Monitor VGA DP (E2318H) HDMI (E2318HN/ E2318HX/ E2318HR) Auto Select Reset Input Source Select VGA input when you are using the analog (...
...the VGA input source. Select DP input when you are using the HDMI connector. Select HDMI input when you are using the DP connector. Input Source Use the Input Source menu to select between different video signals that may be connected to select the DP input source. Push ...to your monitor input settings to scan for available input signals. Select Auto Select to the factory settings. 28 Operating the Monitor VGA DP (E2318H) HDMI (E2318HN/ E2318HX/ E2318HR) Auto Select Reset Input Source Select VGA input when you are using the analog (...
Users Guide 1
Page 46
... appear. • Check whether the signal cable is plugged in diagnostics. 46 Troubleshooting NOTE: When choosing DP/HDMI mode, the Auto Adjust function is white. Product-Specific Problems Specific Symptoms What You Experience Possible Solutions Screen image is too small... Cannot adjust the monitor with the buttons on the front panel No Input Signal when user controls are pressed The ...
... appear. • Check whether the signal cable is plugged in diagnostics. 46 Troubleshooting NOTE: When choosing DP/HDMI mode, the Auto Adjust function is white. Product-Specific Problems Specific Symptoms What You Experience Possible Solutions Screen image is too small... Cannot adjust the monitor with the buttons on the front panel No Input Signal when user controls are pressed The ...


