Users Guide
Page 9
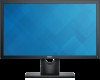
... (Maximum)** Active-off mode Inactive Switch off - Inactive Blank Glowing white - This is referred to the monitor using a VGA cable. If the computer detects input from keyboard, mouse, or other input devices, the monitor automatically resumes functioning. The following sections give... 0.3 W Less than 0.3 W * Energy Star On Mode Power Consumption 13.3 W*** About Your Monitor 9 To attach the optional Dell Soundbar. To connect your computer to the monitor using a DP cable. Bottom View Label Description 1 AC power connector 2 Displayport connector 3 VGA connector...
... (Maximum)** Active-off mode Inactive Switch off - Inactive Blank Glowing white - This is referred to the monitor using a VGA cable. If the computer detects input from keyboard, mouse, or other input devices, the monitor automatically resumes functioning. The following sections give... 0.3 W Less than 0.3 W * Energy Star On Mode Power Consumption 13.3 W*** About Your Monitor 9 To attach the optional Dell Soundbar. To connect your computer to the monitor using a DP cable. Bottom View Label Description 1 AC power connector 2 Displayport connector 3 VGA connector...
Users Guide
Page 18
... The following table lists the monitor's physical characteristics: Model Number Connector type E1916H/ E2016H E1916He 15-pin D-subminiature (Black connector) E2216H DP, Black connector Signal cable type Analog: D-Sub, 15 pins (cable not included) Digital: DisplayPort, 20 pins Dimensions: (with stand) Height Width Depth Dimensions: (without stand) Height Width Depth Stand...(7.09 inches) Weight with packaging 3.60 kg (7.94 lb) 4.11 kg (9.06 lb) 4.85 kg (10.69 lb) Weight with stand assembly and cables Weight without stand assembly (For wall mount or VESA mount considerations -
... The following table lists the monitor's physical characteristics: Model Number Connector type E1916H/ E2016H E1916He 15-pin D-subminiature (Black connector) E2216H DP, Black connector Signal cable type Analog: D-Sub, 15 pins (cable not included) Digital: DisplayPort, 20 pins Dimensions: (with stand) Height Width Depth Dimensions: (without stand) Height Width Depth Stand...(7.09 inches) Weight with packaging 3.60 kg (7.94 lb) 4.11 kg (9.06 lb) 4.85 kg (10.69 lb) Weight with stand assembly and cables Weight without stand assembly (For wall mount or VESA mount considerations -
Users Guide
Page 19
... lb) About Your Monitor 19 Model Number Connector type E2316H / E2416H E2316Hr 15-pin D-subminiature (Back connector) DP, Back connector Signal cable type Analog: D-Sub, 15 pins (cable included for E2316Hr only) Digital: DisplayPort, 20 pins (cable not included for E2316Hr) Dimensions: (with stand) Height 415.0 mm (16.34 inches) Width Depth Dimensions: (... mm (1.99 inches) 177.0 mm (6.97 inches) 250.0 mm (9.84 inches) 180.0 mm (7.09 inches) 5.09 kg (11.22 lb) Weight with stand assembly and cables Weight without stand assembly (For wall mount or VESA mount considerations -
... lb) About Your Monitor 19 Model Number Connector type E2316H / E2416H E2316Hr 15-pin D-subminiature (Back connector) DP, Back connector Signal cable type Analog: D-Sub, 15 pins (cable included for E2316Hr only) Digital: DisplayPort, 20 pins (cable not included for E2316Hr) Dimensions: (with stand) Height 415.0 mm (16.34 inches) Width Depth Dimensions: (... mm (1.99 inches) 177.0 mm (6.97 inches) 250.0 mm (9.84 inches) 180.0 mm (7.09 inches) 5.09 kg (11.22 lb) Weight with stand assembly and cables Weight without stand assembly (For wall mount or VESA mount considerations -

Users Guide
Page 23
... of illustration only. To connect your monitor to different computers with appropriate video systems. Connecting VGA Cable Connecting DP cable NOTE: The graphics are used for the purpose of your computer and disconnect the power cable. 2. Use the all cables at the same time. Connecting Your Monitor WARNING: Before you begin any of the procedures...
... of illustration only. To connect your monitor to different computers with appropriate video systems. Connecting VGA Cable Connecting DP cable NOTE: The graphics are used for the purpose of your computer and disconnect the power cable. 2. Use the all cables at the same time. Connecting Your Monitor WARNING: Before you begin any of the procedures...

Users Guide
Page 53
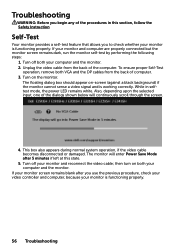
The monitor will enter Power Save Mode after 5 minutes if left at this state. If VGA or DP cable is not connected, a floating dialog box as shown below appears. See Solving Problems for more information. Operating the Monitor 53
The monitor will enter Power Save Mode after 5 minutes if left at this state. If VGA or DP cable is not connected, a floating dialog box as shown below appears. See Solving Problems for more information. Operating the Monitor 53
Users Guide
Page 56
...monitor is functioning properly. Turn off both your computer and the monitor. 2. Turn off your monitor and reconnect the video cable; then turn on both VGA and the DP cables from the back of the computer. Turn on -screen (against a black background) if the monitor cannot sense a ...video signal and is functioning properly. 56 Troubleshooting This box also appears during normal system operation, if the video cable becomes disconnected or damaged....
...monitor is functioning properly. Turn off both your computer and the monitor. 2. Turn off your monitor and reconnect the video cable; then turn on both VGA and the DP cables from the back of the computer. Turn on -screen (against a black background) if the monitor cannot sense a ...video signal and is functioning properly. 56 Troubleshooting This box also appears during normal system operation, if the video cable becomes disconnected or damaged....
Users Guide
Page 59
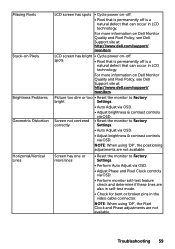
...defect that can occur in LCD technology. spots • Pixel that is a natural defect that can occur in the video cable connector. NOTE: When using 'DP', the Pixel Clock and Phase adjustments are not available. LCD screen has bright • Cycle power on-off is permanently ... bright Settings. • Auto Adjust via OSD. For more information on Dell Monitor Quality and Pixel Policy, see Dell Support site at : http://www.dell.com/support/ monitors. Troubleshooting 59 NOTE: When using 'DP', the positioning adjustments are also in self-test mode. • Check ...
...defect that can occur in LCD technology. spots • Pixel that is a natural defect that can occur in the video cable connector. NOTE: When using 'DP', the Pixel Clock and Phase adjustments are not available. LCD screen has bright • Cycle power on-off is permanently ... bright Settings. • Auto Adjust via OSD. For more information on Dell Monitor Quality and Pixel Policy, see Dell Support site at : http://www.dell.com/support/ monitors. Troubleshooting 59 NOTE: When using 'DP', the positioning adjustments are also in self-test mode. • Check ...

Users Guide
Page 61
... cord, plug back, and then turn on the monitor. • Check whether the OSD menu is locked. NOTE: When choosing DP mode, the Auto Adjust function is white. Re-plug the signal cable if necessary. • Reset the computer or video player. message " No input signal" will appear. • Check whether the... signal cable is centered on screen, but does not fill entire viewing area OSD does not appear on the screen • Check the Aspect Ratio setting in ...
... cord, plug back, and then turn on the monitor. • Check whether the OSD menu is locked. NOTE: When choosing DP mode, the Auto Adjust function is white. Re-plug the signal cable if necessary. • Reset the computer or video player. message " No input signal" will appear. • Check whether the... signal cable is centered on screen, but does not fill entire viewing area OSD does not appear on the screen • Check the Aspect Ratio setting in ...
Users Guide
Page 67
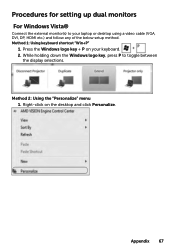
Appendix 67 Method 2: Using the "Personalize" menu 1. Press the Windows logo key + P on the desktop and click Personalize. Right-click on your laptop or desktop using a video cable (VGA, DVI, DP, HDMI etc.) and follow any of the below setup method. Method 1: Using keyboard shortcut "Win+P" 1. While holding down the Windows logo key, press P to your keyboard. 2. Procedures for setting up dual monitors For Windows Vista® Connect the external monitor(s) to toggle between the display selections.
Appendix 67 Method 2: Using the "Personalize" menu 1. Press the Windows logo key + P on the desktop and click Personalize. Right-click on your laptop or desktop using a video cable (VGA, DVI, DP, HDMI etc.) and follow any of the below setup method. Method 1: Using keyboard shortcut "Win+P" 1. While holding down the Windows logo key, press P to your keyboard. 2. Procedures for setting up dual monitors For Windows Vista® Connect the external monitor(s) to toggle between the display selections.
Users Guide
Page 69
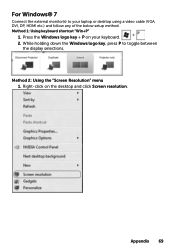
Method 1: Using keyboard shortcut "Win+P" 1. Press the Windows logo key + P on the desktop and click Screen resolution. While holding down the Windows logo key, press P to your keyboard. 2. For Windows® 7 Connect the external monitor(s) to toggle between the display selections. Method 2: Using the "Screen Resolution" menu 1. Appendix 69 Right-click on your laptop or desktop using a video cable (VGA, DVI, DP, HDMI etc.) and follow any of the below setup method.
Method 1: Using keyboard shortcut "Win+P" 1. Press the Windows logo key + P on the desktop and click Screen resolution. While holding down the Windows logo key, press P to your keyboard. 2. For Windows® 7 Connect the external monitor(s) to toggle between the display selections. Method 2: Using the "Screen Resolution" menu 1. Appendix 69 Right-click on your laptop or desktop using a video cable (VGA, DVI, DP, HDMI etc.) and follow any of the below setup method.
Users Guide
Page 71
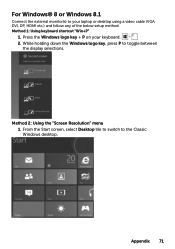
Press the Windows logo key + P on your laptop or desktop using a video cable (VGA, DVI, DP, HDMI etc.) and follow any of the below setup method. While holding down the Windows logo key, press P to the Classic Windows desktop. Method 2: Using the "Screen Resolution" menu 1. From the Start screen, select Desktop tile to switch to toggle between the display selections. For Windows® 8 or Windows 8.1 Connect the external monitor(s) to your keyboard. 2. Method 1: Using keyboard shortcut "Win+P" 1. Appendix 71
Press the Windows logo key + P on your laptop or desktop using a video cable (VGA, DVI, DP, HDMI etc.) and follow any of the below setup method. While holding down the Windows logo key, press P to the Classic Windows desktop. Method 2: Using the "Screen Resolution" menu 1. From the Start screen, select Desktop tile to switch to toggle between the display selections. For Windows® 8 or Windows 8.1 Connect the external monitor(s) to your keyboard. 2. Method 1: Using keyboard shortcut "Win+P" 1. Appendix 71


