
Owner's Manual
Page 1
Dell™ Axim™ X50 Owner's Manual Models HC03U, HC03UL, and HD04U www.dell.com | support.dell.com
Dell™ Axim™ X50 Owner's Manual Models HC03U, HC03UL, and HD04U www.dell.com | support.dell.com
Owner's Manual
Page 12
...or other container where metal objects (such as risk of the power plug is not located where it . SAFETY: Battery • Use only Dell™ battery modules that the ground prong of electric shock and/or fire. Handle a damaged or leaking battery pack with this device. If ...cells could explode or vent, posing a risk of fire. • Do not dispose of the power strip. www.dell.com | support.dell.com SAFETY: Power • Use only the Dell-provided AC adapter approved for use with extreme care. Dispose of the power plug could short-circuit the battery terminals. ...
...or other container where metal objects (such as risk of the power plug is not located where it . SAFETY: Battery • Use only Dell™ battery modules that the ground prong of electric shock and/or fire. Handle a damaged or leaking battery pack with this device. If ...cells could explode or vent, posing a risk of fire. • Do not dispose of the power strip. www.dell.com | support.dell.com SAFETY: Power • Use only the Dell-provided AC adapter approved for use with extreme care. Dispose of the power plug could short-circuit the battery terminals. ...
Owner's Manual
Page 14
... components, such as a memory module by touching an unpainted metal surface. You can damage the display. If possible, use may result in injury. www.dell.com | support.dell.com • When you connect a cable make sure both connectors are ready to install the component. then stroke the cloth across the display in one...
... components, such as a memory module by touching an unpainted metal surface. You can damage the display. If possible, use may result in injury. www.dell.com | support.dell.com • When you connect a cable make sure both connectors are ready to install the component. then stroke the cloth across the display in one...
Owner's Manual
Page 18
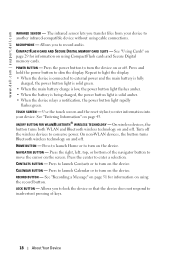
... to record audio. Allows you to turn on the device. POWER BUTTON - TOUCH SCREEN - ON/OFF BUTTON FOR WLAN/BLUETOOTH® WIRELESS TECHNOLOGY - www.dell.com | support.dell.com INFRARED SENSOR - On wireless devices, the button turns both WLAN and Bluetooth wireless technology on and off . Allows you to lock the device so...
... to record audio. Allows you to turn on the device. POWER BUTTON - TOUCH SCREEN - ON/OFF BUTTON FOR WLAN/BLUETOOTH® WIRELESS TECHNOLOGY - www.dell.com | support.dell.com INFRARED SENSOR - On wireless devices, the button turns both WLAN and Bluetooth wireless technology on and off . Allows you to lock the device so...
Owner's Manual
Page 20
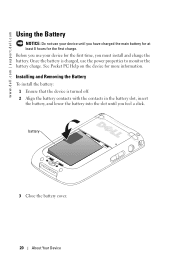
www.dell.com | support.dell.com Using the Battery NOTICE: Do not use your device for more information. Before you use the power properties to monitor the battery charge. See ...
www.dell.com | support.dell.com Using the Battery NOTICE: Do not use your device for more information. Before you use the power properties to monitor the battery charge. See ...
Owner's Manual
Page 22
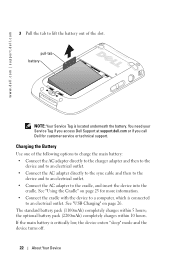
The standard battery pack (1100mAh) completely charges within 10 hours. See "Using the Cradle" on page 26. www.dell.com | support.dell.com 3 Pull the tab to lift the battery out of the following options to charge the main battery: • Connect the AC adapter directly... turns off. 22 About Your Device Charging the Battery Use one of the slot. You need your Service Tag if you access Dell Support at support.dell.com or if you call Dell for more information. • Connect the cradle with the device to an electrical outlet. the optional battery pack (2200mAh) completely ...
The standard battery pack (1100mAh) completely charges within 10 hours. See "Using the Cradle" on page 26. www.dell.com | support.dell.com 3 Pull the tab to lift the battery out of the following options to charge the main battery: • Connect the AC adapter directly... turns off. 22 About Your Device Charging the Battery Use one of the slot. You need your Service Tag if you access Dell Support at support.dell.com or if you call Dell for more information. • Connect the cradle with the device to an electrical outlet. the optional battery pack (2200mAh) completely ...
Owner's Manual
Page 24
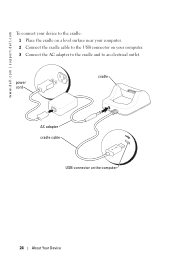
power cord cradle AC adapter cradle cable USB connector on your computer. 3 Connect the AC adapter to the cradle and to an electrical outlet. www.dell.com | support.dell.com To connect your device to the cradle: 1 Place the cradle on a level surface near your computer. 2 Connect the cradle cable to the USB connector on the computer 24 About Your Device
power cord cradle AC adapter cradle cable USB connector on your computer. 3 Connect the AC adapter to the cradle and to an electrical outlet. www.dell.com | support.dell.com To connect your device to the cradle: 1 Place the cradle on a level surface near your computer. 2 Connect the cradle cable to the USB connector on the computer 24 About Your Device
Owner's Manual
Page 26
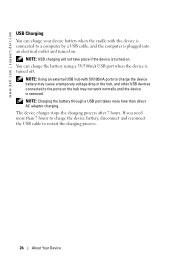
..., disconnect and reconnect the USB cable to the ports on . NOTE: Charging the battery through a USB port takes more than direct AC adapter charging. www.dell.com | support.dell.com USB Charging You can charge the battery using a 5V/500mA USB port when the device is removed.
..., disconnect and reconnect the USB cable to the ports on . NOTE: Charging the battery through a USB port takes more than direct AC adapter charging. www.dell.com | support.dell.com USB Charging You can charge the battery using a 5V/500mA USB port when the device is removed.
Owner's Manual
Page 28
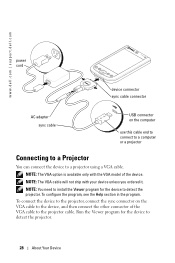
... program for the device to detect the projector. 28 About Your Device To configure the program, see the Help section in the program. www.dell.com | support.dell.com power cord device connector sync cable connector AC adapter sync cable USB connector on the VGA cable to the device, and then connect the...
... program for the device to detect the projector. 28 About Your Device To configure the program, see the Help section in the program. www.dell.com | support.dell.com power cord device connector sync cable connector AC adapter sync cable USB connector on the VGA cable to the device, and then connect the...
Owner's Manual
Page 29
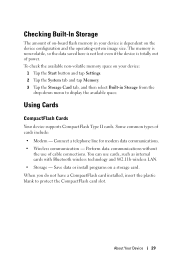
Using Cards CompactFlash Cards Your device supports CompactFlash Type II cards. You can use of cards include: • Modem - Save data or install programs on the device configuration and the operating-system ...
Using Cards CompactFlash Cards Your device supports CompactFlash Type II cards. You can use of cards include: • Modem - Save data or install programs on the device configuration and the operating-system ...

Owner's Manual
Page 30
www.dell.com | support.dell.com To install a CompactFlash card: 1 If a blank is installed, remove it . NOTICE: Do not force the card. If you feel resistance, remove the card, check the orientation, and reinsert it . See the documentation that came with the card for information on the back of the CompactFlash card with the notch in CompactFlash card slot 2 Align the tab on using the card. 30 About Your Device blank tab notch in the CompactFlash card slot, and slide the card into the slot.
www.dell.com | support.dell.com To install a CompactFlash card: 1 If a blank is installed, remove it . NOTICE: Do not force the card. If you feel resistance, remove the card, check the orientation, and reinsert it . See the documentation that came with the card for information on the back of the CompactFlash card with the notch in CompactFlash card slot 2 Align the tab on using the card. 30 About Your Device blank tab notch in the CompactFlash card slot, and slide the card into the slot.
Owner's Manual
Page 32
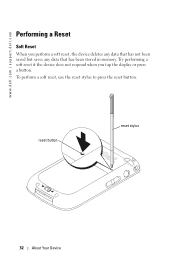
reset button reset stylus 32 About Your Device www.dell.com | support.dell.com Performing a Reset Soft Reset When you tap the display or press a button. Try performing a soft reset if the device does not respond when you perform a soft reset, the device deletes any data that has not been saved but saves any data that has been stored in memory. To perform a soft reset, use the reset stylus to press the reset button.
reset button reset stylus 32 About Your Device www.dell.com | support.dell.com Performing a Reset Soft Reset When you tap the display or press a button. Try performing a soft reset if the device does not respond when you perform a soft reset, the device deletes any data that has not been saved but saves any data that has been stored in memory. To perform a soft reset, use the reset stylus to press the reset button.

Owner's Manual
Page 36
Tap the notification icon to display all notifications. 36 Using Microsoft Windows Mobile 2003 Second Edition www.dell.com | support.dell.com Start button connection icon volume control icon New items menu connection status icon for Bluetooth® wireless technology Status Icons NOTE: If there is not enough room to view all notification icons, the notification icon, , displays.
Tap the notification icon to display all notifications. 36 Using Microsoft Windows Mobile 2003 Second Edition www.dell.com | support.dell.com Start button connection icon volume control icon New items menu connection status icon for Bluetooth® wireless technology Status Icons NOTE: If there is not enough room to view all notification icons, the notification icon, , displays.
Owner's Manual
Page 38
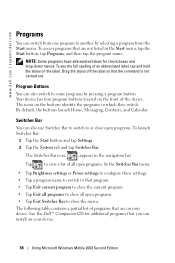
.... 2 Tap the System tab and tap Switcher Bar. Drag the stylus off the label so that are not listed in the navigation bar. www.dell.com | support.dell.com Programs You can switch from the Start menu. To access programs that you can install on your device. 38 Using Microsoft Windows Mobile 2003.... Tap to view a list of programs that the command is not carried out. By default, the buttons launch Home, Messaging, Contacts, and Calendar. See the Dell™ Companion CD for check boxes and drop-down menus.
.... 2 Tap the System tab and tap Switcher Bar. Drag the stylus off the label so that are not listed in the navigation bar. www.dell.com | support.dell.com Programs You can switch from the Start menu. To access programs that you can install on your device. 38 Using Microsoft Windows Mobile 2003.... Tap to view a list of programs that the command is not carried out. By default, the buttons launch Home, Messaging, Contacts, and Calendar. See the Dell™ Companion CD for check boxes and drop-down menus.

Owner's Manual
Page 40
.... Drag the stylus off the icon so that the command is located at the bottom of the screen to other programs and close screens. www.dell.com | support.dell.com Navigation Bar and Command Bar The navigation bar is not carried out.
.... Drag the stylus off the icon so that the command is located at the bottom of the screen to other programs and close screens. www.dell.com | support.dell.com Navigation Bar and Command Bar The navigation bar is not carried out.
Owner's Manual
Page 42
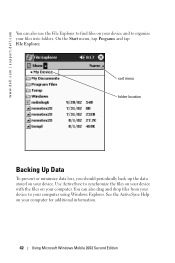
... 2003 Second Edition You can also use the File Explorer to find files on your computer. See the ActiveSync Help on your device. www.dell.com | support.dell.com You can also drag and drop files from your device to organize your files into folders. Use ActiveSync to synchronize the files on your...
... 2003 Second Edition You can also use the File Explorer to find files on your computer. See the ActiveSync Help on your device. www.dell.com | support.dell.com You can also drag and drop files from your device to organize your files into folders. Use ActiveSync to synchronize the files on your...

Owner's Manual
Page 44
.... 2 Tap the keys on the soft keyboard with your device anticipates the word you are typing or writing and displays it learns to anticipate. www.dell.com | support.dell.com When you use your device, the more you use the input panel, your stylus. 44 Entering Information suggested words To change word suggestion...
.... 2 Tap the keys on the soft keyboard with your device anticipates the word you are typing or writing and displays it learns to anticipate. www.dell.com | support.dell.com When you use your device, the more you use the input panel, your stylus. 44 Entering Information suggested words To change word suggestion...

Owner's Manual
Page 45
.... Entering Information 45 NOTE: Letter Recognizer is included with the English, French, German, Italian, and Spanish operating systems. Other versions do not support Block Recognizer. 1 Tap the arrow next to the input panel icon and tap Block Recognizer. 2 Using your stylus, write a letter between ...on the screen. NOTE: Block Recognizer is included with the English, French, German, Italian, and Spanish operating systems. Other versions do not support Letter Recognizer. 1 Tap the arrow next to the input panel icon and tap Letter Recognizer. 2 With your stylus, write the appropriate ...
.... Entering Information 45 NOTE: Letter Recognizer is included with the English, French, German, Italian, and Spanish operating systems. Other versions do not support Block Recognizer. 1 Tap the arrow next to the input panel icon and tap Block Recognizer. 2 Using your stylus, write a letter between ...on the screen. NOTE: Block Recognizer is included with the English, French, German, Italian, and Spanish operating systems. Other versions do not support Letter Recognizer. 1 Tap the arrow next to the input panel icon and tap Letter Recognizer. 2 With your stylus, write the appropriate ...

Owner's Manual
Page 46
... editing command in the lower right hand corner of the screen to select editing commands. www.dell.com | support.dell.com NOTE: Transcriber is included with the English, French, and German operating systems. Other versions do not support Transcriber. 1 Tap the arrow next to the input panel icon and tap Transcriber. 2 With your written...
... editing command in the lower right hand corner of the screen to select editing commands. www.dell.com | support.dell.com NOTE: Transcriber is included with the English, French, and German operating systems. Other versions do not support Transcriber. 1 Tap the arrow next to the input panel icon and tap Transcriber. 2 With your written...

Owner's Manual
Page 48
www.dell.com | support.dell.com To convert written text to the original written text. 48 Entering Information If a word is not recognized, it is incorrect, you want to convert ...
www.dell.com | support.dell.com To convert written text to the original written text. 48 Entering Information If a word is not recognized, it is incorrect, you want to convert ...
