

Owner's Manual
Page 5
2 Using Microsoft® Windows Mobile™ 2003 Second Edition Device Buttons and the Stylus 47 Today Screen 47 Status Icons 48 Programs 50 Program Buttons 50 Switcher Bar 50 Navigation Bar and Command Bar 52 Pop-Up Menus 53 Finding and Organizing Information 54 Backing Up Data 54 3 Entering Information Entering Text Using the Input Panel 55 Typing With the Soft Keyboard 56 Letter Recognizer 57 Block Recognizer 57 Transcriber 58 Editing Typed Text 58 Writing on the Screen 58 Editing Written Text 59 Contents 5
2 Using Microsoft® Windows Mobile™ 2003 Second Edition Device Buttons and the Stylus 47 Today Screen 47 Status Icons 48 Programs 50 Program Buttons 50 Switcher Bar 50 Navigation Bar and Command Bar 52 Pop-Up Menus 53 Finding and Organizing Information 54 Backing Up Data 54 3 Entering Information Entering Text Using the Input Panel 55 Typing With the Soft Keyboard 56 Letter Recognizer 57 Block Recognizer 57 Transcriber 58 Editing Typed Text 58 Writing on the Screen 58 Editing Written Text 59 Contents 5
Owner's Manual
Page 35
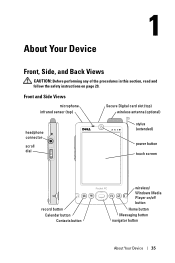
About Your Device Front, Side, and Back Views CAUTION: Before performing any of the procedures in this section, read and follow the safety instructions on /off button Home button Messaging button navigator button About Your Device 35 Front and Side Views microphone infrared sensor (top) Secure Digital card slot (top) wireless antenna (optional) headphone connector scroll dial stylus (extended) power button touch screen record button Calendar button Contacts button wireless/ Windows Media Player on page 29.
About Your Device Front, Side, and Back Views CAUTION: Before performing any of the procedures in this section, read and follow the safety instructions on /off button Home button Messaging button navigator button About Your Device 35 Front and Side Views microphone infrared sensor (top) Secure Digital card slot (top) wireless antenna (optional) headphone connector scroll dial stylus (extended) power button touch screen record button Calendar button Contacts button wireless/ Windows Media Player on page 29.

Owner's Manual
Page 36
... green. SECURE DIGITAL CARD SLOT-See "Using Secure Digital Memory Cards" on page 44 for information on the device. To avoid losing the stylus, store the stylus in use , the antenna lights blue. • When Wi-Fi is in the holder when you are not using the record button. ... . MESSAGING BUTTON-Press this button to launch Calendar or to turn on and off . www.dell.com | support.dell.com INFRARED SENSOR-The infrared sensor lets you transfer files from your device. Ensure that the stylus is solid amber. • When the device relays a notification, the power button light rapidly ...
... green. SECURE DIGITAL CARD SLOT-See "Using Secure Digital Memory Cards" on page 44 for information on the device. To avoid losing the stylus, store the stylus in use , the antenna lights blue. • When Wi-Fi is in the holder when you are not using the record button. ... . MESSAGING BUTTON-Press this button to launch Calendar or to turn on and off . www.dell.com | support.dell.com INFRARED SENSOR-The infrared sensor lets you transfer files from your device. Ensure that the stylus is solid amber. • When the device relays a notification, the power button light rapidly ...
Owner's Manual
Page 37
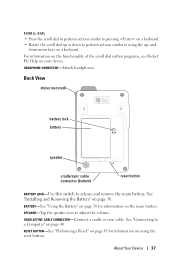
Back View stylus (secured) battery lock battery speaker cradle/sync cable connector (bottom) reset button BATTERY LOCK-Use this switch to a Computer" on page 40. CRADLE/SYNC CABLE ...
Back View stylus (secured) battery lock battery speaker cradle/sync cable connector (bottom) reset button BATTERY LOCK-Use this switch to a Computer" on page 40. CRADLE/SYNC CABLE ...
Owner's Manual
Page 39
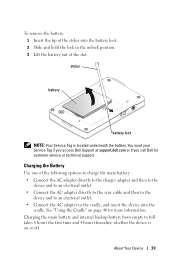
..." on or off. About Your Device 39 You need your Service Tag if you access Dell Support at support.dell.com or if you call Dell for more information. To remove the battery: 1 Insert the tip of the stylus into the cradle. Charging the Battery Use one of the following options to charge the... electrical outlet. • Connect the AC adapter to full takes 8 hours the first time and 4 hours thereafter, whether the device is located underneath the battery. stylus battery battery lock NOTE: Your Service Tag is on page 40 for customer service or technical support.
..." on or off. About Your Device 39 You need your Service Tag if you access Dell Support at support.dell.com or if you call Dell for more information. To remove the battery: 1 Insert the tip of the stylus into the cradle. Charging the Battery Use one of the following options to charge the... electrical outlet. • Connect the AC adapter to full takes 8 hours the first time and 4 hours thereafter, whether the device is located underneath the battery. stylus battery battery lock NOTE: Your Service Tag is on page 40 for customer service or technical support.
Owner's Manual
Page 42
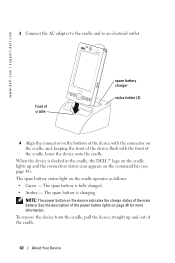
... page 48). See the description of the cradle, lower the device onto the cradle. www.dell.com | support.dell.com 3 Connect the AC adapter to the cradle and to an electrical outlet. front of cradle spare battery charger stylus holder (2) 4 Align the connector on the bottom of the device with the connector on... of the power button lights on the cradle lights up and out of the main battery. When the device is docked in the cradle, the DELL™ logo on page 36 for more information. The spare battery is fully charged. • Amber - The spare battery is charging. NOTE: The power ...
... page 48). See the description of the cradle, lower the device onto the cradle. www.dell.com | support.dell.com 3 Connect the AC adapter to the cradle and to an electrical outlet. front of cradle spare battery charger stylus holder (2) 4 Align the connector on the bottom of the device with the connector on... of the power button lights on the cradle lights up and out of the main battery. When the device is docked in the cradle, the DELL™ logo on page 36 for more information. The spare battery is fully charged. • Amber - The spare battery is charging. NOTE: The power ...

Owner's Manual
Page 45
To perform a soft reset, use the stylus to press the reset button. If you perform a soft reset, the device deletes any data that has not been saved but saves any data that came with the card for information on using the card. See the documentation that has been stored in memory. stylus reset button About Your Device 45 Performing a Reset Soft Reset When you feel resistance, remove the card, check the orientation, and reinsert it. Try performing a soft reset if the device does not respond when you tap the display or press a button. NOTICE: Do not force the card.
To perform a soft reset, use the stylus to press the reset button. If you perform a soft reset, the device deletes any data that has not been saved but saves any data that came with the card for information on using the card. See the documentation that has been stored in memory. stylus reset button About Your Device 45 Performing a Reset Soft Reset When you feel resistance, remove the card, check the orientation, and reinsert it. Try performing a soft reset if the device does not respond when you tap the display or press a button. NOTICE: Do not force the card.
Owner's Manual
Page 46
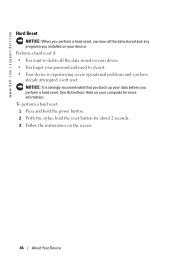
See ActiveSync Help on the screen. 46 About Your Device To perform a hard reset: 1 Press and hold the power button. 2 With the stylus, hold the reset button for about 2 seconds. 3 Follow the instructions on your computer for more information. NOTICE: It is experiencing severe operational problems and you ... your password and need to clear it. • Your device is strongly recommended that you back up your data before you perform a hard reset. www.dell.com | support.dell.com Hard Reset NOTICE: When you perform a hard reset, you lose all the data stored on your device.
See ActiveSync Help on the screen. 46 About Your Device To perform a hard reset: 1 Press and hold the power button. 2 With the stylus, hold the reset button for about 2 seconds. 3 Follow the instructions on your computer for more information. NOTICE: It is experiencing severe operational problems and you ... your password and need to clear it. • Your device is strongly recommended that you back up your data before you perform a hard reset. www.dell.com | support.dell.com Hard Reset NOTICE: When you perform a hard reset, you lose all the data stored on your device.
Owner's Manual
Page 47
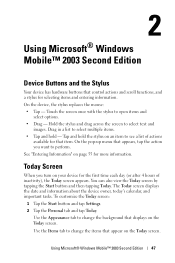
... button and tap Settings. 2 Tap the Personal tab and tap Today. Using Microsoft® Windows Mobile™ 2003 Second Edition 47 Hold the stylus and drag across the screen to open items and select options. • Drag - The Today screen displays the date and information about the device... important tasks. Today Screen When you want to change the items that appear on the Today screen. Touch the screen once with the stylus to select text and images. Use the Appearance tab to perform. Using Microsoft® Windows Mobile™ 2003 Second Edition Device Buttons and the...
... button and tap Settings. 2 Tap the Personal tab and tap Today. Using Microsoft® Windows Mobile™ 2003 Second Edition 47 Hold the stylus and drag across the screen to open items and select options. • Drag - The Today screen displays the date and information about the device... important tasks. Today Screen When you want to change the items that appear on the Today screen. Touch the screen once with the stylus to select text and images. Use the Appearance tab to perform. Using Microsoft® Windows Mobile™ 2003 Second Edition Device Buttons and the...
Owner's Manual
Page 50
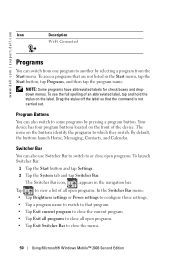
www.dell.com | support.dell.com Icon Description Wi-Fi Connected Programs You can switch from the Start menu. ...navigation bar. Your device has four program buttons located on the front of an abbreviated label, tap and hold the stylus on the buttons identify the programs to which they switch. By default, the buttons launch Home, Messaging, Contacts, ...Bar. Tap to or close the menu. 50 Using Microsoft® Windows Mobile™ 2003 Second Edition Drag the stylus off the label so that program. • Tap Exit current program to close the current program. • Tap...
www.dell.com | support.dell.com Icon Description Wi-Fi Connected Programs You can switch from the Start menu. ...navigation bar. Your device has four program buttons located on the front of an abbreviated label, tap and hold the stylus on the buttons identify the programs to which they switch. By default, the buttons launch Home, Messaging, Contacts, ...Bar. Tap to or close the menu. 50 Using Microsoft® Windows Mobile™ 2003 Second Edition Drag the stylus off the label so that program. • Tap Exit current program to close the current program. • Tap...
Owner's Manual
Page 52
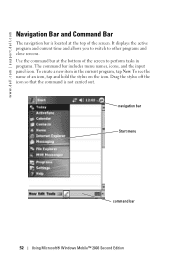
... Start menu command bar 52 Using Microsoft® Windows Mobile™ 2003 Second Edition To see the name of an icon, tap and hold the stylus on the icon. To create a new item in programs. The command bar includes menu names, icons, and the input panel icon. www....dell.com | support.dell.com Navigation Bar and Command Bar The navigation bar is not carried out. Drag the stylus off the icon so that the command is located at the bottom of the screen to other...
... Start menu command bar 52 Using Microsoft® Windows Mobile™ 2003 Second Edition To see the name of an icon, tap and hold the stylus on the icon. To create a new item in programs. The command bar includes menu names, icons, and the input panel icon. www....dell.com | support.dell.com Navigation Bar and Command Bar The navigation bar is not carried out. Drag the stylus off the icon so that the command is located at the bottom of the screen to other...
Owner's Manual
Page 53
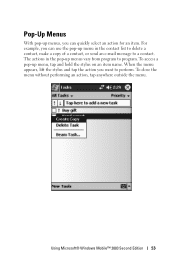
The actions in the contact list to delete a contact, make a copy of a contact, or send an e-mail message to a contact. To close the menu without performing an action, tap anywhere outside the menu. To access a pop-up menus vary from program to perform. For example, you can quickly select an action for an item. When the menu appears, lift the stylus and tap the action you want to program. Using Microsoft® Windows Mobile™ 2003 Second Edition 53 Pop-Up Menus With pop-up menus, you can use the pop-up menu in the pop-up menu, tap and hold the stylus on an item name.
The actions in the contact list to delete a contact, make a copy of a contact, or send an e-mail message to a contact. To close the menu without performing an action, tap anywhere outside the menu. To access a pop-up menus vary from program to perform. For example, you can quickly select an action for an item. When the menu appears, lift the stylus and tap the action you want to program. Using Microsoft® Windows Mobile™ 2003 Second Edition 53 Pop-Up Menus With pop-up menus, you can use the pop-up menu in the pop-up menu, tap and hold the stylus on an item name.
Owner's Manual
Page 55
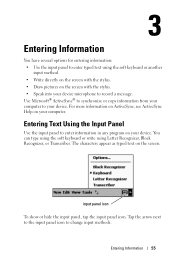
...You can type using the soft keyboard or write using the soft keyboard or another input method. • Write directly on the screen with the stylus. • Draw pictures on your device. Entering Information 55 Entering Text Using the Input Panel Use the input panel to enter information in any... program on the screen with the stylus. • Speak into your computer. The characters appear as typed text on your device microphone to change input methods. input panel icon To ...
...You can type using the soft keyboard or write using the soft keyboard or another input method. • Write directly on the screen with the stylus. • Draw pictures on your device. Entering Information 55 Entering Text Using the Input Panel Use the input panel to enter information in any... program on the screen with the stylus. • Speak into your computer. The characters appear as typed text on your device microphone to change input methods. input panel icon To ...
Owner's Manual
Page 56
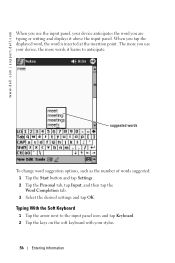
The more you use the input panel, your stylus. 56 Entering Information Typing With the Soft Keyboard 1 Tap the arrow next to anticipate. suggested words To change word suggestion options, such as the number ... and tap Settings. 2 Tap the Personal tab, tap Input, and then tap the Word Completion tab. 3 Select the desired settings and tap OK. www.dell.com | support.dell.com When you use your device, the more words it learns to the input panel icon and tap Keyboard. 2 Tap the keys on the...
The more you use the input panel, your stylus. 56 Entering Information Typing With the Soft Keyboard 1 Tap the arrow next to anticipate. suggested words To change word suggestion options, such as the number ... and tap Settings. 2 Tap the Personal tab, tap Input, and then tap the Word Completion tab. 3 Select the desired settings and tap OK. www.dell.com | support.dell.com When you use your device, the more words it learns to the input panel icon and tap Keyboard. 2 Tap the keys on the...
Owner's Manual
Page 57
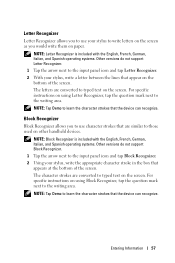
... versions do not support Block Recognizer. 1 Tap the arrow next to the input panel icon and tap Block Recognizer. 2 Using your stylus, write the appropriate character stroke in the box that the device can recognize. Block Recognizer Block Recognizer allows you would write them on other... handheld devices. Letter Recognizer Letter Recognizer allows you to use your stylus to write letters on the screen as you to use character strokes that the device can recognize. For specific instructions on using Letter...
... versions do not support Block Recognizer. 1 Tap the arrow next to the input panel icon and tap Block Recognizer. 2 Using your stylus, write the appropriate character stroke in the box that the device can recognize. Block Recognizer Block Recognizer allows you would write them on other... handheld devices. Letter Recognizer Letter Recognizer allows you to use your stylus to write letters on the screen as you to use character strokes that the device can recognize. For specific instructions on using Letter...
Owner's Manual
Page 58
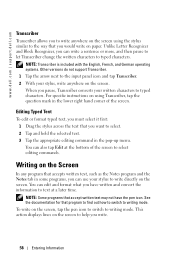
...in the lower right hand corner of the screen to select editing commands. For specific instructions on using the stylus similar to write directly on the screen. www.dell.com | support.dell.com Transcriber Transcriber allows you to write anywhere on the screen using Transcriber, tap the question mark in ...some programs, you can use your stylus to the way that you would write on paper. You can also tap Edit ...
...in the lower right hand corner of the screen to select editing commands. For specific instructions on using the stylus similar to write directly on the screen. www.dell.com | support.dell.com Transcriber Transcriber allows you to write anywhere on the screen using Transcriber, tap the question mark in ...some programs, you can use your stylus to the way that you would write on paper. You can also tap Edit ...

Owner's Manual
Page 59
To convert written text to select. 3 Tap and hold the selected text. 4 Tap the appropriate editing command in the pop-up menu. pen icon Editing Written Text To edit or format written text, you must select it first: 1 Tap the pen icon to deselect it. 2 Drag the stylus across the text that you want to print-style text, tap Tools and tap Recognize. You can also tap Edit at the bottom of the screen to select editing commands. 5 Tap the pen icon to switch back to writing mode. Entering Information 59
To convert written text to select. 3 Tap and hold the selected text. 4 Tap the appropriate editing command in the pop-up menu. pen icon Editing Written Text To edit or format written text, you must select it first: 1 Tap the pen icon to deselect it. 2 Drag the stylus across the text that you want to print-style text, tap Tools and tap Recognize. You can also tap Edit at the bottom of the screen to select editing commands. 5 Tap the pen icon to switch back to writing mode. Entering Information 59

Owner's Manual
Page 63
... first. To select multiple drawings, deselect the pen icon and drag to select editing commands. If you must select it first: 1 Tap and hold the stylus on the drawing until it beeps. 3 While holding down the Record button, make your mouth or other source of the screen to select the drawings...
... first. To select multiple drawings, deselect the pen icon and drag to select editing commands. If you must select it first: 1 Tap and hold the stylus on the drawing until it beeps. 3 While holding down the Record button, make your mouth or other source of the screen to select the drawings...

Owner's Manual
Page 166
... Pocket Outlook, 69 Pocket Word, 89 removing, 87 Start menu, 85 Switcher Bar, 50 Tasks, 74 R recording voice messages, 63 reminders. See programs specifications, 113 stylus using, 47 writing methods, 55 Switcher Bar, 50 sync cable connecting to a computer, 43 synchronizing with your computer, 40 T Tasks about, 74 creating, 74 text...
... Pocket Outlook, 69 Pocket Word, 89 removing, 87 Start menu, 85 Switcher Bar, 50 Tasks, 74 R recording voice messages, 63 reminders. See programs specifications, 113 stylus using, 47 writing methods, 55 Switcher Bar, 50 sync cable connecting to a computer, 43 synchronizing with your computer, 40 T Tasks about, 74 creating, 74 text...

System Information Guide
Page 15
Front, Side, and Back Views Front and Side Views microphone infrared sensor (top) Secure Digital card slot (top) wireless antenna (optional) headphone connector scroll dial stylus (extended) power button touch screen record button Calendar button Contacts button wireless/ Windows Media® Player on/off button Home button Messaging button navigator button System Information Guide 13
Front, Side, and Back Views Front and Side Views microphone infrared sensor (top) Secure Digital card slot (top) wireless antenna (optional) headphone connector scroll dial stylus (extended) power button touch screen record button Calendar button Contacts button wireless/ Windows Media® Player on/off button Home button Messaging button navigator button System Information Guide 13