

Owner's Manual
Page 5
2 Using Microsoft® Windows Mobile™ 2003 Second Edition Device Buttons and the Stylus 47 Today Screen 47 Status Icons 48 Programs 50 Program Buttons 50 Switcher Bar 50 Navigation Bar and Command Bar 52 Pop-Up Menus 53 Finding and Organizing Information 54 Backing Up Data 54 3 Entering Information Entering Text Using the Input Panel 55 Typing With the Soft Keyboard 56 Letter Recognizer 57 Block Recognizer 57 Transcriber 58 Editing Typed Text 58 Writing on the Screen 58 Editing Written Text 59 Contents 5
2 Using Microsoft® Windows Mobile™ 2003 Second Edition Device Buttons and the Stylus 47 Today Screen 47 Status Icons 48 Programs 50 Program Buttons 50 Switcher Bar 50 Navigation Bar and Command Bar 52 Pop-Up Menus 53 Finding and Organizing Information 54 Backing Up Data 54 3 Entering Information Entering Text Using the Input Panel 55 Typing With the Soft Keyboard 56 Letter Recognizer 57 Block Recognizer 57 Transcriber 58 Editing Typed Text 58 Writing on the Screen 58 Editing Written Text 59 Contents 5

Owner's Manual
Page 6
Drawing on the Screen 62 Creating a Drawing 62 Editing a Drawing 63 Recording a Message 63 Using My Text 64 4 Adjusting Settings Personal Tab 65 System Tab 65 Connections Tab 66 5 Using Microsoft® ActiveSync® About ActiveSync 67 Installing and Using ActiveSync 68 6 Scheduling and Communicating About Microsoft® Pocket Outlook 69 Calendar 69 Using the Summary Screen 71 Creating Meeting Requests 71 6 Contents
Drawing on the Screen 62 Creating a Drawing 62 Editing a Drawing 63 Recording a Message 63 Using My Text 64 4 Adjusting Settings Personal Tab 65 System Tab 65 Connections Tab 66 5 Using Microsoft® ActiveSync® About ActiveSync 67 Installing and Using ActiveSync 68 6 Scheduling and Communicating About Microsoft® Pocket Outlook 69 Calendar 69 Using the Summary Screen 71 Creating Meeting Requests 71 6 Contents

Owner's Manual
Page 7
Contacts 72 Finding a Contact 73 Using the Summary Screen 73 Tasks 74 Notes 75 Messaging 76 Synchronizing E-Mail Messages 76 Connecting Directly to an E-Mail Server . . . 77 Using the Message List 78 Composing Messages ...
Contacts 72 Finding a Contact 73 Using the Summary Screen 73 Tasks 74 Notes 75 Messaging 76 Synchronizing E-Mail Messages 76 Connecting Directly to an E-Mail Server . . . 77 Using the Message List 78 Composing Messages ...
Owner's Manual
Page 32
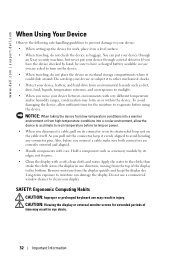
...: Improper or prolonged keyboard use a commercial window cleaner to clean your display. CAUTION: Viewing the display or external monitor screen for extended periods of the display to the bottom. www.dell.com | support.dell.com When Using Your Device Observe the following safe-handling guidelines to prevent damage to your device: • When...
...: Improper or prolonged keyboard use a commercial window cleaner to clean your display. CAUTION: Viewing the display or external monitor screen for extended periods of the display to the bottom. www.dell.com | support.dell.com When Using Your Device Observe the following safe-handling guidelines to prevent damage to your device: • When...
Owner's Manual
Page 35
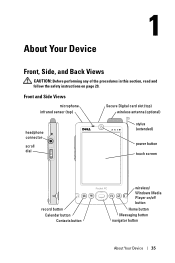
Front and Side Views microphone infrared sensor (top) Secure Digital card slot (top) wireless antenna (optional) headphone connector scroll dial stylus (extended) power button touch screen record button Calendar button Contacts button wireless/ Windows Media Player on page 29. About Your Device Front, Side, and Back Views CAUTION: Before performing any of the procedures in this section, read and follow the safety instructions on /off button Home button Messaging button navigator button About Your Device 35
Front and Side Views microphone infrared sensor (top) Secure Digital card slot (top) wireless antenna (optional) headphone connector scroll dial stylus (extended) power button touch screen record button Calendar button Contacts button wireless/ Windows Media Player on page 29. About Your Device Front, Side, and Back Views CAUTION: Before performing any of the procedures in this section, read and follow the safety instructions on /off button Home button Messaging button navigator button About Your Device 35

Owner's Manual
Page 36
..." on page 44 for information on the device. STYLUS-Use the stylus to write or draw on using Secure Digital memory cards. www.dell.com | support.dell.com INFRARED SENSOR-The infrared sensor lets you are not using it. To avoid losing the stylus, store the stylus in the holder when... OR MICROSOFT® WINDOWS MEDIA® PLAYER ON/OFF BUTTON-On wireless devices, the button turns the wireless module on the device. TOUCH SCREEN-Use the touch screen and the stylus to external power and the main battery is fully charged, the power button light is solid green. • When the ...
..." on page 44 for information on the device. STYLUS-Use the stylus to write or draw on using Secure Digital memory cards. www.dell.com | support.dell.com INFRARED SENSOR-The infrared sensor lets you are not using it. To avoid losing the stylus, store the stylus in the holder when... OR MICROSOFT® WINDOWS MEDIA® PLAYER ON/OFF BUTTON-On wireless devices, the button turns the wireless module on the device. TOUCH SCREEN-Use the touch screen and the stylus to external power and the main battery is fully charged, the power button light is solid green. • When the ...
Owner's Manual
Page 46
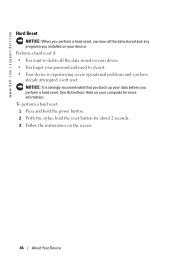
... and you have already attempted a soft reset. See ActiveSync Help on the screen. 46 About Your Device To perform a hard reset: 1 Press and hold the power button. 2 With the stylus, hold the reset button for more information. www.dell.com | support.dell.com Hard Reset NOTICE: When you perform a hard reset, you lose...
... and you have already attempted a soft reset. See ActiveSync Help on the screen. 46 About Your Device To perform a hard reset: 1 Press and hold the power button. 2 With the stylus, hold the reset button for more information. www.dell.com | support.dell.com Hard Reset NOTICE: When you perform a hard reset, you lose...
Owner's Manual
Page 47
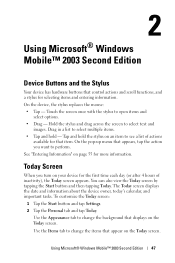
... - See "Entering Information" on your device for the first time each day (or after 4 hours of actions available for that item. The Today screen displays the date and information about the device owner, today's calendar, and important tasks. Using Microsoft® Windows Mobile™ 2003 Second Edition 47 ...Using Microsoft® Windows Mobile™ 2003 Second Edition Device Buttons and the Stylus Your device has hardware buttons that displays on the Today screen. Use the Items tab to change the items that appears, tap the action you turn on page 55 for selecting items and entering ...
... - See "Entering Information" on your device for the first time each day (or after 4 hours of actions available for that item. The Today screen displays the date and information about the device owner, today's calendar, and important tasks. Using Microsoft® Windows Mobile™ 2003 Second Edition 47 ...Using Microsoft® Windows Mobile™ 2003 Second Edition Device Buttons and the Stylus Your device has hardware buttons that displays on the Today screen. Use the Items tab to change the items that appears, tap the action you turn on page 55 for selecting items and entering ...
Owner's Manual
Page 52
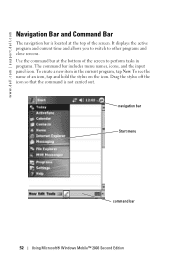
... and current time and allows you to switch to perform tasks in the current program, tap New. To see the name of the screen to other programs and close screens. To create a new item in programs. The command bar includes menu names, icons, and the input panel icon. navigation bar Start menu... command bar 52 Using Microsoft® Windows Mobile™ 2003 Second Edition Use the command bar at the top of the screen. Drag the stylus off the icon so that the command is located at the bottom of an icon, tap and hold the stylus on the...
... and current time and allows you to switch to perform tasks in the current program, tap New. To see the name of the screen to other programs and close screens. To create a new item in programs. The command bar includes menu names, icons, and the input panel icon. navigation bar Start menu... command bar 52 Using Microsoft® Windows Mobile™ 2003 Second Edition Use the command bar at the top of the screen. Drag the stylus off the icon so that the command is located at the bottom of an icon, tap and hold the stylus on the...
Owner's Manual
Page 55
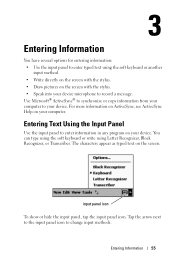
... information: • Use the input panel to enter typed text using Letter Recognizer, Block Recognizer, or Transcriber. The characters appear as typed text on the screen with the stylus. • Speak into your device. Use Microsoft® ActiveSync® to synchronize or copy information from your device. Tap the arrow next... change input methods. You can type using the soft keyboard or write using the soft keyboard or another input method. • Write directly on the screen with the stylus. • Draw pictures on the...
... information: • Use the input panel to enter typed text using Letter Recognizer, Block Recognizer, or Transcriber. The characters appear as typed text on the screen with the stylus. • Speak into your device. Use Microsoft® ActiveSync® to synchronize or copy information from your device. Tap the arrow next... change input methods. You can type using the soft keyboard or write using the soft keyboard or another input method. • Write directly on the screen with the stylus. • Draw pictures on the...
Owner's Manual
Page 57
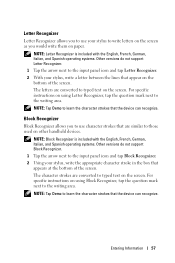
...German, Italian, and Spanish operating systems. Other versions do not support Block Recognizer. 1 Tap the arrow next to typed text on the screen. NOTE: Tap Demo to learn the character strokes that the device can recognize. For specific instructions on using Block Recognizer, tap the ... icon and tap Block Recognizer. 2 Using your stylus, write the appropriate character stroke in the box that appears at the bottom of the screen. NOTE: Block Recognizer is included with the English, French, German, Italian, and Spanish operating systems. Other versions do not support Letter Recognizer...
...German, Italian, and Spanish operating systems. Other versions do not support Block Recognizer. 1 Tap the arrow next to typed text on the screen. NOTE: Tap Demo to learn the character strokes that the device can recognize. For specific instructions on using Block Recognizer, tap the ... icon and tap Block Recognizer. 2 Using your stylus, write the appropriate character stroke in the box that appears at the bottom of the screen. NOTE: Block Recognizer is included with the English, French, German, Italian, and Spanish operating systems. Other versions do not support Letter Recognizer...
Owner's Manual
Page 58
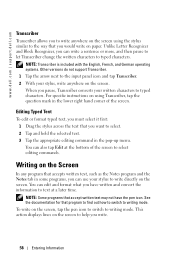
... of the screen. See the documentation for that program to find out how to switch to the way that accepts written text, such as the Notes program and the Notes tab in some programs, you can edit and format what you have the pen icon. www.dell.com | support.dell.com Transcriber... Transcriber allows you to write anywhere on the screen using Transcriber, tap the question mark in the lower right hand corner of the screen to the input panel icon and tap Transcriber. 2 With your written ...
... of the screen. See the documentation for that program to find out how to switch to the way that accepts written text, such as the Notes program and the Notes tab in some programs, you can edit and format what you have the pen icon. www.dell.com | support.dell.com Transcriber... Transcriber allows you to write anywhere on the screen using Transcriber, tap the question mark in the lower right hand corner of the screen to the input panel icon and tap Transcriber. 2 With your written ...

Owner's Manual
Page 59
You can also tap Edit at the bottom of the screen to select editing commands. 5 Tap the pen icon to switch back to print-style text, tap Tools and tap Recognize. Entering Information 59 To convert written text to writing mode. pen icon Editing Written Text To edit or format written text, you must select it first: 1 Tap the pen icon to deselect it. 2 Drag the stylus across the text that you want to select. 3 Tap and hold the selected text. 4 Tap the appropriate editing command in the pop-up menu.
You can also tap Edit at the bottom of the screen to select editing commands. 5 Tap the pen icon to switch back to print-style text, tap Tools and tap Recognize. Entering Information 59 To convert written text to writing mode. pen icon Editing Written Text To edit or format written text, you must select it first: 1 Tap the pen icon to deselect it. 2 Drag the stylus across the text that you want to select. 3 Tap and hold the selected text. 4 Tap the appropriate editing command in the pop-up menu.

Owner's Manual
Page 62
... editing written text. Subsequent strokes that touch or are treated as written text. Drawings that you write on your first stroke. www.dell.com | support.dell.com Drawing on the Screen You can be resized, while written text cannot. A drawing box appears. Cross three ruled lines on your drawing, tap Tools and tap...
... editing written text. Subsequent strokes that touch or are treated as written text. Drawings that you write on your first stroke. www.dell.com | support.dell.com Drawing on the Screen You can be resized, while written text cannot. A drawing box appears. Cross three ruled lines on your drawing, tap Tools and tap...

Owner's Manual
Page 63
...source of sound. 2 Press and hold the stylus on the drawing until it first: 1 Tap and hold the Record button on the side of the screen to select the drawings. 2 Tap and hold the selected drawing and tap an editing command on the pop-up menu. Entering Information 63 Recording a Message... In any program where you can write or draw on the screen, you can also quickly capture thoughts, reminders, and phone numbers by tapping and holding down the Record button, make your recording. 4 To stop recording, ...
...source of sound. 2 Press and hold the stylus on the drawing until it first: 1 Tap and hold the Record button on the side of the screen to select the drawings. 2 Tap and hold the selected drawing and tap an editing command on the pop-up menu. Entering Information 63 Recording a Message... In any program where you can write or draw on the screen, you can also quickly capture thoughts, reminders, and phone numbers by tapping and holding down the Record button, make your recording. 4 To stop recording, ...
Owner's Manual
Page 65
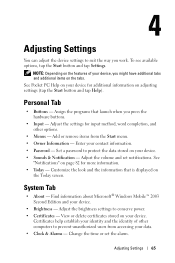
... remove items from accessing your data. • Clock & Alarms - Set a password to suit the way you work. View or delete certificates stored on the Today screen. Personal Tab • Buttons - Adjust the settings for more information. • Today - Adjust the volume and set the alarm. Customize the look and the information...
... remove items from accessing your data. • Clock & Alarms - Set a password to suit the way you work. View or delete certificates stored on the Today screen. Personal Tab • Buttons - Adjust the settings for more information. • Today - Adjust the volume and set the alarm. Customize the look and the information...

Owner's Manual
Page 66
...is off on the Advanced tab. • Regional Settings - By default, the radio is not responding accurately to taps, and select the screen orientation that the device can remain idle before it turns off . • Connections - For more information, see "Adding and Removing Programs... | support.dell.com • Memory - Adjust the microphone gain. • Power - Available only on devices with Bluetooth® wireless technology on page 83. • Screen - Allocate memory for regional settings, such as currency, time, and date. • Remove Programs - Check the battery or charge...
...is off on the Advanced tab. • Regional Settings - By default, the radio is not responding accurately to taps, and select the screen orientation that the device can remain idle before it turns off . • Connections - For more information, see "Adding and Removing Programs... | support.dell.com • Memory - Adjust the microphone gain. • Power - Available only on devices with Bluetooth® wireless technology on page 83. • Screen - Allocate memory for regional settings, such as currency, time, and date. • Remove Programs - Check the battery or charge...
Owner's Manual
Page 68
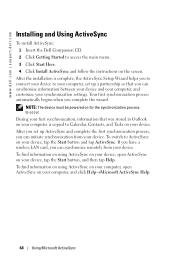
... ActiveSync Help. 68 Using Microsoft ActiveSync NOTE: The device must be powered on your device. www.dell.com | support.dell.com Installing and Using ActiveSync To install ActiveSync: 1 Insert the Dell Companion CD. 2 Click Getting Started to access the main menu. 3 Click Start Here. 4 ... in Outlook on your computer is copied to Calendar, Contacts, and Tasks on for the synchronization process to ActiveSync on the screen. After you set up ActiveSync and complete the first synchronization process, you complete the wizard. Your first synchronization process automatically begins...
... ActiveSync Help. 68 Using Microsoft ActiveSync NOTE: The device must be powered on your device. www.dell.com | support.dell.com Installing and Using ActiveSync To install ActiveSync: 1 Insert the Dell Companion CD. 2 Click Getting Started to access the main menu. 3 Click Start Here. 4 ... in Outlook on your computer is copied to Calendar, Contacts, and Tasks on for the synchronization process to ActiveSync on the screen. After you set up ActiveSync and complete the first synchronization process, you complete the wizard. Your first synchronization process automatically begins...

Owner's Manual
Page 71
...a recording. The Attendees field lists the e-mail addresses that you connect to set how you have entered in Calendar, a summary screen displays. You can use Calendar to your e-mail server. The meeting request is created automatically and placed in the appointment settings. ...meeting attendees. To receive a notification for an appointment, select Remind me in the Outbox folder. Scheduling and Communicating 71 Using the Summary Screen When you send and receive e-mail messages through the Sounds & Notifications icon. To schedule a meeting requests, tap the Start button, ...
...a recording. The Attendees field lists the e-mail addresses that you connect to set how you have entered in Calendar, a summary screen displays. You can use Calendar to your e-mail server. The meeting request is created automatically and placed in the appointment settings. ...meeting attendees. To receive a notification for an appointment, select Remind me in the Outbox folder. Scheduling and Communicating 71 Using the Summary Screen When you send and receive e-mail messages through the Sounds & Notifications icon. To schedule a meeting requests, tap the Start button, ...

Owner's Manual
Page 73
... all contacts again, tap All Contacts. In the Type drop-down menu, tap Contacts, and then tap Go. Using the Summary Screen When you tap a contact in the contact list, a summary screen is displayed to the right of the company name. • Tap the Start button, tap Find, and then enter the...
... all contacts again, tap All Contacts. In the Type drop-down menu, tap Contacts, and then tap Go. Using the Summary Screen When you tap a contact in the contact list, a summary screen is displayed to the right of the company name. • Tap the Start button, tap Find, and then enter the...


