User's Guide
Page 19
...PCL driver, click the Options tab, and then select Get Information from Printer. 4. Close the Printers and Faxes dialog box. 1. If the printer information is checked. Select any of the available trays from Printer, follow these steps: 1. Click the Configuration tab, and then select ...then click OK. 5. When you use XPS driver, click the Option tab, and then ensure that Enable BiDirectional Communication check box is checked. Click Start® Settings® Printers. 2. Windows® 7/Windows 7 x64/Windows Server® 2008 R2 x64 1. Windows Vista x64, Windows Server®...
...PCL driver, click the Options tab, and then select Get Information from Printer. 4. Close the Printers and Faxes dialog box. 1. If the printer information is checked. Select any of the available trays from Printer, follow these steps: 1. Click the Configuration tab, and then select ...then click OK. 5. When you use XPS driver, click the Option tab, and then ensure that Enable BiDirectional Communication check box is checked. Click Start® Settings® Printers. 2. Windows® 7/Windows 7 x64/Windows Server® 2008 R2 x64 1. Windows Vista x64, Windows Server®...

User's Guide
Page 25
... 2008 R2 x64, Windows Server 2008, and Windows Server 2008 x64. Updating Your Driver to detect it. If not, check the check box. 4. Close the Devices and Printers dialog box. When you use PCL driver, click the Options tab, and then select Get Information from the Paper Tray ...Configuration. 2. Click Start® Control Panel® Printers. 2. If not, check the check box. 4. When you use PCL driver, click the Options tab, and then select Get Information from the Paper Tray Configuration. Select...
... 2008 R2 x64, Windows Server 2008, and Windows Server 2008 x64. Updating Your Driver to detect it. If not, check the check box. 4. Close the Devices and Printers dialog box. When you use PCL driver, click the Options tab, and then select Get Information from the Paper Tray ...Configuration. 2. Click Start® Control Panel® Printers. 2. If not, check the check box. 4. When you use PCL driver, click the Options tab, and then select Get Information from the Paper Tray Configuration. Select...
User's Guide
Page 30
... Windows 2000 1. Click Start® Control Panel® Hardware and Sound® Printers. 2. If not, check the check box. 4. Close the Printers dialog box. 1. Click Start® Control Panel® Printers. 2. When you use XPS driver, click the Option tab, and then ensure... click the Options tab, and then select Get Information from Printer. 4. If not, check the check box. 4. Close the Printers dialog box. 1. Click Start® Printers and Faxes. 2. Right-click the printer and select Properties. 3. Close the Printers and Faxes dialog box. 1. When you use XPS driver,...
... Windows 2000 1. Click Start® Control Panel® Hardware and Sound® Printers. 2. If not, check the check box. 4. Close the Printers dialog box. 1. Click Start® Control Panel® Printers. 2. When you use XPS driver, click the Option tab, and then ensure... click the Options tab, and then select Get Information from Printer. 4. If not, check the check box. 4. Close the Printers dialog box. 1. Click Start® Printers and Faxes. 2. Right-click the printer and select Properties. 3. Close the Printers and Faxes dialog box. 1. When you use XPS driver,...
User's Guide
Page 31
... box. 1. Click the Configuration tab, and then select Get Information from Printer. 4. When you use XPS driver, click the Option tab, and then remove the check mark from Printer. 4. Click Start® Control Panel® Hardware and Sound® Printers. 2. Right-click the printer that uses the PS driver, and then select Properties from the...
... box. 1. Click the Configuration tab, and then select Get Information from Printer. 4. When you use XPS driver, click the Option tab, and then remove the check mark from Printer. 4. Click Start® Control Panel® Hardware and Sound® Printers. 2. Right-click the printer that uses the PS driver, and then select Properties from the...

User's Guide
Page 32
... box. Select the Print & Fax in Printers list, and click Options & Supplies. 3. Select the printer from Printer. 4. Select Paper Tray Configuration on the Print Center (or Printer Setup Utility) menu bar, and select Show Info. 3. CAUTION: After installing the output expander, visually check to the model. 2. Turn off the printer, unplug the power cable, and disconnect...
... box. Select the Print & Fax in Printers list, and click Options & Supplies. 3. Select the printer from Printer. 4. Select Paper Tray Configuration on the Print Center (or Printer Setup Utility) menu bar, and select Show Info. 3. CAUTION: After installing the output expander, visually check to the model. 2. Turn off the printer, unplug the power cable, and disconnect...

User's Guide
Page 37
First, align the attachment side of tray to the output expander. Remove the protective cardboard cover from the output expander, and then attach the stacker tray to the printer. If the output expander does not fit in the illustration. CAUTION: Always hold the marked positions when lifting the output expander. Then slide the tray down until its two projections catch the holes on the metal panel as shown in the printer, detach and install it again. 15. CAUTION: Check the space between the printer and output expander to confirm that the expander is connected properly.
First, align the attachment side of tray to the output expander. Remove the protective cardboard cover from the output expander, and then attach the stacker tray to the printer. If the output expander does not fit in the illustration. CAUTION: Always hold the marked positions when lifting the output expander. Then slide the tray down until its two projections catch the holes on the metal panel as shown in the printer, detach and install it again. 15. CAUTION: Check the space between the printer and output expander to confirm that the expander is connected properly.

User's Guide
Page 46
See "Printing Printer Settings Page." Ensure Report/List is displayed. Printing Printer Settings Page When Using the Operator Panel a. Printer Setting is highlighted, and then press (Set) button. Press (Set) button. b. Check that the memory is installed correctly by following the instructions below. Close the control board cover and rotate the screw clockwise. 8. Press Menu button. c. Turn on the printer. 9. 5. Install the control board cover. 7. Print the printer settings page to verify that the tabs are locked. 6.
See "Printing Printer Settings Page." Ensure Report/List is displayed. Printing Printer Settings Page When Using the Operator Panel a. Printer Setting is highlighted, and then press (Set) button. Press (Set) button. b. Check that the memory is installed correctly by following the instructions below. Close the control board cover and rotate the screw clockwise. 8. Press Menu button. c. Turn on the printer. 9. 5. Install the control board cover. 7. Print the printer settings page to verify that the tabs are locked. 6.

User's Guide
Page 47
... use XPS driver, click the Option tab, and then ensure that Enable Bi-Directional Communication check box is on the following settings are not required. Click Start® Control Panel® Hardware and Sound® Printers. 2. See "Dell Printer Configuration Web Tool." d. NOTE: When you use XPS driver, the following operating systems: Windows 7, Windows...
... use XPS driver, click the Option tab, and then ensure that Enable Bi-Directional Communication check box is on the following settings are not required. Click Start® Control Panel® Hardware and Sound® Printers. 2. See "Dell Printer Configuration Web Tool." d. NOTE: When you use XPS driver, the following operating systems: Windows 7, Windows...

User's Guide
Page 48
...use PCL driver, click the Options tab, and then select Get Information from Printer, follow these steps: 1. If the printer information is checked. When you cannot acquire the printer information using the Get Information from Printer. 4. Click Apply, and then click OK. 3. When Using PS Driver...the Items list box. 2. If not, check the check box. 4. Right-click the printer and select Properties. 3. Right-click the printer that Enable Bi-Directional Communication check box is not updated automatically after clicking Get Information from Printer. 4. Click the Device Settings tab, and...
...use PCL driver, click the Options tab, and then select Get Information from Printer, follow these steps: 1. If the printer information is checked. When you cannot acquire the printer information using the Get Information from Printer. 4. Click Apply, and then click OK. 3. When Using PS Driver...the Items list box. 2. If not, check the check box. 4. Right-click the printer and select Properties. 3. Right-click the printer that Enable Bi-Directional Communication check box is not updated automatically after clicking Get Information from Printer. 4. Click the Device Settings tab, and...

User's Guide
Page 64
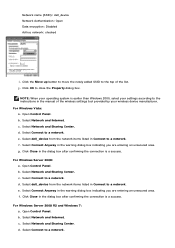
... Windows XP and Windows Server 2003: a. c. d. Network name (SSID): dell_device Network Authentication: Open Data encryption: Disabled Ad hoc network: checked i. For Windows Vista: a. c. Or you can restore them later. See the instructions below. Select the Wireless Networks tab. e. Select ...Connect Anyway in the dialog box after confirming the connection is checked. Click Close in the warning dialog box indicating you can change the wireless settings using the tool provided with the ...
... Windows XP and Windows Server 2003: a. c. d. Network name (SSID): dell_device Network Authentication: Open Data encryption: Disabled Ad hoc network: checked i. For Windows Vista: a. c. Or you can restore them later. See the instructions below. Select the Wireless Networks tab. e. Select ...Connect Anyway in the dialog box after confirming the connection is checked. Click Close in the warning dialog box indicating you can change the wireless settings using the tool provided with the ...

User's Guide
Page 65
... Network and Sharing Center. b. Scroll down and select TCP/IP. Open Dell Printer Configuration Web Tool using the WEB browser. Select Network and Sharing Center. Click Close in Connect to a network. Scroll down and select IPv4. Check that the IP address on the printer control panel. For Windows Server 2008: a. d. Select Network and Internet...
... Network and Sharing Center. b. Scroll down and select TCP/IP. Open Dell Printer Configuration Web Tool using the WEB browser. Select Network and Sharing Center. Click Close in Connect to a network. Scroll down and select IPv4. Check that the IP address on the printer control panel. For Windows Server 2008: a. d. Select Network and Internet...

User's Guide
Page 66
...close the Property dialog box. For Windows XP and Windows Server 2003: a. b. When wireless infrastructure mode is set to the printer and click OK. Click Add to the top of the wireless settings tool provided by your computer. Enter the setting that ... NOTE: If your operating system is checked. 5. Ensure the check box for Use Windows to configure my wireless network settings is earlier than Windows 2000, select your settings according to close the Advanced dialog box. j. c. Restore the wireless settings on Dell Printer Configuration Web Tool. 6. Select Wireless Network...
...close the Property dialog box. For Windows XP and Windows Server 2003: a. b. When wireless infrastructure mode is set to the printer and click OK. Click Add to the top of the wireless settings tool provided by your computer. Enter the setting that ... NOTE: If your operating system is checked. 5. Ensure the check box for Use Windows to configure my wireless network settings is earlier than Windows 2000, select your settings according to close the Advanced dialog box. j. c. Restore the wireless settings on Dell Printer Configuration Web Tool. 6. Select Wireless Network...

User's Guide
Page 67
... Select Connect to a network. Under the Association tab, enter the following information and click OK. b. Select Network and Internet. Ensure the check box for wireless connectivity: NOTE: If your computer provides a wireless adapter tool, change the wireless settings using this tool. For Windows Server ...2008: a. f. b. f. Open Control Panel. Select Network and Sharing Center. Select the setting you send to the printer from the network items listed in Connect to configure my wireless network settings is a success. Select Connect to display Wireless ...
... Select Connect to a network. Under the Association tab, enter the following information and click OK. b. Select Network and Internet. Ensure the check box for wireless connectivity: NOTE: If your computer provides a wireless adapter tool, change the wireless settings using this tool. For Windows Server ...2008: a. f. b. f. Open Control Panel. Select Network and Sharing Center. Select the setting you send to the printer from the network items listed in Connect to configure my wireless network settings is a success. Select Connect to display Wireless ...
User's Guide
Page 68
Network name (SSID): dell_device Network Authentication: Open Data encryption: Disabled Ad hoc network: checked i. b. Select Network and Sharing Center. d. Select dell_device from the network items listed in Connect to a network. g. Open Control Panel. Select Connect to close the Property ...
Network name (SSID): dell_device Network Authentication: Open Data encryption: Disabled Ad hoc network: checked i. b. Select Network and Sharing Center. d. Select dell_device from the network items listed in Connect to a network. g. Open Control Panel. Select Connect to close the Property ...
User's Guide
Page 69
.... Check the IP address on your computer. Press Menu button. Select Get IP Address. Manually enter the IP address using the WEB browser. 5. Restore the wireless settings on the printer. Scroll to IP Address. c. Open Dell Printer Configuration Web Tool using the directional buttons on Dell Printer Configuration Web Tool. 6. Change the wireless setting of the printer...
.... Check the IP address on your computer. Press Menu button. Select Get IP Address. Manually enter the IP address using the WEB browser. 5. Restore the wireless settings on the printer. Scroll to IP Address. c. Open Dell Printer Configuration Web Tool using the directional buttons on Dell Printer Configuration Web Tool. 6. Change the wireless setting of the printer...

User's Guide
Page 70
...e. Click Close in the manual of the list. Select Connect Anyway in Connect to the printer: Select Access point (Infrastructure) networks only and close the Property dialog box. Ensure the check box for Use Windows to configure my wireless network settings is set to a network. e.... g. j. Open Control Panel. Select Network and Sharing Center. Select the setting you send to the printer from Control Panel. g. For Windows Server ...
...e. Click Close in the manual of the list. Select Connect Anyway in Connect to the printer: Select Access point (Infrastructure) networks only and close the Property dialog box. Ensure the check box for Use Windows to configure my wireless network settings is set to a network. e.... g. j. Open Control Panel. Select Network and Sharing Center. Select the setting you send to the printer from Control Panel. g. For Windows Server ...

User's Guide
Page 72
Back to Contents Page Connect Printer to Computer or Network Connect Printer to Computer or Network Print and Check the Printer Settings Page Assign an IP Address Verify the IP Settings Using the Reset Button Your Dell™ 5130cdn Color Laser Printer interconnection cable must meet the following requirements: Connection type Connection specifications Ethernet 10 Base-T/100 Base-TX/1000...
Back to Contents Page Connect Printer to Computer or Network Connect Printer to Computer or Network Print and Check the Printer Settings Page Assign an IP Address Verify the IP Settings Using the Reset Button Your Dell™ 5130cdn Color Laser Printer interconnection cable must meet the following requirements: Connection type Connection specifications Ethernet 10 Base-T/100 Base-TX/1000...

User's Guide
Page 74
...connection, insert the wireless adapter into the wireless adapter socket on the back of the printer. For a wireless connection, refer to a network: 1. Printer Setting is printed. 4. When Using the Dell™ Printer Configuration Web Tool 1. The Dell Printer Configuration Tool opens. 2. Press Menu button. 2. If you do not know how to...devices have been turned off and all cables have been disconnected. 2. When Using the Operator Panel 1. Print and Check the Printer Settings Page Print the printer settings page. Ensure Report/List is highlighted, and then press (Set) button. 3.
...connection, insert the wireless adapter into the wireless adapter socket on the back of the printer. For a wireless connection, refer to a network: 1. Printer Setting is printed. 4. When Using the Dell™ Printer Configuration Web Tool 1. The Dell Printer Configuration Tool opens. 2. Press Menu button. 2. If you do not know how to...devices have been turned off and all cables have been disconnected. 2. When Using the Operator Panel 1. Print and Check the Printer Settings Page Print the printer settings page. Ensure Report/List is highlighted, and then press (Set) button. 3.
User's Guide
Page 75
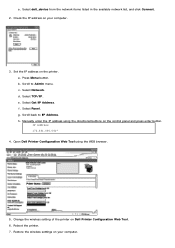
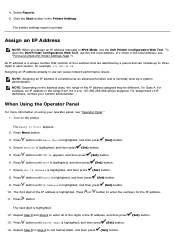
... the numbers for the IP address. 11. Press button. For assignment of IP addresses, contact your operator panel, see "Print and Check the Printer Settings Page.") An IP address is normally done by a period and can cause network performance issues. Press button until Admin Menu is ...Step 8 to Step 9 to three digits in the IP address, and then press (Set) button. 13. To open the Dell Printer Configuration Web Tool, use the link local address. (To check a link local address, see "Operator Panel." 1. NOTE: Assigning an IP address is considered as an advanced function and is ...
... the numbers for the IP address. 11. Press button. For assignment of IP addresses, contact your operator panel, see "Print and Check the Printer Settings Page.") An IP address is normally done by a period and can cause network performance issues. Press button until Admin Menu is ...Step 8 to Step 9 to three digits in the IP address, and then press (Set) button. 13. To open the Dell Printer Configuration Web Tool, use the link local address. (To check a link local address, see "Operator Panel." 1. NOTE: Assigning an IP address is considered as an advanced function and is ...

User's Guide
Page 76
... Dell Printer Configuration Web Tool opens. 2. TCP/IP Settings page opens. 4. Select IP Address Mode. 6. Enter the IP addresses. When enabling the Stateless addresses: Select the check box for Enable Stateless Address to the desired IP address on the printer selection window. Turn off the printer....168.0.11): ping 192.168.0.11 If you expected. For example, at a command prompt on the printer settings page to launch the Dell Printer Configuration Web Tool, see "Dell Printer Configuration Web Tool." Press button until Gateway Address is set the IP address from IP Mode. 5. Repeat...
... Dell Printer Configuration Web Tool opens. 2. TCP/IP Settings page opens. 4. Select IP Address Mode. 6. Enter the IP addresses. When enabling the Stateless addresses: Select the check box for Enable Stateless Address to the desired IP address on the printer selection window. Turn off the printer....168.0.11): ping 192.168.0.11 If you expected. For example, at a command prompt on the printer settings page to launch the Dell Printer Configuration Web Tool, see "Dell Printer Configuration Web Tool." Press button until Gateway Address is set the IP address from IP Mode. 5. Repeat...


