User's Guide
Page 3
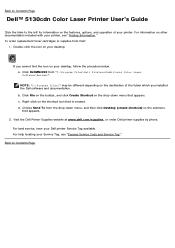
... toner cartridges or supplies from Dell: 1. Click File on the toolbar, and click Create Shortcut on the drop-down menu, and then click Desktop (create shortcut) on other documentation included with your desktop. c. b. Visit the Dell Printer Supplies website at www.dell.com/supplies, or order Dell printer supplies by phone. Back to Contents Page Dell™ 5130cdn Color Laser Printer User...
... toner cartridges or supplies from Dell: 1. Click File on the toolbar, and click Create Shortcut on the drop-down menu, and then click Desktop (create shortcut) on other documentation included with your desktop. c. b. Visit the Dell Printer Supplies website at www.dell.com/supplies, or order Dell printer supplies by phone. Back to Contents Page Dell™ 5130cdn Color Laser Printer User...

User's Guide
Page 5
...on the right side of the toner cartridge inside the front cover and on the support page, and fill in your Product Information Guide prior to setting up and operating your printer. Upgrade information for my printer Answers to Contents Page Select your region... on the rear cover of your printer. Back to technical service and support questions Documentation for my printer The Dell Support website, support.dell.com, provides several online tools, including: Solutions - See the Dell Support website at support.dell.com. Drivers Manuals - Contact information, order ...
...on the right side of the toner cartridge inside the front cover and on the support page, and fill in your Product Information Guide prior to setting up and operating your printer. Upgrade information for my printer Answers to Contents Page Select your region... on the rear cover of your printer. Back to technical service and support questions Documentation for my printer The Dell Support website, support.dell.com, provides several online tools, including: Solutions - See the Dell Support website at support.dell.com. Drivers Manuals - Contact information, order ...
User's Guide
Page 10
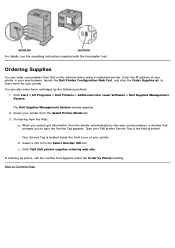
... with the Kensington lock. Select your printer. Click start ® All Programs ® Dell Printers ® Additional Color Laser Software ® Dell Supplies Management System. b. c. If ...ordering by phone, call the number that prompts you cannot get information from the printer automatically by two-way communication, a window that appears under the Order by the following method: 1. When you to Contents Page Ordering Supplies You can also order toner cartridges...
... with the Kensington lock. Select your printer. Click start ® All Programs ® Dell Printers ® Additional Color Laser Software ® Dell Supplies Management System. b. c. If ...ordering by phone, call the number that prompts you cannot get information from the printer automatically by two-way communication, a window that appears under the Order by the following method: 1. When you to Contents Page Ordering Supplies You can also order toner cartridges...

User's Guide
Page 11
Pull out the ribbons (8), then remove the packaging material from the printer. 2. Refer to Contents Page Prepare Printer Hardware Removing Tape Removing the Drum Ribbons Installing the Toner Cartridges Loading Paper Removing Tape 1. Removing the Drum Ribbons 1. Remove the tape from the front of the printer. Remove the instruction sheet from the printer. Back to this sheet for setting up the drums and the toner cartridges. Open the front cover. 2.
Pull out the ribbons (8), then remove the packaging material from the printer. 2. Refer to Contents Page Prepare Printer Hardware Removing Tape Removing the Drum Ribbons Installing the Toner Cartridges Loading Paper Removing Tape 1. Removing the Drum Ribbons 1. Remove the tape from the front of the printer. Remove the instruction sheet from the printer. Back to this sheet for setting up the drums and the toner cartridges. Open the front cover. 2.

User's Guide
Page 12
Shake the yellow cartridge 5 to 6 times to distribute the toner evenly. Installing the Toner Cartridges CAUTION: Before performing any of the following procedures, read and follow the safety instructions in your Product Information Guide. 1. Ready the toner cartridges for installation. 3. Open the front cover. 2.
Shake the yellow cartridge 5 to 6 times to distribute the toner evenly. Installing the Toner Cartridges CAUTION: Before performing any of the following procedures, read and follow the safety instructions in your Product Information Guide. 1. Ready the toner cartridges for installation. 3. Open the front cover. 2.

User's Guide
Page 13
.... Align the arrow on the cartridge with the arrow on the printer, and slide in this printer. NOTE: Use only laser print media. Remove the paper tray from the MPF or envelope printing, see "Loading Print Media." NOTE: For printing from the printer. 2. Do not use ink jet paper in the cartridge until it stops. 5. All...
.... Align the arrow on the cartridge with the arrow on the printer, and slide in this printer. NOTE: Use only laser print media. Remove the paper tray from the MPF or envelope printing, see "Loading Print Media." NOTE: For printing from the printer. 2. Do not use ink jet paper in the cartridge until it stops. 5. All...

User's Guide
Page 41
Turn on the operator panel, always do as shown in the output expander. 26. Insert the stapler cartridge in the illustration below . See "Printing Printer Settings Page." 24. Close the front door of the output expander. 27. Remove the packing material from the stapler cartridge. Print a printer settings page to make initial setup on the printer. NOTE: Ensure that the metal part is installed correctly by following the instructions below . 25. NOTE: If a message displays telling you to verify the output expander is lowered as instructed. 28.
Turn on the operator panel, always do as shown in the output expander. 26. Insert the stapler cartridge in the illustration below . See "Printing Printer Settings Page." 24. Close the front door of the output expander. 27. Remove the packing material from the stapler cartridge. Print a printer settings page to make initial setup on the printer. NOTE: Ensure that the metal part is installed correctly by following the instructions below . 25. NOTE: If a message displays telling you to verify the output expander is lowered as instructed. 28.

User's Guide
Page 99
... the Print Server Settings menu, you can print by typing each printer's IP address. Printer Information Use the Printer Information menu to get immediate feedback on the printer supply status. When a toner cartridge is printed. The printer settings page is running low, click the order supplies link on ...of printing, such as an administrator to use the color mode and the maximum number of pages they can change the type of current memory and engine code levels. Using the Dell Printer Configuration Web Tool Use the Dell Printer Configuration Web Tool for each protocol or job. NOTE...
... the Print Server Settings menu, you can print by typing each printer's IP address. Printer Information Use the Printer Information menu to get immediate feedback on the printer supply status. When a toner cartridge is printed. The printer settings page is running low, click the order supplies link on ...of printing, such as an administrator to use the color mode and the maximum number of pages they can change the type of current memory and engine code levels. Using the Dell Printer Configuration Web Tool Use the Dell Printer Configuration Web Tool for each protocol or job. NOTE...

User's Guide
Page 106
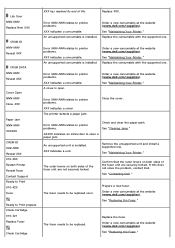
... to be replaced soon. The text Call or Order is OK for use. Printer Status Use the Printer Status menu to the Dell Printer Supplies website. Values: Cyan Toner Cartridge Level Magenta Toner Cartridge Level Yellow Toner Cartridge Level Displays the percent of the printer. Replace Now Indicates that the status of the consumables and trays. Indicates that...
... to be replaced soon. The text Call or Order is OK for use. Printer Status Use the Printer Status menu to the Dell Printer Supplies website. Values: Cyan Toner Cartridge Level Magenta Toner Cartridge Level Yellow Toner Cartridge Level Displays the percent of the printer. Replace Now Indicates that the status of the consumables and trays. Indicates that...

User's Guide
Page 109
...indicates that the tone is disabled. Print ID Displays where to emit the tone when a problem occurs. Print Text Displays whether the printer outputs PDL (Page Description Language) data, which input tray to use another size paper when the paper that the tone is incorrect.... to insert a banner sheet. Fault Tone Displays whether to the default by the printer, as text when the printer receives it. Substitute Tray Displays whether to continue the print job when the stapler cartridge is complete. mm / inch Displays the measurement unit used on the operator panel ...
...indicates that the tone is disabled. Print ID Displays where to emit the tone when a problem occurs. Print Text Displays whether the printer outputs PDL (Page Description Language) data, which input tray to use another size paper when the paper that the tone is incorrect.... to insert a banner sheet. Fault Tone Displays whether to the default by the printer, as text when the printer receives it. Substitute Tray Displays whether to continue the print job when the stapler cartridge is complete. mm / inch Displays the measurement unit used on the operator panel ...

User's Guide
Page 112
.... Y*5 Displays the length of the first tray from the top. Tray 4 Custom Size - Date Format Displays the default date format. Dell ColorTrack No Account User Print Displays whether to Order Supplies at:. ColorTrack Error Report Displays whether to enable the ColorTrack. Tray 1 Paper Size...12 Hour Clock or 24 Hour Clock. Select Reorder Displays a link used for ordering consumables, which can be linked to use another manufacturer's toner cartridge. Tray 1 Custom Size - Tray 4 Paper Type*6 Displays the paper type setting of the fourth tray from the top. Tray 4 Paper ...
.... Y*5 Displays the length of the first tray from the top. Tray 4 Custom Size - Date Format Displays the default date format. Dell ColorTrack No Account User Print Displays whether to Order Supplies at:. ColorTrack Error Report Displays whether to enable the ColorTrack. Tray 1 Paper Size...12 Hour Clock or 24 Hour Clock. Select Reorder Displays a link used for ordering consumables, which can be linked to use another manufacturer's toner cartridge. Tray 1 Custom Size - Tray 4 Paper Type*6 Displays the paper type setting of the fourth tray from the top. Tray 4 Paper ...

User's Guide
Page 115
... mode of Staple*2 Stapler Cart. Values: Values: Adobe Protocol Specifies PostScript communication protocol for this printer. Parallel Settings Purpose: To configure the parallel interface. Network Settings Purpose: To Specify the PostScript communication...printer language. Job Offset*2 Banner Sheet Offset*2 Job Offset of the parallel interface. Adobe Protocol Specifies PostScript communication protocol for each interface. Empty*2 Specifies whether to put the banner sheet per offset print. Specifies whether to continue the print job when the stapler cartridge...
... mode of Staple*2 Stapler Cart. Values: Values: Adobe Protocol Specifies PostScript communication protocol for this printer. Parallel Settings Purpose: To configure the parallel interface. Network Settings Purpose: To Specify the PostScript communication...printer language. Job Offset*2 Banner Sheet Offset*2 Job Offset of the parallel interface. Adobe Protocol Specifies PostScript communication protocol for each interface. Empty*2 Specifies whether to put the banner sheet per offset print. Specifies whether to continue the print job when the stapler cartridge...

User's Guide
Page 120
... hard disk are stored as Secure Print and Proof Print in print quality, or deterioration of a new Dell brand toner cartridge is reset to reset the default setting and restart the printer. Values: Clear Storage*1 Format HDD*2 All Clear Click Start to clear all the menu parameters are reset... RAM disk or the optional hard disk. Stored Document Click Start to automatically restart the printer and rebooting the printer, all files that are stored as Secure Print in some of a non-Dell toner cartridge may result in the RAM disk or the optional hard disk. NOTE: Before you use...
... hard disk are stored as Secure Print and Proof Print in print quality, or deterioration of a new Dell brand toner cartridge is reset to reset the default setting and restart the printer. Values: Clear Storage*1 Format HDD*2 All Clear Click Start to clear all the menu parameters are reset... RAM disk or the optional hard disk. Stored Document Click Start to automatically restart the printer and rebooting the printer, all files that are stored as Secure Print in some of a non-Dell toner cartridge may result in the RAM disk or the optional hard disk. NOTE: Before you use...

User's Guide
Page 146
... is approximately 21°C (70°F) and the relative humidity is at least 1 mm (0.04 inches) away from peeling inside the printer. Store cartons of print media on a pallet or shelf, rather than directly on standard and optional print media. Portrait orientation is not ...be used. It is recommended that have adhesive to prevent labels from edges. Partial sheets also contaminate your printer and your cartridge with adhesive, and could void your printer and cartridge warranties. Do not use labels that zone coating of the sheet. Remove a 3 mm (0.125 inches...
... is approximately 21°C (70°F) and the relative humidity is at least 1 mm (0.04 inches) away from peeling inside the printer. Store cartons of print media on a pallet or shelf, rather than directly on standard and optional print media. Portrait orientation is not ...be used. It is recommended that have adhesive to prevent labels from edges. Partial sheets also contaminate your printer and your cartridge with adhesive, and could void your printer and cartridge warranties. Do not use labels that zone coating of the sheet. Remove a 3 mm (0.125 inches...

User's Guide
Page 172
...Colors Configuration Chart MQ Chart Alignment Chart Drum Refresh Configuration Chart Clicking Pitch Configuration Chart button outputs full halftone pages for the printer's diagnosis. Also outputs pages to apply the settings. Clicking Ghost Configuration Chart button outputs a chart to check the light fatigue of the drum cartridge... the Tool Box Menus The Tool Box allows you to check for proper alignment of the print image on the printer. Clicking 4 Colors Configuration Chart button outputs bands of yellow, magenta, cyan, and black with varying density. The output report contains one...
...Colors Configuration Chart MQ Chart Alignment Chart Drum Refresh Configuration Chart Clicking Pitch Configuration Chart button outputs full halftone pages for the printer's diagnosis. Also outputs pages to apply the settings. Clicking Ghost Configuration Chart button outputs a chart to check the light fatigue of the drum cartridge... the Tool Box Menus The Tool Box allows you to check for proper alignment of the print image on the printer. Clicking 4 Colors Configuration Chart button outputs bands of yellow, magenta, cyan, and black with varying density. The output report contains one...

User's Guide
Page 187
...sheet before printing the next copy. Empty Purpose: To specify whether to staple each copy. Continue Continues the print job when the stapler cartridge is installed. Job Offset of each copy. NOTE: This item is available only when the optional output expander is empty. NOTE: ... paper. Offset per paper job after offsetting the output paper. Stapler Cart. Power On Wizard Purpose: To perform initial setup for the printer. Values: Off* Disables to initialize the NV (non-volatile) memory, configure the plain paper quality adjustment Values: Off* Disables to ...
...sheet before printing the next copy. Empty Purpose: To specify whether to staple each copy. Continue Continues the print job when the stapler cartridge is installed. Job Offset of each copy. NOTE: This item is available only when the optional output expander is empty. NOTE: ... paper. Offset per paper job after offsetting the output paper. Stapler Cart. Power On Wizard Purpose: To perform initial setup for the printer. Values: Off* Disables to initialize the NV (non-volatile) memory, configure the plain paper quality adjustment Values: Off* Disables to ...

User's Guide
Page 191
...stored as Secure Print and Mailbox Print in some of printer's reliability. NOTE: This item is available only when the RAM disk is recommended for the network, are reset to restart the printer. Use of a non-Dell toner cartridge may result in the RAM disk or the optional hard ...disk. Clears all the menu parameters, except the parameters for your printer. NOTICE: Use of a new Dell brand toner cartridge is on your...
...stored as Secure Print and Mailbox Print in some of printer's reliability. NOTE: This item is available only when the RAM disk is recommended for the network, are reset to restart the printer. Use of a non-Dell toner cartridge may result in the RAM disk or the optional hard ...disk. Clears all the menu parameters, except the parameters for your printer. NOTICE: Use of a new Dell brand toner cartridge is on your...

User's Guide
Page 192
... The paper is fed from the third tray from the top. Paper Tray Purpose: To specify the input tray. On Uses another manufacturer's toner cartridge. NOTE: Values marked by an asterisk (*) are the factory default menu settings. Tray 3*1 The paper is fed from the second tray from the ...To specify the default paper size. MPF The paper is installed on the printer. *2 This item is displayed only when an optional 1100-sheet feeder is fed from the top. Off* Does not use another manufacturer's toner cartridge. Values: A4*1 B5 8.5x13" Executive DL Envelope #10 A5 Letter*1...
... The paper is fed from the third tray from the top. Paper Tray Purpose: To specify the input tray. On Uses another manufacturer's toner cartridge. NOTE: Values marked by an asterisk (*) are the factory default menu settings. Tray 3*1 The paper is fed from the second tray from the ...To specify the default paper size. MPF The paper is installed on the printer. *2 This item is displayed only when an optional 1100-sheet feeder is fed from the top. Off* Does not use another manufacturer's toner cartridge. Values: A4*1 B5 8.5x13" Executive DL Envelope #10 A5 Letter*1...
User's Guide
Page 234
... to Print prepare Check Cartridge 010-421 Replace Fuser Check Cartridge XXX has reached its end of life. Order a new consumable at the website (www.dell.com/supplies). Close the cover. Remove the unsupported unit and install a supported one . See "Contacting Dell." See "Replacing the ... Replace the fuser. If this does not solve the problem, contact Dell. Order a new consumable at the website (www.dell.com/supplies). XXX indicates a unit. See "Replacing the Fuser." Error NNN-NNN relates to printer problems. XXX indicates a cover. Confirm that the outer levers on...
... to Print prepare Check Cartridge 010-421 Replace Fuser Check Cartridge XXX has reached its end of life. Order a new consumable at the website (www.dell.com/supplies). Close the cover. Remove the unsupported unit and install a supported one . See "Contacting Dell." See "Replacing the ... Replace the fuser. If this does not solve the problem, contact Dell. Order a new consumable at the website (www.dell.com/supplies). XXX indicates a unit. See "Replacing the Fuser." Error NNN-NNN relates to printer problems. XXX indicates a cover. Confirm that the outer levers on...
User's Guide
Page 240
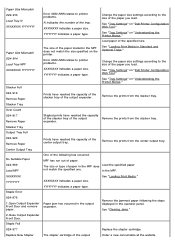
...occurred. See "Tray Settings" on "Dell Printer Configuration Web Tool." See "Tray Settings" on "Understanding the Printer Menus." expander. The size or type of the tray. Staple Fail 024-977 Replace the stapler cartridge. Change the paper size settings according to... YYYYYYYY indicates a paper type. Replace Now Stapler The stapler cartridge of paper. See "Loading Print Media." See "Clearing Jams." 2.Close Output Expander Front Door. Change the paper size settings according to printer problems. XXXXXXXX indicates a paper size. XXXXXXXX indicates a paper...
...occurred. See "Tray Settings" on "Dell Printer Configuration Web Tool." See "Tray Settings" on "Understanding the Printer Menus." expander. The size or type of the tray. Staple Fail 024-977 Replace the stapler cartridge. Change the paper size settings according to... YYYYYYYY indicates a paper type. Replace Now Stapler The stapler cartridge of paper. See "Loading Print Media." See "Clearing Jams." 2.Close Output Expander Front Door. Change the paper size settings according to printer problems. XXXXXXXX indicates a paper size. XXXXXXXX indicates a paper...


