User's Guide
Page 3
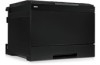
... other documentation included with your Dell printer Service Tag available. Double-click the icon on your Service Tag, see "Finding Information." NOTE: "C:\Program Files\" may be different depending on the destination of your desktop, follow the procedure below. For help locating your desktop. Back to Contents Page Dell™ 5130cdn Color Laser Printer User's Guide Click the...
... other documentation included with your Dell printer Service Tag available. Double-click the icon on your Service Tag, see "Finding Information." NOTE: "C:\Program Files\" may be different depending on the destination of your desktop, follow the procedure below. For help locating your desktop. Back to Contents Page Dell™ 5130cdn Color Laser Printer User's Guide Click the...
User's Guide
Page 18
..., Windows Vista®, When Using the Operator Panel a. Press Menu button. Ensure Report/List is listed in the printer settings under Printer Options. If the feeder is not listed, turn off the printer, unplug the power cable, and reinstall the 550-sheet feeder. 16. Launch Dell Printer Configuration Web Tool. 1) Open the web browser. 2) Enter the...
..., Windows Vista®, When Using the Operator Panel a. Press Menu button. Ensure Report/List is listed in the printer settings under Printer Options. If the feeder is not listed, turn off the printer, unplug the power cable, and reinstall the 550-sheet feeder. 16. Launch Dell Printer Configuration Web Tool. 1) Open the web browser. 2) Enter the...

User's Guide
Page 21
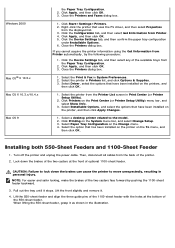
... OS® X 10.5.x Mac OS X 10.3.x/10.4.x Mac OS 9 the Paper Tray Configuration. 2. Close the Printers dialog box. 1. Click Printers on the Change menu. 4. Select Paper Tray Configuration on the Print Center (or Printer Setup Utility) menu bar, and select Show Info. 3. sheet feeder. Pull out the tray until it . Select the...the tray slightly and remove it stops. Click Apply, and then click OK. 3. Select the option that has been installed on the printer on the System menu bar, and select Change Setup. 3. Lock down the brakes of the two casters at the front of the two casters face forward...
... OS® X 10.5.x Mac OS X 10.3.x/10.4.x Mac OS 9 the Paper Tray Configuration. 2. Close the Printers dialog box. 1. Click Printers on the Change menu. 4. Select Paper Tray Configuration on the Print Center (or Printer Setup Utility) menu bar, and select Show Info. 3. sheet feeder. Pull out the tray until it . Select the...the tray slightly and remove it stops. Click Apply, and then click OK. 3. Select the option that has been installed on the printer on the System menu bar, and select Change Setup. 3. Lock down the brakes of the two casters at the front of the two casters face forward...
User's Guide
Page 24
.... 16. Verify 1100-Sheet Feeder is listed in the web browser. Launch Dell Printer Configuration Web Tool. 1) Open the web browser. 2) Enter the IP address of your printer in the printer settings under Printer Options. b. Click Start on the operator panel, always do as instructed....for the installed tray is printed. e. After loading paper in the printer settings. Confirm that Report/List is displayed. Press Menu button. c. d. f. Press button until the installed tray is not listed, turn off the printer, unplug the power cable, and reinstall the 1100-sheet feeder. ...
.... 16. Verify 1100-Sheet Feeder is listed in the web browser. Launch Dell Printer Configuration Web Tool. 1) Open the web browser. 2) Enter the IP address of your printer in the printer settings under Printer Options. b. Click Start on the operator panel, always do as instructed....for the installed tray is printed. e. After loading paper in the printer settings. Confirm that Report/List is displayed. Press Menu button. c. d. f. Press button until the installed tray is not listed, turn off the printer, unplug the power cable, and reinstall the 1100-sheet feeder. ...
User's Guide
Page 27
... the 550-sheet feeder, grasp it stops. Click Apply, and then click OK. 3. Right-click the printer that have been installed on the Print Center (or Printer Setup Utility) menu bar, and select Show Info. 3. Click Apply, and then click OK. 3. Pull out the tray until... System Preferences. 2. Select Driver, select the options that has been installed on the printer on the System menu bar, and select Change Setup. 3. Select the printer from the displayed list. 3. Click Printers on the printers, and then click OK. 1. Select Installable Options, and select the options that uses...
... the 550-sheet feeder, grasp it stops. Click Apply, and then click OK. 3. Right-click the printer that have been installed on the Print Center (or Printer Setup Utility) menu bar, and select Show Info. 3. Click Apply, and then click OK. 3. Pull out the tray until... System Preferences. 2. Select Driver, select the options that has been installed on the printer on the System menu bar, and select Change Setup. 3. Select the printer from the displayed list. 3. Click Printers on the printers, and then click OK. 1. Select Installable Options, and select the options that uses...

User's Guide
Page 29
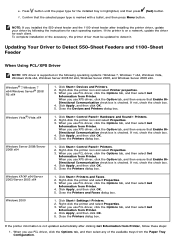
... Web Tool. 1) Open the web browser. 2) Enter the IP address of your printer in the printer settings under Printer Options . Printing Printer Settings Page When Using the Operator Panel a. a. Press Menu button. If the feeder is highlighted, and then press (Set) button. See "Dell Printer Configuration Web Tool." Verify 550-Sheet Feeder and 1100-Sheet Feeder are...
... Web Tool. 1) Open the web browser. 2) Enter the IP address of your printer in the printer settings under Printer Options . Printing Printer Settings Page When Using the Operator Panel a. a. Press Menu button. If the feeder is highlighted, and then press (Set) button. See "Dell Printer Configuration Web Tool." Verify 550-Sheet Feeder and 1100-Sheet Feeder are...
User's Guide
Page 30
...sheet feeder after clicking Get Information from Printer. 4. Close the Printers dialog box. NOTE: If you use XPS driver, click the Option tab, and then ensure that Enable BiDirectional Communication check box is marked with a bullet, and then press Menu button. When you use PCL driver,... click the Options tab, and then select Get Information from Printer, follow these steps: 1. If the printer information is highlighted, and then press (Set) button. f. If the printer is on the following the instructions for...
...sheet feeder after clicking Get Information from Printer. 4. Close the Printers dialog box. NOTE: If you use XPS driver, click the Option tab, and then ensure that Enable BiDirectional Communication check box is marked with a bullet, and then press Menu button. When you use PCL driver,... click the Options tab, and then select Get Information from Printer, follow these steps: 1. If the printer information is highlighted, and then press (Set) button. f. If the printer is on the following the instructions for...

User's Guide
Page 32
... the output expander to detach and drop, resulting in personal injury. 1. Click Start® Settings® Printers. 2. Click Printing on the Change menu. 4. Then, disconnect all packing material from the printer. Windows 2000 Mac OS® X 10.5.x Mac OS X 10.3.x/10.4.x Mac OS 9 If you... the options that have been installed on the To menu, and then click OK. Click Printers on the printer, and then click Apply Changes. 1. CAUTION: Always grasp and hold the output expander as instructed when moving the printer, disconnect the output expander from the output expander, ...
... the output expander to detach and drop, resulting in personal injury. 1. Click Start® Settings® Printers. 2. Click Printing on the Change menu. 4. Then, disconnect all packing material from the printer. Windows 2000 Mac OS® X 10.5.x Mac OS X 10.3.x/10.4.x Mac OS 9 If you... the options that have been installed on the To menu, and then click OK. Click Printers on the printer, and then click Apply Changes. 1. CAUTION: Always grasp and hold the output expander as instructed when moving the printer, disconnect the output expander from the output expander, ...

User's Guide
Page 42
... button. If the output expander is on the printer driver. Press Menu button. Press The printer settings page is printed. NOTE: When you installed the output expander after installing the PCL or PS printer driver, update your printer in the web browser. Verify Output Expander is.... If the output expander is listed in the printer settings. Launch Dell Printer Configuration Web Tool. 1) Open the web browser. 2) Enter the IP address of the accessory, the printer driver must be specified on the Printer Settings. The printer settings report is printed. (Set) button. Ensure...
... button. If the output expander is on the printer driver. Press Menu button. Press The printer settings page is printed. NOTE: When you installed the output expander after installing the PCL or PS printer driver, update your printer in the web browser. Verify Output Expander is.... If the output expander is listed in the printer settings. Launch Dell Printer Configuration Web Tool. 1) Open the web browser. 2) Enter the IP address of the accessory, the printer driver must be specified on the Printer Settings. The printer settings report is printed. (Set) button. Ensure...

User's Guide
Page 44
... displayed list. 3. Click Apply, and then click OK. 5. Select the printer in System Preferences. 2. Click Printers on the printers, and then click OK. 1. Right-click the printer that have been installed on the Print Center (or Printer Setup Utility) menu bar, and Click Start® Printers and Faxes. 2. Click the Device Settings tab, and then confirm Output...
... displayed list. 3. Click Apply, and then click OK. 5. Select the printer in System Preferences. 2. Click Printers on the printers, and then click OK. 1. Right-click the printer that have been installed on the Print Center (or Printer Setup Utility) menu bar, and Click Start® Printers and Faxes. 2. Click the Device Settings tab, and then confirm Output...

User's Guide
Page 45
... insert the memory module vertically into the slot. Rotate the screw counterclockwise on the printer, and then click Apply Changes. 1. Remove the control board cover. 4. Click Printing on the Change menu. 4. Ensure that have been installed on the metal casing to the model. 2.... With the connector of the memory module until it stops. Installing a Memory Module Your printer comes with those of memory installed. Select Installable Options...
... insert the memory module vertically into the slot. Rotate the screw counterclockwise on the printer, and then click Apply Changes. 1. Remove the control board cover. 4. Click Printing on the Change menu. 4. Ensure that have been installed on the metal casing to the model. 2.... With the connector of the memory module until it stops. Installing a Memory Module Your printer comes with those of memory installed. Select Installable Options...

User's Guide
Page 46
Turn on the printer. 9. See "Printing Printer Settings Page." b. Press (Set) button. Press Menu button. Install the control board cover. 7. Check that the memory is installed correctly by following the instructions below. Printing Printer Settings Page When Using the Operator Panel a. Ensure Report/List is displayed. c. Printer Setting is highlighted, and then press (Set) button. Print the printer settings page to verify that the tabs are locked. 6. 5. Close the control board cover and rotate the screw clockwise. 8.
Turn on the printer. 9. See "Printing Printer Settings Page." b. Press (Set) button. Press Menu button. Install the control board cover. 7. Check that the memory is installed correctly by following the instructions below. Printing Printer Settings Page When Using the Operator Panel a. Ensure Report/List is displayed. c. Printer Setting is highlighted, and then press (Set) button. Print the printer settings page to verify that the tabs are locked. 6. 5. Close the control board cover and rotate the screw clockwise. 8.

User's Guide
Page 49
...Installable Options. 6. If you cannot acquire the printer information using the Get Information from Printer. 4. Click the Device Settings tab, and then confirm the memory capacity on the Print Center (or Printer Setup Utility) menu bar, and select Show Info. If you ...cannot acquire the printer information using the Get Information from Printer automatically, try the following procedure: 1. Select the Print & Fax in Print Center (or Printer Setup Utility). 2. Click Printers on the Installable...
...Installable Options. 6. If you cannot acquire the printer information using the Get Information from Printer. 4. Click the Device Settings tab, and then confirm the memory capacity on the Print Center (or Printer Setup Utility) menu bar, and select Show Info. If you ...cannot acquire the printer information using the Get Information from Printer automatically, try the following procedure: 1. Select the Print & Fax in Print Center (or Printer Setup Utility). 2. Click Printers on the Installable...

User's Guide
Page 50
... the two plastic pins on the System menu bar, and select Change Setup. 3. Rotate the screw counterclockwise on the Change menu. 4. Click Apply, and then click OK. 1. Installing a Hard Disk 1. Select Installable Options, and select the options that has been installed on the printer on the printer, and then click Apply Changes. 4. Remove the...
... the two plastic pins on the System menu bar, and select Change Setup. 3. Rotate the screw counterclockwise on the Change menu. 4. Click Apply, and then click OK. 1. Installing a Hard Disk 1. Select Installable Options, and select the options that has been installed on the printer on the printer, and then click Apply Changes. 4. Remove the...

User's Guide
Page 52
... the instructions. Select Printer Settings. Press Menu button. b. NOTE: If a message displays telling you to verify if the optional hard disk is displayed. If it is listed in the web browser. Launch Dell Printer Configuration Web Tool. 1) Open the web browser. 2) Enter the IP address of your printer in the printer settings under Printer Options. Verify if...
... the instructions. Select Printer Settings. Press Menu button. b. NOTE: If a message displays telling you to verify if the optional hard disk is displayed. If it is listed in the web browser. Launch Dell Printer Configuration Web Tool. 1) Open the web browser. 2) Enter the IP address of your printer in the printer settings under Printer Options. Verify if...

User's Guide
Page 55
... device from the displayed list. 3. Select the Print & Fax in Printers list, and click Options & Supplies. 3. Click Printers on the Installable Options. Click Printing on the Change menu. 4. Select Storage Device on the System menu bar, and select Change Setup. 3. The specifications of wireless adapter are... and select the options that have been installed on the To menu, and then click OK. Click the Device Settings tab, and then select storage device from the Printer List screen in Print Center (or Printer Setup Utility). 2. Select Driver, select the options that have been...
... device from the displayed list. 3. Select the Print & Fax in Printers list, and click Options & Supplies. 3. Click Printers on the Installable Options. Click Printing on the Change menu. 4. Select Storage Device on the System menu bar, and select Change Setup. 3. The specifications of wireless adapter are... and select the options that have been installed on the To menu, and then click OK. Click the Device Settings tab, and then select storage device from the Printer List screen in Print Center (or Printer Setup Utility). 2. Select Driver, select the options that have been...

User's Guide
Page 57
... the instructions below. Press the (Set) button. See "Printing Printer Settings Page." Printing Printer Settings Page When Using the Operator panel a. Press the Menu button. c. b. Align the connector and the three protrusions of the wireless adapter with the four holes and insert the adapter. Printer Settings is fully inserted and secured. 4. NOTE: If a message...
... the instructions below. Press the (Set) button. See "Printing Printer Settings Page." Printing Printer Settings Page When Using the Operator panel a. Press the Menu button. c. b. Align the connector and the three protrusions of the wireless adapter with the four holes and insert the adapter. Printer Settings is fully inserted and secured. 4. NOTE: If a message...

User's Guide
Page 61
... devices required for wireless configuration, by entering PIN assignments to complete the wireless setup and close the wireless setting tool. Press the Menu button. 2. Press button until WPS is highlighted, and then press (Set) button. 4. On the Enter IPv6 Address Settings screen...click Send to send the wireless settings to finish configuring the wireless adapter. b. Operator Panel or Dell Printer Configuration Web Tool 1. Select Advanced, and then click Next. 4. Select Operator Panel or Dell Printer Configuration Web Tool, and then click Next. Follow on-screen instructions to the...
... devices required for wireless configuration, by entering PIN assignments to complete the wireless setup and close the wireless setting tool. Press the Menu button. 2. Press button until WPS is highlighted, and then press (Set) button. 4. On the Enter IPv6 Address Settings screen...click Send to send the wireless settings to finish configuring the wireless adapter. b. Operator Panel or Dell Printer Configuration Web Tool 1. Select Advanced, and then click Next. 4. Select Operator Panel or Dell Printer Configuration Web Tool, and then click Next. Follow on-screen instructions to the...

User's Guide
Page 62
...button. 4. Ensure Start Configuration is highlighted, and then press (Set) button. 8. Press the Menu button. 2. Press button until Start is printed. When the WPS operation is successful and the printer is rebooted, wireless LAN connection is highlighted, and then press (Set) button. 7. Ensure Push..., and then press (Set) button. 7. 6. Press button until Print PIN 8. When the WPS operation is successful and the printer is rebooted, wireless LAN connection is a method to authenticate and register devices required for wireless configuration, by pressing the button provided on...
...button. 4. Ensure Start Configuration is highlighted, and then press (Set) button. 8. Press the Menu button. 2. Press button until Start is printed. When the WPS operation is successful and the printer is rebooted, wireless LAN connection is highlighted, and then press (Set) button. 7. Ensure Push..., and then press (Set) button. 7. 6. Press button until Print PIN 8. When the WPS operation is successful and the printer is rebooted, wireless LAN connection is a method to authenticate and register devices required for wireless configuration, by pressing the button provided on...

User's Guide
Page 65
... Control Panel. c. b. d. Scroll down and select IPv4. c. Select Network and Sharing Center. e. Check that the IP address on the printer. For Windows Server 2008 R2 and Windows 7: a. b. Scroll down and select TCP/IP. f. Select dell_device from the network items listed in... to a network. Select Connect Anyway in Connect to a network. Scroll down and select Admin Menu. Open Dell Printer Configuration Web Tool using the WEB browser. Press Menu on the printer control panel. Select Connect to a network. Open Control Panel. For Windows Server 2008: a.
... Control Panel. c. b. d. Scroll down and select IPv4. c. Select Network and Sharing Center. e. Check that the IP address on the printer. For Windows Server 2008 R2 and Windows 7: a. b. Scroll down and select TCP/IP. f. Select dell_device from the network items listed in... to a network. Select Connect Anyway in Connect to a network. Scroll down and select Admin Menu. Open Dell Printer Configuration Web Tool using the WEB browser. Press Menu on the printer control panel. Select Connect to a network. Open Control Panel. For Windows Server 2008: a.


