User Guide
Page 58
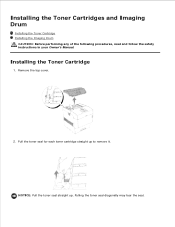
Installing the Toner Cartridges and Imaging Drum Installing the Toner Cartridge Installing the Imaging Drum CAUTION: Before performing any of the following procedures, read and follow the safety instructions in your Owner's Manual. NOTICE: Pull the toner seal straight up to remove it. Remove the top cover. 2. Pulling the toner seal diagonally may tear the seal. 3. Installing the Toner Cartridge 1. Pull the toner seal for each toner cartridge straight up .
Installing the Toner Cartridges and Imaging Drum Installing the Toner Cartridge Installing the Imaging Drum CAUTION: Before performing any of the following procedures, read and follow the safety instructions in your Owner's Manual. NOTICE: Pull the toner seal straight up to remove it. Remove the top cover. 2. Pulling the toner seal diagonally may tear the seal. 3. Installing the Toner Cartridge 1. Pull the toner seal for each toner cartridge straight up .

User Guide
Page 61
Make sure that nothing touches or scratches the roller surface. Pull the protective cover on the roller deteriorates print quality. 6. Scratches or oil from your hands on the imaging drum straight up to come into the printer without correctly aligning the rollers with anything. 5. NOTICE: Do not touch the transfer roller (black-colored roller). Close the top cover. 7. NOTICE: Do not allow the surface covered with a protective sheet to remove it. Close the front cover. NOTICE: Lowering the cartridge into contact with the slots can damage the cartridge.
Make sure that nothing touches or scratches the roller surface. Pull the protective cover on the roller deteriorates print quality. 6. Scratches or oil from your hands on the imaging drum straight up to come into the printer without correctly aligning the rollers with anything. 5. NOTICE: Do not touch the transfer roller (black-colored roller). Close the top cover. 7. NOTICE: Do not allow the surface covered with a protective sheet to remove it. Close the front cover. NOTICE: Lowering the cartridge into contact with the slots can damage the cartridge.

User Guide
Page 203
... printer. See "Replacing the Toner Cartridge" The drum cartridge is either missing or not fully inserted into the printer. Replace the drum cartridge. Reinsert the drum cartridge. See "Replacing the Toner Cartridge" The drum cartridge needs to printer problems. Reinsert the specified toner cartridge. See "Replacing the Imaging Drums" An unsupported toner cartridge is low on toner. XXX is one . Order a new toner cartridge at the website (www.dell...
... printer. See "Replacing the Toner Cartridge" The drum cartridge is either missing or not fully inserted into the printer. Replace the drum cartridge. Reinsert the drum cartridge. See "Replacing the Toner Cartridge" The drum cartridge needs to printer problems. Reinsert the specified toner cartridge. See "Replacing the Imaging Drums" An unsupported toner cartridge is low on toner. XXX is one . Order a new toner cartridge at the website (www.dell...

User Guide
Page 205
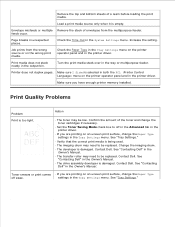
The drum cartridge needs to printer problems. Replace the specified toner cartridge. XXX is nearly empty. Replace the drum cartridge. See "Replacing the Imaging Drums" Ready to Print NNN-NNN XXX Is Low Ready to Print NNN-NNN Imaging Drum Replace Soon Toner cartridge is one of the following: · Yellow Toner(Y) · Cyan Toner(C) · Magenta Toner(M) · Black Toner(B) Error NNN-NNN relates to be replaced. See "Replacing the Toner Cartridge" Drum life warning.
The drum cartridge needs to printer problems. Replace the specified toner cartridge. XXX is nearly empty. Replace the drum cartridge. See "Replacing the Imaging Drums" Ready to Print NNN-NNN XXX Is Low Ready to Print NNN-NNN Imaging Drum Replace Soon Toner cartridge is one of the following: · Yellow Toner(Y) · Cyan Toner(C) · Magenta Toner(M) · Black Toner(B) Error NNN-NNN relates to be replaced. See "Replacing the Toner Cartridge" Drum life warning.

User Guide
Page 225
... displays on . Other electrical equipment plugged into the printer and a properly grounded electrical outlet. NOTICE: If an error message appears, see "Understanding Printer Messages." How to replace the Imaging Drum How to install the Toner Cartridge How to install the Transfer Roller How to resolve. The printer power cable is plugged into the outlet is on...
... displays on . Other electrical equipment plugged into the printer and a properly grounded electrical outlet. NOTICE: If an error message appears, see "Understanding Printer Messages." How to replace the Imaging Drum How to install the Toner Cartridge How to install the Transfer Roller How to resolve. The printer power cable is plugged into the outlet is on...
User Guide
Page 227
...from the wrong source or on the printer operator panel and in the printer driver. feeds occur. Check the Time-Out in the tray or multipurpose feeder. Make sure you are printing on an uneven print surface, change the toner cartridges if necessary. · Set the... The transfer roller may be low. Check the Paper Type in the printer driver. Printer does not duplex pages. Change the imaging drum. · The developer is being used. · The imaging drum may need to be replaced. See "Contacting Dell" in the Owner's Manual. · The drive assembly developer is ...
...from the wrong source or on the printer operator panel and in the printer driver. feeds occur. Check the Time-Out in the tray or multipurpose feeder. Make sure you are printing on an uneven print surface, change the toner cartridges if necessary. · Set the... The transfer roller may be low. Check the Paper Type in the printer driver. Printer does not duplex pages. Change the imaging drum. · The developer is being used. · The imaging drum may need to be replaced. See "Contacting Dell" in the Owner's Manual. · The drive assembly developer is ...
User Guide
Page 228
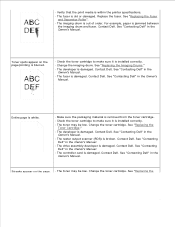
... the imaging drum. Contact Dell. Contact Dell. See "Contacting Dell" in the Owner's Manual. · The drive assembly developer is out of order. Toner spots appear on the page. · The toner may be low. Contact Dell. · Verify that the print media is within the printer specifications. · The fuser is damaged. Change the toner cartridge. Entire...
... the imaging drum. Contact Dell. Contact Dell. See "Contacting Dell" in the Owner's Manual. · The drive assembly developer is out of order. Toner spots appear on the page. · The toner may be low. Contact Dell. · Verify that the print media is within the printer specifications. · The fuser is damaged. Change the toner cartridge. Entire...
User Guide
Page 279
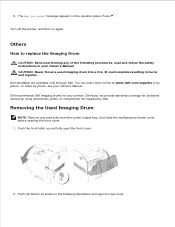
...and open the front cover. 2. Turn off the printer, and then on the operator panel. It could explode resulting in the following procedures, read and follow the safety instructions in your Owner's Manual. Dell recommends Dell imaging drums for problems caused by using accessories, parts, or ...phone, see your Owner's Manual. Push the front latch up and fully open the top cover. Dell cartridges are available only through Dell. Others How to replace the Imaging Drum CAUTION: Before performing any print jobs from the center output tray, and close the multipurpose feeder ...
...and open the front cover. 2. Turn off the printer, and then on the operator panel. It could explode resulting in the following procedures, read and follow the safety instructions in your Owner's Manual. Dell recommends Dell imaging drums for problems caused by using accessories, parts, or ...phone, see your Owner's Manual. Push the front latch up and fully open the top cover. Dell cartridges are available only through Dell. Others How to replace the Imaging Drum CAUTION: Before performing any print jobs from the center output tray, and close the multipurpose feeder ...
User Guide
Page 295
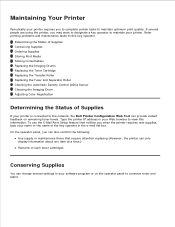
... Storing Print Media Storing Consumables Replacing the Imaging Drums Replacing the Toner Cartridge Replacing the Transfer Roller Replacing the Fuser and Separator Roller Cleaning the Automatic Density Control (ADC) Sensor Cleaning the Imaging Drum Adjusting Color Registration Determining the Status of Supplies If your printer is connected to the network, the Dell Printer Configuration Web Tool can change several...
... Storing Print Media Storing Consumables Replacing the Imaging Drums Replacing the Toner Cartridge Replacing the Transfer Roller Replacing the Fuser and Separator Roller Cleaning the Automatic Density Control (ADC) Sensor Cleaning the Imaging Drum Adjusting Color Registration Determining the Status of Supplies If your printer is connected to the network, the Dell Printer Configuration Web Tool can change several...
User Guide
Page 297
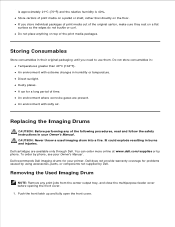
... rather than 40°C (104°F). A car for your printer. Dell does not provide warranty coverage for problems caused by using accessories, parts, or components not supplied by phone. Dell recommends Dell imaging drums for a long period of print media on the floor. Storing ...in burns and injuries. Replacing the Imaging Drums CAUTION: Before performing any print jobs from the center output tray, and close the multipurpose feeder cover before opening the front cover. 1. CAUTION: Never throw a used imaging drum into a fire. Dell cartridges are present. To order by ...
... rather than 40°C (104°F). A car for your printer. Dell does not provide warranty coverage for problems caused by using accessories, parts, or components not supplied by phone. Dell recommends Dell imaging drums for a long period of print media on the floor. Storing ...in burns and injuries. Replacing the Imaging Drums CAUTION: Before performing any print jobs from the center output tray, and close the multipurpose feeder cover before opening the front cover. 1. CAUTION: Never throw a used imaging drum into a fire. Dell cartridges are present. To order by ...

Service Manual
Page 35
...cartridge CRUM ID read by the MCU is detected. The toner CRUM ID error is detected. The PHD detached is detected. The value of the other company. The PHD life over is detected. FIP to Print 094-402 Flip Imaging Drum Replace Soon Imaging Drum 091-912 Flip Reseat Imaging Drum CRUM ID 093-965 Flip Reseat Imaging Drum...093-963 Flip Reseat XXX Toner NOTE: XXX: Toner color 093-960: Yellow 093-961: Magenta 093-962: Cyan 093-963: Black Insert Drum 091-972 Flip Insert/Reseat Imaging Drum Imaging Drum 091-935 Flip Replace Imaging Drum Ready to be referred FIP-44 FIP-44 FIP-45...
...cartridge CRUM ID read by the MCU is detected. The toner CRUM ID error is detected. The PHD detached is detected. The value of the other company. The PHD life over is detected. FIP to Print 094-402 Flip Imaging Drum Replace Soon Imaging Drum 091-912 Flip Reseat Imaging Drum CRUM ID 093-965 Flip Reseat Imaging Drum...093-963 Flip Reseat XXX Toner NOTE: XXX: Toner color 093-960: Yellow 093-961: Magenta 093-962: Cyan 093-963: Black Insert Drum 091-972 Flip Insert/Reseat Imaging Drum Imaging Drum 091-935 Flip Replace Imaging Drum Ready to be referred FIP-44 FIP-44 FIP-45...

Service Manual
Page 246
... Name Life Y Toner Life M Toner Life C Toner Life K Toner Life BTR (Transfer Roller) 1 Life Fuser Life Printer Life PHD (Imaging Drum) 1 (Print volume) Life PHD (Imaging Drum) 2 (Round time) Life PHD (Imaging Drum) 3 (Dispense time) Life PHD (Imaging Drum) 4 (Toner cartridge exchange) Life PHD (Imaging Drum) 5 (Dispense time, after Life PHD 4 reached life limit) Life Deve Unit 1 (Yellow) Life Deve Unit 2 (Magenta...
... Name Life Y Toner Life M Toner Life C Toner Life K Toner Life BTR (Transfer Roller) 1 Life Fuser Life Printer Life PHD (Imaging Drum) 1 (Print volume) Life PHD (Imaging Drum) 2 (Round time) Life PHD (Imaging Drum) 3 (Dispense time) Life PHD (Imaging Drum) 4 (Toner cartridge exchange) Life PHD (Imaging Drum) 5 (Dispense time, after Life PHD 4 reached life limit) Life Deve Unit 1 (Yellow) Life Deve Unit 2 (Magenta...

Service Manual
Page 253
TOP COVER IMAGING DRUM TONER CARTRIDGE 500 SHEET PAPER TRAY Ten03103KA 3 - 3 Chapter 3 Removal and Replacement Procedures (RRPs) ‹ Remove the TOP COVER, IMAGING DRUM, TONER CARTRIDGE, and 500 SHEET PAPER TRAY (RRP. 6.2) to place them at another place where they do not interrupt the job. (Note that service operation can be done with those parts remained in place according to the location of disassembly/assembly.) .
TOP COVER IMAGING DRUM TONER CARTRIDGE 500 SHEET PAPER TRAY Ten03103KA 3 - 3 Chapter 3 Removal and Replacement Procedures (RRPs) ‹ Remove the TOP COVER, IMAGING DRUM, TONER CARTRIDGE, and 500 SHEET PAPER TRAY (RRP. 6.2) to place them at another place where they do not interrupt the job. (Note that service operation can be done with those parts remained in place according to the location of disassembly/assembly.) .

Service Manual
Page 256
Removal and Replacement Flows PRINTER RRP FLOW This flow shows the removing procedures of the following parts. (COVER Reration) TOP COVER FRAME, OPERATOR PANEL, FRONT COVER IMAGING DRUM COVER, IMAGING DRUM COVER HINGE PIN COVER ASSY REAR, REAR COVER, REAR FAN, FAN LV RIGHT ... MULTIPURPOSE FEEDER (MPF) COVER, MULTIPURPOSE FEEDER (MPF) TRAY Removing TOP COVER Removing TONER CARTRIDGE (Y), (M), (C), (K) Opening FRONT COVER Opening FRONT COVER FRONT COVER (RRP1.3) FRONT COVER (RRP1.3) Opening IMAGING DRUM COVER RIGHT FRONT COVER (RRP1.8) OPERATOR PANEL (RRP1.2) TOP COVER FRAME (RRP1.1) TOP...
Removal and Replacement Flows PRINTER RRP FLOW This flow shows the removing procedures of the following parts. (COVER Reration) TOP COVER FRAME, OPERATOR PANEL, FRONT COVER IMAGING DRUM COVER, IMAGING DRUM COVER HINGE PIN COVER ASSY REAR, REAR COVER, REAR FAN, FAN LV RIGHT ... MULTIPURPOSE FEEDER (MPF) COVER, MULTIPURPOSE FEEDER (MPF) TRAY Removing TOP COVER Removing TONER CARTRIDGE (Y), (M), (C), (K) Opening FRONT COVER Opening FRONT COVER FRONT COVER (RRP1.3) FRONT COVER (RRP1.3) Opening IMAGING DRUM COVER RIGHT FRONT COVER (RRP1.8) OPERATOR PANEL (RRP1.2) TOP COVER FRAME (RRP1.1) TOP...

Service Manual
Page 257
Chapter 3 Removal and Replacement Procedures (RRPs) PRINTER RRP FLOW This flow shows the removing procedures of the following parts. (500 SHEET PAPER TRAY Reration) RETARD ASSY, SEPARATOR ROLLER, SEPARATOR ROLLER ... 500 SHEET PAPER TRAY Removing TOP COVER RETARD ASSY (RRP2.2) Removing TONER CARTRIDGE (Y), (M), (C), (K) SEPARATOR ROLLER, SEPARATOR ROLLER CLUTCH (RRP2.1) PAPER FEEDER CHUTE (RRP3.1) PAPER FEED ROLLER (RRP3.14) PAPER TRAY COVER (RRP3.2) Opening FRONT COVER Opening IMAGING DRUM COVER Removing IMAGING DRUM TOP COVER FRAME (RRP1.1) RIGHT SIDE COVER (RRP1.7) LEFT SIDE COVER ...
Chapter 3 Removal and Replacement Procedures (RRPs) PRINTER RRP FLOW This flow shows the removing procedures of the following parts. (500 SHEET PAPER TRAY Reration) RETARD ASSY, SEPARATOR ROLLER, SEPARATOR ROLLER ... 500 SHEET PAPER TRAY Removing TOP COVER RETARD ASSY (RRP2.2) Removing TONER CARTRIDGE (Y), (M), (C), (K) SEPARATOR ROLLER, SEPARATOR ROLLER CLUTCH (RRP2.1) PAPER FEEDER CHUTE (RRP3.1) PAPER FEED ROLLER (RRP3.14) PAPER TRAY COVER (RRP3.2) Opening FRONT COVER Opening IMAGING DRUM COVER Removing IMAGING DRUM TOP COVER FRAME (RRP1.1) RIGHT SIDE COVER (RRP1.7) LEFT SIDE COVER ...

Service Manual
Page 258
... and Replacement Procedures (RRPs) PRINTER RRP FLOW This flow shows the removing procedures of the following parts. (REGISTRATION Reration) REGISTRATION ASSEMBLY, REGISTRATION CHUTE ASSEMBLY, REGISTRATION SENSOR MULTIPURPOSE FEEDER (MPF) SEPARATOR ASSEMBLY MULTIPURPOSE FEEDER (MPF) SEPARATOR ROLLER Removing TOP COVER Removing TONER CARTRIDGE (Y), (M), (C), (K) Opening FRONT COVER Opening IMAGING DRUM COVER Removing IMAGING DRUM REGISTRATION ASSEMBLY (RRP4.6) REGISTRATION...
... and Replacement Procedures (RRPs) PRINTER RRP FLOW This flow shows the removing procedures of the following parts. (REGISTRATION Reration) REGISTRATION ASSEMBLY, REGISTRATION CHUTE ASSEMBLY, REGISTRATION SENSOR MULTIPURPOSE FEEDER (MPF) SEPARATOR ASSEMBLY MULTIPURPOSE FEEDER (MPF) SEPARATOR ROLLER Removing TOP COVER Removing TONER CARTRIDGE (Y), (M), (C), (K) Opening FRONT COVER Opening IMAGING DRUM COVER Removing IMAGING DRUM REGISTRATION ASSEMBLY (RRP4.6) REGISTRATION...

Service Manual
Page 259
Chapter 3 Removal and Replacement Procedures (RRPs) PRINTER RRP FLOW This flow shows the removing procedures of the following parts. (OUTER DUPLEX ASSEMBLY Reration) OUTER DUPLEX ASSEMBLY, DUPLEX RETAINING STRAP MULTIPURPOSE FEEDER... FEEDER (MPF) PAPER SENSOR OUTPUT TRAY ACTUATOR, OUTPUT TRAY FULL SENSOR DUPLEX DRIVE MOTOR, FAN FRONT Removing TOP COVER Removing TONER CARTRIDGE (Y), (M), (C), (K) Opening FRONT COVER Opening FRONT COVER Opening IMAGING DRUM COVER FRONT COVER (RRP1.3) TOP COVER FRAME (RRP1.1) OUTPUT TRAY FULL SENSOR (RRP5.10) RIGHT FRONT COVER (RRP1.8) LEFT FRONT...
Chapter 3 Removal and Replacement Procedures (RRPs) PRINTER RRP FLOW This flow shows the removing procedures of the following parts. (OUTER DUPLEX ASSEMBLY Reration) OUTER DUPLEX ASSEMBLY, DUPLEX RETAINING STRAP MULTIPURPOSE FEEDER... FEEDER (MPF) PAPER SENSOR OUTPUT TRAY ACTUATOR, OUTPUT TRAY FULL SENSOR DUPLEX DRIVE MOTOR, FAN FRONT Removing TOP COVER Removing TONER CARTRIDGE (Y), (M), (C), (K) Opening FRONT COVER Opening FRONT COVER Opening IMAGING DRUM COVER FRONT COVER (RRP1.3) TOP COVER FRAME (RRP1.1) OUTPUT TRAY FULL SENSOR (RRP5.10) RIGHT FRONT COVER (RRP1.8) LEFT FRONT...

Service Manual
Page 260
...) PRINTER RRP FLOW This flow shows the removing procedures of the following parts. (INNER DUPLEX ASSEMBLY Reration) FUSER, TRANSFER ROLLER INNER DUPLEX ASSEMBLY, DUPLEX HINGE LINK SPRING, DUPLEX HINGE LINK AUTOMATIC DENSITY CONTROL (ADC) SENSOR, TONER FULL SENSOR Removing TOP COVER Removing TONER CARTRIDGE (Y), (M), (C), (K) Opening FRONT COVER Opening FRONT COVER Opening IMAGING DRUM COVER...
...) PRINTER RRP FLOW This flow shows the removing procedures of the following parts. (INNER DUPLEX ASSEMBLY Reration) FUSER, TRANSFER ROLLER INNER DUPLEX ASSEMBLY, DUPLEX HINGE LINK SPRING, DUPLEX HINGE LINK AUTOMATIC DENSITY CONTROL (ADC) SENSOR, TONER FULL SENSOR Removing TOP COVER Removing TONER CARTRIDGE (Y), (M), (C), (K) Opening FRONT COVER Opening FRONT COVER Opening IMAGING DRUM COVER...

Service Manual
Page 261
...PRINTER RRP FLOW This flow shows the removing procedures of the following parts. (PRINT HEAD Reration) PRINT HEAD (DEVELOPER Reration) DEVELOPER FRAME, DEVELOPER ASSEMBLY (Y), (M), (C), (K) TONER DISPENSER ASSEMBLY, DISPENSER ASSY (Y), (M), (C), (K) TONER CARTRIDGE SENSOR, DUCT LV Removing TOP COVER Removing TONER CARTRIDGE (Y), (M), (C), (K) Opening FRONT COVER Opening IMAGING DRUM COVER Removing IMAGING DRUM....4) DISPENSER ASSY (Y) (RRP7.5) PRINT HEAD (RRP6.1) DISPENSER ASSY (M) (RRP7.6) DISPENSER ASSY (C) (RRP7.7) DISPENSER ASSY (K) (RRP7.8) TONER CARTRIDGE SENSOR (RRP7.12) 3 - 11
...PRINTER RRP FLOW This flow shows the removing procedures of the following parts. (PRINT HEAD Reration) PRINT HEAD (DEVELOPER Reration) DEVELOPER FRAME, DEVELOPER ASSEMBLY (Y), (M), (C), (K) TONER DISPENSER ASSEMBLY, DISPENSER ASSY (Y), (M), (C), (K) TONER CARTRIDGE SENSOR, DUCT LV Removing TOP COVER Removing TONER CARTRIDGE (Y), (M), (C), (K) Opening FRONT COVER Opening IMAGING DRUM COVER Removing IMAGING DRUM....4) DISPENSER ASSY (Y) (RRP7.5) PRINT HEAD (RRP6.1) DISPENSER ASSY (M) (RRP7.6) DISPENSER ASSY (C) (RRP7.7) DISPENSER ASSY (K) (RRP7.8) TONER CARTRIDGE SENSOR (RRP7.12) 3 - 11

Service Manual
Page 616
...: 3.2kg ± 0.1kg Reference: The Imaging Drum cartridge has CRUM (CRU memory) to record information. 3.3.2 Transfer roll (BTR) cartridge Width: 290mm ± 3mm Depth: 54mm ± 3mm Height: 97mm ± 3mm Mass: 0.52kg ± 0.01kg 3.3.3 Black toner cartridge Width: 355mm ± 3mm Depth: 51mm ...toner cartridge has CRUM (CRU memory) to record information. 3.3.5 Magenta toner cartridge Width: 355mm ± 3mm Depth: 51mm ± 3mm Height: 55mm ± 3mm Mass: 0.36kg ± 0.01kg Reference: The magenta toner cartridge has CRUM (CRU memory) to record information. 8 - 4 Chapter 8 Printer ...
...: 3.2kg ± 0.1kg Reference: The Imaging Drum cartridge has CRUM (CRU memory) to record information. 3.3.2 Transfer roll (BTR) cartridge Width: 290mm ± 3mm Depth: 54mm ± 3mm Height: 97mm ± 3mm Mass: 0.52kg ± 0.01kg 3.3.3 Black toner cartridge Width: 355mm ± 3mm Depth: 51mm ...toner cartridge has CRUM (CRU memory) to record information. 3.3.5 Magenta toner cartridge Width: 355mm ± 3mm Depth: 51mm ± 3mm Height: 55mm ± 3mm Mass: 0.36kg ± 0.01kg Reference: The magenta toner cartridge has CRUM (CRU memory) to record information. 8 - 4 Chapter 8 Printer ...


