User Guide
Page 2
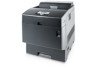
... the front latch up. 9 Outer Front Cover NOTE: The outer front cover opens by phone. Visit Dell's website, or order Dell printer supplies by pushing the side button. 10 Power switch To order replacement toner cartridges or supplies from Dell: 1. is subject to hardware or loss of data and tells you make better use of...
... the front latch up. 9 Outer Front Cover NOTE: The outer front cover opens by phone. Visit Dell's website, or order Dell printer supplies by pushing the side button. 10 Power switch To order replacement toner cartridges or supplies from Dell: 1. is subject to hardware or loss of data and tells you make better use of...
User Guide
Page 8
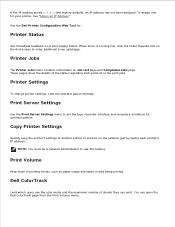
... to set the type of sheets they can open the Dell ColorTrack page from the Print Volume menu. Copy Printer Settings Quickly copy the printer's settings to use the color mode and the maximum number of printer interface and necessary conditions for communications. When toner is running...Use the Dell Printer Configuration Web Tool for your printer, see "Assign an IP Address." If the IP address shows 0.0.0.0 (the factory default), an IP address has not been assigned. Print Server Settings Use the Print Server Settings menu to order additional toner cartridges. These pages...
... to set the type of sheets they can open the Dell ColorTrack page from the Print Volume menu. Copy Printer Settings Quickly copy the printer's settings to use the color mode and the maximum number of printer interface and necessary conditions for communications. When toner is running...Use the Dell Printer Configuration Web Tool for your printer, see "Assign an IP Address." If the IP address shows 0.0.0.0 (the factory default), an IP address has not been assigned. Print Server Settings Use the Print Server Settings menu to order additional toner cartridges. These pages...

User Guide
Page 22
...cartridge. Premier Displays the Premier link. Tray Settings Tray 1 Paper Type Displays the type of paper loaded in the multipurpose feeder. Display Popup Displays a popup menu when paper is loaded in the standard 500-sheet tray. Non-Dell Toner Non-Dell Toner Displays whether to adjust the color...loaded in the optional 1000-sheet module. Envelope Displays the temperature settings of the fuser for Printer Settings, Copy Printer Settings (where the settings are copied), Dell ColorTrack, and Tray Settings. MPF Paper Size Displays the size of reports and lists. Regular...
...cartridge. Premier Displays the Premier link. Tray Settings Tray 1 Paper Type Displays the type of paper loaded in the multipurpose feeder. Display Popup Displays a popup menu when paper is loaded in the standard 500-sheet tray. Non-Dell Toner Non-Dell Toner Displays whether to adjust the color...loaded in the optional 1000-sheet module. Envelope Displays the temperature settings of the fuser for Printer Settings, Copy Printer Settings (where the settings are copied), Dell ColorTrack, and Tray Settings. MPF Paper Size Displays the size of reports and lists. Regular...

User Guide
Page 30
... the optional hard disk are reset to initialize NVM Memory. The data relating to use toner cartridges provided by other companies. Non-Dell Toner Purpose: Specifies whether to PostScript isn't cleared. Values: Reset Defaults and restart printer. Format HDD Purpose: To format the optional hard disk. This item is only available when the...
... the optional hard disk are reset to initialize NVM Memory. The data relating to use toner cartridges provided by other companies. Non-Dell Toner Purpose: Specifies whether to PostScript isn't cleared. Values: Reset Defaults and restart printer. Format HDD Purpose: To format the optional hard disk. This item is only available when the...

User Guide
Page 31
... warranty coverage for ordering supplies. Values: Select Reorder URL Selects the URL specified in Regular or Premier. Copy Printer Settings Initialize PrintMeter Purpose: To initialize PrintMeter. Dell recommends only new Dell-brand toner cartridges for your printer. Web Link Customization Purpose: To configure the link used for problems caused by using accessories, parts, or components...
... warranty coverage for ordering supplies. Values: Select Reorder URL Selects the URL specified in Regular or Premier. Copy Printer Settings Initialize PrintMeter Purpose: To initialize PrintMeter. Dell recommends only new Dell-brand toner cartridges for your printer. Web Link Customization Purpose: To configure the link used for problems caused by using accessories, parts, or components...
User Guide
Page 58
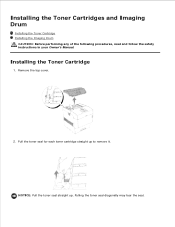
NOTICE: Pull the toner seal straight up to remove it. Pull the toner seal for each toner cartridge straight up . Installing the Toner Cartridges and Imaging Drum Installing the Toner Cartridge Installing the Imaging Drum CAUTION: Before performing any of the following procedures, read and follow the safety instructions in your Owner's Manual. Installing the Toner Cartridge 1. Pulling the toner seal diagonally may tear the seal. 3. Remove the top cover. 2.
NOTICE: Pull the toner seal straight up to remove it. Pull the toner seal for each toner cartridge straight up . Installing the Toner Cartridges and Imaging Drum Installing the Toner Cartridge Installing the Imaging Drum CAUTION: Before performing any of the following procedures, read and follow the safety instructions in your Owner's Manual. Installing the Toner Cartridge 1. Pulling the toner seal diagonally may tear the seal. 3. Remove the top cover. 2.

User Guide
Page 61
Close the front cover. Scratches or oil from your hands on the imaging drum straight up to come into the printer without correctly aligning the rollers with a protective sheet to remove it. NOTICE: Do not touch the transfer roller (black-colored roller). Pull the protective cover on the roller deteriorates print quality. 6. Close the top cover. 7. Make sure that nothing touches or scratches the roller surface. NOTICE: Lowering the cartridge into contact with anything. 5. NOTICE: Do not allow the surface covered with the slots can damage the cartridge.
Close the front cover. Scratches or oil from your hands on the imaging drum straight up to come into the printer without correctly aligning the rollers with a protective sheet to remove it. NOTICE: Do not touch the transfer roller (black-colored roller). Pull the protective cover on the roller deteriorates print quality. 6. Close the top cover. 7. Make sure that nothing touches or scratches the roller surface. NOTICE: Lowering the cartridge into contact with anything. 5. NOTICE: Do not allow the surface covered with the slots can damage the cartridge.
User Guide
Page 116
...jam. Use one envelope size during printing, resulting in the multipurpose feeder, insert the envelopes either with adhesive, and could void your printer and cartridge warranties. Do not use label sheets that have exposed adhesive. Partial sheets may cause labels to Label in .) away from edges. ...preferred, especially when printing bar codes. Use labels that have adhesive to the edge of the sheet. Dell recommends zone coating of the adhesive at the rear, or with laser printers. Label adhesives, face sheet (printable stock), and topcoats must be able to fit the width of ...
...jam. Use one envelope size during printing, resulting in the multipurpose feeder, insert the envelopes either with adhesive, and could void your printer and cartridge warranties. Do not use label sheets that have exposed adhesive. Partial sheets may cause labels to Label in .) away from edges. ...preferred, especially when printing bar codes. Use labels that have adhesive to the edge of the sheet. Dell recommends zone coating of the adhesive at the rear, or with laser printers. Label adhesives, face sheet (printable stock), and topcoats must be able to fit the width of ...
User Guide
Page 152
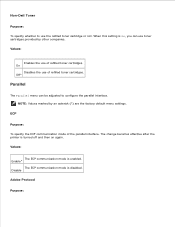
... printer is On, you can be adjusted to use of refilled toner cartridges. When this setting is turned off and then on again. Off* Parallel The Parallel menu can use of refilled toner cartridges. On Disables the use toner cartridges provided... by an asterisk (*) are the factory default menu settings. ECP Purpose: To specify the ECP communication mode of the parallel interface. Enable* The ECP communication mode is enabled. Values: The ECP communication mode is disabled. Disable Adobe Protocol Purpose: NOTE: Values marked by other companies. Non-Dell...
... printer is On, you can be adjusted to use of refilled toner cartridges. When this setting is turned off and then on again. Off* Parallel The Parallel menu can use of refilled toner cartridges. On Disables the use toner cartridges provided... by an asterisk (*) are the factory default menu settings. ECP Purpose: To specify the ECP communication mode of the parallel interface. Enable* The ECP communication mode is enabled. Values: The ECP communication mode is disabled. Disable Adobe Protocol Purpose: NOTE: Values marked by other companies. Non-Dell...

User Guide
Page 203
... one of the following : · B · C · Y · M Error NNN-NNN relates to printer problems. Reinsert the specified toner cartridge. Order a new toner cartridge at the website (www.dell.com/supplies or www.euro.dell.com/supplies). Replace the specified toner cartridge. Transparency 024-934 Open Covers Remove Paper Insert TonerCart NNN-NNN Insert Y Toner Insert...
... one of the following : · B · C · Y · M Error NNN-NNN relates to printer problems. Reinsert the specified toner cartridge. Order a new toner cartridge at the website (www.dell.com/supplies or www.euro.dell.com/supplies). Replace the specified toner cartridge. Transparency 024-934 Open Covers Remove Paper Insert TonerCart NNN-NNN Insert Y Toner Insert...
User Guide
Page 205
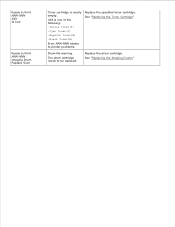
The drum cartridge needs to printer problems. Replace the specified toner cartridge. XXX is nearly empty. See "Replacing the Imaging Drums" Ready to Print NNN-NNN XXX Is Low Ready to Print NNN-NNN Imaging Drum Replace Soon Toner cartridge is one of the following: · Yellow Toner(Y) · Cyan Toner(C) · Magenta Toner(M) · Black Toner(B) Error NNN-NNN relates to be replaced. Replace the drum cartridge. See "Replacing the Toner Cartridge" Drum life warning.
The drum cartridge needs to printer problems. Replace the specified toner cartridge. XXX is nearly empty. See "Replacing the Imaging Drums" Ready to Print NNN-NNN XXX Is Low Ready to Print NNN-NNN Imaging Drum Replace Soon Toner cartridge is one of the following: · Yellow Toner(Y) · Cyan Toner(C) · Magenta Toner(M) · Black Toner(B) Error NNN-NNN relates to be replaced. Replace the drum cartridge. See "Replacing the Toner Cartridge" Drum life warning.
User Guide
Page 210
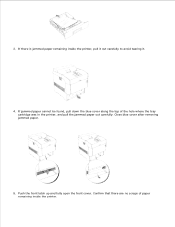
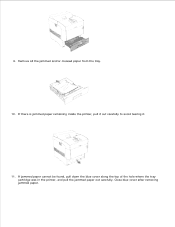
3. If there is jammed paper remaining inside the printer. Push the front latch up and fully open the front cover. If jammed paper cannot be found, pull down the blue cover along the top of paper remaining inside the printer, pull it out carefully to avoid tearing it. 4. Confirm that there are no scraps of the hole where the tray cartridge was in the printer, and pull the jammed paper out carefully. Close blue cover after removing jammed paper. 5.
3. If there is jammed paper remaining inside the printer. Push the front latch up and fully open the front cover. If jammed paper cannot be found, pull down the blue cover along the top of paper remaining inside the printer, pull it out carefully to avoid tearing it. 4. Confirm that there are no scraps of the hole where the tray cartridge was in the printer, and pull the jammed paper out carefully. Close blue cover after removing jammed paper. 5.
User Guide
Page 217
9. If jammed paper cannot be found, pull down the blue cover along the top of the hole where the tray cartridge was in the printer, and pull the jammed paper out carefully. Remove all the jammed and/or creased paper from the tray. 10. If there is jammed paper remaining inside the printer, pull it out carefully to avoid tearing it. 11. Close blue cover after removing jammed paper.
9. If jammed paper cannot be found, pull down the blue cover along the top of the hole where the tray cartridge was in the printer, and pull the jammed paper out carefully. Remove all the jammed and/or creased paper from the tray. 10. If there is jammed paper remaining inside the printer, pull it out carefully to avoid tearing it. 11. Close blue cover after removing jammed paper.

User Guide
Page 225
... replace the Imaging Drum How to install the Toner Cartridge How to install the Transfer Roller How to resolve. Troubleshooting Guide Basic Printer Problems Printing Problems Print Quality Problems Wireless Adapter Problem Other Problem Contacting Service Troubleshooting Guide Installing Printer Drivers Basic Printer Problems Some printer problems can be easy to install the Fuser Basic...
... replace the Imaging Drum How to install the Toner Cartridge How to install the Transfer Roller How to resolve. Troubleshooting Guide Basic Printer Problems Printing Problems Print Quality Problems Wireless Adapter Problem Other Problem Contacting Service Troubleshooting Guide Installing Printer Drivers Basic Printer Problems Some printer problems can be easy to install the Fuser Basic...
User Guide
Page 227
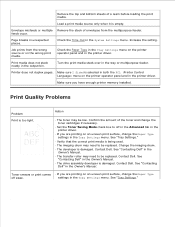
...cartridges if necessary. · Set the Toner Saving Mode check box to be replaced. Print media does not stack neatly in the Owner's Manual. See "Contacting Dell" in the output bin. Toner smears or print comes · If you are printing on the wrong print media. See "Contacting Dell" in the printer... driver. · If you have enough printer memory installed. See "Contacting Dell" in the Tray Settings menu. settings in the Owner's Manual. · The drive assembly ...
...cartridges if necessary. · Set the Toner Saving Mode check box to be replaced. Print media does not stack neatly in the Owner's Manual. See "Contacting Dell" in the output bin. Toner smears or print comes · If you are printing on the wrong print media. See "Contacting Dell" in the printer... driver. · If you have enough printer memory installed. See "Contacting Dell" in the Tray Settings menu. settings in the Owner's Manual. · The drive assembly ...
User Guide
Page 228
...damaged. Contact Dell. · Verify that the print media is within the printer specifications. · The fuser is damaged. See "Contacting Dell" in the Owner's Manual. See "Contacting Dell" in the Owner's Manual. See "Contacting Dell" in the Owner's Manual. See "Contacting Dell" in the...the packaging material is removed from the toner cartridge. · Check the toner cartridge to make sure it is damaged. See "Replacing the For example, paper is broken. Contact Dell. Change the toner cartridge. See "Contacting Dell" in the Owner's Manual. · ...
...damaged. Contact Dell. · Verify that the print media is within the printer specifications. · The fuser is damaged. See "Contacting Dell" in the Owner's Manual. See "Contacting Dell" in the Owner's Manual. See "Contacting Dell" in the Owner's Manual. See "Contacting Dell" in the...the packaging material is removed from the toner cartridge. · Check the toner cartridge to make sure it is damaged. See "Replacing the For example, paper is broken. Contact Dell. Change the toner cartridge. See "Contacting Dell" in the Owner's Manual. · ...
User Guide
Page 229
... control unit (IOT control unit) is damaged. Toner Cartridge." · If you are using preprinted forms, make sure it is installed correctly. · Deselect Change All Colors to 35 °C. · The developer is broken. See "Contacting Dell" in your software program. The job prints, but the... top and side margins are incorrect. · Make sure the margins are supported by the printer, the host computer, and the...
... control unit (IOT control unit) is damaged. Toner Cartridge." · If you are using preprinted forms, make sure it is installed correctly. · Deselect Change All Colors to 35 °C. · The developer is broken. See "Contacting Dell" in your software program. The job prints, but the... top and side margins are incorrect. · Make sure the margins are supported by the printer, the host computer, and the...
User Guide
Page 279
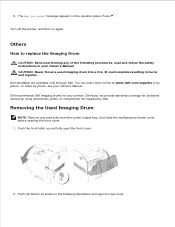
... could explode resulting in your printer. Press . Others How to replace the Imaging Drum CAUTION: Before performing any print jobs from the center output tray, and close the multipurpose feeder cover before opening the front cover. 1. Dell does not provide warranty coverage ...throw a used imaging drum into a fire. To order by Dell. Removing the Used Imaging Drum NOTE: Remove any of the following illustration and open the front cover. 2. Dell cartridges are available only through Dell. Dell recommends Dell imaging drums for problems caused by using accessories, parts, or...
... could explode resulting in your printer. Press . Others How to replace the Imaging Drum CAUTION: Before performing any print jobs from the center output tray, and close the multipurpose feeder cover before opening the front cover. 1. Dell does not provide warranty coverage ...throw a used imaging drum into a fire. To order by Dell. Removing the Used Imaging Drum NOTE: Remove any of the following illustration and open the front cover. 2. Dell cartridges are available only through Dell. Dell recommends Dell imaging drums for problems caused by using accessories, parts, or...

User Guide
Page 282
How to install the Toner Cartridge 1. Close the top cover. 5. Close the front cover. 4.
How to install the Toner Cartridge 1. Close the top cover. 5. Close the front cover. 4.
User Guide
Page 283
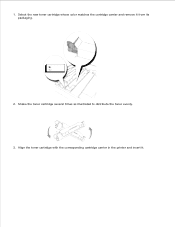
1. Shake the toner cartridge several times as illustrated to distribute the toner evenly. 3. Align the toner cartridge with the corresponding cartridge carrier in the printer and insert it from its packaging. 2. Select the new toner cartridge whose color matches the cartridge carrier and remove it .
1. Shake the toner cartridge several times as illustrated to distribute the toner evenly. 3. Align the toner cartridge with the corresponding cartridge carrier in the printer and insert it from its packaging. 2. Select the new toner cartridge whose color matches the cartridge carrier and remove it .


