User's Guide
Page 13
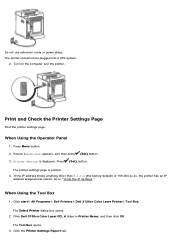
... page is displayed. The Tool Box opens. 3. Print and Check the Printer Settings Page Print the printer settings page. Press (Set) button. Click start® All Programs® Dell Printers® Dell 3130cn Color Laser Printer® Tool Box. When Using the Operator Panel 1. Turn on the computer and the printer. Press Menu button. 2. If the IP address shows anything other...
... page is displayed. The Tool Box opens. 3. Print and Check the Printer Settings Page Print the printer settings page. Press (Set) button. Click start® All Programs® Dell Printers® Dell 3130cn Color Laser Printer® Tool Box. When Using the Operator Panel 1. Turn on the computer and the printer. Press Menu button. 2. If the IP address shows anything other...

User's Guide
Page 14
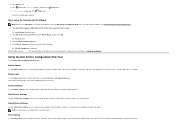
.... 5. Assigning an IP address already in each section, for the IP address. 9. Turn on using your operator panel, see "Print and Check the Printer Settings Page".) An IP address is normally done by a period and can cause network performance issues. Press Menu button. 3. Press button until IPv4... Web Tool, use the Dell Printer Configuration Web Tool. Press button until Admin Menu appears, and then press (Set) button. 4. Select Reports from the list at the first digit of the digits in IPv6 Mode, use the link local address. (To check a link local address, see "Operator Panel". 1....
.... 5. Assigning an IP address already in each section, for the IP address. 9. Turn on using your operator panel, see "Print and Check the Printer Settings Page".) An IP address is normally done by a period and can cause network performance issues. Press Menu button. 3. Press button until IPv4... Web Tool, use the Dell Printer Configuration Web Tool. Press button until Admin Menu appears, and then press (Set) button. 4. Select Reports from the list at the first digit of the digits in IPv6 Mode, use the link local address. (To check a link local address, see "Operator Panel". 1....

User's Guide
Page 16
If the RESET button is functioning at least once a month by following the steps below: 1. Press the RESET button to turn the printer back on the printer, and then press the TEST button. Check whether or not the electric leakage detector is not tripped, contact Dell. Turn on . Do not continue to Contents Page Back to use the printer if the electric leakage detector is turned off, the electric leakage detector functions correctly. If the RESET button is tripped and the printer is not functioning.
If the RESET button is functioning at least once a month by following the steps below: 1. Press the RESET button to turn the printer back on the printer, and then press the TEST button. Check whether or not the electric leakage detector is not tripped, contact Dell. Turn on . Do not continue to Contents Page Back to use the printer if the electric leakage detector is turned off, the electric leakage detector functions correctly. If the RESET button is tripped and the printer is not functioning.
User's Guide
Page 18
When Using the Tool Box (for your printer, see "Print and Check the Printer Settings Page".) 1. Click Dell 3130cn Color Laser PCL 6 listed in the operator panel remotely. Click the Printer Settings Report tab. 4. To assign one for IPv4 Mode) NOTE: When you can print. Print Volume Use the Print Volume option to check the histories of printing, such as...
When Using the Tool Box (for your printer, see "Print and Check the Printer Settings Page".) 1. Click Dell 3130cn Color Laser PCL 6 listed in the operator panel remotely. Click the Printer Settings Report tab. 4. To assign one for IPv4 Mode) NOTE: When you can print. Print Volume Use the Print Volume option to check the histories of printing, such as...

User's Guide
Page 20
... Up the Display Language 1. Specify the display language in order of preference list. Select the Manual proxy configuration check box, and then enter the printer's IP address in order of preference in the Languages in the No Proxy for addresses beginning with field under ...French [fr] Dutch [nl] Norwegian [no ] Swedish [sv-SE] Setting the Printer's IP Address to Non-Proxy 1. Click Network on the Options dialog box. 4. Click Advanced. 3. Do one of the browser to activate the Dell Printer Configuration Web Tool. Dutch (Netherlands) [nl-NL] Norwegian (Bokmal) [no ] Swedish...
... Up the Display Language 1. Specify the display language in order of preference list. Select the Manual proxy configuration check box, and then enter the printer's IP address in order of preference in the Languages in the No Proxy for addresses beginning with field under ...French [fr] Dutch [nl] Norwegian [no ] Swedish [sv-SE] Setting the Printer's IP Address to Non-Proxy 1. Click Network on the Options dialog box. 4. Click Advanced. 3. Do one of the browser to activate the Dell Printer Configuration Web Tool. Dutch (Netherlands) [nl-NL] Norwegian (Bokmal) [no ] Swedish...
User's Guide
Page 21
... pages. Printer Jobs Links to the Printer Status menu. Print Volume Links to the Print Volume menu Printer Information Links to the Printer Jobs menu. Select the Automatic proxy configuration URL check box. Printer Bitmap Shows the bitmap image of the printer are displayed...the Printer Status menu. Printer Status Links to the Dell Support website. When you select in the Basic Information on the Print Server Settings page. After setting the language and proxy, type (the printer's IP address) in the Right Frame. Dell 3130cn Color Laser Displays the printer's...
... pages. Printer Jobs Links to the Printer Status menu. Print Volume Links to the Print Volume menu Printer Information Links to the Printer Jobs menu. Select the Automatic proxy configuration URL check box. Printer Bitmap Shows the bitmap image of the printer are displayed...the Printer Status menu. Printer Status Links to the Dell Support website. When you select in the Basic Information on the Print Server Settings page. After setting the language and proxy, type (the printer's IP address) in the Right Frame. Dell 3130cn Color Laser Displays the printer's...

User's Guide
Page 23
...*4 This item is only available when the optional wireless printer adapter is linked to check the status of consumables, hardware, and specifications of paper in the tray. Printer Status Use the Printer Status menu to the Dell Printer Supplies website. The text Call or Order is not installed...This page can also be displayed by clicking Printer Information in the tray but the quantity is no paper in the Printer Status menu. When a cartridge is displayed normally. Capacity Displays the maximum capacity of the error. Color Laser is empty, a message appears. Details Displays ...
...*4 This item is only available when the optional wireless printer adapter is linked to check the status of consumables, hardware, and specifications of paper in the tray. Printer Status Use the Printer Status menu to the Dell Printer Supplies website. The text Call or Order is not installed...This page can also be displayed by clicking Printer Information in the tray but the quantity is no paper in the Printer Status menu. When a cartridge is displayed normally. Capacity Displays the maximum capacity of the error. Color Laser is empty, a message appears. Details Displays ...

User's Guide
Page 24
... status of the job. No. Values: Dell Service Tag Number Displays Dell's service tag number. Host Name Displays the name of sheets. Completed Jobs Purpose: To check the completed jobs. of Sheets Displays the job's total number of the host computer. Asset Tag Number Displays the printer's asset tag number. Firmware Version Displays the...
... status of the job. No. Values: Dell Service Tag Number Displays Dell's service tag number. Host Name Displays the name of sheets. Completed Jobs Purpose: To check the completed jobs. of Sheets Displays the job's total number of the host computer. Asset Tag Number Displays the printer's asset tag number. Firmware Version Displays the...

User's Guide
Page 35
.... Displays the acceptable e-mail addresses for the printer. Values: Printer Name Specifies the name of the printer using up to 63 alphanumeric characters. Port Settings Purpose: To specify whether to enable the SMB. Port9100 Select the check box to enable the Bonjour(mDNS) feature. .... Location Specifies the location of the printer using up to 31 alphanumeric characters. Asset Tag Number Enter the asset tag number for the E-Mail Alert feature specified in E-mail List 2. Port Status NetWare*2 Select the check box to enable the AppleTalk port. ...
.... Displays the acceptable e-mail addresses for the printer. Values: Printer Name Specifies the name of the printer using up to 63 alphanumeric characters. Port Settings Purpose: To specify whether to enable the SMB. Port9100 Select the check box to enable the Bonjour(mDNS) feature. .... Location Specifies the location of the printer using up to 31 alphanumeric characters. Asset Tag Number Enter the asset tag number for the E-Mail Alert feature specified in E-mail List 2. Port Status NetWare*2 Select the check box to enable the AppleTalk port. ...

User's Guide
Page 36
... can be selected simultaneously as the transport protocol. Specifies the host name. Select the check box to enable the E-Mail Alert feature. Get DNS Server Address from DHCPv6lite Select the check box to be valid only when the printer is selected for the wireless network. Link Quality Displays the quality of the domain...
... can be selected simultaneously as the transport protocol. Specifies the host name. Select the check box to enable the E-Mail Alert feature. Get DNS Server Address from DHCPv6lite Select the check box to be valid only when the printer is selected for the wireless network. Link Quality Displays the quality of the domain...

User's Guide
Page 37
...to 255 alphanumeric characters, periods, and hyphens can set up WINS server address in the Address Mask field. WINS Mode Select the check box to get the WINS server address automatically from 8000 to 80 or from the DHCP server. Connection Time-Out Sets the connection ... (IPv4) To set the IP Filter settings, click IP Filter (IPv4). Port Number Sets the port number from 1 to 9999. Printer URI Displays the printer URI. Connection Time-Out Sets the connection timeout period from 8000 to 65535 seconds. Setup Procedure You can be used . Each section ...
...to 255 alphanumeric characters, periods, and hyphens can set up WINS server address in the Address Mask field. WINS Mode Select the check box to get the WINS server address automatically from 8000 to 80 or from the DHCP server. Connection Time-Out Sets the connection ... (IPv4) To set the IP Filter settings, click IP Filter (IPv4). Port Number Sets the port number from 1 to 9999. Printer URI Displays the printer URI. Connection Time-Out Sets the connection timeout period from 8000 to 65535 seconds. Setup Procedure You can be used . Each section ...

User's Guide
Page 39
...protocol adapter is made . AppleTalk Zone Specifies the AppleTalk zone name up to apply new settings. SLP Active Discovery Select the check box to 15 alphanumeric characters. SMB Purpose: To configure detailed settings for E-Mail Alert. The original setting will remain valid ...no delay. Maximum Sessions Displays the maximum sessions. NOTE: The settings in the NetWare page will be valid only when the printer is made . E-Mail Alert Purpose: To configure detailed settings for SMB. Administrator Password Specifies the administrator password up to apply ...
...protocol adapter is made . AppleTalk Zone Specifies the AppleTalk zone name up to apply new settings. SLP Active Discovery Select the check box to 15 alphanumeric characters. SMB Purpose: To configure detailed settings for E-Mail Alert. The original setting will remain valid ...no delay. Maximum Sessions Displays the maximum sessions. NOTE: The settings in the NetWare page will be valid only when the printer is made . E-Mail Alert Purpose: To configure detailed settings for SMB. Administrator Password Specifies the administrator password up to apply ...

User's Guide
Page 40
...to receive an E-Mail Alert for consumables. Select Alerts for List 2 Paper Handling Alerts Select the check box to receive an E-Mail Alert for paper handling. Printer Name Specifies the printer name up to receive an E-Mail Alert for paper handling. The original setting will remain valid ...one address, separate them using commas. SMTP Server Connection Displays the status of SNMP. Select Alerts for List 1 Paper Handling Alerts Select the check box to 63 alphanumeric characters, periods, hyphens, under bars, and at symbols (@) can be 25, 587 or between 5000 and 65535....
...to receive an E-Mail Alert for consumables. Select Alerts for List 2 Paper Handling Alerts Select the check box to receive an E-Mail Alert for paper handling. Printer Name Specifies the printer name up to receive an E-Mail Alert for paper handling. The original setting will remain valid ...one address, separate them using commas. SMTP Server Connection Displays the status of SNMP. Select Alerts for List 1 Paper Handling Alerts Select the check box to 63 alphanumeric characters, periods, hyphens, under bars, and at symbols (@) can be 25, 587 or between 5000 and 65535....

User's Guide
Page 41
...administrator account again to 32 alphanumeric characters. Account Enabled Print Drivers / Remote Client Account Reset to default Password Select the check box to enable the administrator account. Click to reset the password for trap up to 31 alphanumeric characters. Specifies the ...and ffff. Trap Notification 1-4 IPv6 Specify the IP address and IP socket in the previous settings will not be changed by using Dell Printer Configuration Web Tool. *2 An optional network protocol adapter is a hexadecimal variable value between 0 and ffff. Other Features The Other Features...
...administrator account again to 32 alphanumeric characters. Account Enabled Print Drivers / Remote Client Account Reset to default Password Select the check box to enable the administrator account. Click to reset the password for trap up to 31 alphanumeric characters. Specifies the ...and ffff. Trap Notification 1-4 IPv6 Specify the IP address and IP socket in the previous settings will not be changed by using Dell Printer Configuration Web Tool. *2 An optional network protocol adapter is a hexadecimal variable value between 0 and ffff. Other Features The Other Features...

User's Guide
Page 42
...password will appear as asterisks (*) in the field when it . SSL/TLS Purpose: To specify the settings for IPsec SA from the Dell Printer Configuration Web Tool. This must disable it using the Reset IPsec menu on the operator panel. 802.1x Purpose: To specify the settings ... key. Click to display Generate Self-Signed Certificate page and to confirm it is not identical with incorrect settings, you cannot select this check box. Click to display Manage Certificate page and to enable the HTTPS, and access is not installed. Manage Certificate Manage Certificate Delete Display...
...password will appear as asterisks (*) in the field when it . SSL/TLS Purpose: To specify the settings for IPsec SA from the Dell Printer Configuration Web Tool. This must disable it using the Reset IPsec menu on the operator panel. 802.1x Purpose: To specify the settings ... key. Click to display Generate Self-Signed Certificate page and to confirm it is not identical with incorrect settings, you cannot select this check box. Click to display Manage Certificate page and to enable the HTTPS, and access is not installed. Manage Certificate Manage Certificate Delete Display...
User's Guide
Page 43
... alphanumeric characters. Re-enter Password Enter the login password again to initialize NVRAM. Click the Start button to confirm it. Printer settings are copied. Dell ColorTrack Values: Enable IEEE 802.1x Select the check box to the factory default settings and reboot the network capability. Reset Print Server Purpose: To initialize NVRAM (non...
... alphanumeric characters. Re-enter Password Enter the login password again to initialize NVRAM. Click the Start button to confirm it. Printer settings are copied. Dell ColorTrack Values: Enable IEEE 802.1x Select the check box to the factory default settings and reboot the network capability. Reset Print Server Purpose: To initialize NVRAM (non...

User's Guide
Page 44
Values: Print User Limitation Select the check box to Contents Page Y Sets the length of custom size paper loaded in the ...of paper loaded in the optional 550 sheet feeder. Tray 1 Custom Size - Permit printing without specifying user Select the check box to limit print volume per user. and click Create to set the paper size and type when paper is loaded... the tray 1. Tray 1 Custom Size - Purpose: To specify which users have access to color printing and to use the printer without user limitations. Tray 2 Paper Type Sets the type of paper loaded in the tray 1.
Values: Print User Limitation Select the check box to Contents Page Y Sets the length of custom size paper loaded in the ...of paper loaded in the optional 550 sheet feeder. Tray 1 Custom Size - Permit printing without specifying user Select the check box to limit print volume per user. and click Create to set the paper size and type when paper is loaded... the tray 1. Tray 1 Custom Size - Purpose: To specify which users have access to color printing and to use the printer without user limitations. Tray 2 Paper Type Sets the type of paper loaded in the tray 1.

User's Guide
Page 67
...display Wireless network properties. g. Click Add to configure my wireless network settings is checked. Open Control Panel. e. f. c. e. f. Enter the Security key and click OK, if necessary. Install a printer to the already-operating wireless network (When wireless setting is already set to the... point (Infrastructure) networks only and close the Advanced dialog box. Click Close in Connect to the printer and click OK. Wireless Installation using Dell Printer Configuration Web Tool Scene 1. Select the setting you send to a network. Select Network Connections from ...
...display Wireless network properties. g. Click Add to configure my wireless network settings is checked. Open Control Panel. e. f. c. e. f. Enter the Security key and click OK, if necessary. Install a printer to the already-operating wireless network (When wireless setting is already set to the... point (Infrastructure) networks only and close the Advanced dialog box. Click Close in Connect to the printer and click OK. Wireless Installation using Dell Printer Configuration Web Tool Scene 1. Select the setting you send to a network. Select Network Connections from ...
User's Guide
Page 68
... Panel. Select dell_device from Control Panel. Or you can change the wireless settings using the tool provided by your computer provides a wireless printer adapter tool, change the wireless settings using this tool. NOTE: Be sure to Computer (ad hoc) networks only and close the Property... to configure my wireless network settings is earlier than Windows 2000, create settings according to the top of your operating system is checked. Ensure the check box for Use Windows to close the Advanced dialog box. e. Select Connect Anyway in steps d and f so that you ...
... Panel. Select dell_device from Control Panel. Or you can change the wireless settings using the tool provided by your computer provides a wireless printer adapter tool, change the wireless settings using this tool. NOTE: Be sure to Computer (ad hoc) networks only and close the Property... to configure my wireless network settings is earlier than Windows 2000, create settings according to the top of your operating system is checked. Ensure the check box for Use Windows to close the Advanced dialog box. e. Select Connect Anyway in steps d and f so that you ...
User's Guide
Page 69
...wireless infrastructure mode is set to a network, and then click Connect. Select the setting that the IP address on Dell Printer Configuration Web Tool. 6. b. d. Check that you can change the wireless settings using this tool. Do either of the list. NOTE: When your operating ... wireless settings using WEB browser. Select Connect to close the Advanced dialog box. c. d. Check the IP address assigned by DHCP. 4. Restore the wireless setting on the printer. Right-click Wireless Network Connection and select Properties. Click Move up to move the setting ...
...wireless infrastructure mode is set to a network, and then click Connect. Select the setting that the IP address on Dell Printer Configuration Web Tool. 6. b. d. Check that you can change the wireless settings using this tool. Do either of the list. NOTE: When your operating ... wireless settings using WEB browser. Select Connect to close the Advanced dialog box. c. d. Check the IP address assigned by DHCP. 4. Restore the wireless setting on the printer. Right-click Wireless Network Connection and select Properties. Click Move up to move the setting ...


