
Owner's Manual
Page 6
....dell.com/supplies | support.dell.com 5 Using Your Printer 33 Changing Printer Settings 34 Initializing NVRAM ...35 Setting of Panel Lock 35 Adjusting the Language 36 Printing a Job ...36 Canceling a Job From the Printer ...Drum Cartridge 40 Removing the Used Drum Cartridge 40 Installing the New Drum Cartridge 42 Replacing the Cleaning Pad 44 Replacing the Toner Cartridge 46 Selecting a Replacement Toner Cartridge 46 Removing the Used Toner Cartridge 47 Installing the New Toner Cartridge 48 7 Appendix 51 Technical Assistance ...52 Automated Order-Status Service 52 Contacting Dell...
....dell.com/supplies | support.dell.com 5 Using Your Printer 33 Changing Printer Settings 34 Initializing NVRAM ...35 Setting of Panel Lock 35 Adjusting the Language 36 Printing a Job ...36 Canceling a Job From the Printer ...Drum Cartridge 40 Removing the Used Drum Cartridge 40 Installing the New Drum Cartridge 42 Replacing the Cleaning Pad 44 Replacing the Toner Cartridge 46 Selecting a Replacement Toner Cartridge 46 Removing the Used Toner Cartridge 47 Installing the New Toner Cartridge 48 7 Appendix 51 Technical Assistance ...52 Automated Order-Status Service 52 Contacting Dell...
Owner's Manual
Page 9
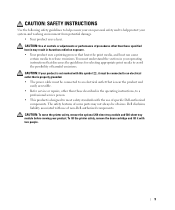
...and working environment from potential damage. • Your product uses a laser. The safety features of specific Dell-authorized components. CAUTION: If your own personal safety and to meet safety standards with two people. 9 Dell disclaims liability associated with use of some parts may not always be...instructions that heats the print media, and heat can cause certain media to avoid the possibility of non-Dell-authorized components. To lift the printer safely, remove the drum cartridge and lift it must be connected to an electrical outlet that is not marked with this symbol , ...
...and working environment from potential damage. • Your product uses a laser. The safety features of specific Dell-authorized components. CAUTION: If your own personal safety and to meet safety standards with two people. 9 Dell disclaims liability associated with use of some parts may not always be...instructions that heats the print media, and heat can cause certain media to avoid the possibility of non-Dell-authorized components. To lift the printer safely, remove the drum cartridge and lift it must be connected to an electrical outlet that is not marked with this symbol , ...

Owner's Manual
Page 39
Section 6 Maintenance Replacing the Drum Cartridge Replacing the Toner Cartridge 6 Maintenance
Section 6 Maintenance Replacing the Drum Cartridge Replacing the Toner Cartridge 6 Maintenance
Owner's Manual
Page 40
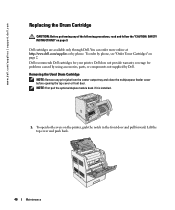
Dell cartridges are available only through Dell. Removing the Used Drum Cartridge NOTE: Remove any of the following procedures, read and follow the "CAUTION: SAFETY INSTRUCTIONS" on page 9. To order by Dell. Dell recommends Dell cartridges for problems caused by using accessories, parts, or components not supplied by phone, see "Order Toner Cartridges" on the printer, grab the notch in the front...
Dell cartridges are available only through Dell. Removing the Used Drum Cartridge NOTE: Remove any of the following procedures, read and follow the "CAUTION: SAFETY INSTRUCTIONS" on page 9. To order by Dell. Dell recommends Dell cartridges for problems caused by using accessories, parts, or components not supplied by phone, see "Order Toner Cartridges" on the printer, grab the notch in the front...

Owner's Manual
Page 41
Grab the drum cartridge by the handle, and pull it up the lever on the right side of the printer. 3. Some parts may be hot. Allow time for the printer to cool before attempting to remove parts in this area. To remove the used drum cartridge, push up and out. Maintenance 41 CAUTION: Do not touch inside the printer with your hands. 2.
Grab the drum cartridge by the handle, and pull it up the lever on the right side of the printer. 3. Some parts may be hot. Allow time for the printer to cool before attempting to remove parts in this area. To remove the used drum cartridge, push up and out. Maintenance 41 CAUTION: Do not touch inside the printer with your hands. 2.

Owner's Manual
Page 42
Guide the cartridge in until it snaps into place. 42 Maintenance CAUTION: Do not touch the drum at the bottom of the drum cartridge. 2. Holding the drum cartridge by the handle, align the arrows on the drum cartridge with the corresponding arrows on the printer. www.dell.com/supplies | support.dell.com Installing the New Drum Cartridge 1. Remove the protective sheet from the drum cartridge.
Guide the cartridge in until it snaps into place. 42 Maintenance CAUTION: Do not touch the drum at the bottom of the drum cartridge. 2. Holding the drum cartridge by the handle, align the arrows on the drum cartridge with the corresponding arrows on the printer. www.dell.com/supplies | support.dell.com Installing the New Drum Cartridge 1. Remove the protective sheet from the drum cartridge.

Owner's Manual
Page 43
3. Pull down the lever on the right to lock the drum cartridge in place. 4. Close the top cover. Maintenance 43
3. Pull down the lever on the right to lock the drum cartridge in place. 4. Close the top cover. Maintenance 43

Owner's Manual
Page 89
... from the operator panel , 34 connecting the printer locally , 20 D Dell contacting , 53 Dell supplies management system , 38 disable menus from the operator panel , 35 drivers, installing , 20 drum cartridge installing , 42 replacing , 40 F factory defaults, restoring , 35 I installing a drum cartridge , 42 a toner cartridge , 48 PPD file , 31 printer drivers for local printing , 20 on Macintosh , 27 L loading paper...
... from the operator panel , 34 connecting the printer locally , 20 D Dell contacting , 53 Dell supplies management system , 38 disable menus from the operator panel , 35 drivers, installing , 20 drum cartridge installing , 42 replacing , 40 F factory defaults, restoring , 35 I installing a drum cartridge , 42 a toner cartridge , 48 PPD file , 31 printer drivers for local printing , 20 on Macintosh , 27 L loading paper...

