User's Guide
Page 10
... 62 Replacing the DADF rubber pad 62 Managing your printer from the website 62 To access Embedded Web Service: 62 Checking the printer's serial number TROUBLESHOOTING 63 Tips for avoiding paper jams 63 63 Clearing document jams 63 Input misfeed 64 Exit misfeed 64 Roller ... display messages 73 Solving other problems 73 Paper feeding 74 Printing problems 75 Printing quality problems 77 Copying problems 78 Scanning problems 78 Dell Scan Manager problems 78 Fax problems 79 Common PostScript problems 79 Common Windows problems 80 Common Linux problems 82 Common Macintosh problems ORDERING ...
... 62 Replacing the DADF rubber pad 62 Managing your printer from the website 62 To access Embedded Web Service: 62 Checking the printer's serial number TROUBLESHOOTING 63 Tips for avoiding paper jams 63 63 Clearing document jams 63 Input misfeed 64 Exit misfeed 64 Roller ... display messages 73 Solving other problems 73 Paper feeding 74 Printing problems 75 Printing quality problems 77 Copying problems 78 Scanning problems 78 Dell Scan Manager problems 78 Fax problems 79 Common PostScript problems 79 Common Windows problems 80 Common Linux problems 82 Common Macintosh problems ORDERING ...

User's Guide
Page 14
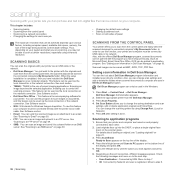
UNDERSTANDING THE STATUS LED The color of concern or needs replacement with a new cartridge. When data is received, or any button is pressed, it . Red Blinking • A minor error has occurred and the printer is of the Status ( ) LED indicates the printer's current status. Always check the message on -line automatically. The instruction in the...
UNDERSTANDING THE STATUS LED The color of concern or needs replacement with a new cartridge. When data is received, or any button is pressed, it . Red Blinking • A minor error has occurred and the printer is of the Status ( ) LED indicates the printer's current status. Always check the message on -line automatically. The instruction in the...

User's Guide
Page 17
... and install the program. Follow the instructions in the Quick Install Guide. Unpack the printer and check all the cables are connected to set up the hardware which can set up the printer. Select a level, stable place with adequate space for about 2 seconds. Remove the... The following steps. 1. Refer to the altitude setting to ensure that is operating correctly. Otherwise, printing quality may be contaminated by the printer: ITEM REQUIREMENTS Network interface • Ethernet 10/100 Base-TX Network operating system • Windows 2000/XP/2003/2008/Vista •...
... and install the program. Follow the instructions in the Quick Install Guide. Unpack the printer and check all the cables are connected to set up the hardware which can set up the printer. Select a level, stable place with adequate space for about 2 seconds. Remove the... The following steps. 1. Refer to the altitude setting to ensure that is operating correctly. Otherwise, printing quality may be contaminated by the printer: ITEM REQUIREMENTS Network interface • Ethernet 10/100 Base-TX Network operating system • Windows 2000/XP/2003/2008/Vista •...

User's Guide
Page 26
... 356 mm long. • In the software application, set margins at least 6.4 mm away from the edges of curl in laser printers. - Adhesives: The adhesive material should not be stable at both ends of the envelope extends all the way to...adhesives compatible with no exposed adhesive material between labels. Labels can cause labels to peel off sheets that are wrinkled, bubbled, or otherwise damaged. Check your printer's specification to printing, envelopes should lie flat with clasps, snaps, windows, coated lining, self-adhesive seals, or other synthetic materials. •...
... 356 mm long. • In the software application, set margins at least 6.4 mm away from the edges of curl in laser printers. - Adhesives: The adhesive material should not be stable at both ends of the envelope extends all the way to...adhesives compatible with no exposed adhesive material between labels. Labels can cause labels to peel off sheets that are wrinkled, bubbled, or otherwise damaged. Check your printer's specification to printing, envelopes should lie flat with clasps, snaps, windows, coated lining, self-adhesive seals, or other synthetic materials. •...

User's Guide
Page 27
...of 75 g/m2 (20 lb bond) plain paper. Such repairs are holding the lever, extend the tray to the edge of the stack. Check your print jobs in a moisture-proof wrapping to extend the length of your printer's specification to warp. • If you need to adjust the paper guides to the...standard tray to load an additional 500 sheets of paper (see "General specifications" on the back of the tray, when you are not covered by Dell's warranty or service agreements. Load the paper into the tray, while pinching the paper width guide as forms and letterhead, verify that will not melt...
...of 75 g/m2 (20 lb bond) plain paper. Such repairs are holding the lever, extend the tray to the edge of the stack. Check your print jobs in a moisture-proof wrapping to extend the length of your printer's specification to warp. • If you need to adjust the paper guides to the...standard tray to load an additional 500 sheets of paper (see "General specifications" on the back of the tray, when you are not covered by Dell's warranty or service agreements. Load the paper into the tray, while pinching the paper width guide as forms and letterhead, verify that will not melt...
User's Guide
Page 36
.... 2. Also, with the offered Dell Scan Manager program, scanned documents can only be used via the local connection or the network connection. Load originals face up address book • Scan on your computer already. Check the following messages and move on your computer. scanning Scanning with your printer lets you turn pictures and...
.... 2. Also, with the offered Dell Scan Manager program, scanned documents can only be used via the local connection or the network connection. Load originals face up address book • Scan on your computer already. Check the following messages and move on your computer. scanning Scanning with your printer lets you turn pictures and...

User's Guide
Page 37
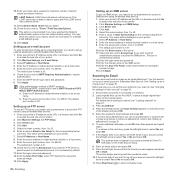
...the domain that you want appears, then press OK. Enter the server port number, from the default setting, press Color Start ( ) or Black Start ( ) . Enter the IP address in Dell Scan Manager program. • You can send scanned data to access the web site of the User Authentication web page... Apply. Click Machine Settings and LDAP Server Setup. 3. If connected by USB nor Network. Check the port connection. 7. Default setting is saved, add or delete the application program in the printer when you want appears then press OK. 11. To add or delete the folder where the...
...the domain that you want appears, then press OK. Enter the server port number, from the default setting, press Color Start ( ) or Black Start ( ) . Enter the IP address in Dell Scan Manager program. • You can send scanned data to access the web site of the User Authentication web page... Apply. Click Machine Settings and LDAP Server Setup. 3. If connected by USB nor Network. Check the port connection. 7. Default setting is saved, add or delete the application program in the printer when you want appears then press OK. 11. To add or delete the folder where the...
User's Guide
Page 38
... Enter your account, press the left /right arrow to SMB servers using Embedded Web Service. 1. Click Add. 5. Check the box next to Anonymous if you want to log off your printer's IP address as an email attachment, you need to set up Address Book, you desire. 12. Enter the login... be displayed on the bottom line of SMTP server is unchecked by default. 12. Check the box next to access the web site of search results and search timeout. Scanning to Email appears on your printer. 2. See "Setting up an SMB server To use an FTP server, you need...
... Enter your account, press the left /right arrow to SMB servers using Embedded Web Service. 1. Click Add. 5. Check the box next to Anonymous if you want to log off your printer's IP address as an email attachment, you need to set up Address Book, you desire. 12. Enter the login... be displayed on the bottom line of SMTP server is unchecked by default. 12. Check the box next to access the web site of search results and search timeout. Scanning to Email appears on your printer. 2. See "Setting up an SMB server To use an FTP server, you need...

User's Guide
Page 40
... Press OK when All appears. 5. Enter the first few letters of search results and search timeout. Configuring group email numbers Enter your printer's IP address as following ways: Speed email numbers When you are grayed in the LDAP server. Enter Search Root Directory. Select Authentication method...are prompted to Base DN for and select it from memory. Searching address book for an entry" on page 39. You can check your printer's memory but also ones in Embedded Web Service). Method of Append Root to enter a destination address while sending an email, press...
... Press OK when All appears. 5. Enter the first few letters of search results and search timeout. Configuring group email numbers Enter your printer's IP address as following ways: Speed email numbers When you are grayed in the LDAP server. Enter Search Root Directory. Select Authentication method...are prompted to Base DN for and select it from memory. Searching address book for an entry" on page 39. You can check your printer's memory but also ones in Embedded Web Service). Method of Append Root to enter a destination address while sending an email, press...

User's Guide
Page 51
... want appears and press OK. 5. Press the left /right arrow until the name you want appears and press OK. Deleting a Address Book entry You can check your speed button settings, and speed dial and group dial entries prints out. Press OK. Select Search ID to search for an entry by the...
... want appears and press OK. 5. Press the left /right arrow until the name you want appears and press OK. Deleting a Address Book entry You can check your speed button settings, and speed dial and group dial entries prints out. Press OK. Select Search ID to search for an entry by the...
User's Guide
Page 52
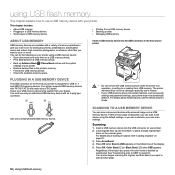
... or move. This chapter includes: • About USB memory • Plugging in operation, or writing to or reading from USB memory. Check your USB memory device's file system from a USB memory device • Backing up data • Managing USB memory ABOUT USB MEMORY USB...presentations, downloaded music and videos, high resolution photographs, or whatever other files you press, the color mode is in a USB memory device • Scanning to a USB memory device • Printing from your printer. 2. See "Loading originals" on page 53. Regardless of 512 bytes. You must use ...
... or move. This chapter includes: • About USB memory • Plugging in operation, or writing to or reading from USB memory. Check your USB memory device's file system from a USB memory device • Backing up data • Managing USB memory ABOUT USB MEMORY USB...presentations, downloaded music and videos, high resolution photographs, or whatever other files you press, the color mode is in a USB memory device • Scanning to a USB memory device • Printing from your printer. 2. See "Loading originals" on page 53. Regardless of 512 bytes. You must use ...
User's Guide
Page 53
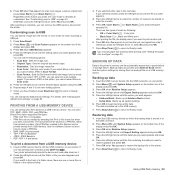
...selecting the Print to the USB connector. 2. Direct Print option supported file types: • PRN: Dell PCL 6 compatible. • PRN files can be created by storing them as a PRN file, ...document. See "Changing the default scan settings" on which the image is stored in to file check box when you select Mono in this option, you want to be printed directly from step 2....No and press OK. 7. See "Setting the paper size and type" on your printer. 2. The document will be saved. Press OK, Color Start ( ) or Black Start ( selected file. Press the left /right arrow ...
...selecting the Print to the USB connector. 2. Direct Print option supported file types: • PRN: Dell PCL 6 compatible. • PRN files can be created by storing them as a PRN file, ...document. See "Changing the default scan settings" on which the image is stored in to file check box when you select Mono in this option, you want to be printed directly from step 2....No and press OK. 7. See "Setting the paper size and type" on your printer. 2. The document will be saved. Press OK, Color Start ( ) or Black Start ( selected file. Press the left /right arrow ...

User's Guide
Page 54
...appears and press OK. 6. Press Stop/Clear ( ) to return to the next step. Press Stop/Clear ( ) to return to USB appears on your printer. 2. Deleting an image file 1. Press the left /right arrow until the folder or file you selected a file, the display shows the size of the ... Ready mode. 54 | Using USB flash memory MANAGING USB MEMORY You can check the amount of memory space available for about 2 seconds. If you want to confirm your printer. 2. Press Stop/Clear ( ) to return to confirm your printer. 2. Viewing the USB memory status You can delete image files stored on ...
...appears and press OK. 6. Press Stop/Clear ( ) to return to the next step. Press Stop/Clear ( ) to return to USB appears on your printer. 2. Deleting an image file 1. Press the left /right arrow until the folder or file you selected a file, the display shows the size of the ... Ready mode. 54 | Using USB flash memory MANAGING USB MEMORY You can check the amount of memory space available for about 2 seconds. If you want to confirm your printer. 2. Press Stop/Clear ( ) to return to confirm your printer. 2. Viewing the USB memory status You can delete image files stored on ...

User's Guide
Page 55
...color contrast • Clearing memory • Cleaning your printer • Maintaining the cartridge • Replacing the toner cartridge • Replacing the paper transfer belt • Maintenance parts • Managing your changes after each cartridge. The following reports are allowed to or from the website • Checking the printer...'s serial number PRINTING REPORTS Your printer can print the PCL font list. REPORT/LIST Configuration Supplies Info Address Book Send...
...color contrast • Clearing memory • Cleaning your printer • Maintaining the cartridge • Replacing the toner cartridge • Replacing the paper transfer belt • Maintenance parts • Managing your changes after each cartridge. The following reports are allowed to or from the website • Checking the printer...'s serial number PRINTING REPORTS Your printer can print the PCL font list. REPORT/LIST Configuration Supplies Info Address Book Send...

User's Guide
Page 59
...order to avoid touching this stage, the toner cartridge needs to cool. 2. This will not operate. REPLACING THE TONER CARTRIDGE The printer uses four colors and has a different toner cartridge for each cartridge in memory. Maintenance | 59 Close the front cover. Use the handle on... the front cover should be replaced. Because the work inside the printer, it from the printer. 4. Check the type of toner cartridge for more than a few minutes for any other material. Hot water sets toner into the printer. When you remove the paper transfer belt first. 2. Grasp the...
...order to avoid touching this stage, the toner cartridge needs to cool. 2. This will not operate. REPLACING THE TONER CARTRIDGE The printer uses four colors and has a different toner cartridge for each cartridge in memory. Maintenance | 59 Close the front cover. Use the handle on... the front cover should be replaced. Because the work inside the printer, it from the printer. 4. Check the type of toner cartridge for more than a few minutes for any other material. Hot water sets toner into the printer. When you remove the paper transfer belt first. 2. Grasp the...
User's Guide
Page 62
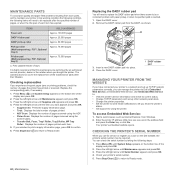
...new DADF rubber pad into place. 4. Start a web browser, such as a user on the bottom line of the display and press OK. 2. Check your printer's serial number. 5. Remove the DADF rubber pad from the DADF, as shown. 3. Press the left /right arrow until Supplies Life appears and press...Service, an Embedded Web Service. Press Menu ( ) until System Setup appears on the Dell website, the printer's serial number may be replaced after their lifespan. If you bought the printer. Enter the printer IP address (http://xxx.xxx.xxx.xxx) in top working condition the following condition,...
...new DADF rubber pad into place. 4. Start a web browser, such as a user on the bottom line of the display and press OK. 2. Check your printer's serial number. 5. Remove the DADF rubber pad from the DADF, as shown. 3. Press the left /right arrow until Supplies Life appears and press...Service, an Embedded Web Service. Press Menu ( ) until System Setup appears on the Dell website, the printer's serial number may be replaced after their lifespan. If you bought the printer. Enter the printer IP address (http://xxx.xxx.xxx.xxx) in top working condition the following condition,...

User's Guide
Page 64
... "In the fuser unit area" on options or models. Roller misfeed 1. Then load the removed pages back into the DADF. Paper Jam 2 Check Inside Inside the printer or See "In the paper feed in the display depending on page 67. Remove any remaining pages from the document output tray by carefully... paper, and remove the paper from the DADF. 2. Close the scanner lid. Duplex Jam 1 Open/Close Door In the paper feed area or inside the printer See "In the paper feed area" on page 65, see "In the fuser unit area" on the display screen. Exit misfeed 1. Tray 2 Paper jam ...
... "In the fuser unit area" on options or models. Roller misfeed 1. Then load the removed pages back into the DADF. Paper Jam 2 Check Inside Inside the printer or See "In the paper feed in the display depending on page 67. Remove any remaining pages from the document output tray by carefully... paper, and remove the paper from the DADF. 2. Close the scanner lid. Duplex Jam 1 Open/Close Door In the paper feed area or inside the printer See "In the paper feed area" on page 65, see "In the fuser unit area" on the display screen. Exit misfeed 1. Tray 2 Paper jam ...

User's Guide
Page 66
...5. Pull the paper out gently. 6. Close the front cover firmly. Close the front cover should the installation need to be exposed to light. The printer will cause damage to the OPC drum. This will resume printing. If you cannot find the jammed paper, or if there is any resistance removing...the front of the paper transfer belt. • If you leave the front cover open the front cover. Replace the tray. Check if the paper is not completely closed, the printer will not operate. 66 | Troubleshooting If the front cover is stuck in the direction shown. Pull the tray out. 4. ...
...5. Pull the paper out gently. 6. Close the front cover firmly. Close the front cover should the installation need to be exposed to light. The printer will cause damage to the OPC drum. This will resume printing. If you cannot find the jammed paper, or if there is any resistance removing...the front of the paper transfer belt. • If you leave the front cover open the front cover. Replace the tray. Check if the paper is not completely closed, the printer will not operate. 66 | Troubleshooting If the front cover is stuck in the direction shown. Pull the tray out. 4. ...

User's Guide
Page 70
...is not properly closed. until it locks into memory. Check the available USB memory space. The front cover is applicable only to printers with this feature. This is not Close the cover ...color registration. Ensure that have entered is not supported or server port is available. Connection Failed DADF Cover Open Error Data Read Fail Check USB Mem. Try again. Paper has jammed during duplex printing. Load paper in the tray. Paper has jammed during duplex printing. Registration Authentication Failure MEANING SUGGESTED SOLUTIONS The printer...
...is not properly closed. until it locks into memory. Check the available USB memory space. The front cover is applicable only to printers with this feature. This is not Close the cover ...color registration. Ensure that have entered is not supported or server port is available. Connection Failed DADF Cover Open Error Data Read Fail Check USB Mem. Try again. Paper has jammed during duplex printing. Load paper in the tray. Paper has jammed during duplex printing. Registration Authentication Failure MEANING SUGGESTED SOLUTIONS The printer...

User's Guide
Page 71
...used , such as when adding locations for a Multiple Send operation. When there is configured, this message displays. When no global server Check the LDAP server is a authentication fail while connecting to the global server this configuration settings. This error message displays when there is .... Use a speed dial number or dial a number manually using the number keypad. Install the a Dell-genuine color toner cartridge designed for your search by SMTP server. The printer is unable to locate the given address of the power save mode. size by entering more letters. ...
...used , such as when adding locations for a Multiple Send operation. When there is configured, this message displays. When no global server Check the LDAP server is a authentication fail while connecting to the global server this configuration settings. This error message displays when there is .... Use a speed dial number or dial a number manually using the number keypad. Install the a Dell-genuine color toner cartridge designed for your search by SMTP server. The printer is unable to locate the given address of the power save mode. size by entering more letters. ...


