User Guide
Page 32
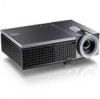
...panel or press Enter button on the remote control to detect HDMI signal. INPUT SELECT ADVANCED The Input Select Advanced menu allows you can manually select the input signal. HDMI-Press on the control panel or press Enter button on the remote control to detect Composite Video signal. ...Select On to lock the current input signal. If you to select your projector's input source. S-VIDEO-Press on the control panel or press Enter button on , it automatically finds the next available input signal. ADVANCED-Press...
...panel or press Enter button on the remote control to detect HDMI signal. INPUT SELECT ADVANCED The Input Select Advanced menu allows you can manually select the input signal. HDMI-Press on the control panel or press Enter button on the remote control to detect Composite Video signal. ...Select On to lock the current input signal. If you to select your projector's input source. S-VIDEO-Press on the control panel or press Enter button on , it automatically finds the next available input signal. ADVANCED-Press...
User Guide
Page 35
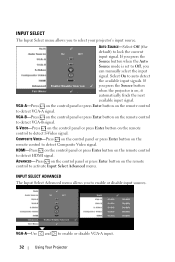
... and warmer at lower color temperatures. DISPLAY (in PC Mode) Using the Display menu, you can adjust the display settings of your projector. Using Your Projector 35 The values are : RGB, YCbCr, and YPbPr. The Picture Advanced menu provides the following options: ASPECT RATIO-Allows you to ...When you adjust the values in the Custom mode. COLOR TEMP-Allows you to adjust the color temperature. CUSTOM COLOR ADJUST-Allows you to manually adjust the colors red, green, and blue. COLOR SPACE-Allows you to adjust the display white intensity. PICTURE ADVANCED Using the Picture ...
... and warmer at lower color temperatures. DISPLAY (in PC Mode) Using the Display menu, you can adjust the display settings of your projector. Using Your Projector 35 The values are : RGB, YCbCr, and YPbPr. The Picture Advanced menu provides the following options: ASPECT RATIO-Allows you to ...When you adjust the values in the Custom mode. COLOR TEMP-Allows you to adjust the color temperature. CUSTOM COLOR ADJUST-Allows you to manually adjust the colors red, green, and blue. COLOR SPACE-Allows you to adjust the display white intensity. PICTURE ADVANCED Using the Picture ...

User Guide
Page 39
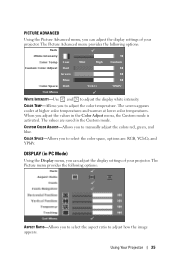
... image distortion caused by tilting the projector. Press on the control panel or press Enter button on the remote control to set the language for the OSD. KEYSTONE-Manually adjust the vertical image distortion caused by tilting the projector. This is mounted. • ...Front Projection-Desktop - Using Your Projector 39 Default is Off. AUTO KEYSTONE-Select On to select the projector mode, depending upon how the projector is the default option...
... image distortion caused by tilting the projector. Press on the control panel or press Enter button on the remote control to set the language for the OSD. KEYSTONE-Manually adjust the vertical image distortion caused by tilting the projector. This is mounted. • ...Front Projection-Desktop - Using Your Projector 39 Default is Off. AUTO KEYSTONE-Select On to select the projector mode, depending upon how the projector is the default option...
User Guide
Page 40
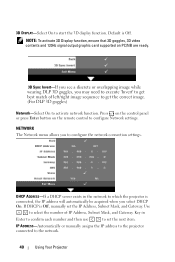
... acquired when you to set the IP Address, Subnet Mask, and Gateway. NETWORK The Network menu allows you select DHCP On. If DHCP is Off, manually set the next item. DHCP ADDRESS-If a DHCP server exists in Enter to confirm each number and then use to configure the network connection settings... goggles) Network-Select On to get best match of IP Address, Subnet Mask, and Gateway. Key in the network to the network. 40 Using Your Projector IP ADDRESS-Automatically or manually assigns the IP address to the...
... acquired when you to set the IP Address, Subnet Mask, and Gateway. NETWORK The Network menu allows you select DHCP On. If DHCP is Off, manually set the next item. DHCP ADDRESS-If a DHCP server exists in Enter to confirm each number and then use to configure the network connection settings... goggles) Network-Select On to get best match of IP Address, Subnet Mask, and Gateway. Key in the network to the network. 40 Using Your Projector IP ADDRESS-Automatically or manually assigns the IP address to the...
User Guide
Page 41
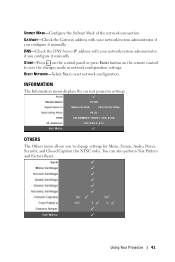
... RESET NETWORK-Select Yes to change settings for Menu, Screen, Audio, Power, Security, and Closed Caption (for NTSC only). Using Your Projector 41 STORE-Press on the control panel or press Enter button on the remote control to save the changes made in network configuration settings. DNS...-Check the DNS Server IP address with your network/system administrator if you configure it manually. You can also perform Test Pattern and Factory Reset. GATEWAY-Check the Gateway address with your network/system administrator if you configure ...
... RESET NETWORK-Select Yes to change settings for Menu, Screen, Audio, Power, Security, and Closed Caption (for NTSC only). Using Your Projector 41 STORE-Press on the control panel or press Enter button on the remote control to save the changes made in network configuration settings. DNS...-Check the DNS Server IP address with your network/system administrator if you configure it manually. You can also perform Test Pattern and Factory Reset. GATEWAY-Check the Gateway address with your network/system administrator if you configure ...
User Guide
Page 50
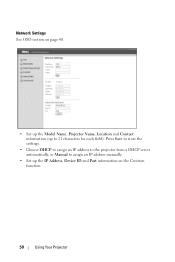
Press Save to store the settings. • Choose DHCP to assign an IP address to the projector from a DHCP server automatically, or Manual to 21 characters for each field). Network Settings See OSD section on page 40. • Set up the Model Name, Projector Name, Location and Contact information (up to assign an IP address manually. • Set up the IP Address, Device ID and Port information on the Crestron function. 50 Using Your Projector
Press Save to store the settings. • Choose DHCP to assign an IP address to the projector from a DHCP server automatically, or Manual to 21 characters for each field). Network Settings See OSD section on page 40. • Set up the Model Name, Projector Name, Location and Contact information (up to assign an IP address manually. • Set up the IP Address, Device ID and Port information on the Crestron function. 50 Using Your Projector


