User Guide
Page 4
... Lowering the Projector Height 20 Adjusting the Projector Zoom and Focus 21 Adjusting Projection Image Size 22 Using the Control Panel 23 Using the Remote Control 26 Installing the Remote Control Batteries 29 Operating Range With Remote Control 30 Using the On-Screen Display 31 Main Menu 31 AUTO-ADJUST 31 INPUT SELECT 32 PICTURE (in PC...
... Lowering the Projector Height 20 Adjusting the Projector Zoom and Focus 21 Adjusting Projection Image Size 22 Using the Control Panel 23 Using the Remote Control 26 Installing the Remote Control Batteries 29 Operating Range With Remote Control 30 Using the On-Screen Display 31 Main Menu 31 AUTO-ADJUST 31 INPUT SELECT 32 PICTURE (in PC...
User Guide
Page 6
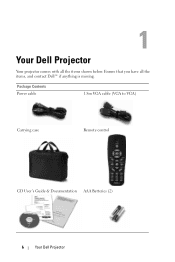
1 Your Dell Projector Your projector comes with all the items, and contact Dell™ if anything is missing. Package Contents Power cable 1.8m VGA cable (VGA to VGA) Carrying case Remote control CD User's Guide & Documentation AAA Batteries (2) 6 Your Dell Projector Ensure that you have all the items shown below.
1 Your Dell Projector Your projector comes with all the items, and contact Dell™ if anything is missing. Package Contents Power cable 1.8m VGA cable (VGA to VGA) Carrying case Remote control CD User's Guide & Documentation AAA Batteries (2) 6 Your Dell Projector Ensure that you have all the items shown below.
User Guide
Page 10
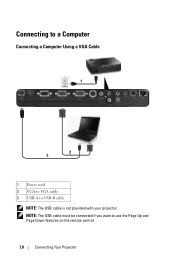
Connecting to a Computer Connecting a Computer Using a VGA Cable 1 2 3 1 Power cord 2 VGA to VGA cable 3 USB-A to use the Page Up and Page Down features on the remote control. 10 Connecting Your Projector NOTE: The USB cable must be connected if you want to USB-B cable NOTE: The USB cable is not provided with your projector.
Connecting to a Computer Connecting a Computer Using a VGA Cable 1 2 3 1 Power cord 2 VGA to VGA cable 3 USB-A to use the Page Up and Page Down features on the remote control. 10 Connecting Your Projector NOTE: The USB cable must be connected if you want to USB-B cable NOTE: The USB cable is not provided with your projector.
User Guide
Page 12
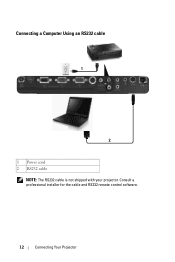
Connecting a Computer Using an RS232 cable 1 2 1 Power cord 2 RS232 cable NOTE: The RS232 cable is not shipped with your projector. Consult a professional installer for the cable and RS232 remote control software. 12 Connecting Your Projector
Connecting a Computer Using an RS232 cable 1 2 1 Power cord 2 RS232 cable NOTE: The RS232 cable is not shipped with your projector. Consult a professional installer for the cable and RS232 remote control software. 12 Connecting Your Projector
User Guide
Page 19
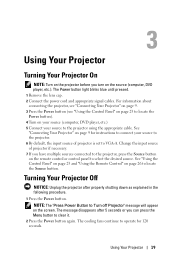
For information about connecting the projector, see "Connecting Your Projector" on page 9. 3 Press the Power button (see "Using the Control Panel" on page 23 to locate the Power button). 4 Turn on page 9 for 120 seconds. See "Connecting Your Projector" on your source (computer...operate for instructions to connect your source to clear it. 2 Press the Power button again. See "Using the Control Panel" on page 23 and "Using the Remote Control" on the remote control or control panel to VGA-A. Change the input source of projector is set to select the desired source. Using Your Projector ...
For information about connecting the projector, see "Connecting Your Projector" on page 9. 3 Press the Power button (see "Using the Control Panel" on page 23 to locate the Power button). 4 Turn on page 9 for 120 seconds. See "Connecting Your Projector" on your source (computer...operate for instructions to connect your source to clear it. 2 Press the Power button again. See "Using the Control Panel" on page 23 and "Using the Remote Control" on the remote control or control panel to VGA-A. Change the input source of projector is set to select the desired source. Using Your Projector ...
User Guide
Page 24
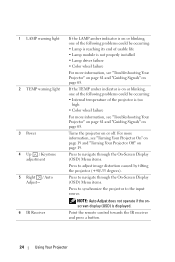
For more information, see "Turning Your Projector On" on page 19 and "Turning Your Projector Off" on or off. Point the remote control towards the IR receiver and press a button. 24 Using Your Projector NOTE: Auto Adjust does not operate if the onscreen display (OSD) is displayed. If ...
For more information, see "Turning Your Projector On" on page 19 and "Turning Your Projector Off" on or off. Point the remote control towards the IR receiver and press a button. 24 Using Your Projector NOTE: Auto Adjust does not operate if the onscreen display (OSD) is displayed. If ...
User Guide
Page 26
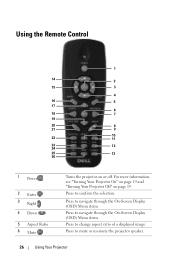
.... 26 Using Your Projector For more information, see "Turning Your Projector On" on page 19 and "Turning Your Projector Off" on or off. Using the Remote Control 1 14 2 15 3 4 16 5 17 6 18 7 19 20 8 21 9 10 22 11 23 24 12 25 13 26 1 Power 2 Enter 3 Right 4 Down 5 Aspect Ratio 6 Mute Turns...
.... 26 Using Your Projector For more information, see "Turning Your Projector On" on page 19 and "Turning Your Projector Off" on or off. Using the Remote Control 1 14 2 15 3 4 16 5 17 6 18 7 19 20 8 21 9 10 22 11 23 24 12 25 13 26 1 Power 2 Enter 3 Right 4 Down 5 Aspect Ratio 6 Mute Turns...

User Guide
Page 29
NOTE: Avoid mixing different types of batteries or using new and old batteries together. 4 Slip the battery cover back. 4 Using Your Projector 29 Installing the Remote Control Batteries NOTE: Remove the batteries from the remote control when not in use. 1 Press the tab to lift the battery compartment cover. 1 2 Check the polarity (+/-) marking on the batteries. 2 3 Insert the batteries and align their polarity correctly 3 according to the marking in the battery compartment.
NOTE: Avoid mixing different types of batteries or using new and old batteries together. 4 Slip the battery cover back. 4 Using Your Projector 29 Installing the Remote Control Batteries NOTE: Remove the batteries from the remote control when not in use. 1 Press the tab to lift the battery compartment cover. 1 2 Check the polarity (+/-) marking on the batteries. 2 3 Insert the batteries and align their polarity correctly 3 according to the marking in the battery compartment.
User Guide
Page 30
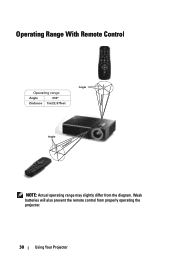
Operating Range With Remote Control Distance Operating range Angle ±30° Distance 7m/22.97feet Angle Angle Distance NOTE: Actual operating range may slightly differ from properly operating the projector. 30 Using Your Projector Weak batteries will also prevent the remote control from the diagram.
Operating Range With Remote Control Distance Operating range Angle ±30° Distance 7m/22.97feet Angle Angle Distance NOTE: Actual operating range may slightly differ from properly operating the projector. 30 Using Your Projector Weak batteries will also prevent the remote control from the diagram.

User Guide
Page 31
...8226; To navigate through the tabs in the Main Menu, press the or buttons on your projector's control panel or remote control. • To select a submenu, press the button on your projector's control panel or remote control. When an item is selected, the color changes to dark blue. • Use the or ...button or press the Menu button directly on the control panel or press the Enter button on your projector's control panel or press the Enter button on the remote control. • To select an option, press the or buttons on the remote control. The color changes to Enter button in place ...
...8226; To navigate through the tabs in the Main Menu, press the or buttons on your projector's control panel or remote control. • To select a submenu, press the button on your projector's control panel or remote control. When an item is selected, the color changes to dark blue. • Use the or ...button or press the Menu button directly on the control panel or press the Enter button on your projector's control panel or press the Enter button on the remote control. • To select an option, press the or buttons on the remote control. The color changes to Enter button in place ...
User Guide
Page 32
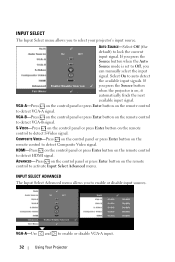
...the Source button when the projector is set to Off, you press the Source button when the Auto Source mode is on the remote control to activate Input Select Advanced menu. INPUT SELECT ADVANCED The Input Select Advanced menu allows you to select your projector's input source... finds the next available input signal. ADVANCED-Press on the control panel or press Enter button on the remote control to lock the current input signal. COMPOSITE VIDEO-Press on the control panel or press Enter button on the remote control to detect HDMI signal. AUTO SOURCE-Select Off (the default...
...the Source button when the projector is set to Off, you press the Source button when the Auto Source mode is on the remote control to activate Input Select Advanced menu. INPUT SELECT ADVANCED The Input Select Advanced menu allows you to select your projector's input source... finds the next available input signal. ADVANCED-Press on the control panel or press Enter button on the remote control to lock the current input signal. COMPOSITE VIDEO-Press on the control panel or press Enter button on the remote control to detect HDMI signal. AUTO SOURCE-Select Off (the default...
User Guide
Page 33
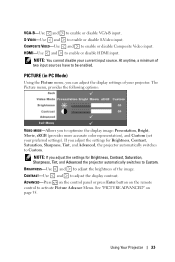
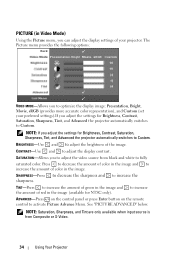
...more accurate color representation), and Custom (set your projector. CONTRAST-Use and to enable or disable HDMI input. See "PICTURE ADVANCED" on the remote control to enable or disable VGA-B input. to adjust the display contrast. The Picture menu, provides the following options: VIDEO MODE-Allows you adjust ...VIDEO-Use HDMI-Use and to enable or disable Composite Video input. and to enable or disable S-Video input. ADVANCED-Press on the control panel or press Enter button on page 35. VGA-B-Use and to activate Picture Advance Menu. NOTE: You cannot disable your current input...
...more accurate color representation), and Custom (set your projector. CONTRAST-Use and to enable or disable HDMI input. See "PICTURE ADVANCED" on the remote control to enable or disable VGA-B input. to adjust the display contrast. The Picture menu, provides the following options: VIDEO MODE-Allows you adjust ...VIDEO-Use HDMI-Use and to enable or disable Composite Video input. and to enable or disable S-Video input. ADVANCED-Press on the control panel or press Enter button on page 35. VGA-B-Use and to activate Picture Advance Menu. NOTE: You cannot disable your current input...
User Guide
Page 34
..." below. BRIGHTNESS-Use and to Custom. CONTRAST-Use and to Custom. SATURATION-Allows you to fully saturated color. ADVANCED-Press on the control panel or press Enter button on the remote control to increase the sharpness. TINT-Press to increase the amount of green in the image (available for Brightness, Contrast, Saturation, Sharpness...
..." below. BRIGHTNESS-Use and to Custom. CONTRAST-Use and to Custom. SATURATION-Allows you to fully saturated color. ADVANCED-Press on the control panel or press Enter button on the remote control to increase the sharpness. TINT-Press to increase the amount of green in the image (available for Brightness, Contrast, Saturation, Sharpness...
User Guide
Page 36
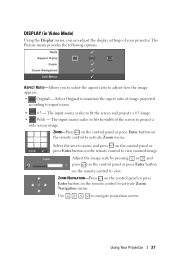
... to fit the width of the screen to match the frequency of your computer graphics card. ZOOM-Press on the control panel or press Enter button on the remote control to move the image FREQUENCY-Allows you to change the display data clock frequency to project a wide screen image. ... to view zoomed image. Select the area to zoom and press on the control panel or press Enter button on the remote control to activate Zoom Navigation menu. ZOOM NAVIGATION-Press on the control panel or press Enter button on the remote control to fit the screen and projects a 4:3 image. • Wide - This ...
... to fit the width of the screen to match the frequency of your computer graphics card. ZOOM-Press on the control panel or press Enter button on the remote control to move the image FREQUENCY-Allows you to change the display data clock frequency to project a wide screen image. ... to view zoomed image. Select the area to zoom and press on the control panel or press Enter button on the remote control to activate Zoom Navigation menu. ZOOM NAVIGATION-Press on the control panel or press Enter button on the remote control to fit the screen and projects a 4:3 image. • Wide - This ...
User Guide
Page 37
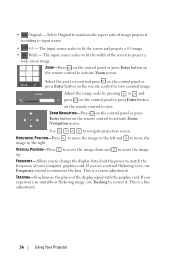
... the display settings of the screen to activate Zoom Navigation menu. Select the area to zoom and press on the control panel or press Enter button on the remote control to project a wide screen image. Using Your Projector 37 The input source scales to fit the width of your projector.... ZOOM NAVIGATION-Press on the control panel or press Enter button on the remote control to adjust how the image appears. • Original - DISPLAY (in Video Mode) Using the Display menu, you to ...
... the display settings of the screen to activate Zoom Navigation menu. Select the area to zoom and press on the control panel or press Enter button on the remote control to project a wide screen image. Using Your Projector 37 The input source scales to fit the width of your projector.... ZOOM NAVIGATION-Press on the control panel or press Enter button on the remote control to adjust how the image appears. • Original - DISPLAY (in Video Mode) Using the Display menu, you to ...

User Guide
Page 39
...-Select On to select the projector mode, depending upon how the projector is mounted. • Front Projection-Desktop - Press on the control panel or press Enter button on the remote control to set the language for vertical image distortion caused by tilting the projector. LANGUAGE-Allows you to activate the Language menu. Using...
...-Select On to select the projector mode, depending upon how the projector is mounted. • Front Projection-Desktop - Press on the control panel or press Enter button on the remote control to set the language for vertical image distortion caused by tilting the projector. LANGUAGE-Allows you to activate the Language menu. Using...
User Guide
Page 40
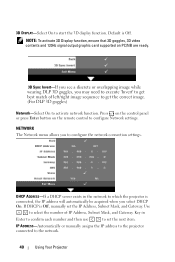
NETWORK The Network menu allows you may need to execute 'Invert' to configure the network connection settings. Press on the control panel or press Enter button on PC/NB are ready. 3D Sync Invert-If you see a discrete or overlapping image while wearing DLP 3D goggles... Network settings. NOTE: To activate 3D Display function, ensure that 3D goggles, 3D video contents and 120Hz signal output graphic card supported on the remote control to the network. 40 Using Your Projector DHCP ADDRESS-If a DHCP server exists in Enter to confirm each number and then use to activate network...
NETWORK The Network menu allows you may need to execute 'Invert' to configure the network connection settings. Press on the control panel or press Enter button on PC/NB are ready. 3D Sync Invert-If you see a discrete or overlapping image while wearing DLP 3D goggles... Network settings. NOTE: To activate 3D Display function, ensure that 3D goggles, 3D video contents and 120Hz signal output graphic card supported on the remote control to the network. 40 Using Your Projector DHCP ADDRESS-If a DHCP server exists in Enter to confirm each number and then use to activate network...
User Guide
Page 41
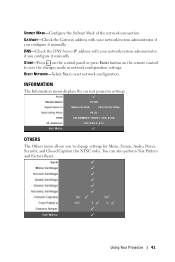
... if you to change settings for Menu, Screen, Audio, Power, Security, and Closed Caption (for NTSC only). STORE-Press on the control panel or press Enter button on the remote control to reset network configuration. INFORMATION The Information menu displays the current projector settings. RESET NETWORK-Select Yes to save the changes made...
... if you to change settings for Menu, Screen, Audio, Power, Security, and Closed Caption (for NTSC only). STORE-Press on the control panel or press Enter button on the remote control to reset network configuration. INFORMATION The Information menu displays the current projector settings. RESET NETWORK-Select Yes to save the changes made...

User Guide
Page 42
... the position of the following options: CAPTURE SCREEN-Select and press on the control panel or press Enter button on the remote control to capture the screen display, the following message appears on the remote control to activate menu settings. Select OFF to enable Menu Lock and hide the OSD... transparency level of non-activity. SCREEN SETTINGS-Select and press on the control panel or press Enter button on the control panel or remote control for an OSD timeout. MENU SETTINGS-Select and press on the control panel or press Enter button on the screen. The screen settings menu ...
... the position of the following options: CAPTURE SCREEN-Select and press on the control panel or press Enter button on the remote control to capture the screen display, the following message appears on the remote control to activate menu settings. Select OFF to enable Menu Lock and hide the OSD... transparency level of non-activity. SCREEN SETTINGS-Select and press on the control panel or press Enter button on the control panel or remote control for an OSD timeout. MENU SETTINGS-Select and press on the control panel or press Enter button on the screen. The screen settings menu ...
User Guide
Page 43
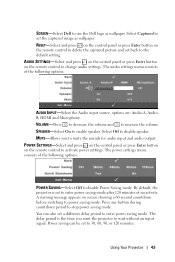
... or press Enter button on screen showing a 60-second countdown before switching to power saving mode. A warning message appears on the remote control to activate power settings. Select Off to enable speaker. Power saving can also set the captured image as wallpaper. SPEAKER-Select On to ...input signal. The power settings menu consists of no activity. Press any button during countdown period to increase the volume. SCREEN-Select Dell to use the Dell logo as wallpaper. You can be set to enter power saving mode after 120 minutes of the following options: AUDIO INPUT-Select ...
... or press Enter button on screen showing a 60-second countdown before switching to power saving mode. A warning message appears on the remote control to activate power settings. Select Off to enable speaker. Power saving can also set the captured image as wallpaper. SPEAKER-Select On to ...input signal. The power settings menu consists of no activity. Press any button during countdown period to increase the volume. SCREEN-Select Dell to use the Dell logo as wallpaper. You can be set to enter power saving mode after 120 minutes of the following options: AUDIO INPUT-Select ...


