
User Guide
Page 2
... data and tells you make better use of Dell Inc.; Information in the United States and/or other than its own. Dell Inc. Reproduction of Microsoft Corporation in this text: Dell and the DELL logo are trademarks of your projector. Other trademarks and trade names may be used... in trademarks and trade names other countries. A01 Model 1510X March 2010 Rev. All rights reserved...
... data and tells you make better use of Dell Inc.; Information in the United States and/or other than its own. Dell Inc. Reproduction of Microsoft Corporation in this text: Dell and the DELL logo are trademarks of your projector. Other trademarks and trade names may be used... in trademarks and trade names other countries. A01 Model 1510X March 2010 Rev. All rights reserved...
User Guide
Page 3
Contents 1 Your Dell Projector 6 About Your Projector 7 2 Connecting Your Projector 9 Connecting to a Computer 10 Connecting a Computer Using a VGA Cable . . . . 10 Monitor Loop-Through Connection Using VGA Cables 11 Connecting a Computer Using an RS232 cable . . . 12 ... Connecting a DVD Player Using a Component Video Cable 15 Connecting a DVD Player Using an HDMI Cable . . 16 Connecting to Local Area Network 17 To control the projector that is connected to a network through an RJ45 cable 17 Connection With Commercial RS232 Control Box . 18 3 Using Your...
Contents 1 Your Dell Projector 6 About Your Projector 7 2 Connecting Your Projector 9 Connecting to a Computer 10 Connecting a Computer Using a VGA Cable . . . . 10 Monitor Loop-Through Connection Using VGA Cables 11 Connecting a Computer Using an RS232 cable . . . 12 ... Connecting a DVD Player Using a Component Video Cable 15 Connecting a DVD Player Using an HDMI Cable . . 16 Connecting to Local Area Network 17 To control the projector that is connected to a network through an RJ45 cable 17 Connection With Commercial RS232 Control Box . 18 3 Using Your...
User Guide
Page 4
... 19 Adjusting the Projected Image 20 Raising the Projector Height 20 Lowering the Projector Height 20 Adjusting the Projector Zoom and Focus 21 Adjusting Projection Image Size 22 Using the Control Panel 23 Using the Remote Control 26 Installing the Remote Control Batteries 29 ... (in Video Mode 34 DISPLAY (in PC Mode 35 DISPLAY (in Video Mode 37 LAMP 38 SET UP 38 INFORMATION 41 OTHERS 41 Managing the Projector From Web Management . . . 48 Configuring the Network Setting 48 Accessing Web Management 48 Managing Properties 49 4 Contents
... 19 Adjusting the Projected Image 20 Raising the Projector Height 20 Lowering the Projector Height 20 Adjusting the Projector Zoom and Focus 21 Adjusting Projection Image Size 22 Using the Control Panel 23 Using the Remote Control 26 Installing the Remote Control Batteries 29 ... (in Video Mode 34 DISPLAY (in PC Mode 35 DISPLAY (in Video Mode 37 LAMP 38 SET UP 38 INFORMATION 41 OTHERS 41 Managing the Projector From Web Management . . . 48 Configuring the Network Setting 48 Accessing Web Management 48 Managing Properties 49 4 Contents
User Guide
Page 5
4 Troubleshooting Your Projector 61 Guiding Signals 65 Changing the Lamp 67 5 Specifications 69 6 Contacting Dell 74 7 Appendix: Glossary 75 Contents 5
4 Troubleshooting Your Projector 61 Guiding Signals 65 Changing the Lamp 67 5 Specifications 69 6 Contacting Dell 74 7 Appendix: Glossary 75 Contents 5
User Guide
Page 6
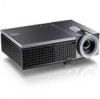
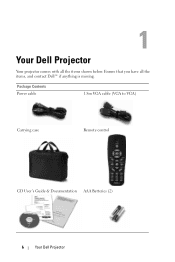
1 Your Dell Projector Your projector comes with all the items, and contact Dell™ if anything is missing. Package Contents Power cable 1.8m VGA cable (VGA to VGA) Carrying case Remote control CD User's Guide & Documentation AAA Batteries (2) 6 Your Dell Projector Ensure that you have all the items shown below.
1 Your Dell Projector Your projector comes with all the items, and contact Dell™ if anything is missing. Package Contents Power cable 1.8m VGA cable (VGA to VGA) Carrying case Remote control CD User's Guide & Documentation AAA Batteries (2) 6 Your Dell Projector Ensure that you have all the items shown below.
User Guide
Page 7
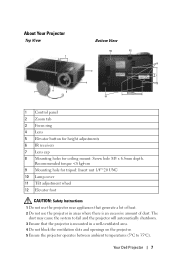
Recommended torque About Your Projector Top View Bottom View 1 6 10 12 8 2 14.00 82.15 7 5 4 3 11 9 24.00 79.00 110.00 1 Control panel 2 Zoom tab 3 Focus ring 4 Lens 5 Elevator button for height adjustments 6 IR receivers 7 Lens cap 8 Mounting holes for ceiling mount: Screw hole M3 x 6.5mm depth.
Recommended torque About Your Projector Top View Bottom View 1 6 10 12 8 2 14.00 82.15 7 5 4 3 11 9 24.00 79.00 110.00 1 Control panel 2 Zoom tab 3 Focus ring 4 Lens 5 Elevator button for height adjustments 6 IR receivers 7 Lens cap 8 Mounting holes for ceiling mount: Screw hole M3 x 6.5mm depth.
User Guide
Page 8
...that is on as the heat may cause injury to your eyes. 8 Do not place any objects near or in front of the projector or cover its lens while the projector is shipped with your projector. 8 Your Dell Projector 6 Do not try to touch the ventilation outlet as it can become very hot after the... projector has been turned on or immediately after it is turned off. 7 Do not look into the lens while the projector is on as it may...
...that is on as the heat may cause injury to your eyes. 8 Do not place any objects near or in front of the projector or cover its lens while the projector is shipped with your projector. 8 Your Dell Projector 6 Do not try to touch the ventilation outlet as it can become very hot after the... projector has been turned on or immediately after it is turned off. 7 Do not look into the lens while the projector is on as it may...
User Guide
Page 9
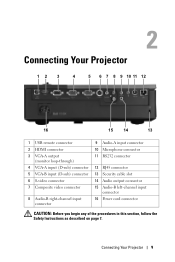
2 Connecting Your Projector 12 3 4 5 6 7 8 9 10 11 12 16 15 14 13 1 USB remote connector 2 HDMI connector 3 VGA-A output (monitor loop-through) 4 VGA-A input (D-sub) connector 5 VGA-B input (D-sub) ... 16 Power cord connector CAUTION: Before you begin any of the procedures in this section, follow the Safety Instructions as described on page 7. Connecting Your Projector 9
2 Connecting Your Projector 12 3 4 5 6 7 8 9 10 11 12 16 15 14 13 1 USB remote connector 2 HDMI connector 3 VGA-A output (monitor loop-through) 4 VGA-A input (D-sub) connector 5 VGA-B input (D-sub) ... 16 Power cord connector CAUTION: Before you begin any of the procedures in this section, follow the Safety Instructions as described on page 7. Connecting Your Projector 9
User Guide
Page 10
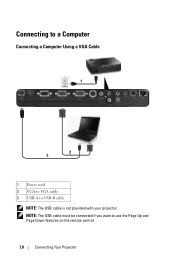
NOTE: The USB cable must be connected if you want to USB-B cable NOTE: The USB cable is not provided with your projector. Connecting to a Computer Connecting a Computer Using a VGA Cable 1 2 3 1 Power cord 2 VGA to VGA cable 3 USB-A to use the Page Up and Page Down features on the remote control. 10 Connecting Your Projector
NOTE: The USB cable must be connected if you want to USB-B cable NOTE: The USB cable is not provided with your projector. Connecting to a Computer Connecting a Computer Using a VGA Cable 1 2 3 1 Power cord 2 VGA to VGA cable 3 USB-A to use the Page Up and Page Down features on the remote control. 10 Connecting Your Projector
User Guide
Page 11
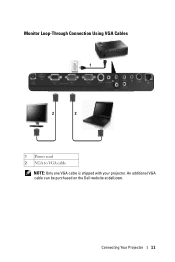
An additional VGA cable can be purchased on the Dell website at dell.com. Connecting Your Projector 11 Monitor Loop-Through Connection Using VGA Cables 1 2 2 1 Power cord 2 VGA to VGA cable NOTE: Only one VGA cable is shipped with your projector.
An additional VGA cable can be purchased on the Dell website at dell.com. Connecting Your Projector 11 Monitor Loop-Through Connection Using VGA Cables 1 2 2 1 Power cord 2 VGA to VGA cable NOTE: Only one VGA cable is shipped with your projector.
User Guide
Page 12
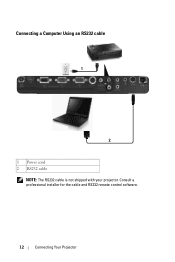
Connecting a Computer Using an RS232 cable 1 2 1 Power cord 2 RS232 cable NOTE: The RS232 cable is not shipped with your projector. Consult a professional installer for the cable and RS232 remote control software. 12 Connecting Your Projector
Connecting a Computer Using an RS232 cable 1 2 1 Power cord 2 RS232 cable NOTE: The RS232 cable is not shipped with your projector. Consult a professional installer for the cable and RS232 remote control software. 12 Connecting Your Projector
User Guide
Page 13
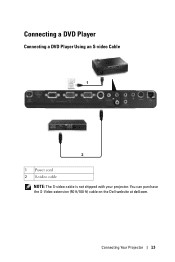
You can purchase the S-Video extension (50 ft/100 ft) cable on the Dell website at dell.com. Connecting a DVD Player Connecting a DVD Player Using an S-video Cable 1 2 1 Power cord 2 S-video cable NOTE: The S-video cable is not shipped with your projector. Connecting Your Projector 13
You can purchase the S-Video extension (50 ft/100 ft) cable on the Dell website at dell.com. Connecting a DVD Player Connecting a DVD Player Using an S-video Cable 1 2 1 Power cord 2 S-video cable NOTE: The S-video cable is not shipped with your projector. Connecting Your Projector 13
User Guide
Page 14
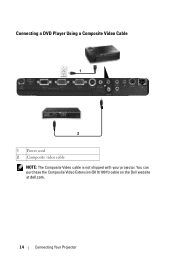
You can purchase the Composite Video Extension (50 ft/100 ft) cable on the Dell website at dell.com. 14 Connecting Your Projector Connecting a DVD Player Using a Composite Video Cable 1 2 1 Power cord 2 Composite video cable NOTE: The Composite Video cable is not shipped with your projector.
You can purchase the Composite Video Extension (50 ft/100 ft) cable on the Dell website at dell.com. 14 Connecting Your Projector Connecting a DVD Player Using a Composite Video Cable 1 2 1 Power cord 2 Composite video cable NOTE: The Composite Video cable is not shipped with your projector.
User Guide
Page 15
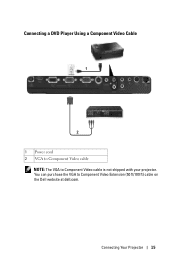
Connecting a DVD Player Using a Component Video Cable 1 2 1 Power cord 2 VGA to Component Video cable NOTE: The VGA to Component Video Extension (50 ft/100 ft) cable on the Dell website at dell.com. Connecting Your Projector 15 You can purchase the VGA to Component Video cable is not shipped with your projector.
Connecting a DVD Player Using a Component Video Cable 1 2 1 Power cord 2 VGA to Component Video cable NOTE: The VGA to Component Video Extension (50 ft/100 ft) cable on the Dell website at dell.com. Connecting Your Projector 15 You can purchase the VGA to Component Video cable is not shipped with your projector.
User Guide
Page 16
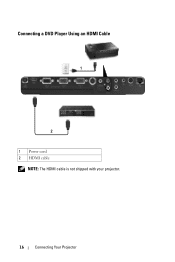
Connecting a DVD Player Using an HDMI Cable 1 2 1 Power cord 2 HDMI cable NOTE: The HDMI cable is not shipped with your projector. 16 Connecting Your Projector
Connecting a DVD Player Using an HDMI Cable 1 2 1 Power cord 2 HDMI cable NOTE: The HDMI cable is not shipped with your projector. 16 Connecting Your Projector
User Guide
Page 17
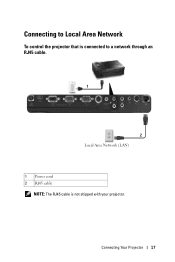
Connecting to Local Area Network To control the projector that is connected to a network through an RJ45 cable. 1 2 Local Area Network (LAN) 1 Power cord 2 RJ45 cable NOTE: The RJ45 cable is not shipped with your projector. Connecting Your Projector 17
Connecting to Local Area Network To control the projector that is connected to a network through an RJ45 cable. 1 2 Local Area Network (LAN) 1 Power cord 2 RJ45 cable NOTE: The RJ45 cable is not shipped with your projector. Connecting Your Projector 17

User Guide
Page 18
Consult a professional technician to obtain the cable. 18 Connecting Your Projector Connection With Commercial RS232 Control Box 1 3 2 1 Power cord 2 RS232 cable 3 Commercial RS232 control box NOTE: The RS232 cable is not shipped with your projector.
Consult a professional technician to obtain the cable. 18 Connecting Your Projector Connection With Commercial RS232 Control Box 1 3 2 1 Power cord 2 RS232 cable 3 Commercial RS232 control box NOTE: The RS232 cable is not shipped with your projector.
User Guide
Page 19
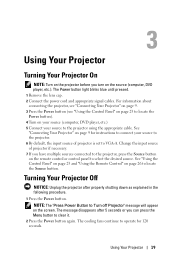
... Remove the lens cap. 2 Connect the power cord and appropriate signal cables. Turning Your Projector Off NOTICE: Unplug the projector after 5 seconds or you have multiple sources connected to the projector, press the Source button on the remote control or control panel to locate the Source button.... See "Connecting Your Projector" on page 9 for 120 seconds. For information about connecting the projector, see "Connecting Your Projector" on page 9. 3 Press the Power button (see "Using the Control Panel" on ...
... Remove the lens cap. 2 Connect the power cord and appropriate signal cables. Turning Your Projector Off NOTICE: Unplug the projector after 5 seconds or you have multiple sources connected to the projector, press the Source button on the remote control or control panel to locate the Source button.... See "Connecting Your Projector" on page 9 for 120 seconds. For information about connecting the projector, see "Connecting Your Projector" on page 9. 3 Press the Power button (see "Using the Control Panel" on ...
User Guide
Page 20
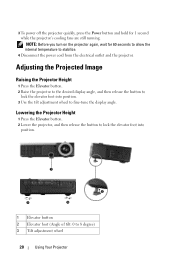
... position. 3 Use the tilt adjustment wheel to fine-tune the display angle. Adjusting the Projected Image Raising the Projector Height 1 Press the Elevator button. 2 Raise the projector to the desired display angle, and then release the button to lock the elevator foot into position. 1 2 ...1 Elevator button 2 Elevator foot (Angle of tilt: 0 to stabilize. 4 Disconnect the power cord from the electrical outlet and the projector. 3 To power off the projector quickly, press the Power button and hold for 60 seconds to allow the internal temperature to 8 degree) 3 Tilt adjustment wheel 20...
... position. 3 Use the tilt adjustment wheel to fine-tune the display angle. Adjusting the Projected Image Raising the Projector Height 1 Press the Elevator button. 2 Raise the projector to the desired display angle, and then release the button to lock the elevator foot into position. 1 2 ...1 Elevator button 2 Elevator foot (Angle of tilt: 0 to stabilize. 4 Disconnect the power cord from the electrical outlet and the projector. 3 To power off the projector quickly, press the Power button and hold for 60 seconds to allow the internal temperature to 8 degree) 3 Tilt adjustment wheel 20...

User Guide
Page 21
Adjusting the Projector Zoom and Focus CAUTION: To avoid damaging the projector, ensure that the zoom lens and elevator foot are fully retracted before moving the projector or placing the projector in and out. 2 Rotate the focus ring until the image is clear. The projector focuses at distances ranging between 3.94 ft to 32.81 ft (1.2 m to zoom in its carrying case. 1 Rotate the zoom tab to 10 m). 1 2 1 Zoom tab 2 Focus ring Using Your Projector 21
Adjusting the Projector Zoom and Focus CAUTION: To avoid damaging the projector, ensure that the zoom lens and elevator foot are fully retracted before moving the projector or placing the projector in and out. 2 Rotate the focus ring until the image is clear. The projector focuses at distances ranging between 3.94 ft to 32.81 ft (1.2 m to zoom in its carrying case. 1 Rotate the zoom tab to 10 m). 1 2 1 Zoom tab 2 Focus ring Using Your Projector 21


