
Owner Manual
Page 4
... exhaust hose housing 9 drainage hose 4 10 power cable 11 wall flange 12 sucker 13 air exhaust hose 14 window outlet 15 castor locks 16 remote control unit 17 window bracket with any electrical appliance, the instructions aim to cool and dehumidify domestic environments and should be transported in line with reduced...
... exhaust hose housing 9 drainage hose 4 10 power cable 11 wall flange 12 sucker 13 air exhaust hose 14 window outlet 15 castor locks 16 remote control unit 17 window bracket with any electrical appliance, the instructions aim to cool and dehumidify domestic environments and should be transported in line with reduced...

Owner Manual
Page 7
...it was turned off will appear. ✔ Never turn the air conditioner off by unplugging from the mains. Control panel THE CONTROL PANEL 12 13 4 2 5 7 12 15 13 16 14 16 DESCRIPTION OF THE CONTROL PANEL 1 Air conditioning symbol 2 Dehumidifying symbol 3 Fan symbol 4 SMART symbol 5 BOOST symbol 6 Temperature ...) 13 BOOST button 14 FAN button 15 ON/Standby button 16 Increase (+) and decrease (-) temperature button OPERATING FROM THE CONTROL PANEL The control panel enables you to manage all the main functions of checks to fully exploit its potential, you must use the remote...
...it was turned off will appear. ✔ Never turn the air conditioner off by unplugging from the mains. Control panel THE CONTROL PANEL 12 13 4 2 5 7 12 15 13 16 14 16 DESCRIPTION OF THE CONTROL PANEL 1 Air conditioning symbol 2 Dehumidifying symbol 3 Fan symbol 4 SMART symbol 5 BOOST symbol 6 Temperature ...) 13 BOOST button 14 FAN button 15 ON/Standby button 16 Increase (+) and decrease (-) temperature button OPERATING FROM THE CONTROL PANEL The control panel enables you to manage all the main functions of checks to fully exploit its potential, you must use the remote...

Owner Manual
Page 10
...button 22 SLEEP button 23 °C or °F selection button 24 BOOST button USING THE REMOTE CONTROL ✔ Point the remote control at the receiver on the appliance. The remote control must be no more than 23 ft (7 metres) away from the appliance (without obstacles between ... Clock 16 Timer ON symbol 17 Timer OFF symbol 18 Reset button (resets the appliance to direct sunlight or sources of the remote control DESCRIPTION OF THE REMOTE CONTROL 1 Air conditioning symbol 2 Dehumidifying symbol 3 Fan symbol 4 Fan speed indicator 5 SMART symbol 6 BOOST symbol 7 SLEEP symbol 8 AUTOFAN ...
...button 22 SLEEP button 23 °C or °F selection button 24 BOOST button USING THE REMOTE CONTROL ✔ Point the remote control at the receiver on the appliance. The remote control must be no more than 23 ft (7 metres) away from the appliance (without obstacles between ... Clock 16 Timer ON symbol 17 Timer OFF symbol 18 Reset button (resets the appliance to direct sunlight or sources of the remote control DESCRIPTION OF THE REMOTE CONTROL 1 Air conditioning symbol 2 Dehumidifying symbol 3 Fan symbol 4 Fan speed indicator 5 SMART symbol 6 BOOST symbol 7 SLEEP symbol 8 AUTOFAN ...

Owner Manual
Page 11
...mode (AIR CONDITIONING, DEHUMIDIFYING, FAN, or SMART) and the fan speed. You should therefore refer to the instructions in the chapter Operating from the control panel to set . BOOST FUNCTION Ideal for a certain length of batteries in accordance with the point of a pencil or pen. To set this ... and then the hours. • Once the correct time has been reached, release the button and press the OK button to the controls on the remote control and restore the original settings, press the reset button lightly with current legislation as follows: • Press the or button until the...
...mode (AIR CONDITIONING, DEHUMIDIFYING, FAN, or SMART) and the fan speed. You should therefore refer to the instructions in the chapter Operating from the control panel to set . BOOST FUNCTION Ideal for a certain length of batteries in accordance with the point of a pencil or pen. To set this ... and then the hours. • Once the correct time has been reached, release the button and press the OK button to the controls on the remote control and restore the original settings, press the reset button lightly with current legislation as follows: • Press the or button until the...

Owner Manual
Page 12
...and 4°F (2°C) after 2 hours. Programming start up • Press the button. The message ( ) appears on the remote control display and the symbol is displayed on the remote control display. • Press the or buttons to set this function correctly: • Select the operating mode (air conditioning, dehumidifying or smart... that the timer is active. 12 The appliance operates in either temperature or humidity and with low fan speed. Using the remote control unit SLEEP FUNCTION This function is ideal for the night as described above. • Press the button.
...and 4°F (2°C) after 2 hours. Programming start up • Press the button. The message ( ) appears on the remote control display and the symbol is displayed on the remote control display. • Press the or buttons to set this function correctly: • Select the operating mode (air conditioning, dehumidifying or smart... that the timer is active. 12 The appliance operates in either temperature or humidity and with low fan speed. Using the remote control unit SLEEP FUNCTION This function is ideal for the night as described above. • Press the button.
Owner Manual
Page 13
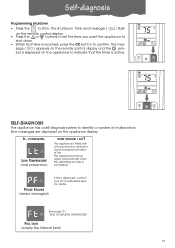
... your local authorised service centre. The mes- The appliance is fitted with a frost protection device to identify a number of ice. sage ( ) appears on the remote control display and the symbol is displayed on the appliance to indicate that the timer is reached, press the OK button to shut down. • When... The shutdown time and message ( ) flash on the appliance display. Self-diagnosis Programming shutdown • Press the button. Error messages are displayed on the remote control display. • Press the or buttons to set the time you want the appliance to confirm.
... your local authorised service centre. The mes- The appliance is fitted with a frost protection device to identify a number of ice. sage ( ) appears on the remote control display and the symbol is displayed on the appliance to indicate that the timer is reached, press the OK button to shut down. • When... The shutdown time and message ( ) flash on the appliance display. Self-diagnosis Programming shutdown • Press the button. Error messages are displayed on the remote control display. • Press the or buttons to set the time you want the appliance to confirm.
