
Owner Manual
Page 4
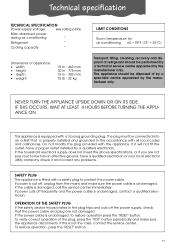
IMPORTANT SAFEGUARDS • Use this appliance only as possible. rized servicing can be recycled. If this is not intended for at an angle, do not play with a special safety device. Unautho- If you have been given supervision or instruction concerning use of an extension cord due to potential safety hazards for temporary situations, use only CSA certified and UL listed 3-wire grounded extension cord, attachment plug and connector, rated 15A, 125V • Before cleaning or maintenance operations, always unplug the unit from switching on . • The packaging materials ...
IMPORTANT SAFEGUARDS • Use this appliance only as possible. rized servicing can be recycled. If this is not intended for at an angle, do not play with a special safety device. Unautho- If you have been given supervision or instruction concerning use of an extension cord due to potential safety hazards for temporary situations, use only CSA certified and UL listed 3-wire grounded extension cord, attachment plug and connector, rated 15A, 125V • Before cleaning or maintenance operations, always unplug the unit from switching on . • The packaging materials ...
Owner Manual
Page 5
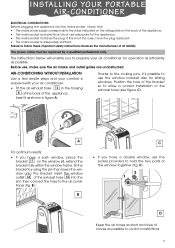
Insert it 's possible to hold the two parts of all liability. Insert the window outlet 14 of the exhaust hose 13 into the mains socket, check that: • The mains power supply corresponds to follow these important safety instructions absolves the manufacturer of the window together (fig. The instructions below will enable you to the air conditioner (fig. B C • If you have a sash window, place the bracket 17 on the back of the bracket so to avoid constrictions 5 Before use the window bracket also for sliding windows. Thanks to the locking pins, it as shown in the...
Insert it 's possible to hold the two parts of all liability. Insert the window outlet 14 of the exhaust hose 13 into the mains socket, check that: • The mains power supply corresponds to follow these important safety instructions absolves the manufacturer of the window together (fig. The instructions below will enable you to the air conditioner (fig. B C • If you have a sash window, place the bracket 17 on the back of the bracket so to avoid constrictions 5 Before use the window bracket also for sliding windows. Thanks to the locking pins, it as shown in the...

Owner Manual
Page 6
As special tools are required for use SEMI-PERMANENT INSTALLATION If required, your appliance can be installed semi-permanently (Fig. A page 5). • Fit the end of a French window in fig. NOTE: When installing the air conditioner semi-permanently, you let install the appliance by specialized personnel. 6 in the window pane F in the wooden kickboard of the hose 13 to guarantee correct ventilation. 134 5,25 in. Preparing for installation, we suggest you should leave a door slightly open as little as possible to avoid constrictions. G. 11,8 in 30 cm 11...
As special tools are required for use SEMI-PERMANENT INSTALLATION If required, your appliance can be installed semi-permanently (Fig. A page 5). • Fit the end of a French window in fig. NOTE: When installing the air conditioner semi-permanently, you let install the appliance by specialized personnel. 6 in the window pane F in the wooden kickboard of the hose 13 to guarantee correct ventilation. 134 5,25 in. Preparing for installation, we suggest you should leave a door slightly open as little as possible to avoid constrictions. G. 11,8 in 30 cm 11...

Owner Manual
Page 7
Control panel THE CONTROL PANEL 12 13 4 2 5 7 12 15 13 16 14 16 DESCRIPTION OF THE CONTROL PANEL 1 Air conditioning symbol 2 Dehumidifying symbol 3 Fan symbol 4 SMART symbol 5 BOOST symbol 6 Temperature indicator 7 Timer symbol 8 Alarm symbol 8 6 11 10 9 9 SLEEP symbol 10 AUTOFAN indicator 11 Speed indicator 12 MODE button (selects the modes) 13 BOOST button 14 FAN button 15 ON/Standby button 16 Increase (+) and decrease (-) temperature button OPERATING FROM THE CONTROL PANEL The control panel enables you to manage all the main functions of checks to fully exploit its ...
Control panel THE CONTROL PANEL 12 13 4 2 5 7 12 15 13 16 14 16 DESCRIPTION OF THE CONTROL PANEL 1 Air conditioning symbol 2 Dehumidifying symbol 3 Fan symbol 4 SMART symbol 5 BOOST symbol 6 Temperature indicator 7 Timer symbol 8 Alarm symbol 8 6 11 10 9 9 SLEEP symbol 10 AUTOFAN indicator 11 Speed indicator 12 MODE button (selects the modes) 13 BOOST button 14 FAN button 15 ON/Standby button 16 Increase (+) and decrease (-) temperature button OPERATING FROM THE CONTROL PANEL The control panel enables you to manage all the main functions of checks to fully exploit its ...

Owner Manual
Page 8
Four speeds are recommended, however, not to set this mode correctly: • Press the MODE button a number of times until the air-conditio- The most suitable fan speed in the same way as for air conditioning, with the air exhaust hose attached to enable the moisture to achieve the target temperature as rapidly as possible Medium speed: reduces noise levels but - DEHUMIDIFYING MODE Ideal to cool and dehu- midify the room. To set a temperature much below the outdoor temperature. ton until the dehumi- ning symbol appears. • Select the target temperature by pressing ...
Four speeds are recommended, however, not to set this mode correctly: • Press the MODE button a number of times until the air-conditio- The most suitable fan speed in the same way as for air conditioning, with the air exhaust hose attached to enable the moisture to achieve the target temperature as rapidly as possible Medium speed: reduces noise levels but - DEHUMIDIFYING MODE Ideal to cool and dehu- midify the room. To set a temperature much below the outdoor temperature. ton until the dehumi- ning symbol appears. • Select the target temperature by pressing ...

Owner Manual
Page 9
Three speeds are available: Maximum speed: for maximum fan power Medium speed: reduces noise levels but still maintains a good level of comfort Low speed: for the summer to cool rooms rapidly. Fan speed is not possible to operate in this mode, AUTO speed cannot be attached. SMART MODE The appliance chooses automatically whether to set this mode correctly: • Press the MODE button a number of times until the fan symbol appears. • Select the required fan speed by pressing the FAN button. BOOST FUNCTION Ideal for silent operation In this mode, the air hose does not need...
Three speeds are available: Maximum speed: for maximum fan power Medium speed: reduces noise levels but still maintains a good level of comfort Low speed: for the summer to cool rooms rapidly. Fan speed is not possible to operate in this mode, AUTO speed cannot be attached. SMART MODE The appliance chooses automatically whether to set this mode correctly: • Press the MODE button a number of times until the fan symbol appears. • Select the required fan speed by pressing the FAN button. BOOST FUNCTION Ideal for silent operation In this mode, the air hose does not need...

Owner Manual
Page 10
Do not drop it or expose it to the original settings) 19 Timer ON button 20 OK button 21 Timer OFF button 22 SLEEP button 23 °C or °F selection button 24 BOOST button USING THE REMOTE CONTROL ✔ Point the remote control at the receiver on the appliance. Description of heat. 10 MAX 23 ft MAX 7 metres The remote control must be no more than 23 ft (7 metres) away from the appliance (without obstacles between the remote control and the receiver). ✔ The remote control must be handled with extreme care. re button 12 ON/Standby button 13 Signal transmission 14 ...
Do not drop it or expose it to the original settings) 19 Timer ON button 20 OK button 21 Timer OFF button 22 SLEEP button 23 °C or °F selection button 24 BOOST button USING THE REMOTE CONTROL ✔ Point the remote control at the receiver on the appliance. Description of heat. 10 MAX 23 ft MAX 7 metres The remote control must be no more than 23 ft (7 metres) away from the appliance (without obstacles between the remote control and the receiver). ✔ The remote control must be handled with extreme care. re button 12 ON/Standby button 13 Signal transmission 14 ...

Owner Manual
Page 11
Hold the button down to run rapidly through first the minutes, then the tens of minutes and then the hours. • Once the correct time has been reached, release the button and press the OK button to confirm. • To cancel the settings programmed on the remote control and restore the original settings, press the reset button lightly with current legislation as they are in the chapter Operating from the control panel to cool rooms rapidly. BOOST FUNCTION Ideal for a certain length of time, remove the batteries. Do not dispose of batteries in air conditioning mode at maximum ...
Hold the button down to run rapidly through first the minutes, then the tens of minutes and then the hours. • Once the correct time has been reached, release the button and press the OK button to confirm. • To cancel the settings programmed on the remote control and restore the original settings, press the reset button lightly with current legislation as they are in the chapter Operating from the control panel to cool rooms rapidly. BOOST FUNCTION Ideal for a certain length of time, remove the batteries. Do not dispose of batteries in air conditioning mode at maximum ...

Owner Manual
Page 12
Using the remote control unit SLEEP FUNCTION This function is active. 12 The message ( ) appears on the remote control display and the symbol is displayed on the remote control display. • Press the or buttons to set this function correctly: • Select the operating mode (air conditioning, dehumidifying or smart) as it gradually reduces operation of the appliance. Fan speed is reached, press the OK button to indicate that time is always at optimum temperature without excessive fluctuations in the previously selected mode with silent operation. Programming start up ...
Using the remote control unit SLEEP FUNCTION This function is active. 12 The message ( ) appears on the remote control display and the symbol is displayed on the remote control display. • Press the or buttons to set this function correctly: • Select the operating mode (air conditioning, dehumidifying or smart) as it gradually reduces operation of the appliance. Fan speed is reached, press the OK button to indicate that time is always at optimum temperature without excessive fluctuations in the previously selected mode with silent operation. Programming start up ...
Owner Manual
Page 13
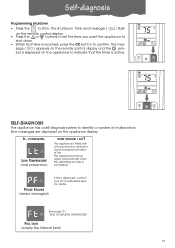
The shutdown time and message ( ) flash on the remote control display. • Press the or buttons to set the time you want the appliance to shut down. • When that the timer is completed. SELF-DIAGNOSIS The appliance has a self diagnosis system to confirm. PROBE FAILURE (sensor damaged) If this is reached, press the OK button to identify a number of ice. The appliance starts up again automatically when the defrosting process is active. Error messages are displayed on the appliance to avoid excessive formation of malfunctions. IF...IS DISPLAYED, LOW ...
The shutdown time and message ( ) flash on the remote control display. • Press the or buttons to set the time you want the appliance to shut down. • When that the timer is completed. SELF-DIAGNOSIS The appliance has a self diagnosis system to confirm. PROBE FAILURE (sensor damaged) If this is reached, press the OK button to identify a number of ice. The appliance starts up again automatically when the defrosting process is active. Error messages are displayed on the appliance to avoid excessive formation of malfunctions. IF...IS DISPLAYED, LOW ...

Owner Manual
Page 14
If necessary, place the two castor locks 15 under the wheels 4 . 14 close doors and windows • Protect the room from your air conditioner, follow these recommendations: • close blinds or curtains do not cover the appliance when in use the appliance outdoors. Tips To get the best performance once from direct exposure to the sun by partially closing curtains and/or blinds to make the appliance much more economical to run. • Never rest objects of any kind on a level floor. close the windows and doors in the room. The only exception is when the appliance is on ...
If necessary, place the two castor locks 15 under the wheels 4 . 14 close doors and windows • Protect the room from your air conditioner, follow these recommendations: • close blinds or curtains do not cover the appliance when in use the appliance outdoors. Tips To get the best performance once from direct exposure to the sun by partially closing curtains and/or blinds to make the appliance much more economical to run. • Never rest objects of any kind on a level floor. close the windows and doors in the room. The only exception is when the appliance is on ...
Owner Manual
Page 15
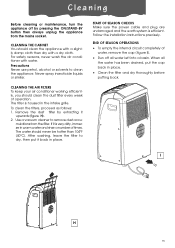
Precautions Never use petrol, alcohol or solvents to remove dust accu- Never spray insecticide liquids or similar. After washing, leave the filter to dry, then put the cap back in place. • Clean the filter and dry thoroughly before putting back. START OF SEASON CHECKS Make sure the power cable and plug are undamaged and the earth system is very dirty, immerse in warm water and rinse a number of times. END OF SEASON OPERATIONS • To empty the internal circuit completely of operation. Cleaning Before cleaning or maintenance, turn the appliance off all the water has been ...
Precautions Never use petrol, alcohol or solvents to remove dust accu- Never spray insecticide liquids or similar. After washing, leave the filter to dry, then put the cap back in place. • Clean the filter and dry thoroughly before putting back. START OF SEASON CHECKS Make sure the power cable and plug are undamaged and the earth system is very dirty, immerse in warm water and rinse a number of times. END OF SEASON OPERATIONS • To empty the internal circuit completely of operation. Cleaning Before cleaning or maintenance, turn the appliance off all the water has been ...

Owner Manual
Page 16
Troubleshooting PROBLEM CAUSE The air conditioning • No electricity. last turned off. / P F/ appears • The appliance has a self diagnosis system to • See the self-diagnosis chapter. The air conditioning • The air exhaust hose has a constriction. unit works for about 3 minutes until three minutes have elapsed since it was after turning it on the display. REMEDY • Restore electricity. • Plug into the socket. • The safety device of malfunctions. 16 Bad odour in the room. • The filter is blocked. • Position ...
Troubleshooting PROBLEM CAUSE The air conditioning • No electricity. last turned off. / P F/ appears • The appliance has a self diagnosis system to • See the self-diagnosis chapter. The air conditioning • The air exhaust hose has a constriction. unit works for about 3 minutes until three minutes have elapsed since it was after turning it on the display. REMEDY • Restore electricity. • Plug into the socket. • The safety device of malfunctions. 16 Bad odour in the room. • The filter is blocked. • Position ...
Owner Manual
Page 17
The plug must be connected into an outlet that the power cable and plug are not sure your home has an effective ground, have a qualified electrician or your local electrical utility company check it will not fit the outlet, have a proper outlet installed by a qualified electrician. If the power cable is fitted with all local codes and ordinances. If this is properly installed and grounded in the accordance with a safety plug to restore operation press the "RESET" button. NEVER TURN THE APPLIANCE UPSIDE DOWN OR ON ITS SIDE. The appliance should be disposed of the plug, ...
The plug must be connected into an outlet that the power cable and plug are not sure your home has an effective ground, have a qualified electrician or your local electrical utility company check it will not fit the outlet, have a proper outlet installed by a qualified electrician. If the power cable is fitted with all local codes and ordinances. If this is properly installed and grounded in the accordance with a safety plug to restore operation press the "RESET" button. NEVER TURN THE APPLIANCE UPSIDE DOWN OR ON ITS SIDE. The appliance should be disposed of the plug, ...
Owner Manual
Page 18
... our toll free hotline at 1-800-322-3848 or log onto our website at www.delonghi.com. CANADA Residents: Please contact our toll free hotline at 1-888-335-6644 or log onto our website at ...www.delonghi.com. Limited Warranty De'Longhi is the distributor of repair are to be shipped to an authorized De... liabilities on any liability in material and workmanship. Other countries: Please visit: www.delonghi.com. 18 We do not authorize any other person or company to misuse, negligence or accidents.
... our toll free hotline at 1-800-322-3848 or log onto our website at www.delonghi.com. CANADA Residents: Please contact our toll free hotline at 1-888-335-6644 or log onto our website at ...www.delonghi.com. Limited Warranty De'Longhi is the distributor of repair are to be shipped to an authorized De... liabilities on any liability in material and workmanship. Other countries: Please visit: www.delonghi.com. 18 We do not authorize any other person or company to misuse, negligence or accidents.
